
You also want an ePaper? Increase the reach of your titles
YUMPU automatically turns print PDFs into web optimized ePapers that Google loves.
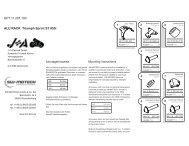
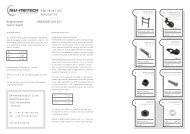
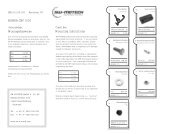
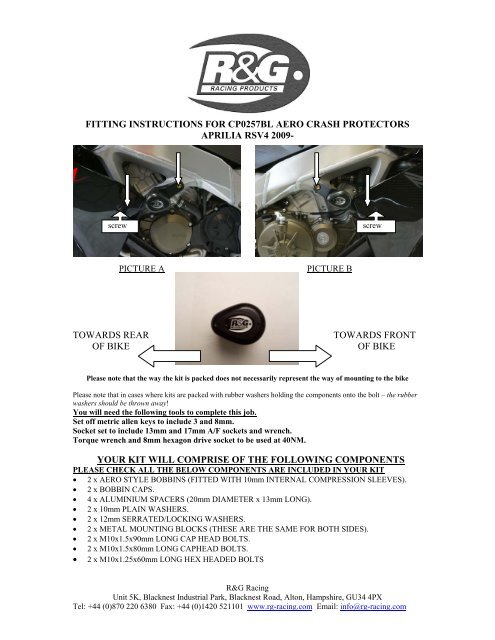
<strong>FITTING</strong> <strong>INSTRUCTIONS</strong> <strong>FOR</strong> CP0257BL AERO CRASH PROTECTORSAPRILIA RSV4 2009-screwscrewPICTURE APICTURE BTOWARDS REAROF BIKETOWARDS FRONTOF BIKEPlease note that the way the kit is packed does not necessarily represent the way of mounting to the bikePlease note that in cases where kits are packed with rubber washers holding the components onto the bolt – the rubberwashers should be thrown away!You will need the following tools to complete this job.Set off metric allen keys to include 3 and 8mm.Socket set to include 13mm and 17mm A/F sockets and wrench.Torque wrench and 8mm hexagon drive socket to be used at 40NM.YOUR KIT WILL COMPRISE OF THE FOLLOWING COMPONENTSPLEASE CHECK ALL THE BELOW COMPONENTS ARE INCLUDED IN YOUR KIT• 2 x AERO STYLE BOBBINS (FITTED WITH 10mm INTERNAL COMPRESSION SLEEVES).• 2 x BOBBIN CAPS.• 4 x ALUMINIUM SPACERS (20mm DIAMETER x 13mm LONG).• 2 x 10mm PLAIN WASHERS.• 2 x 12mm SERRATED/LOCKING WASHERS.• 2 x METAL MOUNTING BLOCKS (THESE ARE THE SAME <strong>FOR</strong> BOTH SIDES).• 2 x M10x1.5x90mm LONG CAP HEAD BOLTS.• 2 x M10x1.5x80mm LONG CAPHEAD BOLTS.• 2 x M10x1.25x60mm LONG HEX HEADED BOLTSR&G RacingUnit 5K, Blacknest Industrial Park, Blacknest Road, Alton, Hampshire, GU34 4PXTel: +44 (0)870 220 6380 Fax: +44 (0)1420 521101 www.rg-racing.com Email: info@rg-racing.com
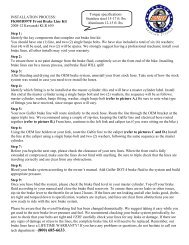
PLEASE READ THROUGH THE <strong>FITTING</strong> <strong>INSTRUCTIONS</strong> AND BE SURE YOUUNDERSTAND BE<strong>FOR</strong>E COMMENCING <strong>FITTING</strong>.LEFT-HAND SIDE (as you sit on the bike)• Remove fairing screw labelled screw in picture A.• This will allow you access to undo and remove engine mounting bolts in positions arrowed inpicture A (do not remove rectangular spacers).• Take either mounting block from kit, place the two shorter (80mm) long cap head bolts throughblock so head of bolt goes into counter-bore.• Place one spacer (all the same size) from kit onto each protruding bolt (these act as frame spacers).• Offer assembly up to original engine mounting holes (please note the longer tapered portionshould face towards the front of bike (the offset is to allow the crash protector bobbin to missfairing). This is a bit difficult due to the length of bolts (other fairing screws may be removed tomake things easier).• Tighten cap head bolts to 40NM (maximum).• Take one of the hex headed bolts and place plain washer over thread end of bolt and against bolthead.• Place one of the serrated/locking washers over thread end of bolt and against bolt head.• Place this assembly through bobbin so head of bolt goes into counter bore of bobbin.• Fit bobbin assembly to metal mounting bracket just fitted (into tapped hole). PLEASE NOTEBOBBIN MUST BE POSITIONED AS PICTURED ABOVE WITH BIGGER ENDTOWARD FRONT OF BIKE. Turn a little more so that you feel the compression increaseslightly. Then apply a quarter turn. Do not overtighten as damage can occur to the bike. Do notexceed 40nm of torque.• Refit and tighten fairing screws.• Fit bobbin caps so logo is as shown above.RIGHT-HAND SIDE (as you sit on the bike)• Remove fairing screw labelled screw in picture B.• This will allow you access to undo and remove engine mounting bolts in positions arrowed inpicture B (do not remove rectangular spacers). PLEASE NOTE when these bolts areremoved the engine to frame spacers may fall out (these must be refitted in the originalposition when assembling the new block to frame).• Take remaining mounting block from kit, place the two longer (90mm) long cap head boltsthrough block so head of bolt goes into counter-bore.• Place one spacer (all the same size) from kit onto each protruding bolt (these act as frame spacers).• Offer assembly up to original engine mounting holes (please note the longer tapered portionshould face towards the front of bike (the offset is to allow the crash protector bobbin to missfairing). This is a bit difficult due to the length of bolts (other fairing screws may be removed tomake things easier).• Tighten cap head bolts to 40NM (maximum).• Take one of the hex headed bolts and place plain washer over thread end of bolt and against bolthead.R&G RacingUnit 5K, Blacknest Industrial Park, Blacknest Road, Alton, Hampshire, GU34 4PXTel: +44 (0)870 220 6380 Fax: +44 (0)1420 521101 www.rg-racing.com Email: info@rg-racing.com
• Place one of the serrated/locking washers over thread end of bolt and against bolt head.• Place this assembly through bobbin so head of bolt goes into counter bore of bobbin.• Fit bobbin assembly to metal mounting bracket just fitted (into tapped hole). PLEASE NOTEBOBBIN MUST BE POSITIONED AS PICTURED ABOVE WITH BIGGER ENDTOWARD FRONT OF BIKE. Turn a little more so that you feel the compression increaseslightly. Then apply a quarter turn. Do not overtighten as damage can occur to the bike. Do notexceed 40nm of torque.• Refit and tighten fairing screws.• Fit bobbin caps so logo is as shown above.CONSUMER NOTICEThe catalogue description and any exhibition of samples are only broad indications of the Products and R&G may make designchanges which do not diminish their performance or visual appeal and supplying them in such state shall conform to the order. TheBuyer acknowledges no representation or warranty (other than as to title) has been given or will apply to the Products other than thosein R&G’s order or confirmation and the Buyer confirms it has chosen the Products as being of merchantable quality and suitable forits particular purposes. Where R&G fits the Products or undertakes other services it shall exercise reasonable skill and care and rectifyany fault free of charge unless the workmanship has been disturbed. The Buyer is responsible for ensuring that the warranty on themotorcycle is not affected by the fitting of the Products. On return of any defective Products R&G shall at its option either supply areplacement or refund the purchase money but shall not be liable if the Products have been modified or used or maintained otherwisethan in accordance with R&G’s or manufacturer’s instructions and good engineering practice or if the defect arises from accident orneglect. Other than identified above and subject to R&G not limiting its liability for causing death and personal injury, it shall not beliable for indirect or consequential loss and otherwise its liability shall be limited to the amounts paid by the Buyer for the Products orthe fitting or service concerned. These terms do not affect the Buyer’s statutory rights.R&G RACING RETURNS POLICY (NON-FAULTY GOODS)Returns must be pre-authorised (if not pre-authorised the return will be rejected). Goods may only be returned direct to us if they werepurchased direct from us (customer must prove if necessary). Otherwise to be returned to original vendor. Goods must be in resellablecondition, in the opinion of R&G Racing. All returns are subject to a 25% restocking and handling fee (25% of the gross valueexc. P&P – at the prevailing price at time of purchase). The customer must pay any and all carriage charges. No returns ofdiscontinued products, unless within 14 days of purchase. This policy does not affect your statutory rights and does not refer to faultygoods.R&G RacingUnit 5K, Blacknest Industrial Park, Blacknest Road, Alton, Hampshire, GU34 4PXTel: +44 (0)870 220 6380 Fax: +44 (0)1420 521101 www.rg-racing.com Email: info@rg-racing.com