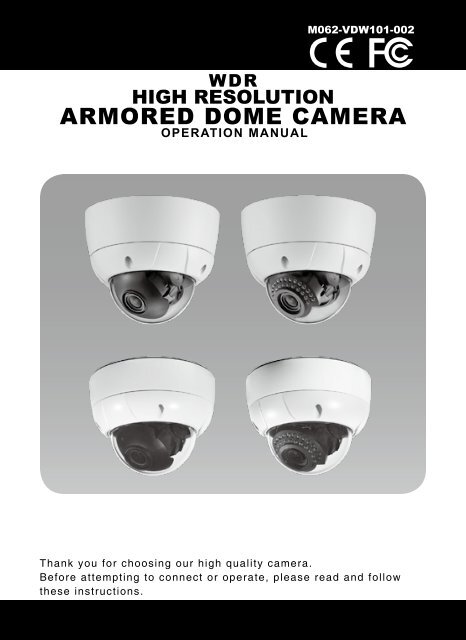
ARMORED DOME CAMERA - DWG
ARMORED DOME CAMERA - DWG
ARMORED DOME CAMERA - DWG

Create successful ePaper yourself
Turn your PDF publications into a flip-book with our unique Google optimized e-Paper software.
CONTENTS1. Cautions2. Features3. Package4. Overview and function5. Installation6. Connection7. Dimensions8. Specifications9. OSD Menu• MENU DESCRIPTION• GENERAL STRUCTURE• OSD FUNCTION DESCRIPTION- LENS- EXPOSURE- WHITE BALANCE- WDR- DAY & NIGHT- IMAGE- SPECIAL- CAM TITLE- LANGUAGE- SYNC- COMM ADJ- PRIVACY- MOTION DET- DISPLAY• FACTORY DEFAULT• EXIT10.Communication Protocol
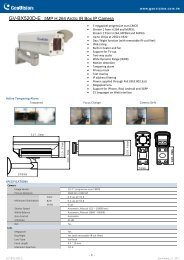
3.Package2 1 FEATURESCAUTIONS1 <strong>ARMORED</strong> <strong>DOME</strong> <strong>CAMERA</strong>2 SURFACE MOUNT3 VIDEO OUTPUT TEST CABLE4 OPERATION MANUAL5SCREW(M4x10) - 4eaSCREW(5x30) - 4eaSCREW(M4x40.SUS) - 4eaL WRENCH - T206 MOUNT GUIDE
4.Overview and function• Name (Led Type)• CONTROL FUNCTION(OSD JOYSTICK)LEFTUPRIGHT• Name (Standard)MENUDOWN
5. InstallationMount GuideLED TypeStandard Type
5. Installation1. Installation of Flush Mount1 Installation of the camera with SURFACECASE(using M4x40)2 Installation of the camera with SCREWS3 Installation of the camera with JUNCTION BOX2. Installation of Surface MountPIPEPIPE1 Installation of the camera on the wall2 Installation of the camera on the 3/4” NPT PIPE3 Installation of the camera on the JUNCTION BOXNOTECheck the safe wire whichshould be entirely inserted into camerahousing during locking the dome cover tomaintain Weatherproof condition.10When using the camerawithout LEDs take off the rubber.
6.Connection• DUAL(DC12V/AC24V)• DC12VWhen you install the camera, please glue up the end of cable tokeep it stable in order to protect the camera from the humidity problems.11
7.DimensionsUnit : mmSurface Mount TypeType AType BFlush Mount Type70˚45˚Standard TypeLED TypeWhen you fix the focus around 22.0mm in f9.0-22.0mm Varifocal lens, pleaseset short distance focus approximately 3M and do not set long distance focus.12
8.SpecificationsSignal Format NTSC PALImage DeviceScanning SystemH.ResolutionSony Vertical double-density interline CCD image sensor2:1 Interlace550TV LinesScanning Frequency H:15.734KHz, V:59.94Hz H:15.625KHz, V:50HzTotal Pixels 811(H) x 508(V) 795(H) x 596(V)Effective Pixels 768(H) x 494(V) 752(H) x 582(V)Electronic Shutter 1/60 sec 1/50 secDigital Slow ShutterWDRBLCAGCMotion DetectionPrivacy MaskingWhite BalanceOSDLanguageS/N RatioGammaMin. IlluminationSync SystemVideo OutputPowerConsumptionDC12VDual1 ~ 500 FieldOff / On / AUTO(Level Adjustment)Off / Bottom / Left / Right / Top / CenterLOW / MID / HIGHZone(Whole, Top, Bottom, Center, Left, Right) / Level AdjustableZone 8ea (Mask Off / On)ATW / PUSH / PUSH LOOK / USER(R Gain, B Gain)Built-InEnglish / Chinese / Russian / Spanish / GermanMore than 48dB(AGC Off)r=0.451.0 Lux / 30 IRE F2.00.001 Lux(DSS)Internal1.0 Vp-p Composite 75(Ω) unbalancedDC 12V ±10%, Less than 210mA• DC 12V ±10%, Less than 300mA• AC 24V ±10%, Less than 3.1WOperating Temperature -10℃ ~ +50℃Storage Temperature -20℃ ~ +60℃Operating Humidity 10% ~ 80%OptionsWeightIP RatingLED TYPEDual Power• Surface Mount Type A : Approx. 1.38kg / Type B : Approx. 1.1kg• Flush type : Approx. 730gIP 66 (Weatherproof)PowerConsumptionMin. IlluminationIR LEDIR LED Half AngleIR LED WavelengthIR Beam RangeIR LED OperationDC12VDualDC 12V ±10%, Less than 550 mA• DC 12V ±10%, Less than 700 mA• AC 24V ±10%, Less than 6.8W0 Lux (IR LED ON)30ea±22 Degree850nmUp to 30 MetersOn : 1 Lux or less, Off : 3 Lux more than13
9.OSD MenuMENU DESCRIPTION• The best clear image can be obtained color camera withWDR(Wide Dynamic Range).• The camera switches lenses automatically depending on theillumination, which promotes the best possible color images duringthe day and black / white image at night.• The camera function can be controlled by OSD menu.OSD STRUCTURE• ▲,▼ : Menu up / down• ◀,▶ : Menu left / right• ■ : MENU14
9.OSD MenuGENERAL STRUCTURESETUP>LENSEXPOSUREWHITE BALANCEWDRDAY&NIGHTIMAGESPECIALFACTORY DEFAULTEXIT[┛][┛][┛][┛][┛][┛][┛]LENS>LENS TYPE... DCLEVEL ... 08INITIALRETURNEXPOSURE>SHUTTER ... 1/60FLICKERLESS ... OFFAGC... MIDDSS... 10xINITIALRETURNWHITE BALANCE>WB MODE... ATWRED CONT ... ----BLUE CONT ... ----PUSH CONT ... ----INITIALRETURNWDR>WDR MODE... OFFWDR LEVEL ... 08BLC... OFFBLC ZONE... CENTERBLC LEVEL ... 04INITIALRETURN15
9.OSD MenuDAY & NIGHTCAM TITLE>D&N MODE... COLORLEVEL ... ----DWELL TIME ... ----INITIALRETURN0123456789ABCDEFGHIJKLMNOPQRSTUVWXYZ!?*#$%(){}SPACE>> CAM ID ... 000BAUDRATE ... 9600INITIALRETURNSPECIALPRIVACY>CAM TITLE ... 001LANGUAGE... ENGSYNC... ZNTCOMM ADJ... [┛]PRIVAC... [┛]MOTION DETECT ... [┛]DISPLAY... [┛]INITIALRETURN>ZONE ... 0MASK... OFFPOSTION... [┛]INITIALRETURNMOTION DET>LOCATION ... [+]WIDTH/HIGHT ... [+]RETURN>MOTION MODE ... OFFZONE... WHOLELEVEL ... 03INITIALRETURNDISPLAY>CAM IDCAM TITLEMOTIONINITIALRETURN... OFF... OFF... OFF16
9.OSD MenuLENS MENU STRUCTUREEXPOSURE MENU STRUCTURE17
9.OSD MenuWHITE BALANCE MENU STRUCTUREWDR MENU STRUCTURE18
9.OSD MenuDAY & NIGHT MENU STRUCTUREIMAGE MENU STRUCTURE19
9.OSD MenuSPECIAL-CAM TITLESPECIAL-LANGUAGE20
9.OSD MenuSPECIAL-SYNCSPECIAL-COMM ADJ21
9.OSD MenuSPECIAL-PRIVACYSPECIAL-MOTION DET22
9.OSD MenuSPECIAL-DISPLAY23
9.OSD MenuOSD FUNCTION DESCRIPTION1.LENS: Enable user to select the lens type according to equipped with camera.Set up using LEFT, RIGHT KEY at each menu.- LENS TYPE1ELC : Enable user to set up for BOARD lens.2DC : Enable user to set up for DC Iris lens.3VIDEO : Enable user to set up for VIDEOIris lens.- LEVEL: Enable user to select the level for Brightnessof image(0~15).- INITIAL: Enable user to initialize the LENS menu set up.2. EXPOSURE: Enable user to set up the function of SHUTTER, FLICKERLESS, AGC, DSS.Set up using LEFT, RIGHT KEY at each menu.- SHUTTER: Enable user to set up the Shutter Speed-> 1/60(50), 1/100(120), 1/250, 1/500, 1/1K,1/2K, 1/4K, 1/10K, 1/100K*() is for PAL TYPE- FLICKERLESS: Enable user to set up the FLICKERLESSON/OFF.- AGC: Enable user to make image bright to amplifythe Gain.-> LOW, MID, HIGH- DSS(Digital Slow Shutter): Enable user to enhance video quality in extreme low-light condition to slow downthe shutter speed and collect over multiple fields based on the shutter limit setting.-> 1X, 5X, 10X, 20X, 40X, 80X, 160X, 320X, 500X- INITIAL: Enable user to initialize the Exposure menu set up.24
9.OSD Menu3. WHITE BALANCE: Enable user to represent the accurate white color by controlling the R,G,B level.Setting up LEFT, RIGHT KEY on each menu.- WB MODE1 ATW : Enable user to trace the White Balanceautomatically in the range of 2,500K~11,000K.2 PUSH : Enable user to search for White Balanceautomatically. In this mode, color temperaturerange is broader than ATW.3 PUSH LOCK : Enable user to fix the WhiteBalance according to the color temperature inthe certain environment.4 USER : Enable user to sets the White Balanceaccording to the circumstance.- RED CONT :In the USER setting of WB MODE, enable user to set the RED GAIN.- BLUE CONT :In the USER setting of WB MODE, enable user to set the BLUE GAIN.- PUSH AUTO :In the PUSH LOCK setting of WB MODE, enable user to fix the White Balance incamera setting.- INITIAL : Enable user to reset the WHITE BALANCE menu setting.4. WDR: Use the condition which Image doesn’t figure out with BLC such as placesurrounded windows and lobby. Set the WDR using the LEFT, RIGHT KEY onthe each menu.- WDR MODE1 OFF : None WDR2 ON : WDR Fixed3 AUTO : Enable user to control ON/OFFautomatically according to the brightness difference onimage analyzing the input image.- WDR LEVEL: Enable user to set WDR Level(0~15 level).- BLC(Back Light Compensation): Back Light Compensation- BLC ZONE : Enable user to set the BLC area.TOP, BOTTOM, CENTER, LEFT, RIGHT- BLC LEVEL : Enable user to set BLC in selectedarea(0~15 level).- INITIAL : Enable user to initialize the WDR setting.25
9.OSD Menu5. DAY&NIGHT: Conversion of output image COLOR / BW depending on exterior environmentEnable user to set the LEFT, RIGHT KEY in menu.- D&N MODE1COLOR : Enable user to fix the outputimage in color.2B/W : Enable user to fix the output image in B/W.3AUTO- MECHANICAL D&N :Enable user to convert toCOLOR/BW by exterior sensor with illumination.- DIGITIAL D&N : Enable user to convert to.COLOR/BW automatically by luminace elementon screen(Nonuse of photocell).4EXT : Enable user to convert to COLOR/BW bysignal of the exterior input.-> Low input signal : COLOR-> High input signal : BW- INITIAL : Enable user to initialize the setting in DAY&NIGHT menu.26
9.OSD Menu6. IMAGE: REVERSE, SHARPNESS, FREEZE, D-ZOOM functions set up bypressing LEFT, RIGHT KEY.- REVERSE: Enable user to reverse the image.-> NORMAL, H, V, H/V- SHARPNESS : Enable user to control the image sharpness (0~15steps).- FREEZE : Enable user to freeze the image.- D-ZOOM(Digital Zoom)-> Max. 2.5x Digital Zoom* Zoom function is not available during WDR on.- INITIAL : Enable user to initialize the setting on IMAGE menu.27
9.OSD Menu7. SPECIAL: Setting up the CAM TITLE, LANGUAGE, SYNC, COMM ADJ, PRIVACY,MOTION DET, DISPLAY Set up using LEFT and RIGHT key in each manual.- CAM TITLE : Enable user to choose any word in screen.(Maximum 10 letter is available)1 A letter Choice from the screen using Menu key.2 Enable user to move to next menu usingLEFT, RIGHT KEY in LOCATION.3 By using UP, DOWN, LEFT, RIGHT KEY,enable user to choose any letters inLOCATION and then get back to previous step.4 Enable user to finish words choice andposition by using LEFT, RIGHT KEY in RETURN.- LANGUAGE : Enable user to set up an OSD language.-> ENGLISH, CHINESE, RUSSIAN, SPANISH, GERMAN- SYNC : Enable user to set up an internal sync mode,external sync mode.1 SYNC MODE : Enable user to set up INT/AUTO- INT : Internal sync mode- AUTO : External sync of Line Lock is worked when the externalsync is put and INT sync mode is worked as no inputof external input sync.28
9.OSD Menu- COMM ADJ : Enable user to set up <strong>CAMERA</strong> ID, BAUDRATE.1 CAM ID : Enable user to set up Camera ID (0~255).2 BAUDRATE : A communication speed to Communicate with external device.(2400, 4800, 9600, 19200).3 INITIAL : Enable user to initialize the setting of menu.- PRIVACY : Privacy is the function that covers some part on screento prevent private life Maximum 8 point covered.1 ZONE : Enable user to set up positions from 0 to 7.2 MASK : Enable user to set up screen output of chosen position.3 POSITION : By using LEFT, RIGHT KEY,Enable user to go to a next menuand then adjust the size & positionof chosen section.4 INITIAL : Enable user to initialize settingof PRIVACY MENU.29
9.OSD Menu- MOTION DET : Motion detection function.1 MOTION MODE : Enable user to set up ON/OFF2 ZONE : Enable user to set up detection zone.-> TOP, BOTTOM, CENTER, LEFT, RIGHT,WHOLE3 LEVEL : Enable user to set up a sensitivity (0~5).4 INITIAL : Enable user to initialize setting of MOTION DET.- DISPLAY : Enable user to set up a screen marking of CAM ID,CAM TITLE, MOTION1 CAM ID : Enable user to set up output on Camera ID screen.2 CAM TITLE : Enable user to set up output in fixed CAM TITLE.3 MOTION : Enable user to set up out put of MOTION on the screen asMOTION DET ON setting.4 INITIAL : Enable user to initialize of DISPLAY menu.8. FACTORY DEFAULT: Enable user to reset all of the status as the factory defaultSetting up using LEFT, RIGHT KEY.9. EXIT: Enable user to EXIT the OSD menu Setting up using LEFT, RIGHT KEY.30
10.Communication ProtocolPelco “D” Protocol Commands• Most widely used Commands- TELE = UP KEY- WIDE = DOWN KEY- NEAR = LEFT KEY- FAR = RIGHT KEY- MENU = MENU KEY31