VEXpro BAG Motor â Spring Modification Instructions - VEX Robotics
VEXpro BAG Motor â Spring Modification Instructions - VEX Robotics
VEXpro BAG Motor â Spring Modification Instructions - VEX Robotics

Create successful ePaper yourself
Turn your PDF publications into a flip-book with our unique Google optimized e-Paper software.
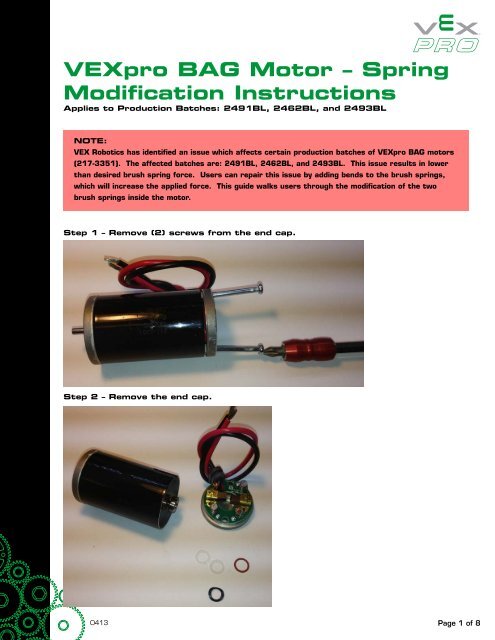
<strong><strong>VEX</strong>pro</strong> <strong>BAG</strong> <strong>Motor</strong> – <strong>Spring</strong><strong>Modification</strong> <strong>Instructions</strong>Applies to Production Batches: 2491BL, 2462BL, and 2493BLNOTE:<strong>VEX</strong> <strong>Robotics</strong> has identified an issue which affects certain production batches of <strong><strong>VEX</strong>pro</strong> <strong>BAG</strong> motors(217-3351). The affected batches are: 2491BL, 2462BL, and 2493BL. This issue results in lowerthan desired brush spring force. Users can repair this issue by adding bends to the brush springs,which will increase the applied force. This guide walks users through the modification of the twobrush springs inside the motor.Step 1 – Remove (2) screws from the end cap.Step 2 – Remove the end cap.0413Page 1 of 8
Step 3 - Notice the (4) loose washers may fall out. Locate these and retain.Step 4 – Locate and remove the brush springs (red arrows). Remove by pushingthe end in the direction of the blue arrow.Page 2 of 8
VersaPlanetary Load RatingsStep 5 –<strong>Spring</strong>s after removal. Both springs are the same.Step 6 – Find needle nose pliersPage 3 of 8
Step 7 – Bend both ends of the spring as shown. The two drawings below are toscale. Use the lines to bend the springs to match the length and angle.Actual Size˜0.3”˜0.2”Step 8 – Reinstall both springs. Notice the non-straight end is in the brush’sgroove.Page 4 of 8
Step 9 – Re-install the four washers in the order shown into the bearing holebetween the brushes. The black wave spring will be on top.Step 10 – Washers installed.Page 5 of 8
Step 11 – Remove the rotor from the housing and front cap. Be sure to locateand retain the white washer.Step 12 - Install the rotor in the bottom cap between the brushes.Page 6 of 8
Step 12 – Install the motor housing over the rotor. You will have to hold the rotorwith your thumb to keep the magnets from moving the rotor out of the end cap. Ifthe rotor comes out of the end cap, go back to step 9 and check that all washersare in place before trying again.Step 13 – Make sure the white washer from Step 11 is in place.Page 7 of 8
Step 14 – Install the front cap and align the groves in the front and end caps.Step 15 – Reinstall the two screws. Notice the screws go into the wider spacedholes.Page 8 of 8