Vinyl Patio Door - Home Doors & Windows
Vinyl Patio Door - Home Doors & Windows
Vinyl Patio Door - Home Doors & Windows
- No tags were found...

Create successful ePaper yourself
Turn your PDF publications into a flip-book with our unique Google optimized e-Paper software.
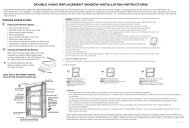
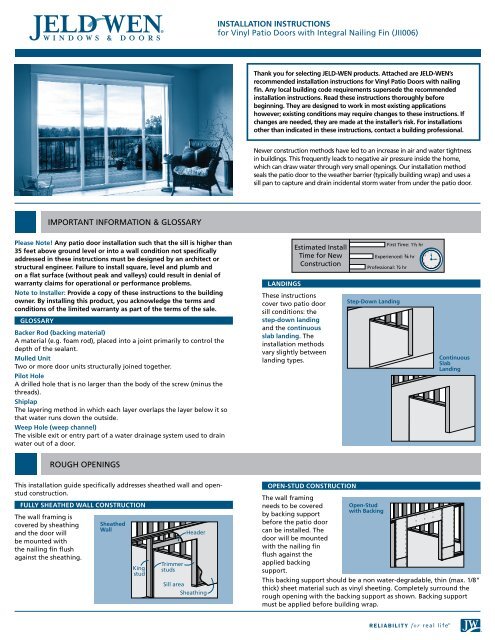
INSTALLATION INSTRUCTIONSfor <strong>Vinyl</strong> <strong>Patio</strong> <strong>Door</strong>s with Integral Nailing Fin (JII006)Thank you for selecting JELD-WEN products. Attached are JELD-WEN’srecommended installation instructions for <strong>Vinyl</strong> <strong>Patio</strong> <strong>Door</strong>s with nailingfin. Any local building code requirements supersede the recommendedinstallation instructions. Read these instructions thoroughly beforebeginning. They are designed to work in most existing applicationshowever; existing conditions may require changes to these instructions. Ifchanges are needed, they are made at the installer’s risk. For installationsother than indicated in these instructions, contact a building professional.Newer construction methods have led to an increase in air and water tightnessin buildings. This frequently leads to negative air pressure inside the home,which can draw water through very small openings. Our installation methodseals the patio door to the weather barrier (typically building wrap) and uses asill pan to capture and drain incidental storm water from under the patio door.Important Information & GlossaryPlease Note! Any patio door installation such that the sill is higher than35 feet above ground level or into a wall condition not specificallyaddressed in these instructions must be designed by an architect orstructural engineer. Failure to install square, level and plumb andon a flat surface (without peak and valleys) could result in denial ofwarranty claims for operational or performance problems.Note to Installer: Provide a copy of these instructions to the buildingowner. By installing this product, you acknowledge the terms andconditions of the limited warranty as part of the terms of the sale.GlossaryBacker Rod (backing material)A material (e.g. foam rod), placed into a joint primarily to control thedepth of the sealant.Mulled UnitTwo or more door units structurally joined together.Pilot HoleA drilled hole that is no larger than the body of the screw (minus thethreads).ShiplapThe layering method in which each layer overlaps the layer below it sothat water runs down the outside.Weep Hole (weep channel)The visible exit or entry part of a water drainage system used to drainwater out of a door.LANDINGSThese instructionscover two patio doorsill conditions: thestep-down landingand the continuousslab landing. Theinstallation methodsvary slightly betweenlanding types.Step-Down Landing ContinuousSlabLandingRough openingsThis installation guide specifically addresses sheathed wall and openstudconstruction.Fully Sheathed Wall ConstructionThe wall framing iscovered by sheathingand the door willbe mounted withthe nailing fin flushagainst the sheathing.SheathedWallKingstudTrimmerstudsHeaderSill areaSheathingOpen-stud CONSTRUCTIONThe wall framingneeds to be coveredby backing supportbefore the patio doorcan be installed. Thedoor will be mountedwith the nailing finflush against theapplied backingsupport.Open-Studwith BackingThis backing support should be a non water-degradable, thin (max. 1/8"thick) sheet material such as vinyl sheeting. Completely surround therough opening with the backing support as shown. Backing supportmust be applied before building wrap.
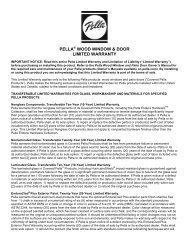
INSTALLATION INSTRUCTIONSfor <strong>Vinyl</strong> <strong>Patio</strong> <strong>Door</strong>s with Integral Nailing Fin (JII006)1 REMOVE PACKAGING & INSPECT YOUR PATIO DOORremove packagingRemove shipping materials such as corner covers, shipping blocksor pads.Inspect your PATIO DOOR• Cosmetic damage• Product squareness (diagonal measurements must be within1/4" difference)• Correct product (size, color, grid pattern, handing, glazing, energyefficiencyrequirements, etc.)• Splits, cracks, holes, missing sections or other damage to the nailingfin longer than 6" and/or within 1/2" of patio door frame• For side-by-side mulled units, a drip cap that extends the length of theframe plus 1/8" overhang on each end is requiredIf any of the above conditions represent a concern, or if you expectenvironmental conditions to exceed the patio door's performancerating, do not install the patio door. Contact your dealer or distributorfor recommendations.2 INSPECT ROUGH OPENING• Verify the width andheight of the patiodoor are each 1/2"-3/4" smaller thanthe rough openingwidth/height.Mulled units shouldbe 3/4" smaller.• Verify the roughopening is square.The (A) and (B)measurementsshould be the same.Maximum allowabledeviation fromsquare is 1/4".Verify Square, Level, & PlumbAB DCE• Verify the rough opening is level and plumb (C). The maximumallowable deviation is 1/8".• The rough opening sill must not be crowned or sagged (D).• The exterior face of the rough opening must be in a single plane (E)with less than 1/8" twist from corner to corner.• Minimum double studs should be used at all rough openings.• The header must be supported by trimmer studs.3PREPARE SILL PAN1. Cut a piece of sheetmaterial to thelength shown.Length of rough opening sill plus 1"6. For continuousslab, cut across thefolding line.Fold sides and back up2. Lightly creasefolding lines 1/2" infrom the two shortsides and one longside.3. Measure thedistance from thenailing fin to theinterior edge ofthe frame and add9/16".4. Take this distancefrom the back edgeand lightly crease afolding line acrossthe sheet material.1/2"MeasureframewidthFramewidth+9/16"Folding LineInterior1/2"7. Fold the three backsides up to make a3-sided box, and,for step-downlandings, fold thefront flap down.Fold cornerforwardContinuous slabFold frontflap down5. For step-downlandings, cut 1/2" inat this line on bothsides of the sheetmaterial.Step-down3
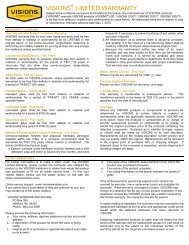
INSTALLATION INSTRUCTIONSfor <strong>Vinyl</strong> <strong>Patio</strong> <strong>Door</strong>s with Integral Nailing Fin (JII006)4 PREPARE ROUGH OPENINGFOR RETROFIT INSTALLATIONSAfter removing the old patio door, remove sufficient siding to expose atleast 9" of intact building wrap. If damaged, apply new building wrapin a shiplap manner. Verify trimmer studs and header are structurallysound. Continue with the instructions.PREPARE BUILDING WRAP1. Trim building wrapflush with theedges of the roughopening. Verifythis does not voidmanufacturer’swarranty.2. At the head, slitbuilding wrap 6"at 45°. Tape up asshown.45˚6"7. Cut two pieces ofJELD-WEN selfadhesiveflashing6" wide and thesill pan width + 3"long.a. For continuousslab landingsonly, cut out theinside corner.Self-Sealing Corner Flash6"Discard(forcontinuousslab only)Sillpanwidth3"Sillpanwidth3"6"Discard(forcontinuousslab only)PREPARE SILL (CONTINUOUS SLAB ONLY)3. Mark a line in therough openingacross the front andback of the sill panas shown. Removesill pan and applythree beads ofsealant between themarked lines.b. Adhere thepieces offlashing to theinside corners.Step-Down LandingSill panwidth3"3"INSTALL SILL PAN4. Place the sill pan inthe rough opening.5. Apply sprayadhesive/primer tothe sill area. Followmanufacturer'sinstructionsfor applicationmethods.6. Cut a piece ofJELD-WEN selfadhesiveflashingthe length of the silland apply over thesill pan as shown.The bottom of thesill pan should becompletely coveredby the self-adhesiveflashing.Sealant6"3"Spray Adhesive8. Smooth gaps orbubbles beneathself-adhesiveflashing with aJ-roller (removeand replace ifnecessary).9. Seal back cornersof sill pan withsealant.10. For step-downlandings only, cutplastic drain screento length ofsill + 2" and staple1/2" below silledge. The drainscreen providesa path for air todry any incidentalmoisture in therough opening.Continuous Slab LandingSealant1/2"3"Sill panwidth3"3"Sill panwidth3"1"4