Create successful ePaper yourself
Turn your PDF publications into a flip-book with our unique Google optimized e-Paper software.
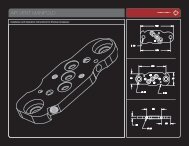
REASSEMBLYCLEANING AND REASSEMBLY01 02 03 04 0506Use a soft cloth toclean all parts ofpaint and dirt as wellas old oil or grease.Make sure the Vision circuit board andits components are clean and undamaged.Make sure no dirt or debris isblocking the Vision holes in the bodybreech – use a cotton swab to cleanthese openings if necessary.Use SL33K togrease all of theo-rings on thebolt and bolt stop.Apply only a thincoating, do notover-grease.Place the bolt stop inside the firechamber and make sure the firechamber insert is fully seated. Makesure the concave side of the bolt stop(shaped like the inside of a cone)faces the back of the marker.Slide the bolt into thebolt stop inside the firechamber until it stops.Screw the fire chamber intothe body breech. Place theVision circuit board into itsslot in the body breech. Itsplug should be on the sideof the board facing the rearof the marker. The clearemitter and detector shouldbe on the side facing thefront of the body breech.07 0809 10If necessary, rotate theswivel donut so that itsscrew holes are on thebottom of the receiver,lined up with the screwholes in the body breech.Slide the inner receiver assembly into the body cover whileholding both upside down to prevent the Vision circuitboard from falling out, then plug the Vision wire harnessback into the Vision circuit board, and reconnect the centerand rear banjo fittings to the receiver, being careful not tocross thread them.Carefully pass the battery clip down into thegrip frame and slide the circuit board intoplace before reinstalling the forward banjofitting to its position in the grip frame, againtaking care not to cross-thread.Reposition the body and grip frame togetherbeing careful not to pinch any wires or hoses.Reinstall the grip frame screws, and flat capbody screw, then tighten all three with an 1/8-inch allen wrench. Reinstall the battery, takingcare not to pinch the battery wires, and flexiblethe rubber grip and its screwsFIG. 18INNER BODY ASSEMBLY1 EPY102–Epiphany Body Breech2 EPY103–Epiphany Feed Tube3 ORN02552070BU – Feed Tube Friction O-rings4 ION209–Fire Bolt5 ION111 – Bolt Stop6 EPYINTS–Small Epiphany Insert (Silver)7 EPYINTM–Medium Epiphany Insert (Blue)8 EPYINTL–Large Epiphany Insert (Green)9 EPY104–Epiphany Fire Chamber10 ION110–Swivel Donut11 CLP004–Donut Clip12 ORN01790UR–SFT O-Ring13 ION108–Ball Detent (2x)14 ORN01770HN–Rear Breech O-Ring15 ION117UPRVSN-Break-Beam Vision Board16 ORN02270BU–Body Breech Friction O-Ring17 ORN02070BU–Body Breech Seal O-Ring18 ORN01590CUR–Firebolt Bumper19 ORN0162070HN–Firebolt Middle O-Ring20 ORB01070UR–Firebolt Rear O-RIng21 ORN01470UR–Bolt Stop Inner O-Ring22 ORN02070BU–Bolt Stop Outer O-Ring23 ORN01570BU X–Swivel Donut O-Rings (2x)16800.922.2147 www.smartparts.com