
You also want an ePaper? Increase the reach of your titles
YUMPU automatically turns print PDFs into web optimized ePapers that Google loves.
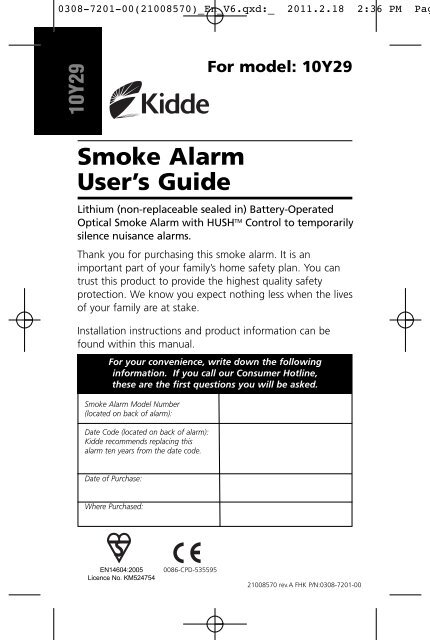
0308-7201-00(21008570)_En_V6.qxd:_ 2011.2.18 2:36 PM Pag<strong>10Y29</strong>For model: <strong>10Y29</strong>Smoke AlarmUser’s GuideLithium (non-replaceable sealed in) Battery-OperatedOptical Smoke Alarm with HUSH TM Control to temporarilysilence nuisance alarms.Thank you for purchasing this smoke alarm. It is animportant part of your family’s home safety plan. You cantrust this product to provide the highest quality safetyprotection. We know you expect nothing less when the livesof your family are at stake.Installation instructions and product information can befound within this <strong>manual</strong>.For your convenience, write down the followinginformation. If you call our Consumer Hotline,these are the first questions you will be asked.Smoke Alarm Model Number(located on back of alarm):Date Code (located on back of alarm):<strong>Kidde</strong> recommends replacing thisalarm ten years from the date code.Date of Purchase:Where Purchased:EN14604:2005Licence No. KM5247540086-CPD-53559521008570 rev.A FHK P/N:0308-7201-00
0308-7201-00(21008570)_En_V6.qxd:_ 2011.2.18 2:36 PM PagIonisation sensing alarms may detect invisible fire particles (associated with fastflaming fires) sooner than photoelectric alarms. Photoelectric sensing alarms maydetect visible fire particles (associated with slow smouldering fires) sooner thanionisation alarms. Home fires develop in different ways and are often unpredictable.For maximum protection, <strong>Kidde</strong> recommends that both Ionisation and Photoelectricalarms be installed.IMPORTANT! READ ALL INSTRUCTIONS BEFORE INSTALLATION AND KEEP THISMANUAL NEAR THE ALARM FOR FUTURE REFERENCE.CONTENTS OF THIS MANUAL1 -- RECOMMENDED LOCATIONS FOR ALARMS2 -- LOCATIONS TO AVOID3 -- INSTALLATION INSTRUCTIONS4 -- OPERATION AND TESTING5 -- NUISANCE ALARMS6 -- MAINTENANCE7 -- LIMITATIONS OF SMOKE ALARMS8 -- GOOD SAFETY HABITS9 -- KIDDE RECOMMENDATIONS10 -- SERVICE AND WARRANTYENVIRONMENTAL PROTECTIONWaste electrical products should not be disposed of with householdwaste. Please recycle where facilities exist. Check with Local Authorityor Supplier for recycling advice.1. RECOMMENDED LOCATIONS FOR ALARMS• Locate the first alarm in the immediate area of the bedrooms. Try to monitor theexit path as the bedrooms are usually farthest from the exit. If more than onesleeping area exists, locate additional alarms in each sleeping area.• Locate additional alarms to monitor any stairway as stairways act like chimneys forsmoke and heat.• Locate at least one alarm on every floor level.• Locate an alarm in every bedroom.• Locate an alarm in every room where electrical appliances are operated excludingkitchens (i.e. portable heaters or humidifiers).• Locate an alarm in every room where someone sleeps with the door closed.The closed door may prevent an alarm not located in that room from waking thesleeper.• Smoke, heat, and combustion products rise to the ceiling and spread horizontally.Mounting the smoke alarm on the ceiling in the center of the room places it closestto all points in the room. Ceiling mounting is required in ordinary residentialconstruction.• When mounting an alarm on the ceiling, locate it at a minimum of 50 cm (20”)from the side wall. (see Figure 1).• When mounting the alarm on the wall, use an inside wall with the top edge of thealarm at a minimum of 10 cm (4”) and a maximum of 30.5 cm (12”) below theceiling. (see Figure 1).
0308-7201-00(21008570)_En_V6.qxd:_ 2011.2.18 2:36 PM Pag• Put smoke alarms at both ends of a bedroom hallway or large room if the hallwayor room is more than 9.1 m (30 feet) long.• Install Smoke Alarms on sloped, peaked or cathedral ceilings at or within 0.9 m (3ft) of the highest point (measured horizontally). Smoke alarms in rooms with ceilingslopes greater than .3 m in 2.4 m (1 foot in 8 feet) horizontally shall be locatedon the high side of the room. A row of detectors shall be spaced and locatedwithin 0.9 m (3 ft) of the peak of the ceiling measured horizontally (see Figure 3).FIGURE 1Smoke Alarms for Minimum ProtectionSmoke Alarms for Additional ProtectionHeat Alarms for Additional ProtectionFIGURE 2 FIGURE 3
0308-7201-00(21008570)_En_V6.qxd:_ 2011.2.18 2:36 PM Pag2.LOCATIONS TO AVOID• In the garage. Products of combustion are present when you start yourmotor vehicle.• Less than 50 cm (20”) from the peak of an “A” frame type ceiling.• In an area where the temperature may fall below 0ºC (32ºF) or rise above 40ºC(104ºF), such as garages and unfinished attics.• In dusty areas. Dust particles may cause nuisance alarm or failure to alarm.• In very humid areas. Moisture or steam can cause nuisance alarms.• In insect-infested areas.• Smoke alarms should not be installed within 3 ft (.9m) of the following: the door to akitchen, the door to a bathroom containing a tub or shower, forced air supply ductsused for heating or cooling, ceiling or whole house ventilating fans, or other high airflow areas.• Kitchens. Normal cooking may cause nuisance alarms.• Near fluorescent lights, including CFL lamps. Electronic “noise” may cause nuisancealarms.• Smoke alarms are not to be used with detector guards unless the combination(alarm and guard) has been evaluated and found suitable for that purpose.3.INSTALLATION INSTRUCTIONSCAUTION: THIS UNIT IS SEALED (INCLUDING THE BATTERY). THE COVER ISNOT REMOVABLE!When mountingin a hallway, the“A” line shouldbe parallel withthe hallway.When wallmounting, the“A” line shouldbe horizontal.FIGURE 4FIGURE 51. To ensure aesthetic alignment ofthe alarm with the hallway or wall,the “A” line on the mountingbracket should be parallel with thehallway when ceiling mounting orhorizontal when wall mounting.RemoveLocatiInstallFIGURE 6
0308-7201-00(21008570)_En_V6.qxd:_ 2011.2.18 2:36 PM Pag2. After selecting the proper smoke alarm location as described in Section 1, attachthe mounting bracket to the ceiling as shown in Figure 3. For wall mounting seeFigure 4. Place the mounting plate on the wall; be sure the “A” line is horizontal(parallel to the floor). Use the screws and cavity fixings provided to secure themounting bracket (use 3/16” drill bit for cavity fixings.).3. This alarm has a battery permanently sealed inside the alarm no battery installationor maintenance is necessary.Note: Extensive cycling between high and low temperatures will significantlyreduce battery life. Long term exposure to high temperatures will degradethe battery over time. <strong>Kidde</strong> recommends locating this alarm in a controlledtemperature environment (20-30ºC) for optimum life.ACTIVATING THE ALARMOnce activated, the battery will supply power to the alarm for the life of thealarm (10 years). Be sure that the mounting bracket is mounted correctlybefore installing the alarm on the mounting bracket.1. To activate the alarm, install the alarm on the mounting bracket (Figure 6) androtate the alarm clockwise (as indicated on the alarm cover) until the alarm snapsinto place .The alarm is now activated!2. After installation/activation, test your alarm by depressing and holding down thetest button for a minimum of 1 second (or until the alarm sounds). This shouldsound the alarm. The alarm will sound at a low level to avoid discomfort. If the testbutton is pressed for greater than 5 seconds, the alarm will sound at the full 85decibels and may cause some discomfortTAMPER RESIST FEATURESmoke Alarm Tamper Resist FeatureThis alarm is equipped with a tamper resist feature that helps prevent someone fromremoving the unit from the mounting bracket. When activated, it can be very effectivein preventing smoke alarm removal or tampering.Activate the smoke alarm tamper resist feature by breaking out the small tab in thesquare hole in the mounting bracket (see Figure 7). When the tab is broken off, thetamper resist on the base is allowed to engage the mounting bracket. Rotate thealarm onto the mounting bracket until you hear the tamper resist tab snap into place,locking the alarm on the mounting bracket. Using the tamper resist feature will helpdeter children and others from removing the alarm from the bracket. NOTE: Toremove the alarm when the tamper resist tab is engaged, press down on the tamperresist tab and rotate the alarm in the direction indicated by the arrows on the cover ofthe alarm (see Figure 8).Location of Posts:FIGURE 7FIGURE 8
0308-7201-00(21008570)_En_V6.qxd:_ 2011.2.18 2:36 PM Pag4.OPERATION AND TESTINGOPERATION: The smoke alarm is operating once the alarm is activated (see Section 3)and testing is complete. When products of combustion are sensed, the unit sounds aloud 85db pulsating alarm until the air is cleared. If there is any question as to thecause of the alarm, it should be assumed that the alarm is due to an actual fire andthe dwelling should be evacuated immediately.HUSH TM CONTROL: NOTE: Hush control and test button are a single button. TheHUSH TM feature has the capability of temporarily desensitising the alarm circuit forapproximately 10 minutes. This feature is to be used only when a known alarm condition,such as smoke from cooking, activates the alarm. The smoke alarm is desensitisedby pushing the HUSH ® button on the smoke alarm cover. The alarm will silenceimmediately, and the LED will flash every 10 seconds to signal that the alarm is inHush mode. The smoke alarm will automatically reset after approximately 10 minutes.The HUSH TM feature can be used repeatedly until the air has been cleared of thecondition causing the alarm. Pushing the test/reset button on the alarm will end thetemporarily desensitised period.NOTE: DENSE SMOKE WILL OVERRIDE THE HUSH TM CONTROL FEATURE.CAUTION: BEFORE USING THE ALARM HUSH TM FEATURE, IDENTIFY THESOURCE OF THE SMOKE AND BE CERTAIN A SAFE CONDITION EXISTS.FLASHING LED LIGHT: This smoke alarm is equipped with a flashing red indicator lightwith the following modes of operation:• The LED will flash every every 60-70 seconds in the standby mode signifying thatthe alarm is receiving power.• The LED will flash every 0.5 seconds when the alarm is sounding. The flashing LEDand pulsating alarm will continue until the air is cleared.• The LED will flash every 10 seconds while in Hush mode.• The LED will flash twice every 30 seconds when the alarm is within 30 days of endof life.• The LED will flash every 30 seconds (with a chirp every 60 seconds) when thealarm is at end of life. (replace alarm immediately)TESTING: Test by pushing the test/Hush button on the cover and holding it down for aminimum of 1 second (or until the alarm sounds). Note: the first test sequence willbe at a lower volume. Holding the test/Hush button for longer than 5 seconds willresult in the full 85 decibel sound output. This will sound the alarm if the electroniccircuitry, horn, and battery are working. If no alarm sounds, the unit has a defectivebattery or other failure. DO NOT use an open flame to test your alarm, you coulddamage the alarm or ignite combustible materials and start a structure fire.SMOKE SENSING CHAMBER OPERATION: This alarm will "chirp" every 30 seconds(with red LED flash at the same time) if it detects a problem with the smoke sensingchamber.NOTE: WEEKLY TESTING IS REQUIRED.TEST THE ALARM WEEKLY TO ENSURE PROPER OPERATION. Erratic or low soundcoming from your alarm may indicate a defective alarm, and it should be returned forservice.If your alarm regularly nuisance alarms (See Section 5) when cooking,this indicates the alarm may be mounted too close to the source e.g..kitchen. However, by pressing the Hush button prior to cooking, you candensisitise the alarm for approximately 10 minutes.
0308-7201-00(21008570)_En_V6.qxd:_ 2011.2.18 2:36 PM Pag5.NUISANCE ALARMSSmoke alarms are designed to minimise nuisance alarms. Cigarette smoke will notnormally set off the alarm, unless the smoke is blown directly into the alarm.Combustion particles from cooking may set off the alarm if the alarm is located closeto the cooking area. Large quantities of combustible particles are generated fromspills or when broiling. Using the fan on a range hood which vents to the outside(non-recirculating type) will also help remove these combustible products from thekitchen.This model <strong>10Y29</strong> has a HUSH TM control that is extremely useful in areas prone to nuisancealarms. For more information refer to Section 4, OPERATION AND TESTING.If the alarm does sound, check for fires first. If a fire is discovered, get out and callthe fire service. If no fire is present, check to see if one of the reasons listed in Section2 may have caused the alarm.6.MAINTENANCEBATTERY ACTIVATION AND DEACTIVATIONNOTE: One Lithium-Ion battery, permanently sealed inside the alarm, powers this unit;no battery installation or replacement is necessary for the life of the alarm.WARNING! DO NOT ATTEMPT TO OPEN THE ALARM FOR ANY REASON!To activate the alarm, attach the alarm to the mounting bracket by rotating in thedirection of the arrows on the cover, see ACTIVATING ALARM in Section 3(INSTALLATION INSTRUCTIONS).This alarm has a low battery monitor circuit. which will cause the alarm to "chirp"every 60 seconds (with a red LED flash every 30 seconds), for a minimum of 30 days,at the end of the life of the alarm to indicate that the alarm needs replacement. Priorto the low battery chirp the LED will flash twice every 30 seconds for a period of 30days. The purpose of this is to alert the user that the alarm will be entering low-batteryand allows the alarm to be changed at a time of convenience to the user (i.e.chirping can be avoided during unsociable hours).To deactivate the alarm remove the alarm from the mounting bracket by rotating thealarm in the direction indicated by the arrows on the cover of the alarm.NOTE: TAMPER RESIST FEATURE in Section 3 (INSTALLATION INSTRUCTIONS). Explainshow to remove alarm from base.WARNING! DO NOT REMOVE THE ALARM UNTIL THE END OF THE ALARMLIFE, WHEN A “CHIRP” IS HEARD EVERY 60 SECONDS.
0308-7201-00(21008570)_En_V6.qxd:_ 2011.2.18 2:36 PM PagCLEANING YOUR ALARMYOUR ALARM SHOULD BE VACUUMED ONCE A MONTHIf the tamper resist feature has been activated you will need to follow the instructionsin Section 3 to remove your alarm for maintenance.To clean your alarm, remove it from the mounting bracket as outlined in thebeginning of this section. You can clean the interior of your alarm (sensing chamber)by using compressed air or a vacuum cleaner hose and blowing or vacuuming throughthe openings around the perimeter of the alarm. The outside of the alarm can bewiped with a damp cloth.After cleaning, reinstall your alarm and test your alarm by using the test button. Ifcleaning does not restore the alarm to normal operation the alarm should be replaced.7.LIMITATIONS OF SMOKE ALARMSWARNING: PLEASE READ CAREFULLY AND THOROUGHLY• Life safety from fire in residential occupancies is based primarily on early notificationto occupants of the need to escape, followed by the appropriate actions by thoseoccupants. Fire warning systems for dwelling units are capable of protecting abouthalf of the occupants in potentially fatal fires. Victims are often intimate with thefire, too old or young, or physically or mentally impaired such that they cannotescape even when warned early enough that escape should be possible. For thesepeople, other strategies such as protection-in-place or assisted escape or rescue arenecessary.• Smoke alarms are devices that can provide early warning of possible fires at areasonable cost; however, alarms have sensing limitations. Ionisation sensingalarms may detect invisible fire particles (associated with fast flaming fires) soonerthan photoelectric alarms. Photoelectric sensing alarms may detect visible fireparticles (associated with slow smoldering fires) sooner than ionisation alarms.Home fires develop in different ways and are often unpredictable. For maximumprotection, <strong>Kidde</strong> recommends that both Ionisation and Photoelectric alarms beinstalled.• Smoke alarms must be tested regularly to make sure the batteries and the alarmcircuits are in good operating condition.• Smoke alarms cannot provide an alarm if smoke does not reach the alarm.Therefore, smoke alarms may not sense fires starting in chimneys, walls, on roofs,on the other side of a closed door or on a different floor.• If the alarm is located outside the bedroom or on a different floor, it may not wakeup a sound sleeper.• The use of alcohol or drugs may also impair one’s ability to hear the smoke alarm.For maximum protection, a smoke alarm should be installed in each sleeping area
0308-7201-00(21008570)_En_V6.qxd:_ 2011.2.18 2:36 PM Pagon every level of a home.• Although smoke alarms can help save lives by providing an early warning of a fire,they are not a substitute for an insurance policy. Home owners and renters shouldhave adequate insurance to protect their lives and property.8. GOOD SAFETY HABITSDEVELOP AND PRACTICE A PLAN OF ESCAPE• Install and maintain Fire extinguishers on every level of the home and in thekitchen, basement and garage. Know how to use a fire extinguisher prior to anemergency.• Make a floor plan indicating all doors and windows and at least two (2) escaperoutes from each room. Second story windows may need a rope or chain ladder.• Have a family meeting and discuss your escape plan, showing everyone what to doin case of fire.• Determine a place outside your home where you all can meet if a fire occurs.• Familiarize everyone with the sound of the smoke alarm and train them to leaveyour home when they hear it.• Practice a fire drill at least every six months, including fire drills at night. Ensurethat small children hear the alarm and wake when it sounds. They must wake up inorder to execute the escape plan. Practice allows all occupants to test your planbefore an emergency. You may not be able to reach your children. It is importantthey know what to do.WHAT TO DO WHEN THE ALARM SOUNDS• Alert small children in the home.• Leave immediately by your escape plan. Every second counts, so don’t waste time gettingdressed or picking up valuables.• In leaving, don’t open any inside door without first feeling its surface. If hot, or if yousee smoke seeping through cracks, don’t open that door! Instead, use your alternateexit. If the inside of the door is cool, place your shoulder against it, open it slightly andbe ready to slam it shut if heat and smoke rush in.• Stay close to the floor if the air is smoky. Breathe shallowly through a cloth, wet ifpossible.• Once outside, go to your selected meeting place and make sure everyone is there.• Call the Fire Brigade by dialling 999 from your neighbour’s home - not from yours!• Don’t return to your home until the fire officials say that it is all right to do so.There are situations where a smoke alarm may not be effective to protect against fire. Forinstance:a) smoking in bedb) leaving children home alonec) cleaning with flammable liquids, such as gasoline
0308-7201-00(21008570)_En_V6.qxd:_ 2011.2.18 2:36 PM Pag9. KIDDE RECOMMENDATIONSSmoke alarms shall be installed outside each separate sleeping area in the immediatevicinity of the bedrooms and on each additional story of the family living unit,including basements and excluding crawl spaces and unfinished attics. In newconstruction, a smoke alarm also shall be installed in each sleeping room.Smoke Detection - Are More Smoke Alarms Desirable? The required number ofsmoke alarms might not provide reliable early warning protection for those areasseparated by a door from the areas protected by the required smoke alarms. For thisreason, it is recommended that the householder consider the use of additional smokealarms for those areas for increased protection. The additional areas include thebasement, bedrooms, dining room, utility room, and hallways not protected by therequired smoke alarms. The installation of the smoke alarms in the kitchen, attic (orunfinished), or garage is normally not recommended, as these locations occasionallyexperience conditions that can result in improper operation.10. SERVICE AND WARRANTYIf after reviewing this <strong>manual</strong> you feel that your smoke alarm is defective in any way,do not tamper with the unit. Return it for servicing to: <strong>Kidde</strong> Safety Europe,,Mathisen Way, Colnbrook, Slough, Berkshire SL3 OHB. (See Warranty for in-warrantyreturns).
0308-7201-00(21008570)_En_V6.qxd:_ 2011.2.18 2:36 PM PagTEN YEAR WARRANTY<strong>Kidde</strong> Safety warrants to the original purchaser that the enclosed smoke alarm willbe free from defects in material and workmanship or design under normal use andservice for a period of ten years from the date of purchase. The obligation of <strong>Kidde</strong>Safety under this warranty is limited to repairing or replacing the smoke alarm orany part which we find to be defective in material, workmanship or design, freeof charge to the customer, upon sending the smoke alarm with proof of date ofpurchase, postage and return postage prepaid, to Warranty Service Department,<strong>Kidde</strong> Safety Europe, Mathisen Way, Colnbrook, Slough, Berkshire SL3 OHBThis warranty shall not apply to the smoke alarm if it has been damaged,modified, abused or altered after the date of purchase or if it fails to operate dueto improper maintenance or incorrect siting.THE LIABILITY OF KIDDE SAFETY OR ANY OF ITS PARENT OR SUBSIDIARYCORPORATIONS ARISING FROM THE SALE OF THIS SMOKE ALARM OR UNDERTHE TERMS OF THIS LIMITED WARRANTY SHALL NOT IN ANY CASE EXCEED THECOST OF REPLACEMENT OF SMOKE ALARM AND, IN NO CASE, SHALL <strong>Kidde</strong>safety OR ANY OF ITS PARENT OR SUBSIDIARY CORPORATIONS BE LIABLE FORCONSEQUENTIAL LOSS OR DAMAGES RESULTING FROM THE FAILURE OF THESMOKE ALARM OR FOR BREACH OF THIS OR ANY OTHER WARRANTY, EXPRESSOR IMPLIED, EVEN IF THE LOSS OR DAMAGE IS CAUSED BY THE COMPANY’SNEGLIGENCE OR FAULT.This Warranty does not affect your statutory rights.©Copyright <strong>Kidde</strong> Safety Europe Ltd 2010. All Rights Reserved.QUESTIONS OR FOR MORE INFORMATIONCall our Consumer Hotline at 0800 917 0722 or contact us atour website at www.smoke-alarms.co.uk<strong>Kidde</strong> Safety Europe, Mathisen Way, Colnbrook, Slough, Berkshire SL3 OHB, UK