

9282984 JX201 MAXIMUSCLE POWER BENCH
9282984 JX201 MAXIMUSCLE POWER BENCH
9282984 JX201 MAXIMUSCLE POWER BENCH

Create successful ePaper yourself
Turn your PDF publications into a flip-book with our unique Google optimized e-Paper software.
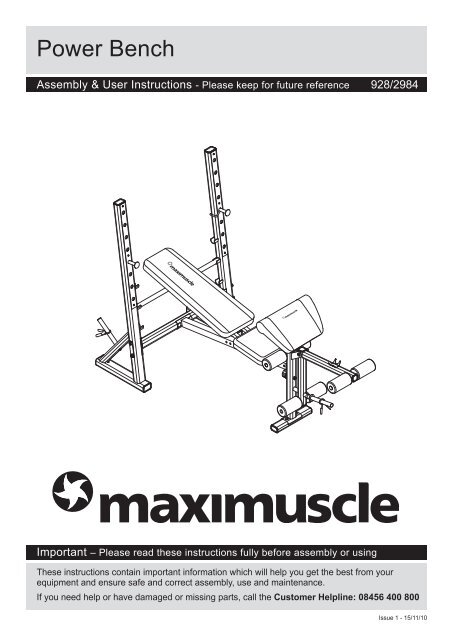
Power BenchAssembly & User Instructions - Please keep for future reference 928/2984Important – Please read these instructions fully before assembly or usingThese instructions contain important information which will help you get the best from yourequipment and ensure safe and correct assembly, use and maintenance.If you need help or have damaged or missing parts, call the Customer Helpline: 08456 400 800Issue 1 - 15/11/10
Safety InformationImportant – Please read these instructions fully before assembly or usingThis exercise equipment is built for optimum safety. However, certain precautions apply whenever youoperate a piece of exercise equipment. Be sure to read the entire manual before you assemble or operatethis equipment. In particular, note the following safety precautions:Assembly• Check you have all the components and tools listed onpages 3 and 4.• Remove all fittings from the plastic bags and separatethem into their groups.• Keep children and animals away from the work area,small parts could choke if swallowed.• Make sure you have enough space to layout the partsbefore starting.• The assembly of this equipment is best carried out by 2people.• Assemble the item as close to its final position (in thesame room) as possible.• Position the equipment on a clear, level surface.Do not use the equipment near water or outdoors.• Dispose of all packaging carefully and responsibly.Using• Keep children and pets away from the equipmentat all times. Do not leave children unattended in thesame room with the equipment.• Before using the equipment to exercise, always dostretching exercises to properly warm up.• If the user experiences dizziness, nausea, chest pain,or any other abnormal symptoms STOP the workout atonce.CONSULT A DOCTOR IMMEDIATELY• Only one person at a time should use the equipment.• Keep hands away from all moving parts.• Always wear appropriate workout clothing whenexercising. Do not wear robes or other clothing that couldbecome caught in the equipment. Running or aerobicshoes are also required when using the equipment.• Use the equipment only for its intended use asdescribed in this manual. Do not use attachments notrecommended by the manufacturer.• Do not place any sharp object around the equipment.• Disabled persons should not use the equipment withouta qualified person or doctor in attendance.• Never operate the equipment if the equipment is notfunctioning properly.• Examine the equipment frequently especially for theeasy damaged parts. The safety level of the equipmentcan only remain if it is examined regularly. Replace anydefective components immediately, Do not use theequipment until it has been repaired.• Parents and others in charge of children should beaware of their responsibility because the natural playinstinct and the fondness of experimenting of children canlead to situations and behaviour for which the trainingequipment is not intended.• A spotter is recommended during exercise.• Maximum weight capacity of the Power Bench:Maximum User’s Weight: 120kgsMaximum weight capacity on Uprights: 120kgsMaximum weight capacity on Leg Developer: 45kgs• Your product is intended for use in clean dry conditions,your should avoid storage in excessively cold or dampplaces as this may lead to corrosion and other relatedproblem that are outside our control.• This product conforms to: (BS EN957)- PARTS 1.4 class (H) - Home Use - Class (C).It is NOT suitable for therapeutic purposes.• This exercise product has been designed andmanufactured to comply with the latest (BS EN 957)British and European Safety Standards.Warning: Before beginning any exercise program, consult your Doctor. This is especiallyimportant for individuals over the age of 35 or persons with pre-existing health problems. Read allinstructions before using any fitness equipment. Argos assumes no responsibility for personal injury orproperty damage sustained by or through the use of this product.2
Components - PartsIf you have damaged or missing components,call the Customer Helpline: 08456 400 800Please check you have all the parts listed belowNote: Some of the smaller components may be pre-fitted to larger components. Please check carefullybefore contacting Argos regarding any missing components.1. Left rear uprightsupport x 12. Right rear uprightsupport x 13. Crossbeam x 14. Main support frame x 15. Frontstabilizer x 16. Front uprightsupport x 17. Preacherspad support x 18. Leg developer x 1 9. Horizontal 10. Seat padslider x 1 support x 111. Backrest inclineadjust rod x 112. Weight storagepost x 213. Backrest support x 214. Left barbellcatch x 115. Right barbellcatch x 116. Foam rolltube x 317. Foam roll x 618. Backrest pad x 119. Seat pad x 120. Preachers pad x 152. Bracket x 33
Components - HardwarePlease check you have all the fittings listed belowNote: The quantities below are the correct amount to complete the assembly. In some cases morehardware may be supplied than are required.31 333414mm Bushing x 225mm Spring collar x 3Lock knob x 1353637M10 x 90mm Carriage bolt x 4 M10 x 70mm Carriage bolt x 2 M10 x 125mm Allen bolt x 138M10 x 75mm Allen bolt x 1 M10 x 15mm Allen bolt x 93940M8 x 20mm Allen bolt x 241M6 x 20mm Allen bolt x 444M10 Lock nut x 842 43M6 x 10mm Phillips screw x 6 M6 x 38mm Hex bolt x 445 46M10 Washer x 19 M8 Washer x 247 48 49M6 Washer x 8 T shape lock knob x 1 Lock pin x 1Allen keys 4, 5, 6mmNote: Some of the smaller components may be pre-fitted to larger components. Please check carefullybefore contacting Argos regarding any missing components.Tools requiredAdjustablespanner x 2Ruler - Use this ruler to help correctly identify the hardware0 5 10 15 20 25 30 35 40 45 50 55 60 65 70 75 80 85 90 95 100 105 110 115 120 125 130 135 140 145 150 155 160 165 1704
Assembly InstructionsStep 1Insert the Weight storagepost (12) into the holeon the back of the Leftrear upright support (1).Secure with a 15mmAllen bolt (39) andWasher (45).Squeeze the handlesof the Spring collar (33)and slide over the Weightstorage post (12).Important:Repeat the sameprocedure to install theother Weight storagepost (12) and Springcollar (33) to Right rearupright support (2).1 233 3312 1245 4539 39Step 2Attach the Crossbeam(3) to the Left rear uprightsupport (1).Line up the holes andpush through 2 x 90mmCarriage bolts (35). Placea Bracket (52) over thebolts and secure togetherwith Washers (45) andLock nuts (44).1Important:Repeat the sameprocedure to install theother side of the Crossbeam (3) to the Rightrear upright support (2).3535352454444455
Assembly InstructionsStep 3Attach the Front uprightsupport (6) to the Frontstabilizer (5).Secure with 2 x 15mmAllen bolts (39) andWashers (45).3945639455Step 4Attach the Main supportframe (4) to the center ofthe Cross beam (3).Line up the holes andpush through 2 x 70mmCarriage bolts (36), placethe Bracket (52) over thebolts and secure withWashers (45) and Locknuts (44).1244 453644 455233646
Assembly InstructionsStep 5a: Slide the Horizontalslider (9) onto the Mainsupport frame (4). Lockin position on the mainsupport frame with the Tshape Lock knob (48)a:b:9394 45484539 4545393945b: Push the Frontupright support (6) intothe end of the Mainsupport frame (4).Secure in position with 5x 15mm Allen bolts (39)and Washers (45).4 9486Step 6Place the Backrestincline adjust rod (11)into the brackets on theinner side of the Rearupright supports (1 & 2).215Adjust the height asrequired during yourworkout.At the required heightinsert the Left and Rightbarbell catches (14 & 15)into the holes on the Leftand Right rear uprightsupports (1 & 2).11411Important:Catches (14 & 15) willonly lock into placecorrectly if fitted asshown.7
Assembly InstructionsStep 7Attach the Seat pad (19)to the Seat pad support(10) and secure with 4 xM6 x 20mm Allen bolts(41), and Washers (47).19Wide end ofSeat pad1047414741Step 8a: Attach the Backrestpad (18) to the Backrestsupports (13). Line upthe holes and secure with4 x 38mm Hex bolts (43)and Washers (47).a:18b: Attach the Seat padassembly and Backrestpad assembly to thebracket on the Horizontalslider (9).474347431313Wide end ofBackrest padPlace the Backrestsupports (13) andSeat pad support (10)in position, on theHorizontal slider (9).Slide a M10 Washer (45)onto the 125mm Allenbolt (37), push the boltthrough all parts (13, 9& 10) and secure with awasher (45) and Lock nut(44).The Seat pad supporthas a two positionadjustment. Line up theholes on the bottom ofthe Seat pad support (10)and the tube on the topof the Horizontal slider(9). Secure with the Lockpin (49).b:47434474318374549444513Note: Seat pad (19)not shown forillustrative purposes.91068
Assembly InstructionsStep 9Push fit 14mm Bushings(31) into the pivot holeseither side of the Legdeveloper (8).Attach the Leg developer(8) to the U shapebracket on the top of theFront upright support (6).Slide a M10 Washer (45)onto the 75mm Allenbolt (38), push the boltthrough and secure withanother M10 Washer (45)and Lock nut (44).38454445316318Squeeze the handlesof the Spring collar (33)and slide over the weightstorage post on the Legdeveloper (8).33Step 10Slide three Foam rolltubes (16) half way intothe holes on the Legdeveloper (8) and Frontstabilizer (6).1617Push 6 x Foam rolls (17)onto each side of theFoam roll tubes (16).817171761717169
Assembly InstructionsStep 11a. Attach the Preacherspad (20) onto thePreachers pad support(7).a:Secure with 2 x M8 x20mm Allen bolts (40)and Washers (46).4640464020b:b. Insert the Preacherspad assembly into theupper opening of theFront upright support (6).720Select the desired heightand secure with the Lockknob (34).7634Step 12The Seat pad assemblyincline and horizontalposition can be adjustedfor different exercises.Pull out the Lock pin (49),adjust the seat angle tothe required position, andreplace the pin.Pull out the ‘springloaded’ T shape lockknob (48) and slidethe seat, when in therequired position, releasethe Lock knob.484910
Exercising InformationBefore starting to exerciseHow you begin to exercise will vary from person to person, If you have not exercised for a long period of time,have been inactive for a while, or are severely overweight you MUST start slowly, increasing your exercisetime gradually, by perhaps only a few minutes for each session per week.Combine a carefully structured nutritious diet with a simple but effective exercise routine and this can helpmake you feel better, look better and will almost certainly enable you to enjoy life more.Aerobic fitnessAerobic exercise is simply defined as any sustainedactivity that increases the supply of oxygen to yourmuscles via the blood pumped by your heart. Withregular exercise, your cardiovascular system willbecome stronger and more efficient. Your recoveryrate i.e. the time taken for your heart to reach itsnormal level, will also decrease.Initially you may only be able to exercise for a fewminutes each day. Do not hesitate to breath throughyour mouth should you need more oxygen. Usethe “talk test”, if you cannot carry on a conversationwhile exercising, you are working too hard!However, aerobic fitness will be gradually built upwith regular exercise, over the next six to eightweeks.Do not be discouraged if it takes longer than this tobegin to feel less lethargic, everyone is different andsome will achieve their targets quicker than others,work at your own, comfortable pace and the resultswill come. The better your aerobic fitness the harderyou will have to work to stay in your “Target Zone”.Warming upA successful exercise programme consists of threeparts; Warm up, Aerobic exercise and Cool down.Never start a training session without warning upand never finish one without cooling down correctly.Perform between five and ten minute of stretchingbefore starting your workout to prevent musclestrains pull and cramps.Aerobic exercise sessionThose new to exercise should exercise no morethan every other day to start with.When you are comfortable with your routine, youcan exercise for 6 days per week. Always take atleast one day off per week.Exercising in your Target ZoneTo ensure that your heart is working in its exercisetarget zone, you need to be able to take your pulse;if you do not have a pulse monitor (either from theproduct you are using or a proprietary independentunit) you will need to locate the pulse in your carotidartery. This is situated in the side of the neck andcan be felt by using the index and middle fingers.Simply count the number of beats you feel in 10seconds and then multiply by six to get your pulserate. This should be taken before you start toexercise for easy reference.People, who have a greater aerobic fitness, willhave a lower resting pulse level and will also beable to exercise with a higher pulse level.Target ZoneTo determine your “Target Zone”, see table below, ifyou are new to exercise and by definition unfit, referto the middle column, if you exercise regularly andhave good aerobic fitness, refer to the right column.Users age(years)Cooling downUnconditioned(Target Zone A)beats per minuteConditioned(Target Zone B)beats per minute20 - 24 145 - 165 155 - 17525 - 29 140 - 160 150 - 17030 - 34 135 - 155 145 - 16535 - 39 130 - 150 140 - 16040 - 44 125 - 145 135 - 15545 - 49 120 - 140 130 - 15050 - 54 115 - 135 125 - 14555 - 59 110 - 135 120 - 14060 and over 105 - 125 115 - 135To decrease fatigue and muscle soreness, youshould also cool down by walking at a show relaxedpace for a minute or so, to allow your heart rate toreturn to normal.11
Exercising InformationMuscle chartTargeted muscle groupsThe exercise routines performed on the preacher pad and barbell will develop primarily upper body musclegroups shown in white. Use the leg extension and curl bar to concentrate on the lower body muscle groupsshown in grey.ABCDEHAIJEKFLGGA: Shoulder musclesD: Abdominal musclesG: Calf muscleJ: Back musclesB: Pectoral musclesE: Forearm musclesH: Trapezius musclesK: Gluteal musclesC: Bicep muscleF: Quadricep musclesI: Tricep musclesL: Hamstring muscles12
Exercising InformationBasic aerobic training programmeFor your basic aerobic exercise routine we suggest that you try the following, remember breathe correctly,exercise at your own pace and do not over-train as it may result in injury (see “Target Zone” table on page 10).Week 1 & 2Warm up 5 - 10 minutesCool down 5 minutesExercise 4 minutes at “Zone A”Rest 1 minuteExercise 2 minutes at “Zone A”Exercise slowly 1 minuteWeek 3 & 4Warm up 5 - 10 minutesCool down 5 minutesExercise 5 minutes at “Zone A”Rest 1 minuteExercise 3 minutes at “Zone A”Exercise slowly 2 minutesWeek 5 & 6Warm up 5 - 10 minutesCool down 5 minutesExercise 6 minutes at “Zone A”Rest 1 minuteExercise slowly 4 minutes at “Zone A”Exercise slowly 3 minutesWeek 7 & 8Warm up 5 - 10 minutesCool down 5 minutesExercise 5 minutes at “Zone A”Exercise 3 minutes at “Zone B”Exercise 2 minutes at “Zone A”Exercise slowly 1 minuteExercise 4 minutes at “Zone A”Exercise slowly 3 minutesGetting startedYou will often read about terms referring to exercisethat may be confusing, below are some of thedefinitions that are regularly used:Repetition - Commonly referred as “REPS”. This isa complete movement from start to finish.Set - This is a complete number of consecutiverepetitions i.e. 1 set of 10 “REPS”.Speed of motion - This is the relative speed ofmovement for each “REP”.Fast is considered as 1 “REP” every second,medium is 1 “REP” every 2 seconds, and slow is 1“REP” every 4 seconds.Intensity - This is how “hard” the exercise feels.Low intensity = easy exerciseHigh Intensity = hard exerciseTraining programmesYou will achieve fast results, gaining a trimmer, fitterbody if you follow these general rules.• Exercise regularly - Do not skip workouts asconsistency is the first key to success.• Do not be afraid to perspire a little. This is a signthat you are working your body hard enough togive a fast result. Your will find “hard” exerciseenjoyable.• Set yourself realistic goals - Do not be overambitious.Week 9 & beyondWarm up 5 - 10 minutesCool down 5 minutesExercise 5 minutes at “Zone A”Exercise 3 minutes at “Zone B”Exercise 2 minutes at “Zone A”Exercise slowly 1 minuteRepeat entire cycle 2 or 3 timesThis is only a suggested programme and may notsuit every individual’s needs.13
Exercising InformationExercise programmesBeginners programmeThis is a short suggested programme which wesuggest you use for no more than 3 weeks, to beideally performed every other day, but certainly notmore than 4 times during the week.This suggested routine is specifically for beginnersor those who have not exercised for a considerabletime. The programme is designed to provide generalimprovement in muscle tone, strength, flexibility andco-ordination.As a beginner, you should start with no more than 2sets of the reps shown below per session.10 REPS - Flat Bench Press5 REPS - Incline Bench Press10 REPS - Leg Extension10 REPS - Leg Curl10 REPS - Bicep Curl10 REPS - Sit Ups• Your rest interval between each set of reps shouldbe 1 minute.• You should perform 2 SET of each exercise.• Your exercise pace should be SLOW to MEDIUM.• This exercise programme should take youapproximately 20 minutes.• Follow this exercise programme with 5 minutes ofproper cool down exercise.Intermediate programmeThis is a slightly longer programme which wesuggest you use for the next 6 - 8 weeks, to beideally performed not more than 5 times during theweek.This suggested routine is specifically forintermediate users or those that are familiar withexercise routines. The programme is designedto increase muscle definition, build strength, aidflexibility and co-ordination.The increase in exercise intensity and speed ofrepetitions is the key to your success at this stage.For intermediate exercise we recommend 3 - 4 setsof the reps shown below per session.15 REPS - Flat Bench Press10 REPS - Leg Extension15 REPS - Bicep Curl15 REPS - Leg Extension following by Leg Curls20 REPS - Sit Ups• Your rest interval between each set of reps shouldbe 1 minute.• You should perform 3 - 4 SETS of each exercise.• Your exercise pace should be MEDIUM to FAST.• This exercise programme should take youapproximately 35 - 40 minutes.• Follow this exercise programme with 5 minutes ofproper cool down exercise.14
Exercising InformationExercise programmesAdvanced programmeThis is an open-ended programme, ideallyperformed not more than 4 times during the week,preferably on alternate days.This suggested routine is specifically for advancedusers or those that are familiar with exerciseroutines. The programme is designed to increasemuscle mass and build strength.The increase in exercise intensity, resistance levelsand speed of repetitions is the key to your on goingsuccess.For advanced training we recommend 4 setshowever at this stage you may want to concentrateon specific body parts, so as you are now fullyfamiliar with the working of your gym you should beable to structure an exercise programme to suit youindividually. Any specific advice should be soughtthrough specialist books.20 REPS - Flat Bench Press15 REPS - Bicep Curl15 REPS - Incline Bench Press15 REPS - Leg Curl15 REPS - Flat Bench Press20 REPS - Leg Extension following by Leg Curls20 REPS - 2 SETS of Sit Ups• Your rest interval between each set of reps shouldbe 1 minute.• You should perform 4 SETS of each exercise.• Your exercise pace should be MEDIUM to FAST.• This exercise programme should take youapproximately 40 - 50 minutes.• Follow this exercise programme with 5 minutes ofproper cool down exercise.15
Exercising InformationWarming up and Cooling down exercisesA successful exercise session begins with warming up exercises and ends with exercises for cooling downand relaxing. These warming up exercises prepare your body for the subsequent demands made upon it. Thecooling down / relaxation period after the exercise session ensures that you do not experience any muscularproblems. In the following pages you will find stretching exercise instructions for warming up and cooling down.Please pay attention to the following points:• Carefully warm up every muscle group you will be using in the exercise session for about 5 to 10 minutes.The stretching exercises are carried out correctly if you feel a comfortable tension in the correspondingmuscle.• Speed does not play a role during the stretching exercises. Fast, jerky movements must be avoided.Neck exercisesTilt your head to the right and feel the tension inyour neck. Slowly drop your head down to yourchest in a semi-circle and then turn your headto the left. You will feel a comfortable tension inyour neck again.You can repeat this exercise alternately severaltimes.Shoulder area exercisesLift the left and right shoulders alternately, or liftboth shoulders simultaneously.Arm stretching exercisesStretch the left and right arms alternatelytowards the ceiling. Feel the tension in your leftand right side.Repeat this exercise several times.16
Power Bench Exercise GuideUsing the Power BenchImportant: When working out, do the following for each exercise: exhale while exerting/lifting andinhale while returning to the starting position in a slow and controlled manner.1. Read all caution and warning stickers before using this equipment.2. Before using, inspect the equipment for loose, frayed, or worn parts. If in doubt, do not use the equipmentuntil the parts have been replaced.3. Any clips must be secured completely before using this equipment.4. Children should not be permitted to use the equipment.5. Prior to beginning any exercise program it is suggested to have a complete physical examination and obtainyour doctors’s approval of your conditioning programme.6. We recommend that you always exercise with a partner or someone who can assist you, should the weightbecome too heavy for you to lift on your own.Always warm up your muscles before exercising. Easy stretching (without bouncing) and light calisthenics,for several minutes, are recommended to prepare your body.Leg CurlDeveloping the HamstringsRemove the preacher pad before performingthis exercise. Select the desired weight. With thebackrest in the flat position lie on your stomach.Place the back of your ankles against the lowerfoam rolls. Raise your legs towards yoursbuttocks. Return to the start position in a slowand controlled manner and repeat the exercise.Beginners: 10 Reps with light weightsIntermediate: 10 Reps / 3 setsAdvanced: 10 Reps / 4 sets with graduallyincreasing weightsLeg ExtensionDeveloping the QuadricepsRemove the preacher pad before performing thisexercise. Select the desired weight. Sit on theseat in the upright position. Align the knee jointswith the pivot axis point of the leg developer.Place the top of your ankles against the lowerfoam rolls. Extend your legs forwards pivotingthem at the knees. Return to the start positionin a slow and controlled manner and repeat theexercise.Beginners: 10 Reps with light weightsIntermediate: 10 Reps / 3 setsAdvanced: 10 Reps / 4 sets with graduallyincreasing weights18
Power Bench Exercise GuidePreacher Bicep CurlDeveloping the Bicep musclesSelect the desired weight. Place both feet on thefloor. Lean forward and position both upper armson the preachers curl pad. Grasp the barbell withyour palms facing up. Lift the barbell up rotatingat the elbows, with your upper arms still on thepreachers curl pad. Return to the starting positionin a slow and controlled manner and repeat theexercise.Bicep curls can be conducted using a barbell forboth arms or one arm at a time using dumbbellweights.Beginners: 10 Reps with light weightsIntermediate: 10 Reps / 3 setsAdvanced: 10 Reps / 4 sets with graduallyincreasing weightsFlat Bench PressDeveloping the Pectoral musclesWe recommend you have a spotter to assistwhen performing this exercise. Select the desiredweight. With the backrest in the flat position, lieon your back with your feet on the floor. Graspthe barbell at the shoulder width distance andcarefully remove it from the catches. Lower thebarbell until it touches your mid chest position.Raise to the starting position in slow andcontrolled manner and repeat the exercise.Beginners: 10 Reps with light weightsIntermediate: 20 Reps with light weightsAdvanced: 20 Reps / 2-4 sets with graduallyincreasing weights19
Power Bench Exercise GuideInclined Bench PressDeveloping the Pectoral musclesWe recommend you have a spotter to assistwhen performing this exercise. Select the desiredweight. With the backrest in the inclined position,lie on your back with your feet on the floor.Grasp the barbell at the shoulder width distanceand carefully remove it from the catches. Lowerthe barbell until it touches your mid chestposition. Raise to the starting position in slowand controlled manner and repeat the exercise.Beginners: 10 Reps with light weightsIntermediate: 20 Reps with light weightsAdvanced: 20 Reps / 2-4 sets with graduallyincreasing weightsCare and MaintenanceUsing the Workout Bench1. Examine the equipmentperiodically in order to detectany damage or wear which mayhave been produced.2. Lubricate moving parts withlight oil periodically to preventpremature wear.3. Inspect and tighten all partsbefore using the equipment,replace any defective partsimmediately, and do not usethe equipment again until it is inperfect working order.4. The equipment can becleaned using a damp cloth andmild non-abrasive detergent.Do not use solvents.5. Do not attempt to repair thisequipment yourself. Shouldyou have any difficulty withassembly, operation or useof your exercise product or ifyou think that you may haveparts missing, contact themanufacturer, their approvedservice agent or the CustomerHelpline: 08456 400 800.Guarantee:For guarantee purposes, pleaseretain your purchase receipt.20
52Exploded Parts DiagramUsing the Workout Bench515322232152214221185133531226281133123214354347471344 45455245345393735362245444944852454422444544454544474192419102574730 45 39 2945 443945346453831845395501750164046401723204623311716335123275021
Exploded Parts ListPart Description Qty1 Left rear upright support 12 Right rear upright support 13 Crossbeam 14 Main support frame 15 Front stabilizer 16 Front upright support 17 Preachers pad support 18 Leg developer 19 Horizontal slider 110 Seat pad support 111 Backrest incline adjust rod 112 Weight storage post 213 Backrest support 214 Left barbell catch 115 Right barbell catch 116 Foam roll tube 317 Foam roll 618 Backrest pad 119 Seat pad 120 Preachers pad 121 Plastic sheet 222 50mm x 70mm x 1.5mm End cap 623 45mm x 45mm x 1.5mm End cap 324 40mm x 60mm x 1.5mm End cap 225 50mm x 30mm x 1.5mm End cap 226 25mm x 1.5mm End cap 427 25mm diameter x 2mm End cap 2Part Description Qty28 28mm diameter x 2mm End cap 229 50mm x 45mm Big R Sleeve 130 50mm x 45mm Sleeve 231 14mm Bush 232 19mm diameter x 2mm End cap 233 25mm Spring collar 334 Lock knob 135 M10 x 90mm Carriage bolt 436 M10 x 70mm Carriage bolt 237 M10 x 125mm Allen bolt 138 M10 x 75mm Allen bolt 139 M10 x 15mm Allen bolt 940 M8 x 20mm Allen bolt 241 M6 x 20mm Allen bolt 442 M6 x 10mm Phillips bolt 643 M6 x 38mm Hex bolt 444 M10 Lock nut 845 M10 washer 1946 M8 Washer 247 M6 Washer 848 T shaped lock knob 149 Lock pin 150 25mm diameter x 1.2mm End cap 651 Plastic grip 652 Bracket 353 25mm diameter x 1.5mm End cap 222
GuaranteeProduct GuaranteeThis product is guaranteed against manufacturing defects for a period ofYearThis product is guaranteed for twelve months from the date of original purchase.Any defect that arises due to faulty materials or workmanship will either be replaced,refunded or repaired free of charge where possible during this period by the dealerfrom whom you purchased the unit.The guarantee is subject to the following provisions:• The guarantee does not cover accidental damage, misuse, cabinet parts, knobsor consumable items.• The product must be correctly installed and operated in accordance with theinstructions contained in this manual.• It must be used solely for domestic purpose.• The guarantee will be rendered invalided if the product is re-sold or has beendamaged by inexpert repair.• Specifications are subject to change without notice.• The manufacturer disclaims any liability for the incidental or consequential damages.• The guarantee is in addition to, and does not diminish your statutory or legal rights.• In the event of a problem with the product with in the guarantee period call theCustomer Helpline: 08456 400 800.Guarantor: Argos Ltd489 - 499 Avebury BoulevardCentral Milton KeynesMK9 2NW