ULTRA-REALISTIC PAPER CRAFT MT-01 Vol.4/Exhaust Pipes ...
ULTRA-REALISTIC PAPER CRAFT MT-01 Vol.4/Exhaust Pipes ...
ULTRA-REALISTIC PAPER CRAFT MT-01 Vol.4/Exhaust Pipes ...

You also want an ePaper? Increase the reach of your titles
YUMPU automatically turns print PDFs into web optimized ePapers that Google loves.
To begin<br />
Tools and materials needed<br />
-Ruler - scissors - blade cutter or "Exacto-knife" - awl or<br />
other pointed tool (for making a folding crease) - felt pen<br />
- pin set - glue - hand towel ( for cleaning your fingers) -<br />
dictionary or other heavy book ( to press the papers flat).<br />
Items of Caution<br />
*Take care when using sharp or pointed objects or when<br />
using bladed cutting tools. Place a heavy sheet of paper<br />
under the paper you want to cut.<br />
*Use glue and other adhesives only in well-ventilated<br />
areas.<br />
*When printing, use a slightly reduced font size. There<br />
may be differences in dimensions, depending on the<br />
type of printer used.<br />
How to assemble<br />
*Follow the working method and markings carefully.<br />
*Cut carefully along the outter line with cutting blade,<br />
Exacto-knife or scissors.<br />
One - point Advice<br />
*Cut carefully with cutting blade, Exacto-knife or<br />
scissors.<br />
*For folding parts, first use an awl or other pointed<br />
tool to make a light crease along the dotted or solid<br />
line. This will make the folds straight. Avoid making<br />
strong creases, as this will cause the paper to tear.<br />
*As an adhesive, white wood glue is recommended.<br />
Avoid over application as this may cause the paper to<br />
wrinkle.<br />
*Before beginning assembly, test adhesive amounts<br />
on extra paper.<br />
*Occasionally, white spots will be apparent on folds<br />
and cuts. Use a marker or pencil to fill in these spots.<br />
It is recommended that this be done after each stage<br />
of assembly because coloring becomes more difficult<br />
once parts are assembled.<br />
Note<br />
2<br />
Basic working method and markings<br />
Solid lines<br />
Fold along these lines.<br />
The printed surface should be<br />
on the outside of the folded shape.<br />
Broken lines<br />
Fold along these lines.<br />
The printed surface should be<br />
on the inside of the folded shape.<br />
Dotted line<br />
Cut along these lines.<br />
Do not fold or cut the parts<br />
marked .<br />
Cut out parts marked with an<br />
asterisk(*).<br />
Red dots are the reference<br />
positions for gluing surfaces.<br />
Please glue them by aligning<br />
the red and red/blue and blue<br />
parts if they are marked on<br />
the paper.
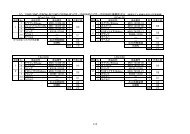
������ �������� ���� ��������� �� ��������� ��� �������<br />
������ ��� ��������� ����� ����� �� ��� ������������ ���<br />
������ ����� �� ���� ��� ����� ���������<br />
������� ����� �<br />
����� �� �� ����� �� �����<br />
Glue in order from � to � on the graphic.<br />
*Assemble both sides. The diagram<br />
�������<br />
shows the left side. The number inside<br />
the ( ) is for the right side.<br />
�<br />
�������<br />
�<br />
������� ������<br />
����� �� � ����� �� �����<br />
Glue in order from to on the graphic.<br />
� �<br />
����<br />
�������<br />
� ���������� ��� ������� �����<br />
���������� �� ������� �������<br />
���� ���� �������� ���� ��������� �� ��� �������� ��������<br />
������ ��� ��� ���� �� ���� ��������� �� ��������� ���� ������ ���������<br />
�������<br />
* Do not paste H-19 & H-20.<br />
����<br />
����<br />
�<br />
����<br />
����<br />
�<br />
�<br />
�<br />
�<br />
����<br />
�<br />
����<br />
�<br />
�<br />
�<br />
�<br />
�<br />
�������<br />
�<br />
�������<br />
�<br />
�<br />
�������<br />
�������<br />
����<br />
���� �� ����� ����<br />
�������<br />
��������� �����<br />
��������� �����
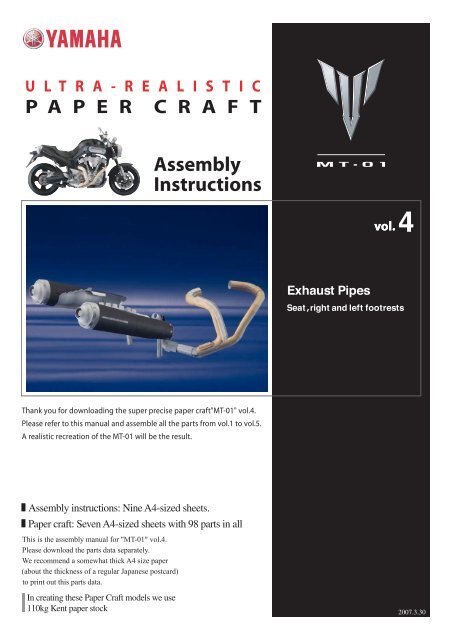
������ �������� ���� ��������� �� ��������� ��� �������<br />
������ ��� ��������� ����� ����� �� ��� ������������ ���<br />
������ ����� �� ���� ��� ����� ���������<br />
������� ������<br />
����� �� � ����� �� �����<br />
Glue in order from � to � on the graphic.<br />
�<br />
�<br />
���� ����<br />
����<br />
����<br />
������� ������<br />
����� �� � ����� �� �����<br />
*Assemble both sides. The diagram<br />
shows the left side. The number inside<br />
the ( ) is for the right side.<br />
������� ������<br />
����� �� �� ����� �� �����<br />
Glue in order from � to �� on<br />
the graphic.<br />
����<br />
����<br />
�<br />
����<br />
� ���������� ��� ������� �����<br />
���������� �� ������� �������<br />
���� ���� �������� ���� ��������� �� ��� �������� ��������<br />
������ ��� ��� ���� �� ���� ��������� �� ��������� ���� ������ ���������<br />
�<br />
����<br />
�<br />
�<br />
��������<br />
�<br />
����<br />
����<br />
�<br />
����<br />
* Do not paste H-29 & H-30.<br />
�<br />
��������<br />
����<br />
�<br />
����<br />
�<br />
�<br />
��<br />
�<br />
����<br />
�<br />
�<br />
�<br />
�<br />
����<br />
����<br />
��������<br />
����<br />
����<br />
����<br />
����<br />
����<br />
���� �� ����� ����<br />
��������� �����<br />
��������� �����<br />
��������� �����
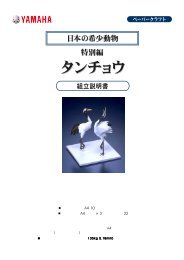
������ �������� ���� ��������� �� ��������� ��� �������<br />
������ ��� ��������� ����� ����� �� ��� ������������ ���<br />
������ ����� �� ���� ��� ����� ���������<br />
������� �����<br />
����� �� �� ����� �� �����<br />
Connect each of the previously assembled parts in<br />
order from � - � according to the diagram.<br />
� ���������� ��� ������� �����<br />
���������� �� ������� �������<br />
���� ���� �������� ���� ��������� �� ��� �������� ��������<br />
������ ��� ��� ���� �� ���� ��������� �� ��������� ���� ������ ���������<br />
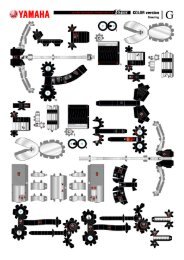
<strong>Exhaust</strong> <strong>Pipes</strong>2<br />
<strong>Exhaust</strong> <strong>Pipes</strong>2<br />
<strong>Exhaust</strong> <strong>Pipes</strong>1<br />
* Do not paste <strong>Exhaust</strong> <strong>Pipes</strong>1<br />
& <strong>Exhaust</strong> <strong>Pipes</strong>4.<br />
* Do not paste <strong>Exhaust</strong> <strong>Pipes</strong>4<br />
& <strong>Exhaust</strong> <strong>Pipes</strong>5.<br />
<strong>Exhaust</strong> <strong>Pipes</strong>4<br />
* Do not paste on<br />
exhaust pipes.<br />
<strong>Exhaust</strong> <strong>Pipes</strong>5<br />
�<br />
�<br />
<strong>Exhaust</strong> <strong>Pipes</strong>1<br />
�<br />
���� �� ����� ����<br />
<strong>Exhaust</strong> <strong>Pipes</strong>4<br />
<strong>Exhaust</strong> <strong>Pipes</strong>3<br />
* Do not paste on<br />
exhaust pipes.<br />
<strong>Exhaust</strong> <strong>Pipes</strong>3<br />
��������� �����
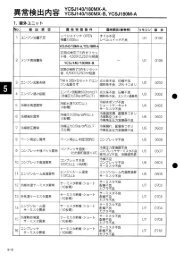
������ �������� ���� ��������� �� ��������� ��� �������<br />
������ ��� ��������� ����� ����� �� ��� ������������ ���<br />
������ ����� �� ���� ��� ����� ���������<br />
����<br />
����� �� � ����� �� �����<br />
Connect each of the previously assembled parts in<br />
order from � - � according to the diagram.<br />
���<br />
�<br />
�<br />
� ���������� ��� ����<br />
���������� �� ������� �������<br />
���� ���� �������� ���� ��������� �� ��� �������� ��������<br />
������ ��� ��� ���� �� ���� ��������� �� ��������� ���� ������ ���������<br />
�<br />
�<br />
�<br />
�<br />
���<br />
�<br />
�<br />
� ��<br />
�<br />
�<br />
���<br />
�<br />
�<br />
���<br />
�<br />
���� �� ����� ����<br />
� � �<br />
�<br />
���<br />
�<br />
���<br />
��������� �����
������ �������� ���� ��������� �� ��������� ��� �������<br />
������ ��� ��������� ����� ����� �� ��� ������������ ���<br />
������ ����� �� ���� ��� ����� ���������<br />
���� ����������<br />
����� �� � ����� �� �����<br />
����� ����������<br />
����� �� � ����� �� �����<br />
����� ����������<br />
����� �� �� ����� �� �����<br />
�� ���������� ��� ����� ��� ���� ���������<br />
Glue in order from � to � on the graphic.<br />
���<br />
Glue in order from � to � on the graphic.<br />
����<br />
����<br />
����<br />
����<br />
�<br />
���������� �� ������� �������<br />
���� ���� �������� ���� ��������� �� ��� �������� ��������<br />
������ ��� ��� ���� �� ���� ��������� �� ��������� ���� ������ ���������<br />
�<br />
����<br />
�<br />
�<br />
����<br />
�<br />
���<br />
�<br />
����<br />
���<br />
���<br />
����<br />
����<br />
�<br />
�<br />
�<br />
�<br />
�<br />
�<br />
���<br />
����<br />
� �<br />
����<br />
����<br />
����<br />
����<br />
����<br />
���� �� ����� ����<br />
��������� �����<br />
��������� �����<br />
��������� �����
������ �������� ���� ��������� �� ��������� ��� �������<br />
������ ��� ��������� ����� ����� �� ��� ������������ ���<br />
������ ����� �� ���� ��� ����� ���������<br />
���� ���������<br />
����� �� �� ����� �� �����<br />
�� ���������� ��� ����� ��� ���� ���������<br />
Connect each of the previously assembled parts in<br />
order from � - �� according to the diagram.<br />
�<br />
���<br />
���������� �� ������� �������<br />
���� ���� �������� ���� ��������� �� ��� �������� ��������<br />
������ ��� ��� ���� �� ���� ��������� �� ��������� ���� ������ ���������<br />
����<br />
Left footrests1<br />
��� ��� ���<br />
��<br />
�<br />
�<br />
�<br />
�<br />
�<br />
���<br />
�<br />
���<br />
�<br />
�<br />
���<br />
���<br />
���� �� ����� ����<br />
�<br />
���<br />
��������� �����
������ �������� ���� ��������� �� ��������� ��� �������<br />
������ ��� ��������� ����� ����� �� ��� ������������ ���<br />
������ ����� �� ���� ��� ����� ���������<br />
����� ���������<br />
����� �� �� ����� �� �����<br />
�� ���������� ��� ����� ��� ���� ���������<br />
Connect each of the previously assembled parts in<br />
order from � - � according to the diagram.<br />
����<br />
���<br />
���������� �� ������� �������<br />
���� ���� �������� ���� ��������� �� ��� �������� ��������<br />
������ ��� ��� ���� �� ���� ��������� �� ��������� ���� ������ ���������<br />
����<br />
�<br />
�<br />
�<br />
�<br />
�<br />
�<br />
�<br />
Right footrests2<br />
�<br />
�<br />
���<br />
���<br />
�<br />
���� �� ����� ����<br />
���<br />
Right footrests3<br />
��������� �����


![YK400XG [2011年11月] (2.1MB)](https://img.yumpu.com/22893831/1/184x260/yk400xg-2011a11aeoe-21mb.jpg?quality=85)