Fabrication and Installation Manual - Caesarstone
Fabrication and Installation Manual - Caesarstone
Fabrication and Installation Manual - Caesarstone

Create successful ePaper yourself
Turn your PDF publications into a flip-book with our unique Google optimized e-Paper software.
<strong>Installation</strong> Instructions<br />
Preparing Base Units / Cabinets Ensure that cabinets are complete <strong>and</strong> satisfactorily installed. Verify that all cabinets are level. The<br />
tops of the cabinets must be flat <strong>and</strong> true within ¹⁄16” (1.5mm) over 18” (457mm). The cabinets should be affixed to each other <strong>and</strong><br />
then secured to the back wall. In the case of a dishwasher, make sure that the surrounds of the opening of the counter will have<br />
sufficient support. The front edge of any countertop over a dishwasher should always be supported with material matching the installed<br />
cabinets to better match the kitchen.<br />
NOTE: If cabinets do not meet the minimum st<strong>and</strong>ards, the installer must notify the homeowner or project manager present at the<br />
jobsite prior to installation of tops.<br />
Support Below are some guidelines on installation, material, <strong>and</strong> type of supports:<br />
• CaesarStone must be supported on a strong perimeter frame.<br />
• Front-to-back support within the cabinet should be provided every 24”. Plan for front-to-back support strips 2.5”-wide (40mm–100mm)<br />
to coincide with cutouts <strong>and</strong> periodic support. Support must be provided under all countertop joints.<br />
NOTE: Support is required across the top of a dishwasher space <strong>and</strong> over an under-counter oven.<br />
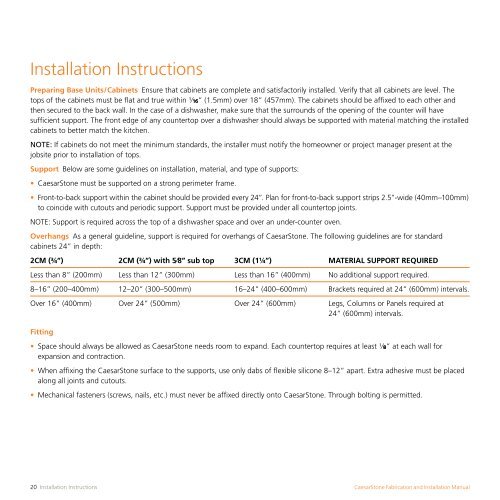
Overhangs As a general guideline, support is required for overhangs of CaesarStone. The following guidelines are for st<strong>and</strong>ard<br />
cabinets 24” in depth:<br />
2CM (¾”) 2CM (¾”) with 5⁄8” sub top 3CM (1¼”) MATERIAL SUPPORT REQUIRED<br />
Less than 8” (200mm) Less than 12” (300mm) Less than 16” (400mm) No additional support required.<br />
8–16” (200–400mm) 12–20” (300–500mm) 16–24” (400–600mm) Brackets required at 24” (600mm) intervals.<br />
Over 16” (400mm) Over 24” (500mm) Over 24” (600mm) Legs, Columns or Panels required at<br />
24” (600mm) intervals.<br />
Fitting<br />
• Space should always be allowed as CaesarStone needs room to exp<strong>and</strong>. Each countertop requires at least ¹⁄8” at each wall for<br />
expansion <strong>and</strong> contraction.<br />
• When affixing the CaesarStone surface to the supports, use only dabs of flexible silicone 8–12” apart. Extra adhesive must be placed<br />
along all joints <strong>and</strong> cutouts.<br />
• Mechanical fasteners (screws, nails, etc.) must never be affixed directly onto CaesarStone. Through bolting is permitted.<br />
20 <strong>Installation</strong> Instructions CaesarStone <strong>Fabrication</strong> <strong>and</strong> <strong>Installation</strong> <strong>Manual</strong>