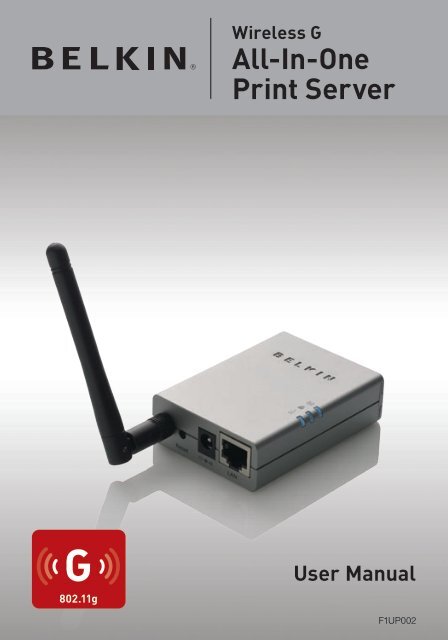
All-In-One Print Server
All-In-One Print Server
All-In-One Print Server

You also want an ePaper? Increase the reach of your titles
YUMPU automatically turns print PDFs into web optimized ePapers that Google loves.
Wireless G<br />
<strong>All</strong>-<strong>In</strong>-<strong>One</strong><br />
<strong>Print</strong> <strong>Server</strong><br />
User Manual<br />
F1UP002
Table of Contents<br />
1 <strong>In</strong>troduction . . . . . . . . . . . . . . . . . . . . . . . . . . . . . . . . . . . . . . . . . . . . . 4<br />
Product Features . . . . . . . . . . . . . . . . . . . . . . . . . . . . . . . . . . . . . . . . . X<br />
AIO-PS (<strong>All</strong>-<strong>In</strong>-<strong>One</strong> <strong>Print</strong>-<strong>Server</strong>) Mode . . . . . . . . . . . . . . . . . . . . . . . . X<br />
PS (<strong>Print</strong>-<strong>Server</strong>) Mode . . . . . . . . . . . . . . . . . . . . . . . . . . . . . . . . . . . . . X<br />
Package Contents. . . . . . . . . . . . . . . . . . . . . . . . . . . . . . . . . . . . . . . . . X<br />
2 Getting to Know your <strong>Print</strong> <strong>Server</strong> . . . . . . . . . . . . . . . . . . . . . . . . . . . X<br />
LEDs . . . . . . . . . . . . . . . . . . . . . . . . . . . . . . . . . . . . . . . . . . . . . . . . . . . X<br />
Reset Button . . . . . . . . . . . . . . . . . . . . . . . . . . . . . . . . . . . . . . . . . . . . . X<br />
3 Placement of the <strong>Print</strong> <strong>Server</strong> . . . . . . . . . . . . . . . . . . . . . . . . . . . . . . X<br />
Placement on a Flat Surface . . . . . . . . . . . . . . . . . . . . . . . . . . . . . . . . X<br />
Mounting on a <strong>Print</strong>er . . . . . . . . . . . . . . . . . . . . . . . . . . . . . . . . . . . . . . X<br />
4 <strong>In</strong>stallation Procedure<br />
Step 1. Connecting Devices to your <strong>Print</strong> <strong>Server</strong> . . . . . . . . . . . . . . . . . X<br />
Step 2. <strong>In</strong>stalling Software . . . . . . . . . . . . . . . . . . . . . . . . . . . . . . . . . . X<br />
Step 3. Configuring Wireless Settings . . . . . . . . . . . . . . . . . . . . . . . . . X<br />
Step 4. <strong>In</strong>stalling MFP Drivers/Utilities. . . . . . . . . . . . . . . . . . . . . . . . . X<br />
Adding New Client Computers to <strong>Print</strong>-<strong>Server</strong> Setup . . . . . . . . . . . . . X<br />
5 Operating <strong>Print</strong> <strong>Server</strong> & Using the MFPs. . . . . . . . . . . . . . . . . . . . . X<br />
Share <strong>Print</strong> . . . . . . . . . . . . . . . . . . . . . . . . . . . . . . . . . . . . . . . . . . . . . . X<br />
Share Scan . . . . . . . . . . . . . . . . . . . . . . . . . . . . . . . . . . . . . . . . . . . . . . X<br />
Share Card Reader . . . . . . . . . . . . . . . . . . . . . . . . . . . . . . . . . . . . . . . . X<br />
Fax a File. . . . . . . . . . . . . . . . . . . . . . . . . . . . . . . . . . . . . . . . . . . . . . . . X<br />
6 <strong>All</strong>-<strong>In</strong>-<strong>One</strong> <strong>Print</strong> Manager . . . . . . . . . . . . . . . . . . . . . . . . . . . . . . . . . . X<br />
<strong>Print</strong> <strong>Server</strong> List . . . . . . . . . . . . . . . . . . . . . . . . . . . . . . . . . . . . . . . . . . X<br />
My Favorite . . . . . . . . . . . . . . . . . . . . . . . . . . . . . . . . . . . . . . . . . . . . . . X<br />
Auto Connect List . . . . . . . . . . . . . . . . . . . . . . . . . . . . . . . . . . . . . . . . . X<br />
Quick Setup . . . . . . . . . . . . . . . . . . . . . . . . . . . . . . . . . . . . . . . . . . . . . X<br />
General Settings . . . . . . . . . . . . . . . . . . . . . . . . . . . . . . . . . . . . . . . . . . X<br />
7 <strong>Print</strong> <strong>Server</strong> Manager . . . . . . . . . . . . . . . . . . . . . . . . . . . . . . . . . . . . . X<br />
<strong>In</strong>troduction. . . . . . . . . . . . . . . . . . . . . . . . . . . . . . . . . . . . . . . . . . . . . . X<br />
Search for <strong>Print</strong> <strong>Server</strong>s . . . . . . . . . . . . . . . . . . . . . . . . . . . . . . . . . . . . X<br />
Status of <strong>Print</strong> <strong>Server</strong>s . . . . . . . . . . . . . . . . . . . . . . . . . . . . . . . . . . . . . X<br />
Set Up the <strong>All</strong>-<strong>In</strong>-<strong>One</strong> <strong>Print</strong> <strong>Server</strong> . . . . . . . . . . . . . . . . . . . . . . . . . . . . X
Table of Contents<br />
General Configuration. . . . . . . . . . . . . . . . . . . . . . . . . . . . . . . . . . . . . . X<br />
TCP/IP Configuration . . . . . . . . . . . . . . . . . . . . . . . . . . . . . . . . . . . . . . X<br />
System Configuration . . . . . . . . . . . . . . . . . . . . . . . . . . . . . . . . . . . . . . X<br />
Wireless Configuration . . . . . . . . . . . . . . . . . . . . . . . . . . . . . . . . . . . . . X<br />
<strong>Print</strong>-<strong>Server</strong> Management. . . . . . . . . . . . . . . . . . . . . . . . . . . . . . . . . . . X<br />
Report . . . . . . . . . . . . . . . . . . . . . . . . . . . . . . . . . . . . . . . . . . . . . . . . . . X<br />
8 Web Management . . . . . . . . . . . . . . . . . . . . . . . . . . . . . . . . . . . . . . . . . X<br />
<strong>In</strong>troduction. . . . . . . . . . . . . . . . . . . . . . . . . . . . . . . . . . . . . . . . . . . . . . X<br />
Login . . . . . . . . . . . . . . . . . . . . . . . . . . . . . . . . . . . . . . . . . . . . . . . . . . . X<br />
Device Settings . . . . . . . . . . . . . . . . . . . . . . . . . . . . . . . . . . . . . . . . . . . X<br />
Setup <strong>Server</strong> . . . . . . . . . . . . . . . . . . . . . . . . . . . . . . . . . . . . . . . . . . . . . X<br />
Wireless . . . . . . . . . . . . . . . . . . . . . . . . . . . . . . . . . . . . . . . . . . . . . . . . X<br />
Setup TCP/IP . . . . . . . . . . . . . . . . . . . . . . . . . . . . . . . . . . . . . . . . . . . . X<br />
Utilities . . . . . . . . . . . . . . . . . . . . . . . . . . . . . . . . . . . . . . . . . . . . . . . . . X<br />
Home|Help|Logout . . . . . . . . . . . . . . . . . . . . . . . . . . . . . . . . . . . . . . . . X<br />
9 LPR <strong>Print</strong>ing . . . . . . . . . . . . . . . . . . . . . . . . . . . . . . . . . . . . . . . . . . . . . X<br />
10 RAW <strong>Print</strong>ing. . . . . . . . . . . . . . . . . . . . . . . . . . . . . . . . . . . . . . . . . . . . . X<br />
11 IPP <strong>Print</strong>ing<br />
<strong>In</strong>troduction. . . . . . . . . . . . . . . . . . . . . . . . . . . . . . . . . . . . . . . . . . . . . . X<br />
System Setup . . . . . . . . . . . . . . . . . . . . . . . . . . . . . . . . . . . . . . . . . . . . X<br />
12 <strong>Print</strong>-<strong>Server</strong> <strong>In</strong>stallation in Windows 98SE/Me/NT . . . . . . . . . . . . . X<br />
Software-<strong>In</strong>stallation Procedure. . . . . . . . . . . . . . . . . . . . . . . . . . . . . . X<br />
Network-Port Setup . . . . . . . . . . . . . . . . . . . . . . . . . . . . . . . . . . . . . . . X<br />
Add <strong>Print</strong>er . . . . . . . . . . . . . . . . . . . . . . . . . . . . . . . . . . . . . . . . . . . . . . X<br />
13 UNIX/Linux-System Network . . . . . . . . . . . . . . . . . . . . . . . . . . . . . . . X<br />
<strong>In</strong>troduction. . . . . . . . . . . . . . . . . . . . . . . . . . . . . . . . . . . . . . . . . . . . . . X<br />
Setup and Configuration. . . . . . . . . . . . . . . . . . . . . . . . . . . . . . . . . . . . X<br />
14 <strong>Print</strong>-<strong>Server</strong> <strong>In</strong>stallation in Mac OS . . . . . . . . . . . . . . . . . . . . . . . . . . X<br />
15 Troubleshooting . . . . . . . . . . . . . . . . . . . . . . . . . . . . . . . . . . . . . . . . . . X<br />
16 Certifications . . . . . . . . . . . . . . . . . . . . . . . . . . . . . . . . . . . . . . . . . . . . X<br />
17 Warranty . . . . . . . . . . . . . . . . . . . . . . . . . . . . . . . . . . . . . . . . . . . . . . . . X
section<br />
1<br />
2<br />
3<br />
4<br />
5<br />
6<br />
7<br />
8<br />
9<br />
10<br />
11<br />
<strong>In</strong>troduction<br />
Thank you for purchasing and using our Wireless G (the <strong>Print</strong> <strong>Server</strong>).<br />
This innovative product easily shares your standard printer or all-inone,<br />
multifunction printer (MFP) on your network. Unlike many print<br />
servers, it can communicate with MFPs and standard printers as if<br />
connected directly to your computer. Advanced features let you print,<br />
scan, read media cards, and fax through the network. The <strong>Print</strong> <strong>Server</strong><br />
offers bidirectional communication with MFPs and standard printers,<br />
to help monitor important details such as ink and paper levels.<br />
The <strong>Print</strong> <strong>Server</strong> supports print, scan, card-reader, and fax-sharing<br />
functions for most popular operating systems such as Windows® 2000<br />
SP4 and higher, and XP SP1 and higher. It also supports Windows XP<br />
scanning utility and MFP vendors’ scanning utilities.<br />
This product can also be used as a traditional print server. It supports<br />
Transmission Control Protocol/<strong>In</strong>ternet Protocol (TCP/IP), Line <strong>Print</strong>er<br />
Remote (LPR) technology, Read-After-Write (RAW), and <strong>In</strong>ternet<br />
<strong>Print</strong>ing Protocols (IPPs). It can share print functions in the various<br />
common network operating systems including Windows 98SE, Me,<br />
NT®, 2000, XP, and 2003; UNIX®; Linux®; and Mac OS® X v10.2.x<br />
and above.<br />
This <strong>Print</strong> <strong>Server</strong> provides IEEE 802.11g/b wireless LAN (up to 54Mbps<br />
data-transfer rate), an Ethernet network port (10/100Mbps Ethernet),<br />
and one USB 2.0/1.1 port for MFPs or standard printers. The <strong>Print</strong><br />
<strong>Server</strong> can be easily connected to your 802.11g/b wireless or wired<br />
network.<br />
Product Features<br />
The <strong>Print</strong> <strong>Server</strong> simultaneously supports dual functionalities: <strong>All</strong>-<strong>In</strong>-<br />
<strong>One</strong>-<strong>Print</strong>-<strong>Server</strong> mode (AIO-PS mode) and <strong>Print</strong>-<strong>Server</strong> mode (PS<br />
mode). Users can choose one of the modes in which to share MFP or<br />
standard-printer functions through the <strong>Print</strong> <strong>Server</strong>.<br />
4
<strong>In</strong>troduction<br />
Wireless Computers<br />
Mac OS<br />
LPR<br />
Windows 98SE/Me/NT<br />
LPR MFP / <strong>Print</strong> server<br />
Windows XP/2000<br />
Click “connect” or IPP or LPR<br />
Linux<br />
LPR<br />
5<br />
<strong>Print</strong>er<br />
OR<br />
<strong>All</strong>-in-one <strong>Print</strong>er<br />
AIO-PS (<strong>All</strong>-<strong>In</strong>-<strong>One</strong> <strong>Print</strong>-<strong>Server</strong>) Mode<br />
The <strong>Print</strong> <strong>Server</strong> can communicate with MFPs and standard printers<br />
as if it is connected directly to your computer. This enables users<br />
to connect to MFPs for sharing print, scan, card-reader, and fax<br />
functions. If the <strong>Print</strong> <strong>Server</strong> is connected to a standard printer but<br />
not to an MFP, users still can share the printing function through<br />
the operation mode. <strong>In</strong> this mode, the supported operating system<br />
is Windows 2000 SP4 and above, and Windows XP SP1 and above.<br />
AIO-PS mode doesn’t support Windows 98SE, Me, or NT; Linux/<br />
UNIX; or Mac OS. For the detailed applications, refer to the following<br />
chapters:<br />
• <strong>In</strong>stallation Procedure” on page xx<br />
• Operating <strong>All</strong>-<strong>In</strong>-<strong>One</strong> <strong>Print</strong> <strong>Server</strong> &<br />
Using the MFPs” on page xx<br />
• <strong>All</strong>-<strong>In</strong>-<strong>One</strong> <strong>Print</strong> Manager” on page xx<br />
1<br />
2<br />
3<br />
4<br />
5<br />
6<br />
7<br />
8<br />
9<br />
10<br />
11<br />
[VERIFY ACTUAL<br />
PAGE NUMBERS]<br />
section
section<br />
1<br />
2<br />
3<br />
4<br />
5<br />
6<br />
7<br />
8<br />
9<br />
10<br />
11<br />
<strong>In</strong>troduction<br />
PS (<strong>Print</strong>-<strong>Server</strong>) Mode<br />
The <strong>Print</strong> <strong>Server</strong> also supports LPR, IPP, and RAW printing protocols,<br />
which enable users to share the print function from an MFP or a<br />
standard printer. The supported operating systems are Windows<br />
98SE, Me, NT, 2000, XP, and 2003; UNIX; Linux; and Mac OS<br />
X v10.2.x and above. For the detailed applications, refer to the<br />
following chapters:<br />
• LPR <strong>Print</strong>ing<br />
• RAW <strong>Print</strong>ing<br />
• IPP <strong>Print</strong>ing<br />
• <strong>All</strong>-<strong>In</strong>-<strong>One</strong> <strong>Print</strong> <strong>Server</strong> <strong>In</strong>stallation in Windows 98SE/Me/NT<br />
• UNIX-System Network<br />
• <strong>All</strong>-<strong>In</strong>-<strong>One</strong> <strong>Print</strong> <strong>Server</strong> <strong>In</strong>stallation in Mac OS<br />
Package Contents<br />
This package contains the following components:<br />
• Belkin Wireless G <strong>All</strong>-<strong>In</strong>-<strong>One</strong> <strong>Print</strong> <strong>Server</strong><br />
• Detachable Antenna<br />
• Power Adapter<br />
• Quick <strong>In</strong>stallation Guide<br />
• RJ45 CAT5e Ethernet Cable<br />
• Self-Attaching Mounting Kit<br />
• CD-ROM (<strong>In</strong>cluding all the software<br />
utilities, drivers, and User Manual)<br />
6
Getting to Know your <strong>Print</strong> <strong>Server</strong><br />
LEDs<br />
The <strong>Print</strong> <strong>Server</strong> features three LEDs that provide information about<br />
a) your wireless connection, b) your <strong>Print</strong> <strong>Server</strong> and printer status,<br />
and c) your LAN activity.<br />
(a) Wireless-Connection LED<br />
Solid Blue The <strong>Print</strong> <strong>Server</strong> is connected to a wireless<br />
access point (AP) or station.<br />
Blinking Blue The <strong>Print</strong> <strong>Server</strong> is trying to connect<br />
to the AP or station.<br />
Off The wireless mode of the <strong>Print</strong> <strong>Server</strong> is disabled.<br />
(b) <strong>Print</strong>-<strong>Server</strong> and <strong>Print</strong>er-Status LED<br />
Solid Blue Firmware is being upgraded to the <strong>Print</strong> <strong>Server</strong>. (If the<br />
<strong>Print</strong> <strong>Server</strong> upgrade fails, the LED will light steadily.)<br />
Blinking Blue The printer is connected (blinks regardless<br />
of whether or not print jobs are being<br />
processed by the <strong>Print</strong> <strong>Server</strong>).<br />
Off No link is established with the printer,<br />
or the printer is turned off.<br />
(c) LAN-Link/Activity LED<br />
Solid Blue The LAN cable is connected to <strong>Print</strong> <strong>Server</strong>.<br />
Blinking Blue Data is being transmitted and<br />
received through this port.<br />
Off No link is established.<br />
7<br />
1<br />
2<br />
3<br />
4<br />
5<br />
6<br />
7<br />
8<br />
9<br />
10<br />
11<br />
section
section<br />
1<br />
2<br />
3<br />
4<br />
5<br />
6<br />
7<br />
8<br />
9<br />
10<br />
11<br />
Getting to Know your <strong>Print</strong> <strong>Server</strong><br />
Reset Button<br />
Reset (Press the “Reset” button with a<br />
pencil tip for less than 5 seconds)<br />
• While the Reset button is pressed, the Wireless-Connection,<br />
and <strong>Print</strong>-<strong>Server</strong> and <strong>Print</strong>er-Status LEDs will be OFF,<br />
awaiting the user to the release the button to reboot.<br />
• When the <strong>Print</strong> <strong>Server</strong> is rebooting, the Wireless-<br />
Connection, and <strong>Print</strong>-<strong>Server</strong> and <strong>Print</strong>er Status<br />
LEDs will briefly turn ON and then OFF.<br />
Reset to factory default (Press the “Reset” button with a pencil tip<br />
for longer than 5 seconds)<br />
• When the <strong>Print</strong> <strong>Server</strong> is reset to default, the Wireless-<br />
Connection, and <strong>Print</strong>-<strong>Server</strong> and <strong>Print</strong>er-Status<br />
LEDs will be OFF in the beginning and then briefly<br />
turn ON and then back OFF. After rebooting, the<br />
<strong>Print</strong> <strong>Server</strong> will reset to factory-default settings<br />
8
Placement of the <strong>Print</strong> <strong>Server</strong><br />
The <strong>Print</strong> <strong>Server</strong> can be placed on a flat surface or mounted on an<br />
MFP or standard printer.<br />
Placement on a Flat Surface<br />
1. Make sure the <strong>Print</strong> <strong>Server</strong> is placed in an<br />
area that allows for proper ventilation.<br />
2. Place on a flat surface.<br />
Mounting on a <strong>Print</strong>er<br />
1. Attach the self-adhesive, double-sided mounting kit<br />
to the back of the <strong>Print</strong> <strong>Server</strong>. Make sure not to stick<br />
the adhesive side over the ID label of the <strong>Print</strong> <strong>Server</strong>.<br />
You might need to refer back to the ID label for the<br />
MAC-address and serial-number information.<br />
2. Place the <strong>Print</strong> <strong>Server</strong> on the side or the<br />
back of the printer as shown here<br />
9<br />
1<br />
2<br />
3<br />
4<br />
5<br />
6<br />
7<br />
8<br />
9<br />
10<br />
11<br />
section
section<br />
1<br />
2<br />
3<br />
4<br />
5<br />
6<br />
7<br />
8<br />
9<br />
10<br />
11<br />
<strong>In</strong>stallation Procedure<br />
Step 1. Connecting Devices to<br />
your <strong>Print</strong> <strong>Server</strong><br />
Before you start, you should have:<br />
• <strong>One</strong> computer with Windows 2000 SP4 or<br />
above, or Windows XP SP1 or above<br />
• <strong>One</strong> MFP or standard printer with a USB<br />
port and an installation CD<br />
• <strong>One</strong> Category 5 Ethernet cable<br />
• <strong>One</strong> USB cable (not included—usually comes with printer)<br />
1. Unpack the <strong>Print</strong>-<strong>Server</strong> package and verify<br />
that all the items listed are provided.<br />
2. Connect the <strong>Print</strong> <strong>Server</strong> to your network by attaching one<br />
end of the network cable to the <strong>Print</strong> <strong>Server</strong>’s network<br />
port and the other to an available port on your router.<br />
3. Plug one end of the power adapter to the <strong>Print</strong> <strong>Server</strong> and the<br />
other into an electrical outlet. The <strong>Print</strong> <strong>Server</strong> will perform a<br />
Power-On Self-Test (POST) after it is powered on. When the<br />
Status LED light goes off, the <strong>Print</strong> <strong>Server</strong> is ready.<br />
10
<strong>In</strong>stallation Procedure<br />
Note:<br />
1. You must use the power adapter shipped along with the<br />
<strong>Print</strong> <strong>Server</strong>; do NOT use any other power adapter.<br />
2. To prevent compatibility problems, power on the<br />
<strong>Print</strong> <strong>Server</strong> before powering on the printer.<br />
3. Before connecting the standard printer via USB cable,<br />
read the printer’s manual. Some printers require users<br />
to install drivers and utilities before connecting to the<br />
computer. Some printers also require users to connect<br />
the printer to the computer during installation.<br />
Step 2. <strong>In</strong>stalling Software<br />
Before you start, verify your computer’s operating system. This<br />
program can be run in Windows 2000 SP4 or above, and Windows XP<br />
SP1 or above.<br />
1. <strong>In</strong>sert the included CD into your CD-ROM drive. The<br />
autorun.exe program should start automatically. If it does<br />
not, run autorun.exe manually from your CD-ROM drive.<br />
To do this, manually navigate to your CD-ROM drive and<br />
double-click on “autorun.exe” to start the install.<br />
2. The following<br />
screen will<br />
be displayed.<br />
Click “<strong>In</strong>stall”<br />
to launch the<br />
<strong>In</strong>stallation<br />
Wizard.<br />
11<br />
1<br />
2<br />
3<br />
4<br />
5<br />
6<br />
7<br />
8<br />
9<br />
10<br />
11<br />
section
section<br />
1<br />
2<br />
3<br />
4<br />
5<br />
6<br />
7<br />
8<br />
9<br />
10<br />
11<br />
<strong>In</strong>stallation Procedure<br />
3. The Belkin <strong>All</strong>-<strong>In</strong>-<strong>One</strong> <strong>Print</strong> <strong>Server</strong> - <strong>In</strong>stallShield<br />
Wizard appears. Click “Next”.<br />
4. Click “Next” to install the <strong>Print</strong>-<strong>Server</strong> utilities in the<br />
default folder (recommended), or click “Change”<br />
to specify the destination folder where you would<br />
like to install the <strong>Print</strong>-<strong>Server</strong> utilities.<br />
12
<strong>In</strong>stallation Procedure<br />
5. The system starts installing the <strong>Print</strong>-<strong>Server</strong> utilities.<br />
6. The “<strong>Server</strong> Configuration” screen will appear. To<br />
configure the <strong>Print</strong> <strong>Server</strong>, click “Next” (recommended<br />
for first install) and go to step 7, following.<br />
If you do not want to configure the <strong>Print</strong> <strong>Server</strong> at this point,<br />
select “No, please skip this setup”. Then, click “Next” to<br />
complete the installation (when adding a new client computer<br />
to share a preexisting print-server setup). <strong>In</strong>dicate whether<br />
or not you want to run the Belkin <strong>All</strong>-<strong>In</strong>-<strong>One</strong> <strong>Print</strong> Manager<br />
utility automatically when Windows starts. We recommend<br />
that you run the <strong>Print</strong> Manager when Windows starts.<br />
13<br />
1<br />
2<br />
3<br />
4<br />
5<br />
6<br />
7<br />
8<br />
9<br />
10<br />
11<br />
section
section<br />
1<br />
2<br />
3<br />
4<br />
5<br />
6<br />
7<br />
8<br />
9<br />
10<br />
11<br />
<strong>In</strong>stallation Procedure<br />
The following steps are for <strong>Print</strong>-<strong>Server</strong><br />
configuration upon choosing “Yes, I would like<br />
to configure my <strong>All</strong>-<strong>In</strong>-<strong>One</strong> <strong>Print</strong> <strong>Server</strong>”.<br />
7. The <strong>Print</strong> <strong>Server</strong> List will search for <strong>Print</strong> <strong>Server</strong>s<br />
on the network. Select the “Wireless G <strong>All</strong>-<br />
<strong>In</strong>-<strong>One</strong> <strong>Print</strong> <strong>Server</strong>” and click “Next”.<br />
14
<strong>In</strong>stallation Procedure<br />
8. Enter the user name and password of the <strong>Print</strong> <strong>Server</strong><br />
you have selected to log in. The default user name<br />
is “admin”; the default password is “1234”.<br />
9. Set the alias name and description of the<br />
<strong>Print</strong> <strong>Server</strong> here. Click “Next”.<br />
Note: You can define the printer’s location or other<br />
information about it in the “MFP <strong>Server</strong> Description” field.<br />
15<br />
1<br />
2<br />
3<br />
4<br />
5<br />
6<br />
7<br />
8<br />
9<br />
10<br />
11<br />
section
section<br />
1<br />
2<br />
3<br />
4<br />
5<br />
6<br />
7<br />
8<br />
9<br />
10<br />
11<br />
<strong>In</strong>stallation Procedure<br />
10. To set up the IP address of the <strong>Print</strong> <strong>Server</strong>, the default<br />
is set to “DHCP” for the TCP/IP configuration.<br />
The <strong>Print</strong> <strong>Server</strong> by default will try to get an IP<br />
address from the connected Belkin Router running<br />
the Dynamic Host Configuration Protocol (DHCP)<br />
server and the following screen will appear.<br />
The newly assigned TCP/IP settings will be displayed in the<br />
“TCP/IP Configuration” window for your reference. Click<br />
“Next” to continue on to step 3 in the installation process.<br />
16
<strong>In</strong>stallation Procedure<br />
If the DHCP server is unavailable or not found, the user<br />
will be prompted to configure the TCP/IP settings of the<br />
<strong>Print</strong> <strong>Server</strong> manually by clicking “Yes” on the screen<br />
below. Clicking “No” will make the <strong>Print</strong> <strong>Server</strong> search for<br />
the IP address from a DHCP server on the network.<br />
Select “Yes” to configure the TCP/IP settings in the “Manual<br />
IP” section. The default TCP/IP-address information in<br />
the Manual-IP mode will be what is shown below.<br />
IP Address: 192.168.2.253<br />
Subnet Mask: 255.255.255.0<br />
Default Gateway: 192.168.2.1<br />
DNS: 0.0.0.0<br />
Make sure that the TCP/IP information configured here is<br />
correct and matches your network settings. Click “Next”<br />
to continue on to step 3 in the installation process.<br />
17<br />
1<br />
2<br />
3<br />
4<br />
5<br />
6<br />
7<br />
8<br />
9<br />
10<br />
11<br />
section
section<br />
1<br />
2<br />
3<br />
4<br />
5<br />
6<br />
7<br />
8<br />
9<br />
10<br />
11<br />
<strong>In</strong>stallation Procedure<br />
The <strong>Print</strong> <strong>Server</strong> will check if the manually configured IP<br />
address in “TCP/IP Configuration” is in the same subnet<br />
as the connected computer running the installation utility.<br />
If the TCP/IP-address settings configured manually<br />
are in a different IP subnet than that of the connected<br />
computer, the user will be prompted by the alert message<br />
shown below. Click “OK” to go back and configure the<br />
correct IP-address settings for the <strong>Print</strong> <strong>Server</strong>.<br />
Note: If you want to change the TCP/IP settings of the <strong>Print</strong><br />
<strong>Server</strong> at some point after the installation, you can use the<br />
<strong>Server</strong>-Manager utility’s TCP/IP- configuration option.<br />
18
<strong>In</strong>stallation Procedure<br />
Step 3. Configuring Wireless Settings<br />
1. The default wireless setting is “Auto” mode. The <strong>Print</strong> <strong>Server</strong><br />
will detect a connection to a wired-LAN network through<br />
the attached Ethernet cable. If the <strong>Print</strong> <strong>Server</strong> is connected<br />
to a wired network, it will work in that network. To enable<br />
wireless mode, the Ethernet cable must be disconnected<br />
after final configurations. However, the Ethernet cable needs<br />
to stay plugged in for the required wireless configurations<br />
in this section. For more detailed information about wireless<br />
settings, refer to the “Wireless Configuration” section.<br />
2. The “Wireless Network Settings” screen of the <strong>Print</strong> <strong>Server</strong><br />
will automatically scan the wireless networks nearby. Select<br />
the wireless network to which you would like to connect<br />
and click “Next”. Alternatively, you can manually enter<br />
the wireless-network information (“Manual” mode).<br />
The default wireless settings are as follows:<br />
Mode: <strong>In</strong>frastructure<br />
SSID: Default<br />
Channel: 11<br />
19<br />
1<br />
2<br />
3<br />
4<br />
5<br />
6<br />
7<br />
8<br />
9<br />
10<br />
11<br />
section
section<br />
1<br />
2<br />
3<br />
4<br />
5<br />
6<br />
7<br />
8<br />
9<br />
10<br />
11<br />
<strong>In</strong>stallation Procedure<br />
3. If you choose to connect to an encrypted network, the<br />
“Wireless Security Settings” screen will appear. Select<br />
“Security Mode” and enter the security settings of your wireless<br />
network. You can select one of several security settings:<br />
“None”, “WEP”, or “WPA” with cipher mode “TKIP” or “AES”.<br />
4. The configurations are now finished. Click<br />
“Finish” to confirm your new settings.<br />
5. Click “Finish” to complete the installation.<br />
20
<strong>In</strong>stallation Procedure<br />
Note: If the Windows XP firewall in your system has<br />
been enabled, the <strong>Print</strong> <strong>Server</strong> will automatically open<br />
some necessary ports for the <strong>Print</strong>-<strong>Server</strong> program<br />
to run smoothly on your system. These ports will only<br />
be opened for computers in your own local IP network<br />
and will not jeopardize safety of your system.<br />
6. <strong>In</strong>dicate whether or not you want to run the Belkin<br />
<strong>All</strong>-<strong>In</strong>-<strong>One</strong> <strong>Print</strong> Manager utility automatically when<br />
Windows starts. We recommend that you do run<br />
the <strong>Print</strong> Manager when Windows starts.<br />
You will now start seeing the<br />
<strong>Print</strong>-<strong>Server</strong> logo on your<br />
computer’s system tray.<br />
21<br />
1<br />
2<br />
3<br />
4<br />
5<br />
6<br />
7<br />
8<br />
9<br />
10<br />
11<br />
section
section<br />
1<br />
2<br />
3<br />
4<br />
5<br />
6<br />
7<br />
8<br />
9<br />
10<br />
11<br />
<strong>In</strong>stallation Procedure<br />
At this point, disconnect the Ethernet cable between your <strong>Print</strong><br />
<strong>Server</strong> and your router to enable the wireless functionality of your<br />
<strong>Print</strong> <strong>Server</strong>.<br />
Store the Ethernet cable in a safe place in case it is needed to<br />
reconfigure the <strong>Print</strong> <strong>Server</strong> at some point in the future.<br />
<strong>All</strong>-<strong>In</strong>-<strong>One</strong> <strong>Print</strong> <strong>Server</strong> Utilities<br />
After the installation is completed, there will be three utilities and a<br />
text file in the <strong>Print</strong> <strong>Server</strong>’s Program folder.<br />
<strong>All</strong>-<strong>In</strong>-<strong>One</strong> <strong>Print</strong> Manager – <strong>All</strong>ows you to manage the<br />
connection between the printer and your computer<br />
for sharing the printer’s various functions.<br />
<strong>Server</strong> Configuration – <strong>All</strong>ows you to configure the <strong>Print</strong><br />
<strong>Server</strong>’s IP address, network protocols, and other advanced<br />
features. It also allows you to manage the <strong>Print</strong> <strong>Server</strong>.<br />
Uninstall – Assistant for removing all installed<br />
<strong>Print</strong>-<strong>Server</strong> software programs.<br />
About Version – Display the version of each utility<br />
including in the <strong>Print</strong>-<strong>Server</strong> software programs<br />
22
<strong>In</strong>stallation Procedure<br />
Step 4. <strong>In</strong>stalling MFP Drivers/Utilities<br />
When the <strong>Print</strong>-<strong>Server</strong> installation is complete, the “Belkin <strong>All</strong>-<strong>In</strong>-<strong>One</strong><br />
<strong>Print</strong> Manager” window will appear. Once a printer is connected to<br />
the <strong>Print</strong> <strong>Server</strong> via a USB cable, the <strong>Print</strong> Manager will automatically<br />
display its name in the <strong>Print</strong> <strong>Server</strong> List.<br />
Before you start to install the printer selected from the <strong>Print</strong> <strong>Server</strong><br />
List, check your computer’s printer-installation status.<br />
• <strong>Print</strong>er drivers/utilities have not been installed<br />
on your computer; refer to section 4.1.<br />
• <strong>Print</strong>er drivers/utilities have been already installed<br />
on your computer; refer to section 4.2.<br />
4.1 <strong>Print</strong>er drivers/utilities have not been installed<br />
Before the installation, read the printer’s manual. Some printers<br />
require users to install the drivers/utilities before connecting<br />
the printer to your computer. Some printers require connecting<br />
the printer to your computer during the installation. Refer to the<br />
illustration below of “HP <strong>All</strong>-<strong>In</strong>-<strong>One</strong> Series,” which is the screen<br />
displayed during the installation.<br />
23<br />
1<br />
2<br />
3<br />
4<br />
5<br />
6<br />
7<br />
8<br />
9<br />
10<br />
11<br />
section
section<br />
1<br />
2<br />
3<br />
4<br />
5<br />
6<br />
7<br />
8<br />
9<br />
10<br />
11<br />
<strong>In</strong>stallation Procedure<br />
To connect the printer to your computer through the <strong>Print</strong> <strong>Server</strong> just<br />
like you have directly connected the printer to your computer through<br />
the USB cable, you can follow the steps below.<br />
1. Select the printer that you want to install in the <strong>Print</strong>-<br />
<strong>Server</strong> list and click the “Connect” button.<br />
24
<strong>In</strong>stallation Procedure<br />
2. Windows will detect the new hardware and prompt to<br />
install the <strong>Print</strong>-<strong>Server</strong> drivers and then the printer drivers.<br />
When the system stops prompting, the drivers are all<br />
installed. If the system cannot find the printer drivers,<br />
insert the printer’s installation CD to find the drivers.<br />
3. After you have completed the printer installation,<br />
you will see the printer is added to “<strong>Print</strong>ers and<br />
Faxes” under your Windows operating system.<br />
25<br />
1<br />
2<br />
3<br />
4<br />
5<br />
6<br />
7<br />
8<br />
9<br />
10<br />
11<br />
section
section<br />
1<br />
2<br />
3<br />
4<br />
5<br />
6<br />
7<br />
8<br />
9<br />
10<br />
11<br />
<strong>In</strong>stallation Procedure<br />
4.2 <strong>Print</strong>er drivers/utilities have been installed<br />
1. To bind the already-installed printer drivers/utilities<br />
with the <strong>Print</strong> <strong>Server</strong>, follow the steps below. Select<br />
the printer that you want to install in the <strong>Print</strong>-<br />
<strong>Server</strong> list and click the “Connect” button.<br />
2. Windows will detect the new hardware and prompt to<br />
install the <strong>Print</strong>-<strong>Server</strong> drivers and then the printer drivers.<br />
When the system stops prompting, the drivers are all<br />
installed. If the system cannot find the printer drivers,<br />
insert the printer’s installation CD to find the drivers.<br />
3. After the installation, a copy of the printer will be added to<br />
“<strong>Print</strong>ers and Faxes” under your Windows operating system.<br />
26
<strong>In</strong>stallation Procedure<br />
Depending upon the previous configuration of your computer,<br />
duplicate system-tray icons or desktop shortcuts for scanners or<br />
camera-card readers may also appear. Use the copies of the icons<br />
and shortcuts as your defaults for use in conjunction with your<br />
<strong>Print</strong> <strong>Server</strong>.<br />
27<br />
1<br />
2<br />
3<br />
4<br />
5<br />
6<br />
7<br />
8<br />
9<br />
10<br />
11<br />
section
section<br />
1<br />
2<br />
3<br />
4<br />
5<br />
6<br />
7<br />
8<br />
9<br />
10<br />
11<br />
<strong>In</strong>stallation Procedure<br />
Enabling Auto-Timeout Settings<br />
After the printer-driver installation is complete, check the “Auto<br />
release when idle time is over” option in the “Belkin <strong>All</strong>-<strong>In</strong>-<strong>One</strong> <strong>Print</strong><br />
Manager” screen with a 5-minute idle timeout setting.<br />
28
<strong>In</strong>stallation Procedure<br />
Adding New Client Computers to <strong>Print</strong>-<strong>Server</strong> Setup<br />
When adding a new client computer to share the print, scan, copy,<br />
fax, and card-reader functionality in a preexisting <strong>Print</strong>-<strong>Server</strong><br />
network, only follow Step 2 from items 1 to 6, and Step 4.2<br />
29<br />
1<br />
2<br />
3<br />
4<br />
5<br />
6<br />
7<br />
8<br />
9<br />
10<br />
11<br />
section
section<br />
1<br />
2<br />
3<br />
4<br />
5<br />
6<br />
7<br />
8<br />
9<br />
10<br />
11<br />
Operating <strong>Print</strong> <strong>Server</strong> & Using the MFPs<br />
Operating <strong>Print</strong> <strong>Server</strong> & Using the MFPs<br />
After you have followed the <strong>In</strong>stallation Wizard to finish the printer<br />
installation, the printer is now connected to your computer. You can<br />
start sharing print, scan, card-reader, or fax functions provided by<br />
the MFP.<br />
Tip 1: If you have finished using the printer, click<br />
“Disconnect” to release the printer. Another user<br />
cannot use the printer until it is released.<br />
Tip 2: We recommend that you enable the “Idle Timeout”<br />
setting. The <strong>Print</strong> <strong>Server</strong> will automatically release your<br />
connection to the printer after a period of idle time that you<br />
have assigned. This allows the printer to not be occupied too<br />
long and other users to share the printer frequently. Refer to<br />
the “<strong>All</strong>-<strong>In</strong>-<strong>One</strong> <strong>Print</strong> Manager” section for more information.<br />
Share <strong>Print</strong><br />
The printer will be added to “<strong>Print</strong>ers and Faxes” in Windows after<br />
the printer is installed. When you have connected to the printer by<br />
clicking “Connect” in the Belkin <strong>All</strong>-<strong>In</strong>-<strong>One</strong> <strong>Print</strong> Manager, the <strong>Print</strong><br />
<strong>Server</strong> will automatically create the connection between the printer<br />
and your computer, and then you can print a document following the<br />
same steps as usual.<br />
30
Operating <strong>Print</strong> <strong>Server</strong> & Using the MFPs<br />
Tip: If you have sent a print job to the printer while it is still<br />
connected to a user, you may be prompted that the device<br />
was not found or the document has failed to print. Resend the<br />
printing job after the printer is idle or released by another user.<br />
Share Scan<br />
Most of the printers with built-in scanners provide a scan utility for<br />
users. You can scan pictures or documents through the utility. <strong>In</strong><br />
Windows XP, users can also scan from the Windows XP scanning<br />
utility. You can also use third-party scanning utilities such as<br />
Photoshop®, PhotoImpact®, Paint Shop Pro®, etc.<br />
An example: HP 1600 Series Utilities<br />
31<br />
1<br />
2<br />
3<br />
4<br />
5<br />
6<br />
7<br />
8<br />
9<br />
10<br />
11<br />
section
section<br />
1<br />
2<br />
3<br />
4<br />
5<br />
6<br />
7<br />
8<br />
9<br />
10<br />
11<br />
Operating <strong>Print</strong> <strong>Server</strong> & Using the MFPs<br />
Windows XP Scanning Utility<br />
Share Card Reader<br />
If your printer has built-in media-card readers, you can read the files<br />
from the plugged card reader through the <strong>Print</strong> <strong>Server</strong>.<br />
32
Operating <strong>Print</strong> <strong>Server</strong> & Using the MFPs<br />
Fax a File<br />
If your printer has a fax function, you can fax files from your<br />
computer to the fax number you designated.<br />
An example: Fax through HP Officejet 5600 Series<br />
After the printer is installed, a fax device will be added to “<strong>Print</strong>ers<br />
and Faxes” in Windows. When you have connected to the printer by<br />
clicking “Connect” in the Belkin <strong>All</strong>-<strong>In</strong>-<strong>One</strong> <strong>Print</strong> Manager, you can<br />
fax a file through the <strong>Print</strong> <strong>Server</strong> to the fax device.<br />
Procedures to Fax a File<br />
1. <strong>In</strong> Microsoft® Office or other programs,<br />
select “<strong>Print</strong>” from the “File” menu.<br />
2. When the following screen pops up, select<br />
the fax device and then click “<strong>Print</strong>”.<br />
33<br />
1<br />
2<br />
3<br />
4<br />
5<br />
6<br />
7<br />
8<br />
9<br />
10<br />
11<br />
section
section<br />
1<br />
2<br />
3<br />
4<br />
5<br />
6<br />
7<br />
8<br />
9<br />
10<br />
11<br />
Operating <strong>Print</strong> <strong>Server</strong> & Using the MFPs<br />
3. The “Send Fax” screen appears. Configure the file and enter<br />
the fax number, and then click “Send Fax” to fax the file.<br />
34
<strong>All</strong>-<strong>In</strong>-<strong>One</strong> <strong>Print</strong> Manager<br />
<strong>Print</strong> <strong>Server</strong> List<br />
The Belkin <strong>All</strong>-<strong>In</strong>-<strong>One</strong> <strong>Print</strong> Manager can automatically find the <strong>Print</strong><br />
<strong>Server</strong> in the network and show it in the <strong>Print</strong> <strong>Server</strong> List. Users can<br />
select a printer and click “Connect” to connect the printer as if they<br />
have directly connected the printer to their computer through a USB<br />
cable. It also displays the information of the connection status.<br />
When you don’t want to use the printer, click “Disconnect” so that<br />
other users can use the device. Or, you can enable the “Idle Timeout”<br />
setting, so that the <strong>Print</strong> <strong>Server</strong> will release your connection after a<br />
period of idle time that you have assigned.<br />
If you unplug the USB cable or turn off the printer while using it,<br />
the device will not display in the list. After you reconnect the USB<br />
cable or turn on the printer, you have to click the “Refresh” and<br />
“Connect” buttons in the Belkin <strong>All</strong>-<strong>In</strong>-<strong>One</strong> <strong>Print</strong> Manager to recover<br />
the connection.<br />
35<br />
1<br />
2<br />
3<br />
4<br />
5<br />
6<br />
7<br />
8<br />
9<br />
10<br />
11<br />
section
section<br />
1<br />
2<br />
3<br />
4<br />
5<br />
6<br />
7<br />
8<br />
9<br />
10<br />
11<br />
<strong>All</strong>-<strong>In</strong>-<strong>One</strong> <strong>Print</strong> Manager<br />
<strong>Print</strong> <strong>Server</strong><br />
List<br />
<strong>All</strong>-<strong>In</strong>-<strong>One</strong><br />
<strong>Print</strong> <strong>Server</strong>/<br />
Multifunction-<br />
<strong>Print</strong>er (MFP)<br />
<strong>In</strong>formation<br />
<strong>All</strong>-<strong>In</strong>-<strong>One</strong><br />
<strong>Print</strong> <strong>Server</strong><br />
Description<br />
Idle Timeout<br />
Status<br />
The <strong>Print</strong> <strong>Server</strong> List will show all the <strong>Print</strong> <strong>Server</strong>s<br />
within the network. You can find the <strong>Print</strong> <strong>Server</strong>’s<br />
information including “<strong>All</strong>-<strong>In</strong>-<strong>One</strong> <strong>Print</strong> <strong>Server</strong><br />
Name”, “MAC ID”, “IP Address”, and the device<br />
that is connected to the <strong>Print</strong> <strong>Server</strong>.<br />
When you click on the <strong>Print</strong> <strong>Server</strong> in the <strong>Print</strong>-<br />
<strong>Server</strong> list, you will see the “<strong>All</strong>-<strong>In</strong>-<strong>One</strong> <strong>Print</strong> <strong>Server</strong><br />
Description” and the “Idle Timeout” setting for that<br />
<strong>Print</strong> <strong>Server</strong>.<br />
This description helps users identify the location<br />
and the name of the <strong>Print</strong> <strong>Server</strong>.<br />
From here, each user can know his/her idletimeout<br />
setting. To avoid occupying the printer<br />
overtime, each user can set the “Idle Timeout”<br />
from “Option\General Setting”. It is used to<br />
disconnect the connection after the printer is idle<br />
for a specified period of time. By default, there is<br />
no timeout setting.<br />
When you click on the printer in the <strong>Print</strong>-<strong>Server</strong><br />
list, you will see information including “Status”,<br />
“Computer Name”, and “Contact <strong>In</strong>formation”.<br />
This displays the status of the printer including<br />
“Connected”, “Idle”, and “Busy”. When the<br />
status is “Connected”, it indicates that you are<br />
connecting the MFP. When the status is “Idle”, it<br />
indicates that the printer is not being used. When<br />
the status is “Busy”, it indicates that another user<br />
is using the printer to scan, print, etc.<br />
36
<strong>All</strong>-<strong>In</strong>-<strong>One</strong> <strong>Print</strong> Manager<br />
Computer<br />
Name<br />
Contact<br />
<strong>In</strong>formation<br />
Refresh<br />
Connect<br />
Disconnect<br />
Add to “My<br />
Favorite” list<br />
Auto Release<br />
when idle<br />
time is over<br />
xx minutes<br />
(5–255)<br />
It display the computer name of the user who is<br />
connecting to the printer.<br />
When the current user has set his “Contact<br />
<strong>In</strong>formation”, you can see it here. You can contact<br />
with the current user for asking to disconnect the<br />
printer.<br />
Refreshes the <strong>Print</strong>-<strong>Server</strong> list immediately.<br />
<strong>All</strong>ows printer connection to your computer.<br />
Disconnects the selected printer.<br />
Adds the <strong>Print</strong> <strong>Server</strong>s that you frequently use to<br />
the “My Favorite” list.<br />
To avoid occupying the printer for too long, you<br />
can set up and idle-timeout setting. It is used to<br />
disconnect the current connection after the printer<br />
is idle for a specified period of time. By default,<br />
there is no timeout setting. We recommend that<br />
you enable the idle-timeout setting after the printer<br />
and <strong>Print</strong> <strong>Server</strong> are installed completely so that<br />
the printer resource will not be occupied easily.<br />
37<br />
1<br />
2<br />
3<br />
4<br />
5<br />
6<br />
7<br />
8<br />
9<br />
10<br />
11<br />
section
section<br />
1<br />
2<br />
3<br />
4<br />
5<br />
6<br />
7<br />
8<br />
9<br />
10<br />
11<br />
<strong>All</strong>-<strong>In</strong>-<strong>One</strong> <strong>Print</strong> Manager<br />
My Favorite<br />
You can add the frequently used <strong>Print</strong> <strong>Server</strong>s to the “My Favorite”<br />
list. The <strong>Print</strong> <strong>Server</strong> in the list will be added to the quick-link list<br />
when you right-click the <strong>Print</strong>-<strong>Server</strong> icon in the system tray. Refer<br />
to the “Quick Setup” section to know more about the quick-setup<br />
functions.<br />
38
<strong>All</strong>-<strong>In</strong>-<strong>One</strong> <strong>Print</strong> Manager<br />
“My Favorite” List<br />
“ My Favorite”<br />
List<br />
<strong>All</strong>-<strong>In</strong>-<strong>One</strong><br />
<strong>Print</strong><br />
<strong>Server</strong>/MFP<br />
<strong>In</strong>formation<br />
Refresh<br />
Connect<br />
Disconnect<br />
Delete<br />
Auto Release<br />
when idle<br />
time is over<br />
xx minutes<br />
(5–255)<br />
Auto Connect List<br />
The “My Favorite” list will show your favorite<br />
<strong>Print</strong> <strong>Server</strong>s. You can find the <strong>Print</strong> <strong>Server</strong>’s<br />
information including its name, MAC ID, IP<br />
address, and any connected devices.<br />
The information listed here is the same as the <strong>Print</strong><br />
<strong>Server</strong> List. Refer to the “<strong>Print</strong> <strong>Server</strong> List” section<br />
for more information.<br />
Refreshes the <strong>Print</strong> <strong>Server</strong> List immediately.<br />
<strong>All</strong>ows printer connection to your computer.<br />
Disconnects the selected MFP.<br />
Deletes the selected <strong>Print</strong> <strong>Server</strong> from the “My<br />
Favorite” list.<br />
To avoid occupying the printer for too long, you<br />
can set up an idle-timeout setting. It is used<br />
to disconnect the current connection after the<br />
printer is idle for a specified period of time.<br />
By default, there is no timeout setting. We<br />
recommend that you enable an idle-timeout<br />
setting after the printer and <strong>Print</strong> <strong>Server</strong> are<br />
installed completely so that the printer resource<br />
will not be occupied easily.<br />
To let the system occupy the <strong>Print</strong> <strong>Server</strong> automatically when you<br />
want to print a document, just like the behavior of using a traditional<br />
print server, you can add the printer into your Auto Connect List. The<br />
system will send the printing jobs to the printer when the <strong>Print</strong> <strong>Server</strong><br />
is idle and there is no connection.<br />
39<br />
1<br />
2<br />
3<br />
4<br />
5<br />
6<br />
7<br />
8<br />
9<br />
10<br />
11<br />
section
section<br />
1<br />
2<br />
3<br />
4<br />
5<br />
6<br />
7<br />
8<br />
9<br />
10<br />
11<br />
<strong>All</strong>-<strong>In</strong>-<strong>One</strong> <strong>Print</strong> Manager<br />
To add the printer to the Auto Connect List, follow the steps below.<br />
1. Click “Add” from the Auto Connect List.<br />
2. The <strong>Print</strong> <strong>Server</strong>s within the network will be<br />
displayed in the following screen. Select the <strong>Print</strong><br />
<strong>Server</strong> you would like to add to the list.<br />
40
<strong>All</strong>-<strong>In</strong>-<strong>One</strong> <strong>Print</strong> Manager<br />
3. Select the printer that is connected to the selected<br />
<strong>Print</strong> <strong>Server</strong>. Click “OK”. Note that in some cases, new<br />
printing jobs cannot be printed because the printer is<br />
already disconnected. It will cause unformatted messages<br />
to be printed out. “Keep connecting for 30 second(s)<br />
after printing has been finished (5-60)” is enabled by<br />
default. It will help to avoid this kind of situation.<br />
41<br />
4. The setup<br />
is finished.<br />
1<br />
2<br />
3<br />
4<br />
5<br />
6<br />
7<br />
8<br />
9<br />
10<br />
11<br />
section
section<br />
1<br />
2<br />
3<br />
4<br />
5<br />
6<br />
7<br />
8<br />
9<br />
10<br />
11<br />
<strong>All</strong>-<strong>In</strong>-<strong>One</strong> <strong>Print</strong> Manager<br />
Quick Setup<br />
Right-click on the <strong>Print</strong>-<strong>Server</strong> icon in the system tray so you can<br />
see the <strong>Print</strong> <strong>Server</strong>s that you have designated to the “My Favorite”<br />
list. You can directly connect or disconnect the printer and check the<br />
printer information from there easily.<br />
42
<strong>All</strong>-<strong>In</strong>-<strong>One</strong> <strong>Print</strong> Manager<br />
Quick Setup<br />
Status<br />
Connect<br />
Disconnect<br />
<strong>In</strong>formation<br />
General Settings<br />
The current status of the printer will be<br />
displayed here. “Connected” indicates that you<br />
are connecting to the printer. “Busy” indicates<br />
that the printer is being used. “Idle” indicates<br />
that the printer is free to use by any users.<br />
If the printer is free to use, the “Connect” button<br />
will be available to click for occupying the<br />
printer. Otherwise, it will be grayed out.<br />
Disconnects the selected printer. The<br />
“Disconnect” button will be available only for<br />
the current user.<br />
To check more information about the <strong>Print</strong><br />
<strong>Server</strong> and the printer, click this button. The<br />
information will be listed as in the illustration<br />
above.<br />
43<br />
1<br />
2<br />
3<br />
4<br />
5<br />
6<br />
7<br />
8<br />
9<br />
10<br />
11<br />
section
section<br />
1<br />
2<br />
3<br />
4<br />
5<br />
6<br />
7<br />
8<br />
9<br />
10<br />
11<br />
<strong>All</strong>-<strong>In</strong>-<strong>One</strong> <strong>Print</strong> Manager<br />
General Setting<br />
Start Control<br />
Manager on<br />
Windows startup<br />
Minimized when start<br />
Control Manager<br />
Refresh status every<br />
xx seconds. (5~300)<br />
Your Contract<br />
<strong>In</strong>formation<br />
Search for <strong>All</strong>-<strong>In</strong>-<strong>One</strong> <strong>Print</strong> <strong>Server</strong><br />
Executes the Belkin <strong>All</strong>-<strong>In</strong>-<strong>One</strong> <strong>Print</strong><br />
Manager when Windows starts every time.<br />
By default, it is enabled.<br />
Minimizes the Belkin <strong>All</strong>-<strong>In</strong>-<strong>One</strong> <strong>Print</strong><br />
Manager to an icon in the system tray<br />
when you start the Belkin <strong>All</strong>-<strong>In</strong>-<strong>One</strong> <strong>Print</strong><br />
Manager. By default, it is disabled.<br />
Sets up the refresh interval for devicestatus<br />
update. By default, it is disabled.<br />
Enter your contact information here. When<br />
you connect to the printer, your contact<br />
information will be displayed in the right<br />
side of the program for other users to<br />
contact you.<br />
If the <strong>Print</strong> <strong>Server</strong> is not in the network as your computer, you can<br />
enter the IP address of the <strong>Print</strong> <strong>Server</strong> to do the remote search. The<br />
<strong>Print</strong> <strong>Server</strong> in the Remote MFP <strong>Server</strong> List will be added to the <strong>Print</strong><br />
<strong>Server</strong> List for you to configure.<br />
44
<strong>Print</strong> <strong>Server</strong> Manager<br />
<strong>In</strong>troduction<br />
This chapter introduces the <strong>Print</strong> <strong>Server</strong>’s system-configuration<br />
utility in a Windows environment. This utility provides the most<br />
complete management and configuration functions on the <strong>Print</strong>-<br />
<strong>Server</strong> side. This utility only provides configuration functions for the<br />
<strong>Print</strong> <strong>Server</strong> itself; it does not include configuration functions for the<br />
client side or other file server in the network environment.<br />
The configuration utility provides the following<br />
configuration and management functions:<br />
• Search <strong>All</strong>-<strong>In</strong>-<strong>One</strong> <strong>Print</strong> <strong>Server</strong>: Searches all<br />
available <strong>Print</strong> <strong>Server</strong>s on the network.<br />
• Status: Displays <strong>Print</strong> <strong>Server</strong>’s network status.<br />
• Setup: Shows configuration settings for the <strong>Print</strong> <strong>Server</strong>.<br />
• General Configuration: Configure general settings about<br />
the <strong>Print</strong> <strong>Server</strong> such as server name, password, etc.<br />
• TCP/IP Configuration: IP-address and<br />
DHCP-server configuration.<br />
• System Configuration: <strong>Print</strong> <strong>Server</strong>’s networkability<br />
setting and firmware upgrades.<br />
• Wireless Configuration: Searches for available<br />
wireless networks and configures the wireless settings<br />
of the <strong>Print</strong> <strong>Server</strong> for the wireless connection.<br />
• <strong>All</strong>-<strong>In</strong>-<strong>One</strong> <strong>Print</strong> <strong>Server</strong> Management: <strong>All</strong>ows the<br />
administrator to manage the <strong>Print</strong> <strong>Server</strong>. Administrator can<br />
force-disconnect the current connection of the <strong>Print</strong> <strong>Server</strong>.<br />
• Report: Lists the information of all available<br />
<strong>Print</strong> <strong>Server</strong>s on the network.<br />
We will explain each function separately in the following section.<br />
45<br />
1<br />
2<br />
3<br />
4<br />
5<br />
6<br />
7<br />
8<br />
9<br />
10<br />
11<br />
section
section<br />
1<br />
2<br />
3<br />
4<br />
5<br />
6<br />
7<br />
8<br />
9<br />
10<br />
11<br />
<strong>Print</strong> <strong>Server</strong> Manager<br />
Search for <strong>Print</strong> <strong>Server</strong>s<br />
Every time you run the “<strong>Server</strong> Manager” configuration utility,<br />
click the “Search” icon on the tool bar. The configuration utility<br />
will delay for several seconds because the utility is using the<br />
system’s available network protocols to search for all <strong>Print</strong><br />
<strong>Server</strong>s on the network. <strong>All</strong> available <strong>Print</strong> <strong>Server</strong>s will be<br />
listed under “<strong>Server</strong> Group” on the left side of the window.<br />
You must select the <strong>Print</strong> <strong>Server</strong> you would like to configure from<br />
the list. The system will, at the same time, display the selected <strong>Print</strong><br />
<strong>Server</strong>’s status on the right side of the window.<br />
46
<strong>Print</strong> <strong>Server</strong> Manager<br />
Status of <strong>Print</strong> <strong>Server</strong>s<br />
Clicking the “Status” icon on the tool bar will show<br />
the status of the currently selected <strong>Print</strong> <strong>Server</strong> on the<br />
right side of the window. The <strong>Print</strong>-<strong>Server</strong> information<br />
displayed includes the MAC ID, model type, firmware<br />
version, port status, IP address, subnet mask, default<br />
gateway, and supported printing protocols.<br />
You can refresh the <strong>Print</strong> <strong>Server</strong>’s status<br />
by pressing the “Refresh” button<br />
You can restart the <strong>Print</strong> <strong>Server</strong> by<br />
pressing the “Reboot” button<br />
47<br />
1<br />
2<br />
3<br />
4<br />
5<br />
6<br />
7<br />
8<br />
9<br />
10<br />
11<br />
section
section<br />
1<br />
2<br />
3<br />
4<br />
5<br />
6<br />
7<br />
8<br />
9<br />
10<br />
11<br />
<strong>Print</strong> <strong>Server</strong> Manager<br />
Set Up the <strong>All</strong>-<strong>In</strong>-<strong>One</strong> <strong>Print</strong> <strong>Server</strong><br />
Clicking the “Setup” icon on the tool bar will show the selected<br />
<strong>Print</strong> <strong>Server</strong>’s setup items on the right side of the window.<br />
Double-click one of the icons to set up the selected <strong>Print</strong><br />
<strong>Server</strong>. A screen pops up to verify the <strong>Print</strong> <strong>Server</strong>’s<br />
user name and password. The default values are:<br />
User Name: admin<br />
Password: 1234<br />
Tip: When you have finished selecting the settings, click “ ”<br />
to restart the <strong>Print</strong> <strong>Server</strong> to allow the settings to take effect<br />
48
<strong>Print</strong> <strong>Server</strong> Manager<br />
General Configuration<br />
Double-click the “General” icon and the “General” configuration<br />
window will appear. You can view basic <strong>Print</strong>-<strong>Server</strong> information in<br />
this page. You also can configure the server name, user name, and<br />
Password here.<br />
<strong>Server</strong> Name: the name of the <strong>Print</strong> <strong>Server</strong>. You can<br />
use this name to identify the <strong>Print</strong> <strong>Server</strong> when you are<br />
searching for it with the “<strong>Server</strong> Manger” utility.<br />
User Name / Password: used to authenticate the administrator<br />
to log in to the <strong>Print</strong> <strong>Server</strong> for configuring it from the “<strong>Server</strong><br />
Manger” utility or the web-management tool. Also note that<br />
passwords cannot exceed more than seven characters.<br />
49<br />
1<br />
2<br />
3<br />
4<br />
5<br />
6<br />
7<br />
8<br />
9<br />
10<br />
11<br />
section
section<br />
1<br />
2<br />
3<br />
4<br />
5<br />
6<br />
7<br />
8<br />
9<br />
10<br />
11<br />
<strong>Print</strong> <strong>Server</strong> Manager<br />
TCP/IP Configuration<br />
Double-click the “TCP/IP” icon and the “TCP/IP” configuration<br />
window opens. You can configure the <strong>Print</strong> <strong>Server</strong> to automatically<br />
get an IP address from a DHCP server (enabled by default), or<br />
manually specify static-IP configurations. The <strong>Print</strong> <strong>Server</strong> also has a<br />
built-in DHCP server (disabled by default).<br />
50
<strong>Print</strong> <strong>Server</strong> Manager<br />
IP Settings<br />
Click the “IP” button to enter the IP-setting page. By default, “Auto<br />
IP” is selected to enable the <strong>Print</strong> <strong>Server</strong> to automatically get an IP<br />
address from a DHCP server.<br />
The window will show the IP-address information acquired from a<br />
DHCP server for user reference.<br />
51<br />
1<br />
2<br />
3<br />
4<br />
5<br />
6<br />
7<br />
8<br />
9<br />
10<br />
11<br />
section
section<br />
1<br />
2<br />
3<br />
4<br />
5<br />
6<br />
7<br />
8<br />
9<br />
10<br />
11<br />
<strong>Print</strong> <strong>Server</strong> Manager<br />
If the DHCP server is unavailable or not found, the user will be<br />
prompted to configure the TCP/IP settings of the <strong>Print</strong> <strong>Server</strong><br />
manually by clicking “Yes” on the screen below. Clicking “No” will<br />
make the <strong>Print</strong> <strong>Server</strong> search for the IP address from a DHCP server<br />
on the network.<br />
You can select “Static IP” to manually assign the IP address, subnet<br />
mask, and gateway for the <strong>Print</strong> <strong>Server</strong>. The default TCP/IP-address<br />
information in the “Static IP” mode will be:<br />
IP Address: 192.168.2.253<br />
Subnet Mask: 255.255.255.0<br />
Gateway: 192.168.2.1<br />
Make sure that the TCP/IP information configured here is correct and<br />
matches your network settings, as it may be used as an alternative if<br />
a DHCP server on the network is ever unavailable or not found.<br />
52
<strong>Print</strong> <strong>Server</strong> Manager<br />
The <strong>Print</strong> <strong>Server</strong> will check if the manually configured IP address is in<br />
the same subnet as the network or connected computer. If the TCP/<br />
IP-address settings configured manually are in a different IP subnet<br />
than that of the connected networking devices, the user will be<br />
prompted by the alert message shown below. Click “OK” to go back<br />
and configure the correct IP-address settings for the <strong>Print</strong> <strong>Server</strong>.<br />
<strong>In</strong>ternal DHCP <strong>Server</strong><br />
Click the “DHCP <strong>Server</strong>” button to enter into the internal DHCP<br />
server’s setting page. You can enable/disable the DHCP server and<br />
assign a range of IP addresses here. By default, the DHCP server is<br />
disabled (recommended). When it comes to assigning an IP address<br />
to the <strong>Print</strong> <strong>Server</strong>, the internal DHCP server takes lower precedence<br />
to either getting an IP address from an external DHCP server or using<br />
the configured static IP address. Both options are described in the<br />
“IP Settings” section above.<br />
53<br />
1<br />
2<br />
3<br />
4<br />
5<br />
6<br />
7<br />
8<br />
9<br />
10<br />
11<br />
section
section<br />
1<br />
2<br />
3<br />
4<br />
5<br />
6<br />
7<br />
8<br />
9<br />
10<br />
11<br />
<strong>Print</strong> <strong>Server</strong> Manager<br />
If the DHCP server is enabled, you have to assign a valid range of IP<br />
addresses. Fill in the “Starting Address”, “Range”, “Subnet Mask”,<br />
“Gateway”, and “DNS” fields; then the <strong>Print</strong> <strong>Server</strong> will assign a<br />
unique IP address to each DHCP client. However, the <strong>Print</strong> <strong>Server</strong><br />
itself will get an IP address from the external DHCP server or use<br />
the configured static IP address, if the <strong>Print</strong> <strong>Server</strong> is configured for<br />
either of these two options as described in the “IP Settings” section<br />
above. Otherwise, the internal DHCP server will assign the first IP<br />
address to itself if no external DHCP server is found and the <strong>Print</strong><br />
<strong>Server</strong> is not set up to use a static IP.<br />
There is another option called “Auto” for the internal DHCP server.<br />
“Auto” means that the <strong>Print</strong> <strong>Server</strong> will first search for and detect<br />
DHCP servers within the network automatically. If a DHCP server<br />
exists on the network, the internal DHCP server will stay idle<br />
(disabled) and would not respond back to DHCP requests that it<br />
receives from clients. If a DHCP server doesn’t exist on the network,<br />
the <strong>Print</strong> <strong>Server</strong> will turn on its own internal DHCP server and assign<br />
IP addresses to clients. <strong>In</strong> this case, the internal DHCP server will<br />
also assign the first IP address to itself only if the <strong>Print</strong> <strong>Server</strong> is not<br />
set for a static IP as described in the “IP Settings” section above, as<br />
static IP takes precedence. Fill in the “Starting Address”, “Range”,<br />
“Subnet Mask”, “Gateway”, and “DNS” fields; then the <strong>Print</strong> <strong>Server</strong><br />
will assign a unique IP to each DHCP client.<br />
54
<strong>Print</strong> <strong>Server</strong> Manager<br />
System Configuration<br />
Double-click the “System” icon and the “System” configuration<br />
window pops up.<br />
<strong>In</strong> the System configuration page, you can see all available printing<br />
protocols and upgrade the new firmware for this <strong>Print</strong> <strong>Server</strong>.<br />
Upgrade Firmware: You can use this “Upgrade Firmware” tool to<br />
update the newest firmware of the <strong>Print</strong> <strong>Server</strong>. Click the “...” button<br />
and select the correct firmware in your computer. After selecting<br />
the firmware file, click the “Upgrade” button to finish the firmwareupdate<br />
process.<br />
Tip: Before you upgrade the firmware, make sure<br />
that the IP-address settings of the <strong>Print</strong> <strong>Server</strong><br />
are in the same network as your computer.<br />
Load Default: If you want to reset the <strong>Print</strong> <strong>Server</strong> to default factory<br />
settings, click “Load Default”.<br />
55<br />
1<br />
2<br />
3<br />
4<br />
5<br />
6<br />
7<br />
8<br />
9<br />
10<br />
11<br />
section
section<br />
1<br />
2<br />
3<br />
4<br />
5<br />
6<br />
7<br />
8<br />
9<br />
10<br />
11<br />
<strong>Print</strong> <strong>Server</strong> Manager<br />
Wireless Function: You can select to enable or disable the wireless<br />
function manually. If you manually enable wireless function, the <strong>Print</strong><br />
<strong>Server</strong>’s wireless LAN will be always enabled and Ethernet will be<br />
always disabled. If you manually disable the wireless function, the<br />
<strong>Print</strong> <strong>Server</strong>’s wireless LAN will be always disabled and Ethernet will<br />
be always enabled. You can also select “Auto” to let the <strong>Print</strong> <strong>Server</strong><br />
automatically decide to enable or disable the wireless function. The<br />
<strong>Print</strong> <strong>Server</strong> only can work in either Ethernet or wireless-LAN mode.<br />
It cannot work in both Ethernet and wireless-LAN mode at the same<br />
time. When the <strong>Print</strong> <strong>Server</strong> starts up, it will automatically detect if<br />
the LAN port is connected to an active network by an Ethernet cable.<br />
If the <strong>Print</strong> <strong>Server</strong> is connected to an active network by Ethernet<br />
cable when starting up, the <strong>Print</strong> <strong>Server</strong> will run in Ethernet mode. If<br />
the <strong>Print</strong> <strong>Server</strong> is not connected to an active network by Ethernet<br />
cable when starting up, the <strong>Print</strong> <strong>Server</strong> will run in wireless-LAN<br />
mode. The <strong>Print</strong> <strong>Server</strong>’s default is in “Auto” mode.<br />
Domain Country: The wireless channels are different from country<br />
to country. Generally, the channels are from 1 to 11 in the USA and<br />
from 1 to 13 in Europe. The operating channel will be set to the <strong>Print</strong><br />
<strong>Server</strong> before importing. If you are in a different country, make sure<br />
that you have set the available channels according to your location<br />
Wireless Configuration<br />
If you want to use the <strong>Print</strong> <strong>Server</strong> through a wireless LAN, set it<br />
up through Ethernet first and make sure your wireless-LAN setting<br />
is correct. After setting up the wireless LAN, unplug the Ethernet<br />
cable and restart the <strong>Print</strong> <strong>Server</strong>. You can start to use the <strong>Print</strong><br />
<strong>Server</strong> through a wireless LAN. If the wireless configuration does<br />
not work, plug in the Ethernet cable again, restart the <strong>Print</strong> <strong>Server</strong>,<br />
and configure it through Ethernet until the wireless-LAN settings are<br />
correct.<br />
56
<strong>Print</strong> <strong>Server</strong> Manager<br />
The default settings of the <strong>Print</strong>-<strong>Server</strong><br />
wireless function are as follows:<br />
• Mode: <strong>In</strong>frastructure<br />
• SSID: Default<br />
• Channel: 11<br />
Double-click the “Wireless” icon and the “Wireless” configuration<br />
window pops up. If you use an access point to build up your wireless<br />
network, you have to select “<strong>In</strong>frastructure Mode”. If you do not have<br />
an access point and want to use a peer-to-peer connection to build<br />
up your wireless network, you have to select “Ad-Hoc Mode”. After<br />
selecting the operation modes of the wireless function, click “Next”<br />
to go to further detailed configuration.<br />
57<br />
1<br />
2<br />
3<br />
4<br />
5<br />
6<br />
7<br />
8<br />
9<br />
10<br />
11<br />
section
section<br />
1<br />
2<br />
3<br />
4<br />
5<br />
6<br />
7<br />
8<br />
9<br />
10<br />
11<br />
<strong>Print</strong> <strong>Server</strong> Manager<br />
<strong>In</strong>frastructure<br />
Mode:<br />
<strong>In</strong> the <strong>In</strong>frastructure mode, you have to allow the <strong>Print</strong> <strong>Server</strong> to<br />
associate with an access point. You can choose to let the <strong>Print</strong><br />
<strong>Server</strong> scan for an available access point automatically, or you can<br />
manually assign the SSID of the access point you want to use.<br />
The table will list the available access points near the <strong>Print</strong> <strong>Server</strong>.<br />
Select an access point from the list and click “Next”. If you cannot<br />
find the access point that you want to use, click “Scan” to allow the<br />
<strong>Print</strong> <strong>Server</strong> to scan again.<br />
58<br />
If you select to<br />
allow the <strong>Print</strong><br />
<strong>Server</strong> to scan<br />
for an available<br />
access point, the<br />
following window<br />
will pop up.
<strong>Print</strong> <strong>Server</strong> Manager<br />
Ad-Hoc Mode:<br />
<strong>In</strong> the Ad-Hoc mode, you can allow the <strong>Print</strong> <strong>Server</strong> to automatically<br />
associate with another wireless station, or you can manually assign<br />
the SSID of your wireless network. You can allow the <strong>Print</strong> <strong>Server</strong><br />
to automatically select the channel that is the same as the wireless<br />
station with which you want to connect, or you can manually assign a<br />
channel.<br />
If you select to<br />
allow the <strong>Print</strong><br />
<strong>Server</strong> to scan<br />
for an active<br />
wireless station,<br />
the following<br />
window will pop<br />
up<br />
The list shows<br />
the scanned<br />
active wireless<br />
stations. Select a<br />
wireless station<br />
from the list and<br />
click “Next”. If you cannot find the wireless station with which you<br />
want the <strong>Print</strong> <strong>Server</strong> to communicate, click “Scan” to allow the <strong>Print</strong><br />
<strong>Server</strong> to scan again.<br />
59<br />
1<br />
2<br />
3<br />
4<br />
5<br />
6<br />
7<br />
8<br />
9<br />
10<br />
11<br />
section
section<br />
1<br />
2<br />
3<br />
4<br />
5<br />
6<br />
7<br />
8<br />
9<br />
10<br />
11<br />
<strong>Print</strong> <strong>Server</strong> Manager<br />
Both <strong>In</strong>frastructure and Ad-Hoc modes have to go through the<br />
following procedure:<br />
Wireless<br />
Security:<br />
This <strong>Print</strong> <strong>Server</strong> supports Wired Equivalent Privacy (WEP) and Wi-<br />
Fi® Protected Access-Pre-Shared Key (WPA-PSK) security modes.<br />
If you want to use WEP encryption to protect your wireless network,<br />
you have to select “WEP(ASCII)” or “WEP(HEX)”. If you want to use<br />
60
<strong>Print</strong> <strong>Server</strong> Manager<br />
WPA-PSK, you have to select “WPA-shared key” or “WPA-None”<br />
specified for Ad-Hoc mode. The wireless-security setting should be<br />
the same as the other wireless devices in the same network. WPA<br />
currently supports cipher modes Temporal Key <strong>In</strong>tegrity Protocol<br />
(TKIP) and Advanced Encryption Standard (AES).<br />
WEP Security Mode:<br />
61<br />
1<br />
2<br />
3<br />
4<br />
5<br />
6<br />
7<br />
8<br />
9<br />
10<br />
11<br />
section
Belkin Ltd.<br />
Express Business Park<br />
Shipton Way, Rushden<br />
NN10 6GL, United Kingdom<br />
+44 (0) 1933 35 2000<br />
+44 (0) 1933 31 2000 fax<br />
Belkin B.V.<br />
Boeing Avenue 333<br />
1119 PH Schiphol-Rijk<br />
Netherlands<br />
+31 (0) 20 654 7300<br />
+31 (0) 20 654 7349 fax<br />
Belkin Sweden<br />
Knarrarnäsgatan 7<br />
164 40 Kista<br />
Sweden<br />
+46 (0) 8 5229 1870<br />
+46 (0) 8 5229 1874 fax<br />
Wireless G<br />
<strong>All</strong>-<strong>In</strong>-<strong>One</strong><br />
<strong>Print</strong> <strong>Server</strong><br />
Belkin Lifetime Product Warranty<br />
For the life of the product, Belkin warrants that this<br />
product shall be free of defects in design, assembly,<br />
material, and workmanship (free replacement).<br />
Belkin SAS<br />
130 rue de Silly<br />
92100 Boulogne-Billancourt<br />
France<br />
+33 (0) 1 41 03 14 40<br />
+33 (0) 1 41 31 01 72 fax<br />
Belkin Iberia<br />
Avda. Cerro del Aguila 3<br />
28700 San Sebastián de los Reyes<br />
Spain<br />
+34 9 16 25 80 00<br />
+34 9 02 02 00 34 fax<br />
Belkin Nordics & Baltics<br />
Roskildevej 522<br />
2605 Brøndby<br />
Denmark<br />
+45 (0) 3612 6000<br />
+45 (0) 3612 6010 fax<br />
Belkin GmbH<br />
Hanebergstrasse 2<br />
80637 Munich<br />
Germany<br />
+49 (0) 89 143405 0<br />
+49 (0) 89 143405 100 fax<br />
Belkin Italy & Greece<br />
Via Carducci, 7<br />
Milano 20123<br />
Italy<br />
+39 02 862 719<br />
+39 02 862 719 fax<br />
Belkin LTD<br />
Al Thuraya Tower 1, Office suite 201<br />
Dubai <strong>In</strong>ternet City,<br />
Dubai, UAE<br />
+971 (0) 4 369 2705<br />
+971 (0) 4 368 8402 fax<br />
© 2004 Belkin Corporation. <strong>All</strong> rights reserved. <strong>All</strong> trade names are registered trademarks of respective<br />
manufacturers listed. Apple, AirPort, Mac, Mac OS, and AppleTalk are trademarks of Apple Computer,<br />
<strong>In</strong>c., registered in the U.S. and other countries. The mark “Wi-Fi” is a registered mark of the Wi-Fi <strong>All</strong>iance.<br />
54g is a trademark of Broadcom Corporation.<br />
P75192