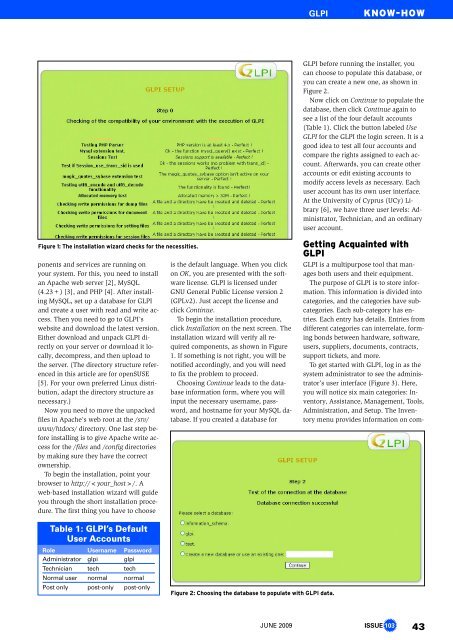
GLPIKnow-HowGLPI before running the installer, youcan choose to populate this database, oryou can create a new one, as shown inFigure 2.Now click on Continue to populate thedatabase, then click Continue again tosee a list of the four default accounts(Table 1). Click the button labeled UseGLPI for the GLPI the login screen. It is agood idea to test all four accounts andcompare the rights assigned to each account.Afterwards, you can create otheraccounts or edit existing accounts tomodify access levels as necessary. Eachuser account has its own user interface.At the University of Cyprus (UCy) Library[6], we have three user levels: Administrator,Technician, and an ordinaryuser account.Figure 1: The installation wizard checks for the necessities.ponents and services are running onyour system. For this, you need to installan Apache web server [2], MySQL(4.23+) [3], and PHP [4]. After installingMySQL, set up a database for GLPIand create a user with read and write access.Then you need to go to GLPI’swebsite and download the latest version.Either download and unpack GLPI directlyon your server or download it locally,decompress, and then upload tothe server. (The directory structure referencedin this article are for openSUSE[5]. For your own preferred <strong>Linux</strong> distribution,adapt the directory structure asnecessary.)Now you need to move the unpackedfiles in Apache’s web root at the /srv/www/htdocs/ directory. One last step beforeinstalling is to give Apache write accessfor the /files and /config directoriesby making sure they have the correctownership.To begin the installation, point yourbrowser to http:// /. Aweb-based installation wizard will guideyou through the short installation procedure.The first thing you have to chooseis the default language. When you clickon OK, you are presented with the softwarelicense. GLPI is licensed underGNU General Public License version 2(GPLv2). Just accept the license andclick Continue.To begin the installation procedure,click Installation on the next screen. Theinstallation wizard will verify all requiredcomponents, as shown in Figure1. If something is not right, you will benotified accordingly, and you will needto fix the problem to proceed.Choosing Continue leads to the databaseinformation form, where you willinput the necessary username, password,and hostname for your MySQL database.If you created a database forGetting Acquainted withGLPIGLPI is a multipurpose tool that managesboth users and their equipment.The purpose of GLPI is to store information.This information is divided intocategories, and the categories have subcategories.Each sub-category has entries.Each entry has details. Entries fromdifferent categories can interrelate, formingbonds between hardware, software,users, suppliers, documents, contracts,support tickets, and more.To get started with GLPI, log in as thesystem administrator to see the administrator’suser interface (Figure 3). Here,you will notice six main categories: Inventory,Assistance, Management, Tools,Administration, and Setup. The Inventorymenu provides information on com-Table 1: GLPI’s DefaultUser AccountsRole Username PasswordAdministrator glpi glpiTechnician tech techNormal user normal normalPost only post-only post-onlyFigure 2: Choosing the database to populate with GLPI data.JUNE 2009ISSUE 10343
Know-HowGLPIFigure 3: The administrator’s user interface.puters and devices running on your network.The first sub-category, Computers,presents a list of your computer equipment,as seen in Figure 4. With the useof search filters, you can search this list.GLPI lets you set up pre-configuredtemplates to add similar systems to theinventory. To create the entry, use a template,then edit the settings for the serialnumber, host name, and IP address asnecessary. Also, you can enter a fullentry manually. Figure 5 shows thescreen that lets you add a computer tothe inventory. The green hexagon with amagnifying lens on the right of a field indicatesthat you can add/ edit/ delete anentry for that field.TicketsThe other side of GLPI is its role in providinghelp desk support. The GLPI userinterface makes it easy to create andmanage help tickets. An ordinary usercan create a new ticket to request support.Admins and technicians can addtickets manually or assign a user’s ticketto the appropriate technician.The Assistance option has the sub-categoriesTracking, Helpdesk, Planning,and Statistics.Tracking allows the admin to view alist of all tickets submitted by users. Bydefault, the list shows the tickets currentlyopen. A search tool offers simpleand advanced search filters to narrowdown the list of tickets according to yourcriteria, sort the list, and perform actionson multiple items. Also, you can exportthe resulting items in PDF, Excel, andother formats. A system administratorcan perform actions on all tickets, butordinary users can only access informationon their own tickets.Active tickets are summarized for theuser in a list. The list includes severaldata fields, such as the creation date, thelast update date, the requester, and thetechnician in charge of the ticket. Clickon a ticket in the list to view, edit, orclose the ticket (Figure 6).ManagementGLPI’s Management features let youkeep tabs on contacts, suppliers, contracts,and documents. A supplier is similarto a contact, although the term has aspecial meaning. A supplier is a personyou buy equipment from, so an entry inthe supplier list can link directly to anitem in the inventory. This way, whenyou view the details of an item in the inventory,you automatically know whoyou bought it from and how to contactthe supplier.Contract entries can refer to actualcontract documents, as well as details onthe warranty, expiration date, renewalcosts, and so on. Contracts are alsolinked to items in your inventory and tothe supplier that issued the contract.Also, you can attach a scanned documentso that you can generate the actualcontract anytime in electronic form.The Documents module is a universalmodule with many uses. A documentcan reference a support ticket or a contract,or it can simply be an importantpaper you want to preserve. In my case,I find it very useful to scan all documentsabout contracts, maintenance,and invoices. Another useful characteristicof documents is the ability to attachfiles, such as screen captures andspreadsheets, to support tickets.ToolsThe Tools feature provides access to avariety of support information. GLPI dividesthe Tools section into the categoriesNotes, Knowledge base, Reservations,and Reports. An optional fifth categorycalled OCSNG [8] lets you importdata from another application. Notes canbe either personal (viewed only by theAfter and BeforeFigure 4: A list of computers in GLPI’s inventory list.GLPI’s Planning feature lets you scheduleupcoming interventions and eventsin a calendar view. Also, you can exportthe calendar data in iCalendar format tosynchronize with other calendar tools,such as the tools of Mozilla’s CalendarProject [7].GLPI also lets you view statistics on ticketssubmitted by users, including detailson each item (location, operating system,graphics card, etc.), as well as reportson overall parameters, such as thetotal number of tickets, the number ofunresolved tickets, the average andmaximum ticket resolution delays, andmore. Results appear in either table orchart format.44 ISSUE 103 JUNE 2009