APPLICATION NOTE: Configuring Net2 Card Printing - IP Way
APPLICATION NOTE: Configuring Net2 Card Printing - IP Way
APPLICATION NOTE: Configuring Net2 Card Printing - IP Way

Create successful ePaper yourself
Turn your PDF publications into a flip-book with our unique Google optimized e-Paper software.
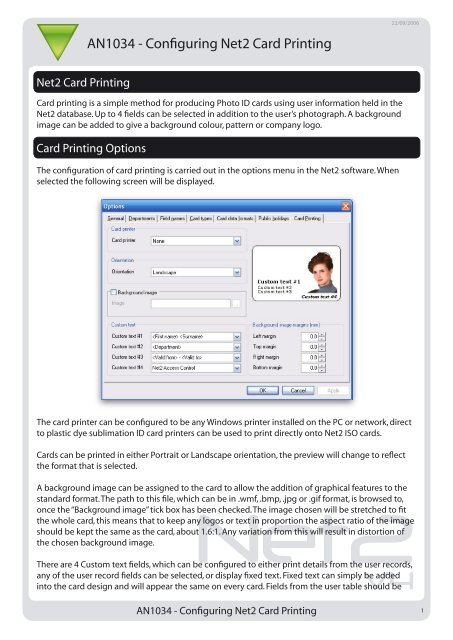
22/09/2006AN1034 - <strong>Configuring</strong> <strong>Net2</strong> <strong>Card</strong> <strong>Printing</strong>Paxton Access<strong>Net2</strong> <strong>Card</strong> <strong>Printing</strong><strong>Card</strong> printing is a simple method for producing Photo ID cards using user information held in the<strong>Net2</strong> database. Up to 4 fields can be selected in addition to the user’s photograph. A backgroundimage can be added to give a background colour, pattern or company logo.<strong>Card</strong> <strong>Printing</strong> OptionsThe configuration of card printing is carried out in the options menu in the <strong>Net2</strong> software. Whenselected the following screen will be displayed.The card printer can be configured to be any Windows printer installed on the PC or network, directto plastic dye sublimation ID card printers can be used to print directly onto <strong>Net2</strong> ISO cards.<strong>Card</strong>s can be printed in either Portrait or Landscape orientation, the preview will change to reflectthe format that is selected.A background image can be assigned to the card to allow the addition of graphical features to thestandard format. The path to this file, which can be in .wmf, .bmp, .jpg or .gif format, is browsed to,<strong>Net2</strong>once the “Background image” tick box has been checked. The image chosen will be stretched to fitthe whole card, this means that to keep any logos or text in proportion the aspect ratio of the imageshould be kept the same as the card, about 1.6:1. Any variation from this will result in distortion ofthe chosen background image.V4There are 4 Custom text fields, which can be configured to either print details from the user records,any of the user record fields can be selected, or display fixed text. Fixed text can simply be addedinto the card design and will appear the same on every card. Fields from the user table should beAN1034 - <strong>Configuring</strong> <strong>Net2</strong> <strong>Card</strong> <strong>Printing</strong>1
selected from the drop down menu.For fine-tuning of the background image, margin controls are provided, these will allow themargins to be adjusted to make allowances for variations in printers or to tune the location of thebackground graphics.<strong>Printing</strong> a card<strong>Printing</strong> of cards can be done from two locations in the <strong>Net2</strong> software, from the user’s details screenor from the “add new user” window. Once a card printer has been defined a new button will appearat the bottom of both the user’s screen and the “new user” window labelled “Print card”.In the user record screen, clicking on this button will print the card for the user being displayed. Allof the fields defined in the card printing setup window will be taken for the current user record andprinted along with the displayed photograph.<strong>Net2</strong>In the new user window, once the new users details have been entered, the print card button canbe pressed. At this point the operator will be prompted to browse to the location of the new user’spicture. Once the picture has been selected the card will be printed and the picture automaticallyadded to the user record.V4AN1034 - <strong>Configuring</strong> <strong>Net2</strong> <strong>Card</strong> <strong>Printing</strong>2