CETRIS® PDI
CETRIS® PDI
CETRIS® PDI
- No tags were found...

You also want an ePaper? Increase the reach of your titles
YUMPU automatically turns print PDFs into web optimized ePapers that Google loves.
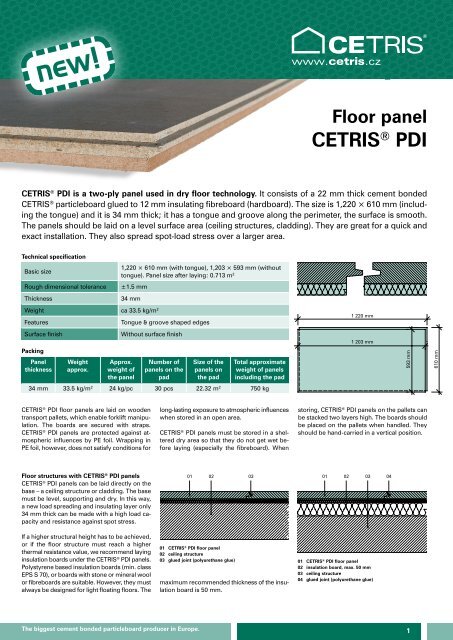
new!Floor panelCETRIS ® <strong>PDI</strong>CETRIS ® <strong>PDI</strong> is a two-ply panel used in dry floor technology. It consists of a 22 mm thick cement bondedCETRIS ® particleboard glued to 12 mm insulating fibreboard (hardboard). The size is 1,220 × 610 mm (includingthe tongue) and it is 34 mm thick; it has a tongue and groove along the perimeter, the surface is smooth.The panels should be laid on a level surface area (ceiling structures, cladding). They are great for a quick andexact installation. They also spread spot-load stress over a larger area.Technical specificationBasic sizeRough dimensional toleranceThickness1,220 × 610 mm (with tongue), 1,203 × 593 mm (withouttongue). Panel size after laying: 0.713 m 2±1.5 mm34 mmWeight ca 33.5 kg/m 2FeaturesTongue & groove shaped edges1 220 mmSurface finishPackingPanelthicknessWeightapprox.Without surface finishApprox.weight ofthe panelNumber ofpanels on thepadSize of thepanels onthe padTotal approximateweight of panelsincluding the pad1 203 mm593 mm610 mm34 mm 33.5 kg/m 2 24 kg/pc 30 pcs 22.32 m 2 750 kgCETRIS ® <strong>PDI</strong> floor panels are laid on woodentransport pallets, which enable forklift manipulation.The boards are secured with straps.CETRIS ® <strong>PDI</strong> panels are protected against atmosphericinfluences by PE foil. Wrapping inPE foil, however, does not satisfy conditions forlong-lasting exposure to atmospheric influenceswhen stored in an open area.CETRIS ® <strong>PDI</strong> panels must be stored in a sheltereddry area so that they do not get wet beforelaying (especially the fibreboard). Whenstoring, CETRIS ® <strong>PDI</strong> panels on the pallets canbe stacked two layers high. The boards shouldbe placed on the pallets when handled. Theyshould be hand-carried in a vertical position.Floor structures with CETRIS ® <strong>PDI</strong> panelsCETRIS ® <strong>PDI</strong> panels can be laid directly on thebase – a ceiling structure or cladding. The basemust be level, supporting and dry. In this way,a new load spreading and insulating layer only34 mm thick can be made with a high load capacityand resistance against spot stress.01 020301 02 03 04If a higher structural height has to be achieved,or if the floor structure must reach a higherthermal resistance value, we recommend layinginsulation boards under the CETRIS ® <strong>PDI</strong> panels.Polystyrene based insulation boards (min. classEPS S 70), or boards with stone or mineral woolor fibreboards are suitable. However, they mustalways be designed for light floating floors. The®01 CETRIS <strong>PDI</strong> floor panel02 ceiling structure03 glued joint (polyurethane glue)®01 CETRIS <strong>PDI</strong> floor panel02 insulation board, max. 50 mm03 ceiling structure04 glued joint (polyurethane glue)maximum recommended thickness of the insulationboard is 50 mm.The biggest cement bonded particleboard producer in Europe. 1
Floor systemsCETRIS ® 3Moisture of the baseThe maximum allowable specific moisture ofthe base:• wooden base ......12 %• silicate base ........6 %Insulation against moistureTo eliminate transport of moisture into the thermaland sound insulation layer, this layer mustbe separated from the floor structure by a protectivefoil. This protection concerns mainly asupport ceiling structure, which contains residualmoisture or areas where increased penetrationLaying CETRIS ® <strong>PDI</strong> floor panels1 Floating floors made with CETRIS ® <strong>PDI</strong> arelaid as a final layer after finishing «wet» buildingworks (after finishing walls, plastering, etc.).2 Floating floors made with CETRIS ® <strong>PDI</strong> arelaid on a dry, clean base.of moisture through the ceiling structure is anticipated.Spread a hydro-insulating foil (e.g.0.2 mm PE foil) with overlaps of at least 200 mm(or plaster the joints with adhesive tape) over acleaned surface and pull it up to vertical structuresabove the intended floor level.When using a self-levelling compound, lay themoisture insulation film on the finished compound;if using a sub-base, lay it between thebearing structure and the sub-base.When laying the floor on a wooden structure oran original ceiling structure, application of PE filmJoints between insulation boards and the CETRIS ®<strong>PDI</strong> sections must not mate.7 The insulation boards should be set to thevertical structures so that they touch a dilatationinsert, without dilatation gaps in the surface.is not recommended to ensure the breathing ofthe ceiling. If a room with higher air humidity(bathroom, kitchen) is located below the ceiling,it is necessary to prevent the transport ofhumidity into the structure or ensure its freeevaporation.Moisture insulation must be addressed within thecomplete structure of the ceiling or the floor.A micro-ventilating layer (e.g. OLDROYD,TECHNODREN) or a studded foil can be usedfor venting wet structures.the surface of the floating floor before laying theflooring material.9 Start the laying with a full CETRIS ® <strong>PDI</strong> panelopposite the door. The panels are laid on thebutt.3 Before laying, the floor panels must beallowed to acclimatise for at least 48 hours ata minimum temperature of 18° C and relativehumidity of 70 % max. The acclimatisation adaptsthe production moisture in the board to the balancedmoisture during application, thus reducingproblems with future dimensional and shapechanges.Laying insulationboards1,0001,000500 500 500 50047Without a feather on the longitudinal side3216547Without a featheron the crosswise side.4 If the base contains a high level or residualmoisture or if penetration of moisture through theceiling structure is anticipated, a PE foil shouldbe laid on the base with a 200 mm overlap of thestrips and pulled up along vertical structures tothe anticipated level of the floor.Installationof the foiloverlapon the wallfoil overlappingmin. 200 mm5 If necessary, the base can be levelled withdry sub-base – spread it always only over a partof the surface.6 If insulation boards are used together withCETRIS ® <strong>PDI</strong> panels, the laying direction of theboards must be determined before their application.When laying individual layers, makesure they are laid crosswise over each other.When a dry floor structure passes across a doorsill,take care of installation of the doorframe.It must be levelled and propped into a preciseheight by the central cross-beam. When fixingthe threshold, use longer screws to connect theframe to the base section.If an insulating board is used, we recommendinstallation of an underlaying batten under theCETRIS ® <strong>PDI</strong> panel along both sides of the doorsill.The recommended size of an underlayingbatten is 80 × 30 mm; it can be supplementedwith an EPS board of an appropriate thickness(see the detail). The loss of impact noise reductionof the entire floor is negligible because ofa local application. We also recommend usingan underlaying batten for dilatation of the floorin the surface (area larger than 6 × 6 m), floortransitions, etc.8 Make a 15 mm wide dilatation gap alongvertical structures (walls, columns, etc.). We recommendinserting a 15 mm strip of mineral woolor polystyrene in the dilatation gaps to eliminateclogging during the subsequent operations. Cutthis strip to the required height after finishing10 CETRIS ® <strong>PDI</strong> panels are usually laid from theright to the left; no cross-joints may appear; theminimum overlap between joints is 200 mm. Theprotruding tongue on the first panel in the firstrow must be cut both on the long (longitudinal)and short (transverse) side. The tongue on thelonger side must be cut on the remaining panelsin the first row.Apply glue to the top side of the tongue of theinserted panel and in the groove (bottom part)of the already laid panel.Use polyurethane glue for wood (e.g. DenBraven D4, Soudal PRO 45, etc.). The approximateglue consumption is 40 g/m 2 of a laid area(500 ml packaging = ca. 12 m 2 of floor).3
8Floor systemsCETRIS ®Cement-bonded particleboardThe floor panels must be glued at a maximumrelative air humidity of 80 % and a minimumroom temperature of 5° C. The CETRIS ® <strong>PDI</strong>panels must be in full contact with each other.11 When laying down the final panel, first cutit to the required length, then cut the tongue onthe longitudinal side. You can use the cut-offpiece (minimum length 200 mm) for starting thesecond row.Doorsillless floor transitionVertical cross-section04 05 06 010201 Dilatation section SchlüterDILEX02 Doorsill link of thedoorframe03 Wooden base sectionunder the doorframe04 Wear layer®05 Floor panel CETRIS <strong>PDI</strong>06 Vapor barrier07 Dilatation gap 15 mm08 Ceiling structure12 After laying a floor with CETRIS ® <strong>PDI</strong> panels,cut an edge strip and the insulation foil to therequired height with a knife.13 When laying a large floor area, we recommenda sequential installation of insulation andpanels in individual areas of the dilatation zone.This will reduce damage to the insulation boardsby worker activity.07 03 0814 The floor can be fully loaded and other operationscan be performed (laying floor covering)after complete setting of the polyurethane glue(min. 24 hours). Remove the excessive glue witha spatula after the setting.15 For laying the final flooring, we recommendthe principles described in Chapter 7.9 Flooring(Materials for designing and implementation ofCETRIS ® boards).Floor transition over a thresholdVertical cross-section04 05 06 07 0801 0201 Wooden threshold 20 mm thick02 Doorsill link of the doorframe03 Wooden base section under thedoorframe04 Wear layer®05 Floor panel CETRIS <strong>PDI</strong>06 Insulation board (max. 50 mmthick)07 Vapor barrier08 Wooden base batten09 Dilatation gap 15 mm10 Ceiling structureNote: As a result of drying and gradual adaptationof CETRIS ® <strong>PDI</strong> panels, free edges mayrise (along walls, in corners) after laying a floorespecially during winter months. This effect canbe eliminated by local fastening of CETRIS ® <strong>PDI</strong>panels to the base (cladding, ceiling).09 03 10Joint of the floor with the wallVertical cross-section0101 Wall02 Sealing washer03 Plastic plug04 Wear layer®05 Floor panel CETRIS <strong>PDI</strong>06 Steam protection07 Ceiling structure08 Dilatation gap0804Cement-bonded particleboardCIDEM Hranice, a.s. – division CETRISNová 223, CZ-753 01 HraniceCzech Republicphone: +420 581 676 281cell phone: +420 774 247 753e-mail: cetris@cetris.czwww.cetris.cz02 03 05 06 074