3610 & 3640 - Stoves Online
3610 & 3640 - Stoves Online
3610 & 3640 - Stoves Online

You also want an ePaper? Increase the reach of your titles
YUMPU automatically turns print PDFs into web optimized ePapers that Google loves.
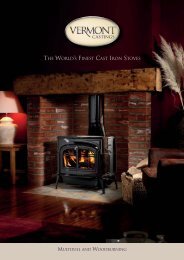
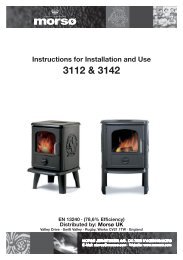
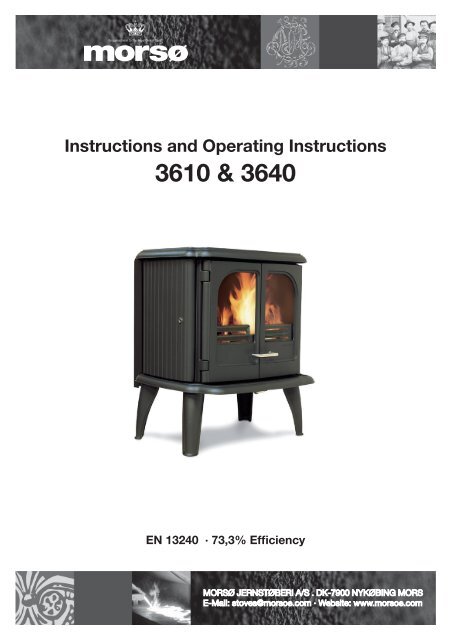
Instructions and Operating Instructions<strong>3610</strong> & <strong>3640</strong>EN 13240 · 73,3% EfficiencyMORSØ JERNSTØBERI A/S . DK-7900 NYKØBING MORSE-Mail: stoves@morsoe.com · Website: www.morsoe.com
Enjoy your new Morsø stove!Morsø, the largest stove manufacturer in Denmark,has been making cast-iron stoves of thehighest quality since 1853. By carefully followingthe instructions below, we are certain that you willenjoy many years of comfortable warm from yournew Morsø stove.CONTENTS1.0 Installing your Morsø stove Page1.1 Unpacking the stove 31.2 Installing the stove 31.3 Chimneysweep 31.4 Stove placement/distance requirements 31.5 The chimney 41.6 Pipe connections 51.7 Connecting to a masonry chimney 61.8 Connecting to a steel chimney 61.9 Draught conditions 72.0 Firing the stove 8.1 Lighting instructions and fuelling intervals 93.0 Routine stove maintenance 123.1 External maintenance 123.2 Internal maintenance 123.3 Cleaning the stove 13Additional accessoriesMorsø also offers a comprehensive line of floor plates and accessory products that can facilitatethe safe and efficient operation and maintenance of your Morsø stove.
1.0 Installing your Morsø stoveIn situations where the stove is to be fitted into a brick or non-combustible recess, we recommendthat the stove is installed with at least 10 - 15 cm clearance to the wall, this will allowheat to circulate around the stove; also the maintenance of the outside stove is easier.When applied to masonry, a layer of wallpaper is normally classified as a non-combustiblesurface.1.1 Unpacking the stoveAfter removing the outer packaging, flatten it and lay onto the floor close to the stove; thiscan then act as protective work surface during the assembly process.Next, remove the legs and bolts from inside the stove. Gently lay the stove onto its back andunscrew it from the wooden pallet. Using the bolts supplied, now screw the legs into positionon the underside of the base. The stove should now be lifted and moved into the upright position,avoiding excess load on the back legs.The stove is heavy and therefore it is strongly recommended that when lifting, iti is undertakenby two people. Morsø <strong>3610</strong> weighs 199 kg. Morsø <strong>3640</strong> weighs 209 kg.1.2 Installing the stoveThe stove and chimney installations MUST comply to all current National and Local BuildingRegulations; your approved Morsø dealer or your local building control officer can adviseregarding this. Ultimately, it is you and your installer who is responsible that the installationcomplies.1.3 Chimney sweepIt may also be wise to consult your local chimney sweep before installing the stove. After yourstove has been installed, it is advisable to have the chimney checked and swept at least oncea year. In any case, if your chimney has not been used for some time, it should be inspectedfor cracking, bird nests, etc. before it is put back into use.1.4 Stove placement/distance requirementsClearance requirements apply only if the stove is placed near to combustible materials. Permittedclearances to combustible materials are indicated on the data plate on the rear of thestove.Minimum clearances to combustible surfaces:Stove type Behind the stove (A) To the sides of the stove (B) To soft funushingsMorsø <strong>3610</strong>/<strong>3640</strong> 200 mm 400 mm 1000 mmuninsulated flue<strong>3610</strong> corner installation <strong>3640</strong> corner installation
On the FloorNational and Local Building Regulations must again be observed when considering the type,thickness and area of the hearth to be used in the installation. The hearth temperature undersafety test was less than 55°C.One should of course always make certain that the underlying floor surface can bear theweight of the stove.Distance to furniture and soft furnishingsWe recommend that the stove be installed 1000 mm from furniture. Serious considerationshould also be given to positioning of any furniture that could be adversely affected by heat.The clearances to combustible materials in front of the stove should be a minimum of 1000mm. When lit, a wood-burning stove gets hot and therefore adequate protect must be provided,particularly in situations where there is a safety risk to children or the infirm. A suitablesafety guard around the stove should be considered.The stoves handle also gets hot when the stove is lit, which is why a safety glove is includedwith the stove.1.5 The chimneyOnly if National or Local Regulations permit are you permitted to connect a stove into a chimneythat is shared by another appliance. YOU MUST be aware of any applicable Regulationsin this respect. The wood-burning stove must never been connected to a chimney to which agas-burning stove or appliance is connected.The stove must never be connected to a chimney that is shared with another appliance.An efficient modern stove places heavy demands on the chimney, and you should have thechimney regularly swept and inspected by your approved chimney sweep.The cross-sectional area of the chimney (at its narrowest point) must comply with Nationaland Local Building Regulations. Generally, the area needed for a Morsø wood-burning stoveinstallation should measure at least 175 cm2 (150 mm diameter).An over-sized chimney is generally hard to keep warm and results in poor draft. In caseswhere there is an oversized masonry chimney, it is recommended that the chimney be linedusing an appropriately chimney lining system with the correct internal diameter.With respect to the chimney termination, all chimneys should terminate in accordance withNational and Local Building Regulations.Note that National and Local Regulations also apply with regard to the placement of chimneysand flues in connection with thatched roofs. See the section on Draught Conditions, 1.9.The chimney or flue system must be equipped with access doors for inspection and cleaningdoors. The size of the cleaning door in the chimney must at least equal that of the cross-sectionalarea of the chimney.
1.7 Connecting the stove to a masonry chimneyA wall sleeve should be bricked securely into the wall of the chimney at the appropriate heightand the stovepipe inserted centrally. The pipe must not extend into the actual chimney opening,but rather must reach only to the inside of the chimney aperture. The gap between thestovepipe and sleeve must be sealed using glass fibre packing rope. It is normally not necessaryto seal between any pipe joints.If the flue transitions from horizontal to vertical, it is helpful to install it with a gentle bend soas to avoid loss of draught.Only use stovepipe components that comply to National and Local Building Regulations.Morsø recommends, however, that flues made of 2 mm sheet steel, as this will extend theservece life of the flue.1.8 Connecting to a stainless steel insulated chimney systemIf your installation involves taking the chimney straight up and through the ceiling, you mustcomply with National, Local Building Regulations or flue manufacturers instructions concerningclearances to combustible materials such as walls, floor joists and ceilings. The joint betweenthe stove flue collar and the stovepipe must also be sealed using the glass fibre ropeprovided. It is important that the insulated flue system is properly supported both at ceilinglevel and at roof level. THE STOVE MUST NOT BEAR THE WEIGHT OF THE CHIMNEY SYS-TEM (See chimney manufacturer’s instructions). Excessive weight on the stove will inhibit expansionand could lead to damage of the stove top. Damage caused to the stove in this waywould not be covered by the manufacturers warranty scheme.In the event that a chimney fire occurs as a result of faulty operation or prolonged use ofdamp wood fuel, close the air vents completely and contact your local fire department immediately.Be aware of the following:Cleaning procedure: Discuss this with chimney sweep or qualified installer priorto or during the stove installationChimney draft: If the chimney draft is naturally poor it is better to install the fluefrom the top of the stove so as to minimise any internal resistance of the fluegases.Avoid having any more than 2 bends in the flue system and limit the length of theoffset between bends.Fresh air supplyA wood-burning stove requires air for combustion and therefore you may need toinstall additional ventilation to the room, especially so in well insulated houses. Ifthe air supply in inadequate the chimney draft may be too weak, with the possibleresult that the stove will not burn properly; smoke spillage may also occurduring the refuelling process.On a positive note, a properly installed wood-burner will give even the most efficienthouses a pleasant and natural ventilation.
1.9 Draft conditionsIf smoke spillage occurs when the fire door is opened, it is probably due to poor chimneydraft. This type of stove requires at least 12 pa of chimney draft to achieve satisfactory combustionand smoke spillage prevention. However, in cases where the stove door is openedtoo vigorously you could expect that slight smoke spillage may occur.The smoke gas temperature at the rated output is 300° C relative to 20° C.The smoke gas flow is 12,7 gr/sec.If you have any doubts, you may want to have your installer measure the draft in the chimney.Draft conditionsThe chimney’s draft is the resulting effect within the flue caused by the differencein temperature within the flue and the cooler temperature outside. Otherfactors that can influence the level of draft include the length of the flue, insulationof the chimney, adverse weather conditions or tall buildings or treesnearby the flue terminal.Poor draught occurs when:- The atmospheric temperature difference is too low, e.g. a poorly insulated chimney.If the chimney is excessively cool, it may help to ‘prime’ the flue beforethe fire is lit. Just place a screwed-up sheet of newspaper in the flue-ways ofthe stove and ignite.- The outside temperature is too high, e.g. during the summer months.- There is no air movement (wind) outside.- The chimney is not tall enough, with the result that the terminal sits in the leeof the roof surface or in the vicinity of tall trees or neighbouring buildings. Theseconditions are also associated with downdraft where the flue gases are pushedback down the chimney.- Flue draft is diluted by residual air entering the chimney, e.g. due to inadequateflue-pipe joints or leaks at the cleaning door or flue collar.- Unsealed, unused fireplaces are connected to the chimney.- The flue is blocked, e.g. by soot, due to inadequate cleaning, loose debris oreven a birds nest.- The house is too tightly sealed (see section on Fresh air supply).A good draught is achieved when:- The temperature difference between the chimney and outside is high. This alsoapplies during firing, when the need is greatest.- The weather is clear and there is a good wind.- The chimney is of the proper height, i.e. minimum 4 meters over the stove andthe termination adequately clear of the roof line.
2.0 Firing the stove/Using your stoveYour stove is constructed with air supplies in three places.One air supply leads to the combustion via a duct through 2 holes at the front of the partition.A preheated secondary air supply leads to the combustion above the glass, and a preheatedtertiary air supply leads to the combustion through the numerous holes in the smoke plateabove the fire.The secondary and tertiary air supplies are extremely simple to regulate using the handle underneaththe hot ash box.The stove is fitted with a detachable handle made of stainless steel – a material that is a poorconductor of heat. When the handle is removed, the stove is more childproof.Morsø <strong>3610</strong> and <strong>3640</strong> are large stoves. A certain amount of expansion noise should thereforebe expected during combustion in connection with heating and cooling. The stove’s ratedheat output is 9 kW. The efficieny is 73,3%. Your new Morsø stove is EN-tested and recommendedto be fired with wood. The stove is suitable for intermittent use.N.B!Wood is a material that contains a great deal of gas (approximately 75 %). The gases are releasedwhen the wood is lit and heated up. For this reason, it is important that the gases areignited quickly after stoking.If the wood just lies smouldering, especially after re-stoking, a lot of smoke is created, which,in the worst case, may cause an explosive ignition of the gasses, resulting in damage to thestove.In order to ignite the gases that are released from the wood, and to keep clear, lasting flamesduring the combustion process, it is important to let in the required quantity of oxygen (air supply)at all times.The setting of the air supply, the method of ignition and the lighting intervals depend on thedraught in the chimney, the wind and weather, the amount of heat required, the fuel, etc. Thismeans that it may take some time before you get to know the correct functioning of the stoveunder any given circumstances.Although you can fire your Morsø stove with almost all kinds of wood, you should not fire withwet wood, or unseasoned wood. Wood ought to be stored under a roof for at least 1 year, andpreferably 2 years, with free access to wind. Wood should be chopped as soon as possible afterfelling if it is to dry quickly. The wood can be used once the moisture content is less than 20%.During the EN test, all stoves are tested with wood with a moisture content of (16 ± 4)%.Never use driftwood, as it usually has a high salt content, which damages both the stove andthe chimney. Impregnated and painted wood and chipboard emit poisonous smoke and fumes,so they should not be used as fuel either.Please note that liquid fuel may not be used in the stove.Pieces of wood with a diameter greater than 10 cm should always be chopped.The pieces of wood should be short enough to be able to lie flat over the layer of embers, withair at both ends.The maximum length of fuel in the stove is 58 cm.The maximum quantity of fuel is 3-3.5 kg/hour (max. 4 pieces of wood each time you re-stoke).The first few times you light the stove, the fire should be moderate, so that the heat-resistantpaint can harden before firing more vigorously. During the hardening phase, the paint maydevelop obnoxious smoke and smell the first time it is lit, which is very normal. Make sure thatthe room is well ventilated during this period.
2.1 Lighting and fuelling intervalsA lot of air is needed when lighting the stove. If you are starting with a totally cold stove, itmay be helpful to leave the door ajar during the first few minutes and open the air supply allthe way.Wood fuel burns well when placed onto an ash bed on the grate of the stove. To achieve thisyou should burn roughly 1-2 kg of dry kindling the first time you light the stove. You shouldbuild and maintain the ash bed to a thickness of approximately 1 cm.1. A layer of embers will form rapidly if the stove is lit with2 - 4 fire lighters or 7 - 10 rolled up sheets of newspaper,underneath roughly 1-2 kg of dry kindling.2. Open the air supply fully. Controled with the handle underthe ash lip.3. After the paper/fire lighters have caught fire, leave the firedoor ajar about 2 cm, so hat the chimney draws well.4. After 5-10 minutes the chimney draft should be established,at this point close the fire door. If all the necessaryconditions are met, a nice layer of embers will start to accumulateafter another 15 - 20 minutes.
5. Normal reloading should be done while there are stillcoals left. Spread the coals over the bottom but concentratedmostly at the front of the stove.6. Place a piece of wood across the coals in one layer, withspacing of roughtly 1 cm between the logs.7. When the air supply is opened all the way and the dooris closed, the new fuel will ignite in a few minutes.8. Once the new fuel has taken, adjust the air amount tothe desired setting; optimal combustion will continue untilglowing coals are produced. Under normal chimneydraft conditions, expect to refuel your stove every 90 -100 minutes.9. A new charge of wood can be added by repeating steps5 & 6.10
The stove door should normally be opened gently the first 2 - 3 centimetres, then you shouldwait until the pressure has equalised before opening the door all the way. This technique willprevent smoke from getting out, particularly when there is a poor draughtThe stove door should never be opened when the stove is being fired vigorously.Once the wood has burned out, it becomes glowing charcoal. If a good layer of embers hasalready formed on top of a sufficient layer of ash, the stove can keep warm for a very longtime, not least due to the favourable qualities of the cast iron.We would strongly recommend that you do not leave your stove alit at night.It harms the environment, and constitutes very poor use of the wood, as thegases in the wood do not ignite at the low temperature, but settle as soot (unburnedgases) in the chimney and stove. Extreme conditions, such as poordraught in the chimney, large quantities of wood or wet wood, may, in theworst-case scenario, cause an explosive ignition.When firing in the summer period, when there is minimal need for heat, thecombustion will be poor. The stove provides too much heat, so the combustionshould be reduced. But always remember to make sure that there are lastingflames until the wood becomes charcoal. If you want a weaker fire, stoke upusing less wood.If you fire the stove using wet wood, a lot of the fuel’s thermal energy will bespent forcing the water out of the wood, without releasing any heat to thestove. This incomplete combustion results in a layer of soot being left in thestove, pipe and chimney.Comparison between wood-burning and oil-burningType of wood (moisture content 20%)No. of cubic metres per 1000 litre of OilOak 7.0Beech 7.0Ash 7.2Sycamore 7.5Birch 8.0Elm 8.911
3.0 Routine stove maintenance3.1 External maintenanceThe surface of the stove is painted with heat-resistant Senotherm paint. If the stove is usedtoo vigorously, the painted surface may take-on a greyish tinge. It is easily maintained by simplyvacuuming the surface with a soft brush attachment and applying two light layers of paint.Morsø stoves are painted in Morsø dark grey. The touch-up paint is available either as aerosolspray or as regular brush-on.3.2 Internal maintenanceCeramic glassIf the stove is used and installed onto a flue with the correct draft, very little or no depositsshould appear on the ceramic glass. It is usual for soot deposits to appear during long slumberingfires however, once the fire has been re-established to a burn brightly, these depositswill burn off.If the glass window becomes thoroughly covered in soot due to faulty operation or poor draft,the soot can be easily removed using, e.g. Morsø Glass Cleaner, but please ensure that theis cold before cleaning. Avoid fuelling the stove with wood that is long enough that it pressesagainst the glass when the door is closed.Reasons for sooted glass window:- fuel is too wet (green)- pieces of fuel/uncut wood are too thick- operating temperature of the stove is too low- too much air coming through bottom grate- POOR FLUE DRAFTInternal cast-iron parts and/or wear componentsThe shaking grate, baffle plate and other internal components that are in direct contact withthe fire are all constituted as ‘wear’ components or consumables, as, they exposed to themost wear. When used properly, these parts will last for many years, but overly vigorous usewill naturally shorten the lifespan. The aforementioned parts are all easily replaced.If the baffle plate is damaged or warped and is not replaced in time, the top plate could becomesubject to excessively high temperatures, which may lead to damage here also.Note that no unauthorised alterations to the stove design should be undertaken, andalways ensure that any replacement parts purchased must be Morsø original parts.Reasons for premature wear of internal parts- Stove being used/fired too vigorously- Too much air passing through the bottom grate- Use of excessively dry wood (wood from old furniture)- Excessive debris collection on baffle plate or inner fireback(see section on cleaning)- Ash level too high in the ash pan (see section on ash12
GasketsThe rope gaskets in the door will need regular inspection in order to ensure and maintain fullcontrol of your stove’s burning rate; over time the rope gaskets will harden and will becomeless airtight, at this point you will need to remove and replace will new. Use only the genuineMorsø gasket kit, which comes with detailed replacement instructions.NOTE:Normal wear components (inner parts) are not covered by Morsø’s extended warranty.Maintenance products (Spare Parts, Glass Cleaner, Paint, Gasket Kit, etc) are all availablefrom your authorised Morsø dealer.3.3 Cleaning the stoveDuring normal use and sweeping of your stove and chimney, a layer of ash, soot or debriscan form, particularly on the top of the baffle plate or inner fireback. Any deposits allowedto build-up over time will have an insulating effect on these parts, thus restricting expansion;this ultimately will result in a shorter lifespan. The chrome-iron baffle plate and inner fireback/bricks can easily be removed from the stove and should be regularly checked for debris andcleaned. You must ensure that your chimney sweep removes all soot and debris from thestove after the sweeping process.Your chimney should be swept at least once a year; however a regular inspection of yourstovepipe and chimney will determine whether a more frequent approach should be adopted.AshAs noted above, there should be a circa 1 cm insulating layer of ash on top of the grate in orderto achieve a high combustion temperature. Excess ash can be removed by pulling out theshaker rod (outside of the stove) several times so that ash falls cleanly into the ash pan below.Be sure to empty the ash pan before it gets completely full; if the ash level reaches the undersideof the grate, air flow through the grate will be restricted and will lead to over-heating andpremature wear of the grate parts.When emptying the ash pan always dump the waste ash into a metal container (dustbin)where it can fully cool before being taken away by your refuse collector. Ash from a woodburningstove does not benefit your garden as fertiliser.Maintenance parts for <strong>3610</strong> & <strong>3640</strong>DescriptionProduct CodeRiddling grate 34361100Baffle, complete 54361700Door Glass 79360000Back brick 79360300Securingplate side door 34361400Securingplate side 34361500Front grate front 44184921Front grate side 4436240013
Morsø Jernstøberi A/S - 20.04.2007 - 7236180016MORSØ JERNSTØBERI A/S . DK-7900 NYKØBING MORSE-Mail: stoves@morsoe.com · Website: www.morsoe.com