SYSTEMSURE IK6 hand operated injector / sprayer - Kamco
SYSTEMSURE IK6 hand operated injector / sprayer - Kamco
SYSTEMSURE IK6 hand operated injector / sprayer - Kamco

You also want an ePaper? Increase the reach of your titles
YUMPU automatically turns print PDFs into web optimized ePapers that Google loves.
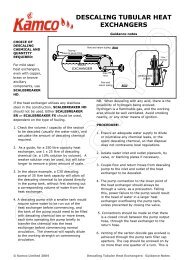
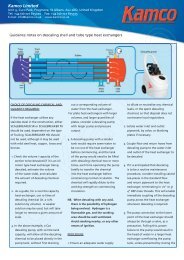
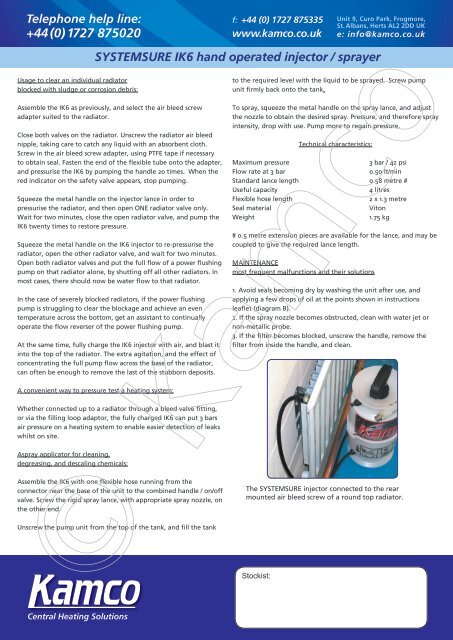
Usage to clear an individual radiatorblocked with sludge or corrosion debris: <strong>SYSTEMSURE</strong> <strong>IK6</strong> <strong>hand</strong> <strong>operated</strong> <strong>injector</strong> / <strong>sprayer</strong>Assemble the <strong>IK6</strong> as previously, and select the air bleed screwadapter suited to the radiator.Close both valves on the radiator. Unscrew the radiator air bleednipple, taking care to catch any liquid with an absorbent cloth.Screw in the air bleed screw adapter, using PTFE tape if necessaryto obtain seal. Fasten the end of the flexible tube onto the adapter,and pressurise the <strong>IK6</strong> by pumping the <strong>hand</strong>le 20 times. When thered indicator on the safety valve appears, stop pumping.Squeeze the metal <strong>hand</strong>le on the <strong>injector</strong> lance in order topressurise the radiator, and then open ONE radiator valve only.Wait for two minutes, close the open radiator valve, and pump the<strong>IK6</strong> twenty times to restore pressure.Squeeze the metal <strong>hand</strong>le on the <strong>IK6</strong> <strong>injector</strong> to re-pressurise theradiator, open the other radiator valve, and wait for two minutes.Open both radiator valves and put the full flow of a power flushingpump on that radiator alone, by shutting off all other radiators. Inmost cases, there should now be water flow to that radiator.In the case of severely blocked radiators, if the power flushingpump is struggling to clear the blockage and achieve an eventemperature across the bottom, get an assistant to continuallyoperate the flow reverser of the power flushing pump.At the same time, fully charge the <strong>IK6</strong> <strong>injector</strong> with air, and blast itinto the top of the radiator. The extra agitation, and the effect ofconcentrating the full pump flow across the base of the radiator,can often be enough to remove the last of the stubborn deposits.A convenient way to pressure test a heating system:Whether connected up to a radiator through a bleed valve fitting,or via the filling loop adaptor, the fully charged <strong>IK6</strong> can put 3 barsair pressure on a heating system to enable easier detection of leakswhilst on site.Aspray applicator for cleaning,degreasing, and descaling chemicals:Assemble the <strong>IK6</strong> with one flexible hose running from theconnector near the base of the unit to the combined <strong>hand</strong>le / on/offvalve. Screw the rigid spray lance, with appropriate spray nozzle, onthe other end.Unscrew the pump unit from the top of the tank, and fill the tank to the required level with the liquid to be sprayed. Screw pumpunit firmly back onto the tank.To spray, squeeze the metal <strong>hand</strong>le on the spray lance, and adjustthe nozzle to obtain the desired spray. Pressure, and therefore sprayintensity, drop with use. Pump more to regain pressure.Technical characteristics:Maximum pressure3 bar / 42 psiFlow rate at 3 bar0.50 lt/minStandard lance length 0.58 metre #Useful capacity4 litresFlexible hose length2 x 1.3 metreSeal materialVitonWeight1.75 kg# 0.5 metre extension pieces are available for the lance, and may becoupled to give the required lance length.MAINTENANCEmost frequent malfunctions and their solutions1. Avoid seals becoming dry by washing the unit after use, andapplying a few drops of oil at the points shown in instructionsleaflet (diagram B).2. If the spray nozzle becomes obstructed, clean with water jet ornon-metallic probe.3. If the filter becomes blocked, unscrew the <strong>hand</strong>le, remove thefilter from inside the <strong>hand</strong>le, and clean.The <strong>SYSTEMSURE</strong> <strong>injector</strong> connected to the rearmounted air bleed screw of a round top radiator.© <strong>Kamco</strong>