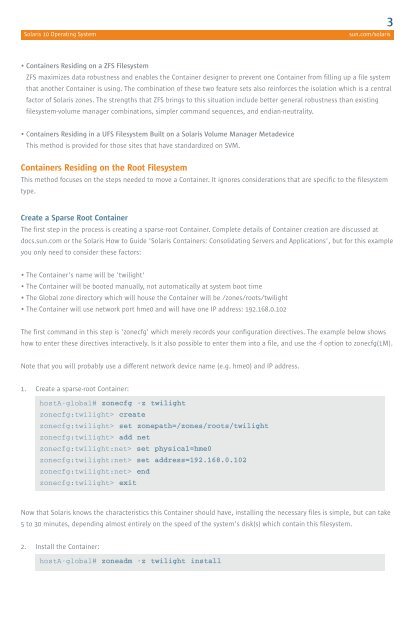
2Solaris 10 Operating Systemsun.com/solarisAs an example of server consolidation, a four-CPU Sun Fire V490 running Solaris 10 may have four Containers, each ofwhich is running database software. In this example, each Container has been configured with:• Unlimited access to 8GB RAM• Shared access to 8GB of swap space• Shared use of internal SCSI bandwidth• Access to shared files in /sbin, /usr, and other filesystems• Access to private files in /etc, /var, and other filesystems, and 8GB of space allocated to a private filesystem• Access to the network via a shared 1Gbps NIC• An IP address• 10 CPU sharesCRM<strong>CONTAINER</strong>10 SharesHR<strong>CONTAINER</strong>10 SharesAR<strong>CONTAINER</strong>10 SharesAP<strong>CONTAINER</strong>10 SharesSOLARIS 108GB RAM NIC FILESYSTEMS SWAP SPACE CPUsFigure 3—Example configurationThe Fair Share Scheduler (FSS) enables CPU resources to be allocated proportionally to applications. That is, eachapplication gets assigned a number of shares which represent a portion of the total number of shares, which in turnrepresent the processing power of the whole system or of a resource pool. So the 10 CPU shares given to each of theContainers above guarantee to one Container's processes, in aggregate, a minimum of one-fourth of the processingcapacity of the system, or approximately one CPU of processing power. This does not limit a Container's processes to25%—processing capacity does not go to waste if it is available.As shown in Figure 3 one of the Containers has a CRM database installed in it. In this example, use of the CRM databasehas been growing and occasionally experiences performance problems. The bottleneck could be insufficient hardwareresources, e.g. storage bandwidth, CPU power, or memory. Performance analysis will determine the cause and, in somecases, the problem can be addressed by simply changing the Container's configuration on the same system.On the other hand, if the computer simply has insufficient compute capacity for the four workloads, the best solution maybe to move the CRM Container to another computer. This could be either a computer dedicated to this task or one withsufficient unused resources to provide acceptable performance for the CRM environment. The end result is the movementof the entire workload, including all configuration information, from the V490 to another computer running Solaris 10. Theremaining three Containers would also benefit from reduced resource contention.Solaris Container Migration: Three ExamplesThis document describes the process used to move a Container from one system to another. Three different examplemethods are included for completeness. The difference between the methods is the type of filesystem which holds theContainer's private files:• Containers Residing on the Root FilesystemThis is the simplest method. Its description focuses on the migration aspects.
Solaris 10 Operating System3sun.com/solaris• Containers Residing on a ZFS FilesystemZFS maximizes data robustness and enables the Container designer to prevent one Container from filling up a file systemthat another Container is using. The combination of these two feature sets also reinforces the isolation which is a centralfactor of Solaris zones. The strengths that ZFS brings to this situation include better general robustness than existingfilesystem-volume manager combinations, simpler command sequences, and endian-neutrality.• Containers Residing in a UFS Filesystem Built on a Solaris Volume Manager MetadeviceThis method is provided for those sites that have standardized on SVM.Containers Residing on the Root FilesystemThis method focuses on the steps needed to move a Container. It ignores considerations that are specific to the filesystemtype.Create a Sparse Root ContainerThe first step in the process is creating a sparse-root Container. Complete details of Container creation are discussed atdocs.sun.com or the Solaris How to Guide 'Solaris Containers: Consolidating Servers and Applications', but for this exampleyou only need to consider these factors:• The Container's name will be 'twilight'• The Container will be booted manually, not automatically at system boot time• The Global zone directory which will house the Container will be /zones/roots/twilight• The Container will use network port hme0 and will have one IP address: 192.168.0.102The first command in this step is 'zonecfg' which merely records your configuration directives. The example below showshow to enter these directives interactively. Is it also possible to enter them into a file, and use the -f option to zonecfg(1M).Note that you will probably use a different network device name (e.g. hme0) and IP address.1. Create a sparse-root Container:hostA-global# zonecfg -z twilightzonecfg:twilight> createzonecfg:twilight> set zonepath=/zones/roots/twilightzonecfg:twilight> add netzonecfg:twilight:net> set physical=hme0zonecfg:twilight:net> set address=192.168.0.102zonecfg:twilight:net> endzonecfg:twilight> exitNow that Solaris knows the characteristics this Container should have, installing the necessary files is simple, but can take5 to 30 minutes, depending almost entirely on the speed of the system's disk(s) which contain this filesystem.2. Install the Container:hostA-global# zoneadm -z twilight install