Installation and Service Manual - Harmar
Installation and Service Manual - Harmar
Installation and Service Manual - Harmar

You also want an ePaper? Increase the reach of your titles
YUMPU automatically turns print PDFs into web optimized ePapers that Google loves.
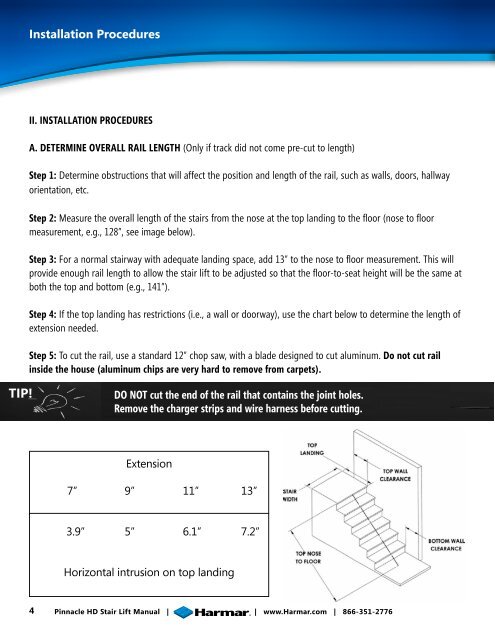
Table <strong>Installation</strong> of Contents ProceduresII. INSTALLATION PROCEDURESA. DETERMINE OVERALL RAIL LENGTH (Only if track did not come pre-cut to length)Step 1: Determine obstructions that will affect the position <strong>and</strong> length of the rail, such as walls, doors, hallwayorientation, etc.Step 2: Measure the overall length of the stairs from the nose at the top l<strong>and</strong>ing to the floor (nose to floormeasurement, e.g., 128”, see image below).Step 3: For a normal stairway with adequate l<strong>and</strong>ing space, add 13” to the nose to floor measurement. This willprovide enough rail length to allow the stair lift to be adjusted so that the floor-to-seat height will be the same atboth the top <strong>and</strong> bottom (e.g., 141”).Step 4: If the top l<strong>and</strong>ing has restrictions (i.e., a wall or doorway), use the chart below to determine the length ofextension needed.Step 5: To cut the rail, use a st<strong>and</strong>ard 12” chop saw, with a blade designed to cut aluminum. Do not cut railinside the house (aluminum chips are very hard to remove from carpets).TIP!DO NOT cut the end of the rail that contains the joint holes.Remove the charger strips <strong>and</strong> wire harness before cutting.Extension7” 9” 11” 13”3.9” 5” 6.1” 7.2”Horizontal intrusion on top l<strong>and</strong>ing4Pinnacle HD Stair Lift <strong>Manual</strong> | | www.<strong>Harmar</strong>.com | 866-351-2776