Installation and Service Manual - Harmar
Installation and Service Manual - Harmar
Installation and Service Manual - Harmar

You also want an ePaper? Increase the reach of your titles
YUMPU automatically turns print PDFs into web optimized ePapers that Google loves.
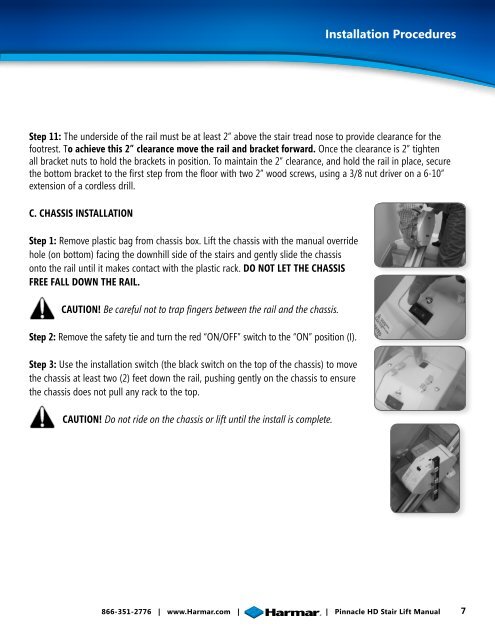
<strong>Installation</strong> Table Procedures of ContentsStep 11: The underside of the rail must be at least 2” above the stair tread nose to provide clearance for thefootrest. To achieve this 2” clearance move the rail <strong>and</strong> bracket forward. Once the clearance is 2” tightenall bracket nuts to hold the brackets in position. To maintain the 2” clearance, <strong>and</strong> hold the rail in place, securethe bottom bracket to the first step from the floor with two 2” wood screws, using a 3/8 nut driver on a 6-10”extension of a cordless drill.C. CHASSIS INSTALLATIONStep 1: Remove plastic bag from chassis box. Lift the chassis with the manual overridehole (on bottom) facing the downhill side of the stairs <strong>and</strong> gently slide the chassisonto the rail until it makes contact with the plastic rack. DO NOT LET THE CHASSISFREE FALL DOWN THE RAIL.CAUTION! Be careful not to trap fingers between the rail <strong>and</strong> the chassis.Step 2: Remove the safety tie <strong>and</strong> turn the red “ON/OFF” switch to the “ON” position (I).Step 3: Use the installation switch (the black switch on the top of the chassis) to movethe chassis at least two (2) feet down the rail, pushing gently on the chassis to ensurethe chassis does not pull any rack to the top.CAUTION! Do not ride on the chassis or lift until the install is complete.866-351-2776 | www.<strong>Harmar</strong>.com | | Pinnacle HD Stair Lift <strong>Manual</strong> 7