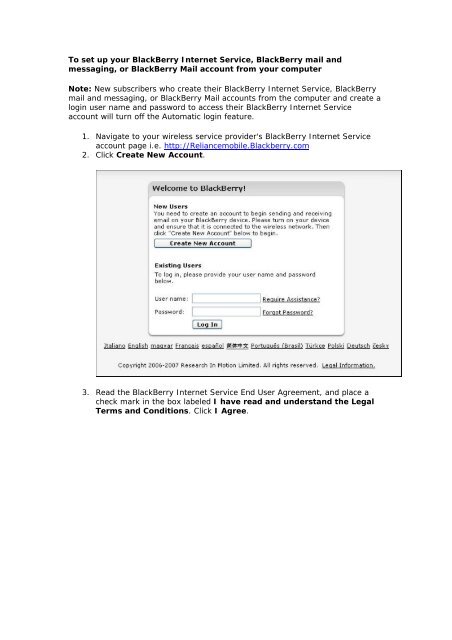
To set up your BlackBerry Internet Service, BlackBerry mail and ...
To set up your BlackBerry Internet Service, BlackBerry mail and ...
To set up your BlackBerry Internet Service, BlackBerry mail and ...

You also want an ePaper? Increase the reach of your titles
YUMPU automatically turns print PDFs into web optimized ePapers that Google loves.
<strong>To</strong> <strong>set</strong> <strong>up</strong> <strong>your</strong> <strong>BlackBerry</strong> <strong>Internet</strong> <strong>Service</strong>, <strong>BlackBerry</strong> <strong>mail</strong> <strong>and</strong>messaging, or <strong>BlackBerry</strong> Mail account from <strong>your</strong> computerNote: New subscribers who create their <strong>BlackBerry</strong> <strong>Internet</strong> <strong>Service</strong>, <strong>BlackBerry</strong><strong>mail</strong> <strong>and</strong> messaging, or <strong>BlackBerry</strong> Mail accounts from the computer <strong>and</strong> create alogin user name <strong>and</strong> password to access their <strong>BlackBerry</strong> <strong>Internet</strong> <strong>Service</strong>account will turn off the Automatic login feature.1. Navigate to <strong>your</strong> wireless service provider's <strong>BlackBerry</strong> <strong>Internet</strong> <strong>Service</strong>account page i.e. http://Reliancemobile.Blackberry.com2. Click Create New Account.3. Read the <strong>BlackBerry</strong> <strong>Internet</strong> <strong>Service</strong> End User Agreement, <strong>and</strong> place acheck mark in the box labeled I have read <strong>and</strong> underst<strong>and</strong> the LegalTerms <strong>and</strong> Conditions. Click I Agree.
4. Type the personal information number (PIN) <strong>and</strong> International MobileEquipment Identity (IMEI) or electronic serial number (ESN) for <strong>your</strong><strong>BlackBerry</strong> smartphone, <strong>and</strong> click Continue.Note: For instructions on how to locate the PIN, IMEI or ESN on <strong>your</strong><strong>BlackBerry</strong> smartphone, complete the following steps:1. On the <strong>BlackBerry</strong> device Home screen, click Options.2. Click Status.
5. Type a user name <strong>and</strong> password, <strong>and</strong> click Next.6. If the user name chosen has already been taken by another <strong>BlackBerry</strong><strong>Internet</strong> <strong>Service</strong> subscriber, you must choose a different user name.Suggestions for user names that have not yet been taken will be provided.Once you have chosen an alternative, click Next.
7. Your <strong>BlackBerry</strong> <strong>Internet</strong> <strong>Service</strong> account is now <strong>set</strong> <strong>up</strong>. You may beginadding e<strong>mail</strong> accounts or create a <strong>BlackBerry</strong> e<strong>mail</strong> address.
<strong>To</strong> <strong>set</strong> <strong>up</strong> <strong>your</strong> <strong>BlackBerry</strong> <strong>Internet</strong> <strong>Service</strong> (BIS) or<strong>BlackBerry</strong> <strong>mail</strong> <strong>and</strong> messaging account from <strong>your</strong><strong>BlackBerry</strong>Note: Before <strong>set</strong>ting <strong>up</strong> a BIS account please ensure that the <strong>BlackBerry</strong> <strong>Service</strong>s have beenactivated post which register the device on the wireless network by completing the followingsteps :Home Screen>Options>Advanced Options>Host Routing Table>click on MenuKey>Register Now1. Verify <strong>your</strong> <strong>BlackBerry</strong> Smartphone is connected to the wireless network, check for the icon1X on the right side of the device on the top2. Click E-<strong>mail</strong> Settings.3. Read the Legal Terms <strong>and</strong> Conditions carefully.Select Yes, indicating you have read <strong>and</strong> understood the Legal Terms <strong>and</strong> Conditions.Click I Agree, to be bound by the Legal Terms <strong>and</strong> Conditions to continue with the <strong>set</strong><strong>up</strong>process.Note: The <strong>BlackBerry</strong> <strong>Internet</strong> <strong>Service</strong>, <strong>BlackBerry</strong> <strong>mail</strong> <strong>and</strong> messaging, or <strong>BlackBerry</strong>Mail account is now configured.4. Complete the appropriate steps to begin sending <strong>and</strong> receiving e<strong>mail</strong> messages.Add an existing personal or work e<strong>mail</strong> address1. On the E<strong>mail</strong> Account Set<strong>up</strong> screen, enter <strong>your</strong> existing personal or work e<strong>mail</strong> address<strong>and</strong> password. Click Next.2. You will receive a successfully configured access to <strong>your</strong> e<strong>mail</strong> account message. ClickOK. The <strong>Service</strong>s - E<strong>mail</strong> Account screen appears.3. The <strong>Service</strong>s - E<strong>mail</strong> Account screen provides an overview of the following:Create a <strong>BlackBerry</strong> e<strong>mail</strong> address1. On the Create a <strong>BlackBerry</strong> E<strong>mail</strong> Address screen, enter a user name, password <strong>and</strong>confirm password, secret question <strong>and</strong> secret answer.2. Click OK.3. You will receive a successfully configured access to <strong>your</strong> e<strong>mail</strong> account message. ClickOK. The <strong>Service</strong>s - E<strong>mail</strong> Account screen appears.4. From the <strong>Service</strong> - E<strong>mail</strong> Account screen, you may edit or delete each e<strong>mail</strong> addresses,integrate another e<strong>mail</strong> account or go to the <strong>Service</strong> <strong>and</strong> Settings screen.<strong>To</strong> <strong>set</strong> <strong>up</strong> <strong>your</strong> <strong>BlackBerry</strong> <strong>Internet</strong> <strong>Service</strong>, <strong>BlackBerry</strong> <strong>mail</strong> <strong>and</strong> messaging, or<strong>BlackBerry</strong> Mail account from <strong>your</strong> computerNote: Subscribers who create their <strong>BlackBerry</strong> <strong>Internet</strong> <strong>Service</strong>, <strong>BlackBerry</strong> <strong>mail</strong> <strong>and</strong>messaging, or <strong>BlackBerry</strong> Mail accounts from the computer <strong>and</strong> create a login user name <strong>and</strong>password to access their<strong>BlackBerry</strong> <strong>Internet</strong> <strong>Service</strong> account will turn off the Automatic login feature.Perform a Register Now operation on the <strong>BlackBerry</strong>.1. Go to the website: http://reliancemobile.blackberry.com2. Click on Create New Account.3. Read the <strong>BlackBerry</strong> <strong>Internet</strong> <strong>Service</strong> End User Agreement, <strong>and</strong> place a check mark in thebox labeled I have read <strong>and</strong> underst<strong>and</strong> the Legal Terms <strong>and</strong> Conditions. Click I Agree.4. Type the personal information number (PIN) <strong>and</strong> International Mobile Equipment Identity(IMEI) or Electronic Serial Number (ESN) for <strong>your</strong> <strong>BlackBerry</strong> <strong>and</strong> click Continue.Note: PIN <strong>and</strong> ESN details are available under Home Screen>Options>Status5. Type a user name <strong>and</strong> password, <strong>and</strong> click Next.
6. If the user name chosen has already been taken by another <strong>BlackBerry</strong> <strong>Internet</strong> <strong>Service</strong>subscriber, you must choose a different user name. Suggestions for user names that have notyet been taken willbe provided. Once you have chosen an alternative, click Next .Your <strong>BlackBerry</strong> <strong>Internet</strong> <strong>Service</strong> account is now <strong>set</strong> <strong>up</strong>. You may begin adding e<strong>mail</strong>accounts or create a <strong>BlackBerry</strong> e<strong>mail</strong> address, under the headings Set <strong>up</strong> <strong>and</strong> Existing E<strong>mail</strong>Account <strong>and</strong> Create a <strong>BlackBerry</strong> Device E<strong>mail</strong> Address.Also you can re login <strong>and</strong> create a <strong>BlackBerry</strong> E<strong>mail</strong> Address <strong>and</strong> add existing e<strong>mail</strong> accountsby following below said steps.Add an existing personal or work e<strong>mail</strong> address1. Log in to <strong>your</strong> <strong>BlackBerry</strong> <strong>Internet</strong> <strong>Service</strong> account.2. Under the heading Valid E<strong>mail</strong> Account, click on the Click Here write <strong>up</strong>.3. Enter the existing e<strong>mail</strong> address <strong>and</strong> password, confirm the password <strong>and</strong> click Next.4. A confirmation will be displayed stating that the e<strong>mail</strong> address has been created.Create a <strong>BlackBerry</strong> e<strong>mail</strong> address1. Log in to <strong>your</strong> <strong>BlackBerry</strong> <strong>Internet</strong> <strong>Service</strong> account.2. Under the heading <strong>BlackBerry</strong> Device E<strong>mail</strong> Address, click the Create Address button.3. Enter the prefix of <strong>your</strong> desired <strong>BlackBerry</strong> e<strong>mail</strong> address, <strong>and</strong> click Next4. If the desired address is already in use by another subscriber, you will be prompted tochoose a different address. Suggestions for addresses which have not yet been taken areprovided. Select analternative address <strong>and</strong> click Next.5. A confirmation will be displayed stating that the e<strong>mail</strong> address has been created.