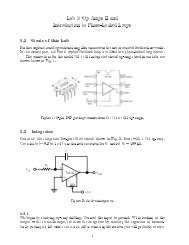
Lab 5: Analog to Digital Conversion 5.1 Introduction 5.2 DAC ...
Lab 5: Analog to Digital Conversion 5.1 Introduction 5.2 DAC ...
Lab 5: Analog to Digital Conversion 5.1 Introduction 5.2 DAC ...

Create successful ePaper yourself
Turn your PDF publications into a flip-book with our unique Google optimized e-Paper software.
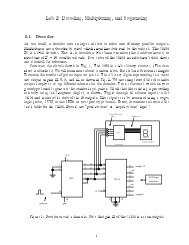
How many clock pulses occur from start <strong>to</strong> end of conversion?Carefully measure 6 input analog values including zero and full scale, and ll out a tablewith the following 4 headings:V in V <strong>DAC</strong> Expected <strong>Digital</strong> Out Measured <strong>Digital</strong> Out (LEDs)Is the response linear? Make a plot of digital output vs V in . Estimate the maximumnon-linearity over the full input range. Is it consistent withLSB=2 ? Is there an oset?5.4 Normal Speed CheckoutSetupcontinuous cycling operation by replacing the S but<strong>to</strong>n with a connection from CC.That is, directly connect pin 2 <strong>to</strong> pin 10. Replace the clock but<strong>to</strong>n input with one from theTTL output of the pro<strong>to</strong>type board function genera<strong>to</strong>r. Run the clock frequency somewherein the range 10 kHz <strong>to</strong> 100 kHz.5.4.1Connect a scope probe <strong>to</strong> the <strong>DAC</strong> output. Trigger the scope on CC. Now watch theconversion process on the scope. Vary the analog input and watch your ADC converge <strong>to</strong>the input value. Compare what you see <strong>to</strong> Fig. 9.52A of Horowitz and Hill.5.4.2There is a 2 MHz function genera<strong>to</strong>r in the lab. Replace your pro<strong>to</strong>type board clock with thisone. Watch the conversion process while increasing the clock frequency. You will probablynotice a lot of parasitic capacitive coupling at the highest frequencies. But beyond this noise,does the nal ADC value remain steady with increasing frequency? Is there a breakdownfrequency, where the conversion no longer works properly?5.4.3Now we will make a pretty display. As before, connect the clock <strong>to</strong> the pro<strong>to</strong>type boardclock. Use a frequency of few10 4 Hz. Using an external function genera<strong>to</strong>r, give your ADCan input consisting of a triangle wave of frequency 100 Hz and amplitude which spansthe range of your ADC. Set up the scope as before. You should now see the entire binarysearch pattern on the scope, as your ADC attempts <strong>to</strong> converge <strong>to</strong> all possible input values.By carefully tuning the two frequencies it is possible <strong>to</strong> get a (nearly) stationary pattern.Compare with Horowitz and Hill Fig. 9.52B.Use the oscilloscope camera <strong>to</strong> snap a picture of your trace <strong>to</strong> include in your report. (Note:for a normally bright scope trace, a shutter speed of 0.25 <strong>to</strong> 0.5 sec works OK. After pullingthe pho<strong>to</strong> from the camera, let it process for 90 sec before removing the chemical backing.)5.5 Completing the ADCAny real ADC will have a digital output which islatched and s<strong>to</strong>red at the end of theconversion cycle. This will be done using the 8-bit D-type positive edge-triggered register5