IMPRESSA E40 IMPRESSA E45 IMPRESSA E60 ... - Esperanza
IMPRESSA E40 IMPRESSA E45 IMPRESSA E60 ... - Esperanza
IMPRESSA E40 IMPRESSA E45 IMPRESSA E60 ... - Esperanza
- No tags were found...

Create successful ePaper yourself
Turn your PDF publications into a flip-book with our unique Google optimized e-Paper software.
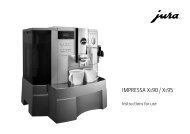
<strong>IMPRESSA</strong> <strong>E40</strong><strong>IMPRESSA</strong> <strong>E45</strong><strong>IMPRESSA</strong> <strong>E60</strong><strong>IMPRESSA</strong> E65Instructions for useArt. Nr. 629025/05
Jura Impressa <strong>E40</strong>/<strong>E45</strong>/<strong>E60</strong>/E65English................................................................................................................ 5 – 19= Note = Important = TipJura Elektroapparate AG, CH-4626 Niederbuchsiten,Internet http://www.juraworld.com
Fig. 1Fig. 2Fig. 3Fig. 4Fig. 5Fig. 6Fig. 7Fig. 8Fig. 921
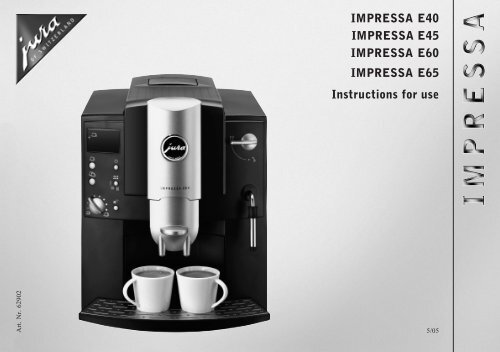
876543219 10111213141516Operating elementsJura Impressa <strong>E40</strong>/<strong>E45</strong>/<strong>E60</strong>/E651 Water quantity switch2 Powder coffee selection switch3 Coffee key for 2 cups4 Maintenance key (for functions such as: rinsing,cleaning, de-scaling, filter)5 Coffee key for 1 cup6 ON/OFF switch7 Display with symbols8 Water tank with carrying handle9 Height-adjustable coffee spout10 Pre-ground coffee filler funnel11 Cover for beam container12 Selector switch for hot water/steam13 Pivoting nozzle for hot water/steam14 Frothing aid15 Container for coffee grounds16 Drip tray cover17 Drip tray17
ContentsJura Impressa <strong>E40</strong>/<strong>E45</strong>/<strong>E60</strong>/E651. Description....................................................page 61.1 Symbols .................................................page 62. Safety instructions ..........................................page 72.1 Warnings................................................page 72.2 Safety precautions ....................................page 73. Preparation of the machine ...............................page 73.1 Checking the mains voltage.........................page 73.2 Checking the fuse .....................................page 73.3 Filling the water tank ................................page 73.4 Adding coffee beans ..................................page 73.5 Adjusting the grinder.................................page 83.6 Adjusting the water hardness.......................page 83.7 Adjustable automatic switch-off ...................page 94. First start of operation ....................................page 94.1 Fill system with water ...............................page 95. Rinsing the machine ........................................page 106. Adjusting the water quantity..............................page 107. Drawing off espresso/normal coffee .....................page 107.1 Drawing off espresso/strong coffee ................page 107.2 Drawing off espresso/extra coffee .................page 107.3 Drawing off powder coffee ..........................page 108. Drawing off steam ..........................................page 118.1 Drawing off steam with the Profi-Auto-Cappuccino/Caffè Latte (optional <strong>E45</strong>).................page 118.2 Return to stand-by .................................. page 119. Drawing off hot water......................................page 119.1 Drawing off hot water <strong>E45</strong> .........................page 1210. Switching machine off .....................................page 1211. Care and maintenance......................................page 1211.1 Fill water ...........................................page 1211.2 Empty grounds container .........................page 1211.3 No drip tray .........................................page 1211.4 Clean unit............................................page 1211.5 Unit scaled...........................................page 1211.6 Use of Claris filter cartridges ...................page 1211.7 Insert filter ..........................................page 1311.8 Replace filter........................................page 1311.9 General cleaning instrictions.....................page 1311.10 Empty system .......................................page 1412. Cleaning.......................................................page 1413. Decalcifying ..................................................page 1514. Disposal .......................................................page 1615. Tips for perfect coffee......................................page 1616. Messages......................................................page 1717. Problems ......................................................page 1818. Legal information ...........................................page 1919. Technical data ...............................................page 19E5
Important information for the userThank you for choosing this Jura product.Please study these instructions carefully before using your newmachine for the first time and keep them in a safe place for easyreference in future.Should you require further information or should particularproblems occur that are not dealt with in sufficient detail for you inthese operating instructions, please contact your local dealer or usfor the information you require.1.1 Symbols1 COFFEE READY2 COFFEE POWDER3 RINSE MACHINE4 STEAM / HOT WATER5 CLOSE TAP6 FILL WATER7 EMPTY GROUNDS CONTAINER /DRIP TRAY MISSING8 CLEAN MACHINE9 MACHINE SCALED10 REPLACE FILTER11 OPEN TAP1. DescriptionThis fully automatic espresso/coffee machine impresses because ofits compactness and can prepare 1 or 2 cups of excellent, professional-qualityespresso/coffee with guaranteed froth. The uniqueJura pre-brew system (Intelligent Pre Brew Aroma SystemI.P.B.A.S © ) ensures full use of the coffee aroma. The machineworks fully automatically at the push of a button. With the coffeearoma, you have the choice between normal, strong and extrastrong, depending on taste. The integrated grinder grinds the beansto the required fineness. A separate filler funnel makes it possibleto use additional, pre-ground sorts of coffee. The water quantitycan be set individually. Electronic filling controls for the watertank and container for coffee grounds simplify operation. Thanks tothe integrated rinsing, cleaning and de-scaling programmes, careand maintenance are also quick and easy.61 2 3 4 56 7 89 10 11
2. Safety instructions2.1 Warnings Children are unaware of the dangers that electrical machines canrepresent; for this reason, children should never be left unsupervisedwith electrical machines. This machine should only be used by people who have readthese instructions. Never use a faulty machine or one with a damaged power cable. Never immerse the machine in water.2.2 Safety precautions Never subject the machine to the effects of the weather (rain,snow, frost) and never operate it with wet hands. Place your machine on a solid level surface. Never leave it on asurface which is warm or hot (hob etc.). Choose a location whichis inaccessible for children or for pets. Always pull the plug out if you are away for a long time (holidaysetc.). Always pull the plug out first before cleaning. When pulling the plug out, never tug on the cord or on themachine itself. Never repair or open the machine yourself. All repairs should bedone by authorised service centres only using original Jura spareparts and accessories. The machine is connected to the mains power socket via anelectric cable. Make sure that nobody trips over it and pulls themachine down. Keep children and pets well away from themachine. Never put the machine or even parts of it into the dishwasher. Choose a place with a good circulation of air in order to preventthe machine from overheating. If you use de-scaling agents containing acid, remove any splashesand drips on sensitive surfaces, in particular natural stoneand timber surfaces and/or take corresponding precautionarymeasures.3. Preparation of the machine3.1 Checking the mains voltageThe machine is set to the correct voltage before leaving ourfactory. Ensure that your mains voltage corresponds to the detailsquoted on the rating plate attached to the bottom of the machine.3.2 Checking the fuseThe machine is designed for a current of 10 Amps. Check that thefuse used matches this.3.3 Filling the water tank Remove the water tank and rinse it out well with cold tap water. Then fill the water tank and put it back into the machine. Ensurethat the tank engages properly (Fig. 1).Only use fresh, cold water. Never fill with milk, mineralwater or other fluids. You can also add water withoutremoving the tank. Simply lift the lid up and pour in waterfrom above with a vessel. Close the lid again.3.4 Adding coffee beansTo ensure that your machine will work perfectly for a longtime and to avoid damage, please note that the grinding gearof your Jura coffee machine is not suitable for coffee beanswhich were treated, during or after roasting, with additives(e.g. sugar). Such coffee blends may damage the grindinggear. Any repair costs resulting from the use of such blendsare not covered by warranty.7E
Lift up the cover of the bean container (11). Clean out any dirt or foreign objects from the bean container. Pour coffee beans into the bean container and close the coveragain.3.5 Adjusting the grinderYou have the possibility of adjusting the grinder to the roast ofyour coffee. We recommend the following:for a light roast ➞ a finer adjustmentfor a dark roast ➞ a coarser adjustment Open the cover of the bean container. To adjust the grinding, turn the selector switch (Fig. 2) to therequired position. You have the following possibilities:the smaller the dots, the finer the grindingthe larger the dots, the coarser the grindingthe degree of grinding should only be adjusted with thegrinder in operation.3.6 Adjusting the water hardnessWater is heated inside the machine. This leads to calcium deposits(scale) during use. This is automatically displayed.Before you use your machine for the first time, you must adjust itto the hardness of the local water. For this purpose, please use theenclosed test sticks.1° German water hardness corresponds to 1.79° French waterhardness.The machine has 6 hardness settings to choose from. During thesetting, the water hardness selected is shown on the display.Level for Claris FilterSetting for the use of the Claris filtercartridge.Level 0 = water hardness is switched offThe automatic scale display isswitched off.Level 1German water hardness 1 – 7°French water hardness 1.79 – 12.53°Level 2German water hardness 8 – 15°French water hardness 14.32 – 26.85°Level 3German water hardness 16 – 23°French water hardness 28.64 – 41.14°Level 4German water hardness 24 – 30°French water hardness 42.96 – 53.7°The machine is adjusted to hardness level 3 in the factory. Youcan alter this setting by proceeding as follows:8
Pull the plug and the feed wire out of the wire box on the backof the machine. Put the plug in. Do not switch the machine on. Press the draw-off key for about 3 seconds. Now, the ,, , symbols light up. Now select the corresponding level with the draw-off keyand press the ON/OFF switch in order to save the setting.The symbols go off.The water hardness only need to be set before the first use ofthe machine or if a different water quality is used.If you do not carry out a change of level for longer than 30seconds, the display goes off. The last figure you have storedremains valid.3.7 Adjustable automatic switch-offYou can amend the automatic switch-off time of 1 1/2 hours set byJura. The machine offers you three levels for this:1st levelThe symbol lights up. The automatic switch-off is not activated.2nd levelThe , , symbols light up.The automatic switch-off is set to 1 1/2 hours.3rd levelThe , , , , , symbols light up.The automatic switch-off is set to 3 1/2 hours.In order to set or alter the automatic switch-off time, pleaseproceed as follows: Connect the plug with the mains. However, do not switch the machine on. Please the draw-off key for about 3 seconds. The , ,symbols light up. Select the required level with the draw-off key. Press the ON/OFF switch in order to save the required level.If you do not carry out a change of level for longer than 30seconds, the display goes off. The last figure you have storedremains valid.4. First start of operation4.1 Fill system with water Switch your machine on with the ON/OFF switch. The symbol lights up. Place an empty cup under the pivoting nozzle for hot water/steam (13). Switch the selector switch for hot water/steam (12) to theposition. The machine now lets off water and the symbolflashes at the same time. If the symbol lights up on the display, turn the selectorswitch for hot water/steam (12) back to the position.E9
5. Rinsing the machineWhen the symbol lights up, a rinsing process is demanded. Place an empty cup under the coffee-spout. Press the rinsing maintenance key (4). The rinsing process isautomatically ended.If the machine has been switched off and has already cooleddown, the rinsing function will be demanded when themachine is switched on.A rinsing is automatically started when the machine isswitched off.6. Adjusting the water quantityThe water quantity can be infinitely adjusted with rotary knob (1).The small key means little water for espresso, the large cup meansa lot of water for coffee.You can also change the water volume while coffee is beingdrawn off. Simply turn the rotary knob (1) to give more orless water.With draw-off key , the machine automatically doublesthe water quantity and distributes it to 2 cups.7. Drawing off espresso/normal coffee As soon as the symbol lights up, you can draw off coffee. Place 1 or 2 cups, as necessary, under coffee-spout (9) and pressthe required draw-off key. The pre-brew system (I.P.B.A.S. © )moistens the coffee powder, briefly interrupts the flow and thenstarts the actual brewing process.You can interrupt the draw-off prematurely by pressing anyof the coffee draw-off keys.In order to obtain outstanding froth, you can adapt thecoffee-spout (5) individually to the size of your cups (Fig. 3).7.1 Drawing off espresso/strong coffee Place 1 cup under the coffee-spout (9). Press the draw-off symbol until two dots light up to the leftof the symbol.This draw-off of espresso / strong coffee is only possible for1 cup.7.2 Drawing off espresso/extra coffee Place 1 cup under the coffee-spout (9) . Press the draw-off symbol until three dots light up to theleft of the symbol.This draw-off of espresso / extra coffee is only possible for1 cup.7.3 Drawing off powder coffee Press the selector switch. The and symbols lightup. Now put 1 or 2 level measuring spoons of pre-ground coffee intothe filler funnel for pre-ground coffee (10). Place 1 or 2 cups under the coffee-spout (9) and press therequired coffee key.Never use water-soluble instant coffee or quick coffee. Werecommend that you only use powder from freshly groundcoffee beans or pre-ground, vacuum-packed coffee. Neverput more than 2 portions of coffee in. The filler funnel isnot a storage container.10
If the draw-off key is pressed by mistake, the selectioncan be cancelled by pressing the draw-off key. Yourmachine rinses.After each cleaning operation the filler funnel for the 2ndcoffee type should be cleaned.8. Drawing off steamThe steam can be used for heating liquids and also for frothingmilk for cappuccino. Make sure that the frothing aid (14) is pushedupwards when heating liquids. When frothing liquids, push thefrothing aid downwards (Fig. 5). Place a cup under the pivoting nozzle for hot water/steam (13). Immerse the frothing aid (14) into the milk to be frothed or theliquid to be heated and turn the selector switch for hotwater/steam (12) to the position. Immediately after this, press the maintenance key (4). When you have reached the required quantity of steam, turn theselector switch for hot water/steam (12) back to the position . The , symbols light up. If you would like to draw off a coffee immediately after thesteam, please proceed as described in point 8.1.The max. draw-off time is about 8 minutes.A little water will come out first when frothing. It can be letoff before actually drawing off steam. The good result, e.g.when frothing milk, is not influenced in any way.At the start of a steam draw-off, there can be splashes. Thepivoting nozzle for hot water/steam gets hot. Please avoiddirect contact with the skin.8.1 Drawing off steam with theProfi-Auto-Cappuccino/Caffè Latte (optional <strong>E45</strong>)The Profi-Auto-Cappuccino/Caffè Latte is optionallyavailable. Contact your authorized dealer.8.2 Return to stand-by Place a vessel under the pivoting nozzle for hot water/steam(13). Press a draw-off key, the symbol lights up on the display. Turn the selector switch for hot water/steam (12) to the position. Draw water off until the flow of water is automatically interruptedand the symbol lights up. After this, turn the selector switch for hot water/steam (12) backto the position.After each steam draw-off, clean the pivoting nozzle with adamp cloth.9. Drawing off hot water Place a cup under the pivoting nozzle for hot water/steam (13)and turn the selector switch for hot water/steam (12) to thesymbol . The machine now produces hot water. To finish the process, turn the selector switch for hot water/steam (12) back to the position.At the start of a water draw-off, there can be splashes. Thepivoting nozzle for hot water/steam gets hot. Please avoiddirect contact with the skin.E11
9.1 Drawing off hot water <strong>E45</strong>Install the hot water nozzle to optain perfect water flow. Thisis included in your Welcome Pack.10. Switching machine offWhen the machine is switched off, the rinsing programme is automaticallystarted. Therefore, place an empty container under thecoffee-spout and press the ON/OFF switch.When the rinsing water has run into the cup, the machine switchesoff. Throw the rinsing water away.11. Care and maintenance11.1 Fill water When the display lights up, no drawing-off is possible. Fillwith water as described under point 3.3.11.2 Empty grounds containerThe grounds container collects the coffee grounds. When this displaylights up, no drawing-off is possible and the groundscontainer must be emptied. Push the coffee spout (9) up. Remove the drip tray. Be careful, as there is water in it. Empty and clean the drip tray and the grounds container (Fig. 6).Push the drip tray and then the grounds container back in(Fig. 7).The drip tray must also be emptied when you empty thegrounds.11.3 No drip trayIf theproperly.symbol flashes, the drip tray has not been insertedIf the drip tray has not been put into the machine, you canclean the interior of the machine. Wipe out any coffeepowder that might be in the machine with a damp cloth. Putthe drip tray back in again.11.4 Clean unitAfter 200 draw-offs or 160 rinses, the machine must be cleaned;the symbol flashing announces this. You can continue to drawoff coffee or hot water/steam. We recommend carrying out thecleaning (as described in point 12) within the next few days.Warning lamp does not go out until the complete cleaningprozess has been carried out.11.5 Unit scaledScale is caused by using the machine and depends upon the hardness levelof your water. The machine recognises the necessity of de-scaling. Heretoo, the flashing symbol tells you when de-scaling is necessary.You can continue to draw off coffee or hot water/steam. We recommendcarrying out the de-scaling (as described in point 13)within the next few days. Warning lamp does not go out untilthe complete decalcifying prozess has been carried out.11.6 Use of Claris filter cartridgesIf the Claris filter cartridges are used correctly, your machine nolonger needs de-scaling. You can obtain more information from thebrochure “Claris. Hard on scale. Gentle to your coffee machine.”(enclosed in the welcome pack).12
11.7 Insert filter Pull up the cartridge holder in the water tank. Pressing gently,put the filter cartridge into the water tank (Fig. 4). Close the cartridge holder until it engages audibly. Fill the water tank with cold fresh tap water and put it back intothe machine. Switch the machine off with the ON/OFF switch. Press the draw-off key for about 3 seconds. The degree ofhardness set appears on the display. Press the draw-off key until only the symbol is stillalight. Press the ON/OFF switch as a confirmation. The ,symbols light up. Place a sufficiently large vessel under the pivoting nozzle for hotwater/steam (13) and turn the selector switch for hot water/steam (12) to the position . Draw off water until the symbol lights up. Now turn the selector switch for hot water/steam (12) back to theposition . When the symbol lights up, press the maintenance key (4).Your machine rinses and is ready for drawing off coffee.The water can be slightly discoloured (not dangerous tohealth)11.8 Replace filterAfter 50 litres have been drawn off, the filter loses its effect.The symbol flashes to inform you.If you do not draw off often, you should replace the filtercartridge every 2 months, but no report appears on the display.There is a special disk on the cartridge holder so thatyou can set the replacement date. Switch your machine off with the ON/OFF switch. Press the maintenance key (4) for about 3 seconds. The ,symbols light up. Empty the water tank and lift up the cartridge mounting.Pressing gently, put the new filter cartridge into the water tank(Fig. 4) Place a sufficiently large vessel under the pivoting nozzle forhot/water steam (13) and turn the selector switch for hotwater/steam (12) to the position . The symbol flashes. Draw off water until the symbol lights up. Now turn the selector switch for hot water/steam (12) back to theposition . When the symbol lights up, press the maintenance key (4).Your machine rinses and is ready for drawing off coffee.11.9 General cleaning instructions Never use abrasive articles or corrosive chemicals to clean yourmachine. Wipe down the casing on the inside and out using a soft, dampcloth. Clean the pivoting nozzle for hot water/steam after each use. After heating milk, draw off a little hot water in order to cleanthe inside of the pivoting nozzle. You can take off the frothing aid for a thorough cleaning(Fig. 8). The water tank should be rinsed out and filled with clean waterevery day.If there is scale visible in the water tank, you can remove itwith a customary de-scaling agent. Remove the water tankfrom the machine for this purpose.13E
11.10 Empty systemThis procedure is necessary in order to protect the machinefrom damage by frost in transport. Switch the machine OFF with the ON/OFF switch. Place a vessel under the pivoting nozzle for hot water/steam(13). Turn the selector switch for hot water/steam (12) to position . Switch your machine back on again with the ON/OFFswitch. The symbol lights up. Press the maintenance key until the symbol flashes. . Draw steam off until the flow of steam is automatically interruptedand the symbol lights up on the display. After this, turn the selector switch for hot water/steam (12) backto the position.12. CleaningThe machine has an integrated cleaning programme.If the machine needs cleaning, the symbol flashes.You can continue to draw off coffee or hot water/steam andrun the cleaning programme later.Only use Jura cleaning tablets. They are available from yourJura dealer.You must not interrupt the cleaning programme once it hasstarted. Empty the drip tray and the grounds container and put both ofthem back in again. The (only when necessary), symbolsgo off and the symbol appears. Please a vessel under the coffee spout (9) and press the maintenancekey (4). The symbol goes off.The symbol lights up to inform you that the cleaning processhas been activated. If the symbol lights up, empty the drip tray (if necessary) andput it back in again. The symbol goes off and the , ,symbols light up. Now put a Jura cleaning tablet into the filler funnel for powdercoffee (10) (Fig. 9). Press the maintenance key (4). The , symbols go off.The cleaning process is continued. This is displayed by thesymbol lighting up. If the symbol lights up again, empty the drip tray (if necessary),wait for about 10 seconds before putting it back in again.The symbol goes off and the , symbols light up. Place a vessel under the coffee spout (9) again and press themaintenance key (4). The cleaning process is continued. This is displayed by thesymbol lighting up. As soon as it has been completed, thesymbol lights up. Empty the drip tray and the grounds container and put both ofthem back in. The symbol lights up. Switch your machine on with the ON/OFF key. Press the maintenance key (4) for about 3 seconds. Thewhen necessary), , symbols light up. Fill the water tank.(onlyAfter each cleaning operation the filler funnel for the 2ndcoffee type should be cleaned.14
13. DescalcifyingThe machine has an integrated de-scaling programme. If you use aClaris filter cartridge, your machine does not need de-scaling. Onlyuse Jura cleaning tablets. They are available from your Jura dealer.If the machine needs de-scaling, the symbol flashes.You can continue to draw off coffee and hot water/steam andthen run the de-scaling programme later.Only run the de-scaling programme when the machine hasbeen switched off for at least 2 hours and has cooled downwell. The de-scaling programme is started with the machineswitched off. Once it has started, the de-scaling programmemust not be interrupted. Switch your machine off with the ON/OFF switch and leaveit to cool down for 2 hours. Remove the water tank and empty it. Press the maintenance key (4) for about 3 seconds. The ,symbols light up. Empty the drip tray and the grounds container and put both ofthem back in again. The symbol goes off and the ,symbols light up. Completely dissolve the contents of one blister (2 tablets) in 0.5litres of water in a vessel and pour the mixture into the watertank. Put the tank back in again. The symbol appear. Turn the selector switch for hot water/steam (12) to the position. The symbol go off and the , symbols light up. Place a sufficiently large vessel under the pivoting nozzle for hotwater/steam (13) and press the maintenance key (4).The lighting of the symbol and the flashing of the symbolshow you that the de-scaling process has been activated. If the symbol lights up, empty the drip tray (if necessary) andput it back in again. The symbol lights up. Turn the selector switch for hot water/steam (12) back to theposition .The de-scaling process is continued de-scaling solution is guidedinto the drip tray in the interior of the machine. The , , symbols light up.Rinse the water tank out well and fill it with cold freshtap water. Then put it back into the machine again. Place asufficiently large vessel under the pivoting nozzle. Empty the drip tray and put it back in again. The , symbolslight up. Turn the selector switch for hot water/steam (12) to position . Place a sufficiently large vessel under the pivoting nozzle for hotwater/steam (13) and press the maintenance key (4).The lighting of the symbol and flashing of the symbol showyou that the de-scaling process has been activated. If the , , symbols light up, empty the drip tray (if necessary)and put it back in again. Turn the selector switch for hot water/steam (12) back to theposition .The de-scaling process is continued and the water is guided intothe drip tray in the interior of the machine. If the symbol lights up, empty the drip tray and put it back inagain. The symbol appear. After this, press the maintenance key (4). Your machine rinsesand is now ready for the next draw-off of coffee.E15
14. DisposalFor correct disposal, you should return your coffee machine to yourdealer, your Jura service centre or the firm of Jura.15. Tips for perfect coffeeHeight-adjustable coffee-spoutYou can adjust the coffee-spout to the size of your cupsGrindingSee point 3.5Pre-warming cupsYou can pre-warm the cups with hot water or steam. The smallerthe amount of coffee, the more important the pre-warming.Sugar and creamHeat is lost by stirring the contents. Adding milk or cream from thefridge considerably lowers the temperature of the coffee.16
16. MessagesDisplay Cause Action– System empty – Fill system (see point 4.1)– System too hot after drawing off steam – Reset to coffee stand-by– Wrong position of selector switch – Put selector switch into correct position– General troubles 1. – Switch off– disconnect from mains– connect to mains– switch machine on– Machine needs rinsing Rinsing the machine2. Have machine examined by Jura servicecentreE– The tank is empty – Fill with water– Floater defective – Rinse out or de-scale water tank– Grounds container full – Empty grounds container– Tray replaced too early after emptying – Only replace the tray after about 10 sec.17
Display Cause Actionflash– Drip tray not inserted properly or missing – Insert correctlyflash– Cleaning necessary – Carry out cleaning processflash– De-scaling necessary – Carry out de-scaling processflash– Replacing of filter – Run program17. ProblemsProblem Cause ActionCoffee flow is stopped – bean container empty – Fill with beansafter pre-brewing– not enough coffee powder – Correct amount of powderGrinder is very noisy – foreign body in grinder – Drawing off coffee with pre-ground powder– is still possible– Have machine examined by Jura service centre18
Problem Cause ActionNot enough froth when – frothing aid blocked – clean frothing aidfrothing milk– frothing aid in wrong position – draw off steam (see point 8)If the above mentioned messages and/or problems still exist, please contact your dealer or get in touch directly with Jura ElektroapparateAG.18. Legal informationThese operating instructions contain the information necessary forthe correct use, operation and maintenance of the machine.Understanding of and complying with the directions contained inthese operating instructions are essential for use of the machinewithout risk and for safety in operation and maintenance.The operation instructions cannot cover every imaginable exampleof use. The machine has been designed for use in private households.We would further like to point out that the contents of these operatinginstructions in no way constitute a part or, nor do they alterany previous or existing contract, assurance or legal relationship.All obligations on the part of Jura Elektroapparate AG result fromthe purchase contract in question, which also contains full detailsof the only warranty regulations applying to this machine. Thesecontractual warranty terms are neither extended nor limited by theinformation given in these operating instructions.The operating instructions contain information protected by copyright.Photocopying or translating into another language shall notbe admissible without prior written approval by Jura ElektroapparateAG.19. Technical dataVoltage:Output:Fuse:Safety check:230V AC1350 W10 AEnergy consumption standby: approx. 4WhEnergy consumption ready tomake coffee:approx. 17WhPump pressure:max. 15 barWater tank:1,9 litresCapacity, bean container: 200 gr.Capacity, grounds container: max. 16 port.Cable length:1,1 mWeight:8,3 kgDimensions (B x H x D): 28 x 34,5 x 41,5 cmThe machine complies with the following EU directives:73/23/EWG dated 19/02/1973 “Low Voltage Directive” includingModification Directive 93/336/EWG89/336/EWG dated 03/05/1989 “EMC Directive” includingModification Directive 92/31/EWG19E