Objective 1: Understand Outlook Web Access (OWA ... - SUNY Delhi
Objective 1: Understand Outlook Web Access (OWA ... - SUNY Delhi
Objective 1: Understand Outlook Web Access (OWA ... - SUNY Delhi
You also want an ePaper? Increase the reach of your titles
YUMPU automatically turns print PDFs into web optimized ePapers that Google loves.
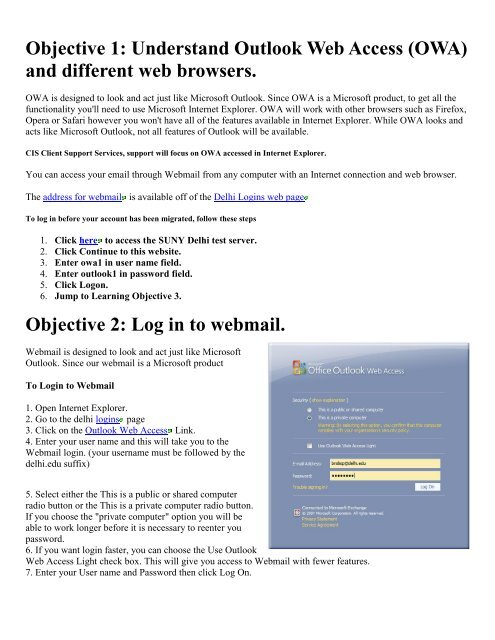
<strong>Objective</strong> 1: <strong>Understand</strong> <strong>Outlook</strong> <strong>Web</strong> <strong>Access</strong> (<strong>OWA</strong>)and different web browsers.<strong>OWA</strong> is designed to look and act just like Microsoft <strong>Outlook</strong>. Since <strong>OWA</strong> is a Microsoft product, to get all thefunctionality you'll need to use Microsoft Internet Explorer. <strong>OWA</strong> will work with other browsers such as Firefox,Opera or Safari however you won't have all of the features available in Internet Explorer. While <strong>OWA</strong> looks andacts like Microsoft <strong>Outlook</strong>, not all features of <strong>Outlook</strong> will be available.CIS Client Support Services, support will focus on <strong>OWA</strong> accessed in Internet Explorer.You can access your email through <strong>Web</strong>mail from any computer with an Internet connection and web browser.The address for webmail is available off of the <strong>Delhi</strong> Logins web pageTo log in before your account has been migrated, follow these steps1. Click here to access the <strong>SUNY</strong> <strong>Delhi</strong> test server.2. Click Continue to this website.3. Enter owa1 in user name field.4. Enter outlook1 in password field.5. Click Logon.6. Jump to Learning <strong>Objective</strong> 3.<strong>Objective</strong> 2: Log in to webmail.<strong>Web</strong>mail is designed to look and act just like Microsoft<strong>Outlook</strong>. Since our webmail is a Microsoft productTo Login to <strong>Web</strong>mail1. Open Internet Explorer.2. Go to the delhi logins page3. Click on the <strong>Outlook</strong> <strong>Web</strong> <strong>Access</strong> Link.4. Enter your user name and this will take you to the<strong>Web</strong>mail login. (your username must be followed by thedelhi.edu suffix)5. Select either the This is a public or shared computerradio button or the This is a private computer radio button.If you choose the "private computer" option you will beable to work longer before it is necessary to reenter youpassword.6. If you want login faster, you can choose the Use <strong>Outlook</strong><strong>Web</strong> <strong>Access</strong> Light check box. This will give you access to <strong>Web</strong>mail with fewer features.7. Enter your User name and Password then click Log On.
<strong>OWA</strong> log in\Locking information:5 failed login attempts will result in a 15 minute lockoutEach subsequent failure will result in its own 15 minute lockoutAlthough CIS cannot "unlock" the account to let the user in immediately, CIS can reset the password. If the useropts for the password reset rather than waiting, please note that the user cannot reuse passwords.<strong>Objective</strong> 3: Send and read messages.To Move the Reading Pane1. From the Toolbar at the top, click the small black arrow next to the Show/Hide Reading Pane button.2. Then click Off, Bottom, or Right.To Read E-mail Messages in a New Window1. Double click on the message you wish to read.NOTE: If you don't see all of your messages listed, be sure to click the Next Page button at the bottom of themessage list to see more messages.To Send a Message1. From the toolbar click New.2. Click the To link to select names from the address book.
3. Select Default Global Address List on the left or click Contacts, then enter a name in thesearch box and press Enter.4. Double click the names to add them to the To list. Then click OK.5. Enter a subject and message text, and then click Send.To Forward or Reply to an E-mail1. Double Click on a message to read the full message in a separate window.2. After you have read your message, click the Forward or Reply button.3. If you choose Reply the To... box will be automatically filled in. If you want to Forward the message to someone,specify a mail recipient in the TO... box.4. You may add/edit text in the body section of the message window.5. Click Send when ready.NOTE: If you want your reply sent to everyone who received the original message, use the Reply to All buttons.<strong>Objective</strong> 4: Add an auto signature to all messages.AutoSignatureAn AutoSignature allows you to create a signature that will automatically appear in your e-mailmessages. Examples may include your name, title, e-mail address, and links to your webpage.To Add an AutoSignature
1. Click Options in the top right.2. Make sure Messaging is selected on the left navigation area.3. Then in the E-mail Signature section enter you information.4. Check the Automatically include my signature on outgoing messages check box.5. Then click Save in the upper left.6. Click Mail in the navigation pane to leave the Options screen.<strong>Objective</strong> 5: Attach files to messages and retrieveattached files.To Attach Files to Email Messages1. Click the New button to create a new message.2. Click the Insert File (Paper clip) button on the toolbar.3. Click the Browse button; find the location of the file you wish to attach.4. Choose the file from the list displayed. Click Open.5. Click the Attach button to attach the file to the current message.
To Open an Attachment from the Preview Pane or New Window1. From the preview pane or new window, double click the Icon for the attachment located nearthe top of the message under the To: and Cc: lines.<strong>Objective</strong> 6: Manage Messages.Saving a DraftSuppose you begin a message but do not have time to complete it. Instead of canceling themessage and losing everything you have typed, you can save a draft of the message and sendit at a later time.To Save a Draft1. Create an e-mail message as you normally would. In the message window, click the Savebutton.2. <strong>OWA</strong> will save this message in the Drafts folder located in your Folder list on the left side ofthe <strong>OWA</strong> window.3. You can then close the message.4. To edit or send the message that is now stored in the drafts folder, you can click Drafts, andthen double click on the message to open it. Make your changes, if necessary, and then Sendthe message.Deleting Messages from <strong>OWA</strong>Messages will eventually need to be deleted from the Server. Otherwise, you can accumulateseveral hundred messages. You should develop a routine so that you regularly deleteunnecessary messages.To Delete Messages1. Click the message(s) to be deleted2. Click the Delete button (black X) on the toolbar, and the message moves to the Deleted Items folder.3. When ready, click the Deleted Items folder in the Navigation Pane. Then Delete themessage(s) from that folder. This will permanently delete the messages.
To Set Delete Options1. Click Options in the top right.2. Make sure Deleted Items is selected on the left navigation area.3. Check the Empty Deleted Items folder on logoff check box.4. Then click Save in the upper left.5. Click Mail in the navigation pane to leave the Options screen.Organizing Your E-mail MessagesTo Create a Folder1. Right click on your Inbox in the Navigation Pane.2. Click Create New Folder from the menu.3. Enter a name for the folder and then press Enter.4. To created a sub-folder right click on the parent folder and repeat steps 2 and 3.To Move a Folder1. Right click the desired folder. Click Move Folder from the shortcut menu.2. Highlight new destination folder.3. Click Move.4. You should also be able to drag a folder and drop it into the new desired location.<strong>Objective</strong> 7: Use Address Books to send messages.The Global Address ListThe Global Address List provides current information on all college personnel. It can be usedto find e-mail addresses for college employees and students. You can not add information to this list but youcan use it to send messages.The Personal Address Book aka ContactsContacts contains any names/addresses that you have added yourself---friends, family, business contactsand colleagues at other institutions.To Add Entries to your Personal Address Book or Contacts1. Click Contacts from the Navigation Pane.
2. Click the New Contact button in the upper left.3. Enter contact information then click Save & Close.To View All Address Books1. From the upper right click the Address Book button.<strong>Objective</strong> 8: Open the Calendar.To Open the Calendar1. Click Calendar on the Navigation pane.<strong>Objective</strong> 9: Add appointments and recurringappointments to the calendar.To Add an Appointment1. Double click the date on the calendar that you wantto add an appointment to.
2. In the Subject box enter the title/name of the appointment.3. In the Location box enter the location for the appointment.4. If the appointment is something that has a specific time associated with it then clear the checkfrom the All day event checkbox.5. Then from the drop down lists select a start and end time for the appointment.6. If you would like to receive a pop-up reminder about the appointment from the Event Ribbonbar, click the Reminder check box then select the notification time from the drop down list(i.e. do you want to be reminded 15 minutes, 18 hours, or 30 minutes before the appointment).7. Click the Show time as drop down list and select the appropriate description for theappointment (Busy, Free, Out of the Office, or Tentative). This is usually for when somebodyelse views your availability for inviting you to a meeting. If they see that you are 'Busy' during aparticular time they know not to invite you to a meeting. If they see that you are 'Tentative' thenthey know that you might be able to accept an invitation to a meeting at that time.8. In the large white box you can enter details or a description of the appointment.9. In the bottom right you can also make an appointment private by clicking the Private checkbox. This means that no matter who you are sharing your calendar with they will be unable toview your appointment except to see that you have blocked time out.10. In the upper left click Save and Close.To Add a Recurring Appointmenti.e. (Classes that you teach, office hours, standing meetings, birthdays, etc)1. Repeat steps 1-9 from above.2. Click the Recurrence button (circular arrows next to attachment) from the tool bar.3. In the Recurrence pattern section, select the radio button for whether this appointment will occur Daily, Weekly,Monthly or Yearly. (i.e. select Yearly for birthdays, Weekly for classes, etc)4. In the right side of the Recurrence pattern section select the specifics of when the appointment should recur. (i.e.If it is a class that meets every Monday and Wednesday, select the Weekly radio button then check the boxes nextto Monday and Wednesday.)
5. In the Range of recurrence section, select the day the appointment should start then select how long it shouldkeep going for. (i.e. If the appointment is a class the End by date should be the last day of classes. If theappointment is a birthday perhaps there should be No end date.)6. Click OK.7. Then click Save and Close.To Edit an Appointment1. Double click the appointment on the calendar.2. Make necessary changes.3. Click Save and Close.<strong>Objective</strong> 11: Invite people to meetings/appointments.To Invite People to Meetings1. Double click the date on the calendar that you want to hold the meeting.2. Click Invite Attendees on the on the Tool bar.
3. Then click Required link to open the Address Book.4. Search and then double click the names for people you want to invite to the meeting fromthe Global Address List.5. Then click OK.6. Use the Start and End drop down lists to select meeting times. Times that are poor choiceswill be shown in blue.7. Click the Appointment tab and then finish any details for the meeting.8. Click Send in the upper left.Invitations will arrive in the inbox of your invitees. They will then have the option to Accept or Decline.If you edit a meeting through your calendar, a new invitation with the changes h5. will automatically be sent out. This will giveinvitees the option to Accept or Decline again.Remember invitations that are accepted are automatically added to your Calendar.<strong>Objective</strong> 12: To Use the Tasks ToolThe Tasks Tool in <strong>Web</strong>mail allows you to create a to do type list that includes dates. The Task list can be viewedthrough the calendar screen or from the Task area. The difference between an appointment and a task is that thetask is more like a project which may last for days, weeks, months, and may have a specific due date forcompletion. An appointment is more like a meeting, or a one-day event.To View Tasks1. Click the Tasks icon form theNavigation Pane.To Create a Task1. Click New button in the upper left.2. Enter the information (Subject, Due date, Startdate, Status, etc) you desire for this task.3. Click on the Save and Close button to set the taskinto the task list.To Delete a Task1. Select the Task to be deleted2. Select Delete on the toolbar.


