Samsung UA46D6003 Product Manual - Comparison.com.au
Samsung UA46D6003 Product Manual - Comparison.com.au
Samsung UA46D6003 Product Manual - Comparison.com.au
- No tags were found...

You also want an ePaper? Increase the reach of your titles
YUMPU automatically turns print PDFs into web optimized ePapers that Google loves.
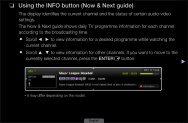
ContentsChannel Menu• Using the INFO button (Now & Next guide) 1• Using the Channel Menu 2• Using the Channel 10• Using Favourite Channels 14• Memorising Channels 17• Other Features 22Basic Features• Changing the Preset Picture Mode 24• Adjusting Picture Settings 25• Changing the Picture Size 26• Changing the Picture Options 30• Setting up the TV with Your PC 39• Changing the Preset Sound Mode 42• Adjusting Sound Settings 43• Selecting the Sound Mode 54Preference Features• Setting the Network 55• Setting the Time 86• Locking Programme 92• Economical Solutions 94• Other Features 96• Picture In Picture (PIP) 101• Support Menu 104Advanced Features• Using the 3D function 110• Getting Started with Smart Hub 123• Setting up Smart Hub 136• Using the Smart Hub service 140• Troubleshooting for SMART HUB 151• AllShare 154• Anynet+ 160• Using the Smart Hub 170• Connecting a USB Device 171• Connecting to the PC through network 172• Recorded TV for LED 6400 series and above 180• Videos 190• Music 197• Photos 201• Media Contents - Additional Function 202Other Information• Troubleshooting 208• Analogue Channel Teletext Feature 221• Licence 226
◀●●●●●●●●Channel: Select the desired channel.Repeat: Select Once, <strong>Manual</strong>, Sat~Sun, Mon~Fri or Everyday to set at yourconvenience. If you select <strong>Manual</strong>, you can set the day you want.NNThe c mark indicates the date is selected.Date: You can set the desired date.NNIt is available when you select Once in Repeat.Start Time: You can set the start time you want.▶English
NNOnly memorised channels can be reserved.NNOn the Information screen, you can change or cancel a reserved information.Select a reserved programme, and then press the ENTERE button to openthe Detailed Information screen.◀●●●●●●Cancel Schedules: Cancel a show you have reserved to watch.Edit: Change a show you have reserved to watch.Return: Return to the previous screen.▶English
◀Using the Timer Recording (digital channels only) for LED 6400 series and aboveAllows you to make a reservation to record a programme scheduled for broadcast.Set the current time first to use this function.OOThe button also controls recording.1. Press the ENTERE button to select Schedule. The Schedule Manager screenwill be displayed.2. Press the ENTERE button to add manual booking. A pop up screen will appear.3. Press the l or r button to select the Timer Recording.NNWe re<strong>com</strong>mend using a USB HDD with at least 5 400 rpm, but a USB HDD ofRAID type is not supported.NNA USB storage device cannot record until it <strong>com</strong>pletes the DevicePerformance Test.4. Press the ENTERE button to add manual booking. A pop up screen will appear.NNIf you want to play a recorded programme, refer to “Recorded TV” in thee-<strong>Manual</strong>.▶English
◀■■Channel ListYou can view all the channel searched.NNWhen you press the CH LISTbutton on the remote control,Channel List screen will bedisplayed at once.1 TV #12 TV #23 TV #44 TV #45 TV #5No Information6 TV #67 TV #78 TV #89 TV #910 TV #1011 TV #1112 TV #12NNIf you want to view favouritechannels you added, press the●●CH LIST button and use the l or r(Ch. Mode) button to move Favourites 1-5.Channel ListAll Channel{ programme View L Ch.Mode E Watch k PageThe displayed image may differ depending on the model.▶English
NNUsing the operation buttons with the Channel List.●●k (Page): Move to next or previous page.●●E (Watch / Information): Watches the channel you select. / Displays detailsof the selected programme.● ●{ Yellow (Programme View / Channel View): Displays the programme whendigital channel is selected. Returns to the channel view.◀●●l r (Ch. Mode / Channel): Move to the type of channels you want todisplay on the Channel List screen. (All, TV, Radio, Data/Other, Analogue,Favourites 1~5) The option may differ depending on country.▶English
❑❑Using the Channel■■ChannelOOSMART HUB → Channel → ENTERE◀Delete added channels or set favourites channels and use the programme guidefor digital broadcasts. Select a channel in the All, Analogue, TV, Radio andFavourites 1-5 screen. Change the antenna, or channel settings using the menusin the top right corner of the screen.● ● Sort: Sorting by Channel Number or Channel Name.● ● Edit Mode: You can change the channel settings or set favouriteschannels.Select All: Select all the channels or deselect all the selected channels in theChannel menu.▶English
Using the TOOLS button with the Channel◀●●●●Up<strong>com</strong>ing Programme (digital channels only): View details on the programmebeing aired on a selected digital channel.Edit Favourites: Set channels you watch frequently as favourites.1. Select the Edit Favourites, then press the ENTERE button.2. Press the ENTERE button to select Favourites 1-5, then press the OKbutton.NNOne favourite channel can be added in several of favourite channels amongFavourites 1-5.▶English
●●Lock / Unlock: Lock a channel so that the channel cannot be selected andviewed.NNNOTE●●●●This function is available only when the Channel Lock is set to On.The PIN input screen appears. Enter your 4-digit PIN, the def<strong>au</strong>lt ofwhich is “0-0-0-0”. Change the PIN using the Change PIN option.◀●●●●Edit Channel Name (analogue channels only): Assign your own channel name.NNThis function may not be supported depending on the region.Edit Channel Number: Edit the number by pressing the number buttonsdesired.NNThis function may not be supported depending on the region.▶English
●●Delete: Delete a channel to display the channels you want.NNA gray-coloured channel indicates the channel has been deleted.Channel Status Display IconsIconacOperationsAn analogue channel.A channel selected.◀F A channel set as a Favourite 1-5.\ A locked channel.▶English
❑❑Using Favourite Channels■■FavouritesOOSMART HUB → Favourites → ENTERE◀Shows all favourite channels.View all of your favourite channels. If you want to change the favourite groupamong Favourites 1-5, move the cursor to group name. And then press theENTERE button to change the group you want.NNThe “F” symbol will be displayed and the channel will be set as a favourite.▶English
Change the view mode, antenna, sorting type or edit item using the menus in thetop right corner of the screen.View Mode: You can change a view mode between Text mode or Thumbnailmode.Sorting: Sorts by title or category (channel, input source, etc.).Edit Mode: Delete item assigned to Favourites.◀▶English
◀How to assign a channel to favourite (in Channel)1. On the Channel screen, Select Edit Mode. The Edit Mode screen willappear.2. Press the l / r / u / d button to select a channel you want to add and pressthe ENTERE button.NNIf you want to select all channels, press the l / r / u / d buttons to selectSelect All.NNThe c mark appears to the left of the selected files.3. When done, press the d button to select Edit Favourites.4. Add a channel in the favourite groups you want among 1, 2, 3, 4 and 5.NNOne or more groups can be selected.5. After you have changed the settings, the channel list for each group can beviewed in favourite.▶English
❑❑Memorising ChannelsOOMENUm → Channel → ENTERE■■Country for Australia, Singapore, New Zealand / AreaNNThe PIN input screen appears. Enter your 4 digit PIN number.for Australia, Singapore, New Zealand◀NNSelect your country so that the TV can correctly <strong>au</strong>to-tune the broadcastingchannels.▶English
■■Auto TuningScans for a channel <strong>au</strong>tomatically and stores in the TV.NNAutomatically allocated programme numbers may not correspond to actual ordesired programme numbers. If a channel is locked using the Channel Lockfunction, the PIN input window appears.––Digital & Analogue / Digital / Analogue: Select the channel source tomemorise.◀▶English
■■<strong>Manual</strong> TuningScans for a channel manually and stores in the TV.NNIf a channel is locked using the Channel Lock function, the PIN input windowappears.NNThis function may not be supported depending on the region.◀●●Digital Channel Tuning: Scans for a digital channel.1. Press the l / r button to select New.2. Set the Channel, Frequency and Bandwidth.NNThe Bandwidth function is supported in New zealand and Singaporeonly.3. Press the d button to select Search. When scanning has finished achannel is updated in the channel list.N N If you want to rescan a values of digital channel, select a digital channel, andthen select Rescan. You can edit a values of selected digital channel.▶English
◀●●Analogue Channel Tuning: Scans for a analogue channel.1. Press the u / d / l / r button to select New.2. Set the Programme, Colour System, Sound System, Channel andSearch.3. Press the d button to select Store. When scanning has finished, a channelis updated in the channel list.N N If you want to edit a values of analogue channel, select an analoguechannel, and then select Edit. You can edit a values of selected analoguechannel.▶English
NNChannel mode●●●●P (programme mode): When tuning is <strong>com</strong>plete, the broadcasting stationsin your area have been assigned to position numbers from P0 to P99. Youcan select a channel by entering the position number in this mode.C (aerial channel mode) / S (cable channel mode): These two modes allowyou to select a channel by entering the assigned number for each aerialbroadcasting station or cable channel.◀▶English
❑❑Other FeaturesOOMENUm → Channel → ENTERE■■Transfer Channel ListNNThis function may not be supported depending on the region.The PIN input screen appears. Enter your 4 digit PIN number. Imports or exportsthe channel map. You should connect a USB storage to use this function.◀●●●●Import from USB: Import channel list from USB.Export to USB: Export channel list to USB. this function is available when USBis connected.▶■■Edit Channel Number (Disable / Enable) (depending on the country)Edit the number by pressing the number buttons desired.English
■■Fine Tune(analogue channels only)If the reception is clear, you do not have to fine tune the channel, as this is done<strong>au</strong>tomatically during the search and store operation. If the signal is weak ordistorted, fine tune the channel manually. Scroll to the left or right until the image isclear.NNSettings are applied to the channel you’re currently watching.◀NNFine tuned channels that have been saved are marked with an asterisk “*” onthe right-hand side of the channel number in the channel banner.NNTo reset the fine-tuning, select Reset.▶English
Basic Features❑❑Changing the Preset Picture ModeOOMENUm → Picture → Picture Mode → ENTERE◀■■Picture Mode tSelect your preferred picture type.NNThe quick menu l<strong>au</strong>nched by the TOOLS button may not provide this option insome models. for LED 6003 SeriesNNWhen connecting a PC, you can only make changes to the Standard andEntertain.●●●●●●●●●●Dynamic: Suitable for a bright room.Standard: Suitable for a normal environment.Natural: Suitable for reducing eye strain.Movie: Suitable for watching movies in a dark room.Entertain: Suitable for watching movies and games.NNIt is only available when connecting a PC.▶English
❑❑Adjusting Picture SettingsOOMENUm → Picture → ENTERE◀■■Backlight / Contrast / Brightness / Sharpness / Colour / Tint (G/R)Your television has several setting options for picture quality control.NNIn analogue TV, AV modes of the PAL system, the Tint (G/R) function is notavailable.NNWhen connecting a PC, you can only make changes to Backlight, Contrast,Brightness and Sharpness.NNSettings can be adjusted and stored for each external device connected to theTV.NNLowering picture brightness reduces power consumption.▶English
❑❑Changing the Picture SizeOOMENUm → Picture → Screen Adjustment → ENTERE◀■■Screen Adjustment●●Picture Size: Your cable box/satellite receiver may have its own set of screensizes as well. However, we highly re<strong>com</strong>mend you use 16:9 mode most of thetime.––Auto Wide: Automatically adjusts the picture size to the 16:9 aspect ratio.––16:9: Adjusts the picture size to 16:9 for DVDs or wide broadcasting.––Wide Zoom: Magnifies the picture size more than 4:3.NNAdjusts the Position by using u, d buttons.––Zoom: Magnifies the 16:9 wide pictures vertically to fit the screen size.NNAdjusts the Zoom or Position by using u, d button.▶English
◀––4:3: The def<strong>au</strong>lt setting for a movie or normal broadcasting.NNDo not watch in 4:3 format for a long time. Traces of bordersdisplayed on the left, right and centre of the screen may c<strong>au</strong>se imageretention(screen burn) which are not covered by the warranty.––Screen Fit: Displays the full image without any cut-off when HDMI (720p /1080i / 1080p) or Component (1080i / 1080p) signals are inputted.––Smart View 1: Reduces the 16:9 picture by 50%.––Smart View 2: Reduces the 16:9 picture by 25%.NNSmart View 1 is enabled only in HDMI mode.NNSmart View 2 is enabled only in HDMI or DTV mode.N N The picture size can vary depending on the input resolution whencontent is played using Videos under Media contents or Smart Hub.▶English
NNNOTE●●Depending on the input source, the picture size options may vary.●●The available items may differ depending on the selected mode.●●In PC mode, only 16:9 and 4:3 modes can be adjusted.●●Settings can be adjusted and stored for each external device connected to aninput on the TV.◀●●If you use the Screen Fit function with HDMI 720p input, 1 line will be cut atthe top, bottom, left and right as in the overscan function.▶Input SourcePicture SizeATV, AV, Component (480i, 480p) Auto Wide, 16:9, Zoom, 4:3HDMI (720p, 1080i, 1080p) Smart View 1DTV(1080i), HDMI (720p, 1080i, 1080p) Smart View 2DTV(1080i), Component (1080i, 1080p),HDMI (720p, 1080i, 1080p)16:9, 4:3, Wide Zoom, Screen FitPC 16:9, 4:3English
❑❑Changing the Picture Options■■Advanced SettingsOOMENUm → Picture → Advanced Settings → ENTERE(available in Standard / Movie mode)You can adjust the detailed setting for the screenincluding colour and contrast.Advanced SettingsBlack ToneDynamic ContrastOffMedium◀NNWhen connecting a PC, you can only make changesto Gamma and White Balance .Shadow Detail -2Gamma 0Expert PattenOff▶RGB Only ModeColour SpaceOffNative● ● The displayed image may differdepending on the model.English
●●Black Tone (Off / Dark / Darker / Darkest): Select the black level to adjust thescreen depth.●●Dynamic Contrast (Off / Low / Medium / High): Adjust the screen contrast.●●Shadow Detail (-2~+2): Increase the brightness of dark images.●●Gamma: Adjust the primary colour intensity.◀●●Expert Pattern (Off / Pattern1 / Pattern2): By running the Expert Patternfunction, the picture can be calibrated without a generator or filter. If the OSDmenu disappears or a menu other than the Picture menu is opened, thecalibration is saved and the Expert Pattern window disappears.▶NNWhile the Expert Pattern is running, sound is not outputted.NNOnly enabled on DTV, Component / HDMI mode.English
◀●●●●●●RGB Only Mode (Off / Red / Green / Blue): Displays the Red, Green andBlue colour for making fine adjustments to the hue and saturation.Colour Space (Auto / Native / Custom): Adjust the range of colours availableto create the image.NNTo adjust Colour, Red, Green, Blue and Reset, set Colour Space toCustom.White Balance: Adjust the colour temperature for a more natural picture.R-Offset / G-Offset / B-Offset: Adjust each colour’s (red, green, blue)darkness.R-Gain / G-Gain / B-Gain: Adjust each colour’s (red, green, blue) brightness.Reset: Resets the White Balance to it’s def<strong>au</strong>lt settings.▶English
●●10p White Balance (Off / On): Controls the white balance in 10 point intervalby adjusting the red, green, and blue brightness.NNAvailable when the picture mode is set to Movie and when the externalinput is set to all input.NNSome external devices may not support this function.◀Interval: Select interval to adjust.Red: Adjust the red level.Green: Adjust the green level.Blue: Adjust the blu e level.Reset: Resets the 10p White Balance to its def<strong>au</strong>lt settings.▶English
●●Flesh Tone: Emphasize pink “Flesh Tone.”●●Edge Enhancement (Off / On): Emphasize object boundaries.●●Motion Lighting (Off / On) : Reduces power consumption by reducing screenbrightness when the picture on the screen is motionless.NNMotion Lighting is available in Standard / Movie mode.NNWhen changing a setting value of Backlight, Brightness or Contrast,Motion Lightning will be set to Off.◀●●xvYCC (Off / On): Setting the xvYCC mode on increases detail and colourspace when watching movies from an external device (e.g. DVD player)connected to the HDMI or Component IN jacks.▶NNAvailable when the picture mode is set to Movie and when the externalinput is set to HDMI or Component.●●LED Motion Plus (Off / On): Removes drag from fast scenes with a lot ofmovement to provide a clear picture.English
■■Picture OptionsOOMENUm → Picture → Picture Options → ENTERENNWhen connecting a PC, you can only make changesto the Colour Tone.Picture OptionColour ToneStandard●●Colour Tone (Cool / Standard / Warm1 / Warm2)NNWarm1 or Warm2 will be deactivated when thepicture mode is Dynamic.Digital Noise FilterMPEG Noise FilterHDMI Black LevelFilm ModeAutoAutoNomalOff◀NNSettings can be adjusted and stored for eachexternal device connected to an input on the TV.●●Motion PlusThe displayed image may differdepending on the model.Standard▶English
◀●●●●Film Mode (Off / Auto1 / Auto2): Sets the TV to <strong>au</strong>tomatically sense andprocess film signals from all sources and adjust the picture for optimum quality.NNAvailable in AV, COMPONENT (480i / 1080i) and HDMI (1080i).Motion Plus (Off / Clear / Standard / Smooth / Custom / Demo): Removesdrag from fast scenes with a lot of movement to provide a clearer picture.NNThe Info screen on your TV displays the resolution and frequency of thein<strong>com</strong>ing signal (60Hz), but not the frequency the TV is generating for theimage it is displaying by using Motion Plus function.NNIf noise occurs on the screen, please set up the Motion Plus to Off. IfMotion Plus is Custom, you can set up the Blur Reduction, JudderReduction or Reset manually.NNIf Motion Plus is Demo, you can <strong>com</strong>pare the difference of on and offmodes.▶English
Blur Reduction: Adjusts the blur reduction level from video sources.Judder Reduction: Adjusts the judder reduction level from video sources whenplaying films.Reset: Reset the custom settings.■■Reset Picture (Yes / No)Resets your current picture mode to its def<strong>au</strong>lt settings.◀▶English
❑❑Setting up the TV with Your PCSet the input source to PC.■■Auto Adjustment tOOMENUm → Picture → Auto Adjustment → ENTEREAdjust frequency values/positions and fine tune the settings <strong>au</strong>tomatically.NNNot available when connecting with an HDMI to DVI cable.◀▶English
■■PC Screen AdjustmentOOMENUm → Picture → Screen Adjustment → PC Screen Adjustment →ENTERE●●Coarse / Fine: Removes or reduces picture noise. If the noise is not removedby Fine-tuning alone, then adjust the frequency as best as possible (Coarse)and Fine-tune again. After the noise has been reduced, readjust the picture sothat it is aligned to the centre of screen.◀●●●●Position: Adjusts the PC screen position with direction button (u / d / l / r).Image Reset: Resets the image to the def<strong>au</strong>lt settings.▶English
◀Using Your TV as a Computer (PC) DisplaySetting Up Your PC Software (Based on Windows XP)Depending on the version of Windows and the video card, the actual screens on yourPC may differ in which case the same basic set-up information will almost always beapplied. (If not, contact your <strong>com</strong>puter manufacturer or <strong>Samsung</strong> Dealer.)1. Click on “Control Panel” on the Windows start menu.2. Click on “Appearance and Themes” in the “Control Panel” window and a displaydialog-box will appear.3. Click on “Display” and a display dialog box will appear.4. Navigate to the “Settings” tab on the display dialog-box.●●●●The correct size setting (resolution) [Optimum: 1920 X 1080 pixels]If a vertical-frequency option exists on your display settings dialog box, thecorrect value is “60” or “60 Hz”. Otherwise, just click “OK” and exit the dialogbox.▶English
❑❑Changing the Preset Sound ModeOOMENUm → Sound → Sound Mode → ENTERE■■Sound Mode t●●Standard: Selects the normal sound mode.●●Music: Emphasizes music over voices.●●Movie: Provides the best sound for movies.◀●●●●Clear Voice: Emphasizes voices over other sounds.Amplify: Increase the intensity of high-frequency sound to allow a betterlistening experience for the hearing impaired.▶NNIf Speaker Select is set to External Speaker, Sound Mode is disabled.English
❑❑Adjusting Sound SettingsOOMENUm → Sound → ENTERE■■Sound EffectNNIf Speaker Select is set to External Speaker, Sound Effect is disabled.●●SRS TruSurround HD (Off / On) t(standard sound mode only)◀This function provides a virtual 5.1 channel surround sound experience througha pair of speakers using HRTF (Head Related Transfer Function) technology.NNThe quick menu l<strong>au</strong>nched by the TOOLS button may not provide this optionin some models. for LED 6003 Series▶English
●●SRS TruDialog (Off / On)(standard sound mode only)This function allows you to increase the intensity of a voice over backgroundmusic or sound effects so that dialog can be heard more clearly.●●SRS CS Headphone: You can hear virtual 5.1ch surround sound over theheadphones.◀▶English
●●EqualizerAdjusts the sound mode (standard sound mode only).Balance L/R: Adjusts the balance between the right and left speaker.100Hz / 300Hz / 1kHz / 3kHz / 10kHz (Bandwidth Adjustment): Adjusts thelevel of specific bandwidth frequencies.Reset: Resets the equalizer to its def<strong>au</strong>lt settings.◀▶English
■■3D Audio (Off / Low / Medium / High)3D <strong>au</strong>dio technology provides the immersive sound corresponding to the pop-upeffect of 3D video by <strong>au</strong>dio depth control in perspective.NNAvailable in only when watching 3D image.NN3D is not supported. for LED 6003 Series◀▶English
●●Audio Description(not available in all locations) (digital channels only)This function handles the Audio Stream for the AD (Audio Description) which issent along with the Main <strong>au</strong>dio from the broadcaster.NNAudio Description (Off / On): Turn the <strong>au</strong>dio description function on or off.NNVolume: Adjust the <strong>au</strong>dio description volume.◀▶English
◀■■Additional Settings(digital channels only)●●DTV Audio Level (MPEG / HE-AAC): This function allows you to reduce thedisparity of a voice signal (which is one of the signals received during a digitalTV broadcast) to a desired level.NNAccording to the type of broadcast signal, MPEG / HE-AAC can beadjusted between -10dB and 0dB.NNTo increase or decrease the volume, adjust between the range 0 and -10respectively.▶English
●●SPDIF Output: SPDIF (Sony Philips Digital InterFace) is used to provide digitalsound, reducing interference going to speakers and various digital devices suchas a DVD player.●●Audio Format: You can select the Digital Audio output (SPDIF) format.NNThe available Digital Audio output (SPDIF) format may differ depending onthe input source.◀●●Audio Delay: Correct <strong>au</strong>dio-video sync problems, when watching TV or video,and when listening to digital <strong>au</strong>dio output using an external device such as anAV receiver (0ms ~ 250ms).▶English
●●Dolby Digital Comp (Line / RF): This function minimizes signal disparitybetween a dolby digital signal and a voice signal (i.e. MPEG Audio, HE-AAC,ATV Sound).NNSelect Line to obtain dynamic sound, and RF to reduce the differencebetween loud and soft sounds at night time.●●Line: Set the output level for signals greater or less than -31dB (reference) toeither -20dB or -31dB.◀●●RF: Set the output level for signals greater or less than -20dB (reference) toeither -10dB or -20dB.▶English
■■Speaker Settings●●Speaker Select (External Speaker / TV Speaker)◀A sound echo may occur due to a difference in decoding speed betweenthe main speaker and the <strong>au</strong>dio receiver. In this case, set the TV to ExternalSpeaker.NNWhen Speaker Select is set to External Speaker, the volume and MUTEbuttons will not operate and the sound settings will be limited.NNWhen Speaker Select is set to External Speaker.●●TV Speaker: Off, External Speaker: OnNNWhen Speaker Select is set to TV Speaker.▶●●TV Speaker: On, External Speaker: OnNNIf there is no video signal, both speakers will be mute.English
●●Auto Volume (Off / Normal / Night)To equalize the volume level on each channel, set to Normal.Night: This mode provides an improved sound experience <strong>com</strong>pared toNormal mode, making almost no noise. It is useful at night.NNTo use the volume control of a connected source device, set Auto Volumeto Off. A change to the volume control of the connected source device maynot be applied if Auto Volume is set to Normal or Night.◀■■Reset Sound (Yes / No)▶Reset all sound settings to the factory def<strong>au</strong>lts.English
❑❑Selecting the Dual f-gWhen you set to Dual f-g, the current sound mode is displayed on the screen.A2 StereoAudio Type DUAL f-g Def<strong>au</strong>ltMonoMONOStereoSTEREO ↔ MONOAutomatic change◀NICAM StereoDual DUAL f ↔ DUAL g DUAL fMonoStereoDualMONOMONO ↔ STEREOMONO → DUAL fDUAL g ↑←Automatic changeDUAL fNNIf the stereo signal is weak and an <strong>au</strong>tomatic switching, occurs, then switch tothe mono.NNOnly activated in stereo sound signal.NNOnly available when the Source is set to TV.▶English
Preference Features❑❑Setting the Network■■Connecting to a Wired NetworkYou can attach your TV to your LAN using cable in three ways:You can attach your TV to your LAN by connecting the LAN port on the back ofyour TV to an external modem using a LAN cable. See the diagram below.The Modem Port on the Wall◀External Modem(ADSL / VDSL / Cable TV)TV Rear Panel▶Modem CableLAN CableEnglish
●●You can attach your TV to your LAN by connecting the LAN port on the backof your TV to a IP Sharer which is connected to an external modem. Use LANcable for the connection. See the diagram below.The Modem Porton the WallTV Rear PanelExternal Modem(ADSL / VDSL / Cable TV)IP Sharer(having DHCP server)◀▶Modem CableLAN CableLAN CableEnglish
●●Depending on how your network is configured, you may be able to attach yourTV to your LAN by connecting the LAN port on the back of your TV directly toa network wall outlet using a LAN cable. See the diagram below. Note that thewall outlet is attached to a modem or router elsewhere in your house.The LAN Port on the WallTV Rear Panel◀▶LAN CableEnglish
●●If you have a Dynamic Network, you should use an ADSL modem or routerthat supports Dynamic Host Configuration Protocol (DHCP). Modems androuters that support DHCP <strong>au</strong>tomatically provide the IP address, subnet mask,gateway, and DNS values your TV needs to access the Internet so you do nothave to enter them manually. Most home networks are Dynamic Networks.◀Some networks require a Static IP address. If your network requires a StaticIP address, you must enter the IP address, subnet mask, gateway, and DNSvalues manually on your TV’s Cable Setup Screen when you set up the networkconnection. To get the IP address, subnet mask, gateway, and DNS values,contact your Internet Service Provider (ISP). If you have a Windows <strong>com</strong>puter,you can also get these values through your <strong>com</strong>puter.N N You can use ADSL modems that support DHCP if your network requires aStatic IP address. ADSL modems that support DHCP also let you use StaticIP addresses.▶English
■■Network SettingOOMENUm → Network → Network Settings → ENTERESet the network connection to use various Internet services such as SMART HUB,AllShare and perform software upgrade.■■Network StatusOOMENUm → Network → Network Status → ENTERE◀■■You can check the current network and Internet status.AllShare Settings▶OOMENUm → Network → AllShare Settings → ENTERESelects whether to use media functions on the network.English
■■Network Setup (Auto)Use the Automatic Network Setup when connecting your TV to a network thatsupports DHCP. To set up your TV’s cable network connection <strong>au</strong>tomatically,follow these steps:How to set up <strong>au</strong>tomatically1.Go to Network Setting screen.To enter it, follow the directions of Network Setting.◀2. Select the Wired.Network Settings2/6▶3. The network test screen appears, andnetwork setting is done.Select a network connection type.WiredWireless(general)WPS(PBC)One Foot ConnectionConnect to the network usinga LAN cable. Please make surethat the LAN cable is connected.PreviousNextCancel●●The displayed image may differ depending on themodel.English
NNIf it fails to set <strong>au</strong>tomatically, check theconnection of LAN port.NNIf you cannot find network connectionvalues or if you want to set connectionmanually, set it to <strong>Manual</strong>. Refer to following“How to set up manually”.●●Network SettingsWiress network and Internet connection <strong>com</strong>pleted.SEC_LinkShareMAC Address 00:12:fb:2b:56:4dIP Address 192.168.11.4Subnet Mask 255.255.255.0Gareway 192.168.11.1DNS Server 192.168.11.1Internet is connected successfully.If you have a problem with using Internet Service, contact your Internet serviceprovider.RetryIP SettingsThe displayed image may differ depending on themodel.OK2/6◀▶English
■■Network Setting (<strong>Manual</strong>)Use the <strong>Manual</strong> Network Setup when connecting your TV to a network thatrequires a Static IP address.◀Getting the Network Connection ValuesTo get the Network connection values on most Windows <strong>com</strong>puters, follow thesesteps:1. Right click the Network icon on the bottom right of the screen.2. In the pop-up menu that appears, click Status.3. On the dialog that appears, click the Support tab.4. On the Support Tab, click the Details button. The Network connection valuesare displayed.▶English
How to set up manuallyTo set up your TV’s cable network connection manually, follow these steps:1. Follow Steps 1 through 2 in the “How to set up <strong>au</strong>tomatically” procedure.2. Select the IP Settings on network test screen.IP Settings◀3. Set IP Mode to <strong>Manual</strong>.4. Press the d button on your remote to go to theIP Address.5. Enter the IP Address, Subnet Mask, Gateway,and DNS Server values. Use the numberbuttons on your remote to enter numbers andthe arrow buttons to move from one entry field toanother.6. When done, select the OK.7. The network test screen appears, and network setting is done.●IP Mode<strong>Manual</strong>IP Address 0 . 0 . 0 . 0Subnet Mask 0 . 0 . 0 . 0Gateway 0 . 0 . 0 . 0DNS Mode<strong>Manual</strong>DNS Server 0 . 0 . 0 . 0OKThe displayed image may differ depending onthe model.▶English
■■Connecting to a Wireless Network for LED 6400 series and underTo connect your TV to your network wireless, you need a wireless router ormodem and a <strong>Samsung</strong> Wireless LAN adapter (WIS09ABGN, WIS09ABGN2,WIS10ABGN-sold separately) , which you connect to your TV’s back or side panelUSB port. See the illustration below.◀The LAN Porton the WallWireless IP sharer(router having DHCP server)<strong>Samsung</strong>Wireless LANadapterTV Rear Panel▶LAN CableEnglish
<strong>Samsung</strong>’s Wireless LAN adapter is sold separately and is offered by selectedretailers, E<strong>com</strong>merce sites and <strong>Samsung</strong>parts.<strong>com</strong>. <strong>Samsung</strong>’s Wireless LANadapter supports the IEEE 802.11a/b/g and n <strong>com</strong>munication protocols. <strong>Samsung</strong>re<strong>com</strong>mends using IEEE 802.11n. When you play video over a IEEE 802.11b/gconnection, the video may not play smoothly.NNNOTE◀●●●●You must use the “<strong>Samsung</strong> Wireless LAN adapter” (WIS09ABGN,WIS09ABGN2, WIS10ABGN) to use a wireless network.<strong>Samsung</strong> Wireless LAN Adapter and The USB extension Cable are soldseparately and are offered by select retailers, E<strong>com</strong>merce sites and<strong>Samsung</strong>parts.<strong>com</strong>.▶●●To use a wireless network, your TV must be connected to a wireless IP sharer(either a router or a modem). If the wireless IP sharer supports DHCP, your TVcan use a DHCP or static IP address to connect to the wireless network.English
●●Select a channel for the wireless IP sharer that is not currently being used. If thechannel set for the wireless IP sharer is currently being used by another devicenearby, this will result in interference and <strong>com</strong>munication failure.●●If you apply a security system other than the systems listed below, it will notwork with the TV.◀●●●●If Pure High-throughput (Greenfield) 802.11n mode is selected and theEncryption type is set to WEP, TKIP or TKIP AES (WPS2Mixed) for your wirelessrouter, <strong>Samsung</strong> TVs will not support a connection in <strong>com</strong>pliance with new Wi-Fi certification specifications.If your wireless router supports WPS (Wi-Fi Protected Setup), you canconnect to the network via PBC (Push Button Configuration) or PIN (PersonalIdentification Number). WPS will <strong>au</strong>tomatically configure the SSID and WPA keyin either mode.▶English
●●●●●●If your router, modem, or device is not certified, it may not connect to the TVvia the “<strong>Samsung</strong> Wireless LAN adapter.”Ensure the TV is turned on before you connect the <strong>Samsung</strong> Wireless LANadapter.Connection Methods: You can setup the wireless network connection on fiveways.––Auto Setup (Using the Auto Network Search function)◀––<strong>Manual</strong> Setup––WPS (PBC)––One Foot Connection––Plug & Access▶●●The <strong>Samsung</strong> Wireless LAN adapter may not be recognized when using aconnection via a USB hub or via a USB extension cable other than the cablesupplied.English
<strong>Samsung</strong> Wireless LAN Adapter supports the IEEE 802.11a/b/g and n<strong>com</strong>munication protocols. <strong>Samsung</strong> re<strong>com</strong>mends using IEEE 802.11n. When youplay video over a IEEE 802.11b/g connection, the video may not play smoothly.NNNOTE●●To use a wireless network, your TV must be connected to a wireless IP sharer(either a router or a modem). If the wireless IP sharer supports DHCP, your TVcan use a DHCP or static IP address to connect to the wireless network.◀●●Select a channel for the wireless IP sharer that is not currently being used. If thechannel set for the wireless IP sharer is currently being used by another devicenearby, this will result in interference and <strong>com</strong>munication failure.▶●●If you apply a security system other than the systems listed below, it will notwork with the TV.English
●●If Pure High-throughput (Greenfield) 802.11n mode is selected and theEncryption type is set to WEP, TKIP or TKIP AES (WPS2Mixed) for your wirelessrouter, <strong>Samsung</strong> TVs will not support a connection in <strong>com</strong>pliance with new Wi-Fi certification specifications.●●If your wireless router supports WPS (Wi-Fi Protected Setup), you canconnect to the network via PBC (Push Button Configuration) or PIN (PersonalIdentification Number). WPS will <strong>au</strong>tomatically configure the SSID and WPA keyin either mode.◀●●If your router, modem, or device is not certified, it may not connect to the TV▶English
●●Connection Methods: You can setup the wireless network connection on fiveways.––Auto Setup (Using the Auto Network Search function)◀––<strong>Manual</strong> Setup––WPS (PBC)––One Foot Connection––Plug & Access▶English
■■Network Setup (Auto)◀Most wireless networks have an optional security system that requires devices thataccess the network to transmit an encrypted security code called an Access orSecurity Key. The Security Key is based on a Pass Phrase, typically a word or aseries of letters and numbers of a specified length you were asked to enter whenyou set up security for your wireless network. If you use this method of setting upthe network connection, and have a Security Key for your wireless network, youwill have to enter the Pass Phrase during the setup process.How to set up <strong>au</strong>tomatically▶1. Go to Network Settings screen. To enter it,follow the directions of Network Settings.Network SettingsSelect a network connection type.Wired2/62. Select the Wireless.Wireless(general)WPS(PBC)One Foot ConnectionSet up wireless network byselecting your Wireless Router.you may need to enter securitykey depending on the setting ofthe Wireless Router.PreviousNextCancel●●The displayed image may differ depending on themodel.English
◀3. The Network function searches for available wireless networks. When done, itdisplays a list of the available networks.4. In the list of networks, press the u or d button to select a network, and thenpress the ENTERE button.NNIf the wireless router is set to Hidden (Invisible), you have to select AddNetwork and enter the correct Network Name (SSID) and Security key toestablish the connection.5. If the Security screen pop-up appears, go to step 6. If you select the wirelessrouter which does not have security, go to step 10.▶English
◀6. If the wireless router has security, enter theSecurity key(Security or PIN), then selectNext.NNWhen you enter the Security key(Securityor PIN), use u / d / l / r buttonson your remote to select number/characters.NNYou should be able to find the Pass Phraseon one of the set up screens you used to set up your router or modem.7. The network connection screen appears, and network setting is done.NNIf it fails to set Security key(Security or PIN), select Reset or IP Settings.NNIf you want to set connection manually, select the IP Settings. Refer tofollowing “How to set up manually”.●●Network SettingsEnter Acceress Point Name(SSID) to connect.a b c d e f 1 2 3g h i j k l 4 5 6m n o p q r 7 8 9s t u v w x y z 0a/A Delete SpacePreviousNextCancelThe displayed image may differ depending on themodel.▶English
■■Network Setup (<strong>Manual</strong>)Use the <strong>Manual</strong> Network Setup when connecting your TV to a network thatrequires a Static IP address.◀Getting the Network Connection ValuesTo get the Network connection values on most Windows <strong>com</strong>puters, follow thesesteps:1. Right click the Network icon on the bottom right of the screen.2. In the pop-up menu that appears, click Status.3. On the dialog that appears, click the Support tab.4. On the Support Tab, click the Details button. The Network connection valuesare displayed.▶English
How to set up manuallyTo set up your TV’s cable network connectionmanually, follow these steps:IP ModeIP Settings<strong>Manual</strong>◀1. Follow Steps 1 through 2 in the “How to setup <strong>au</strong>tomatically” procedure.2. Select the IP Settings on network testscreen.3. Set IP Mode to <strong>Manual</strong>.4. Press the d button on your remote to go tothe first entry field.5. Enter the IP Address, Subnet Mask, Gateway, and DNS Server values. Usethe number buttons on your remote to enter numbers and the arrow buttons tomove from one entry field to another.6. When done, select the OK.7. The network connection screen appears, and network setting is done.●IP Address 0 . 0 . 0 . 0Subnet Mask 0 . 0 . 0 . 0Gateway 0 . 0 . 0 . 0DNS Mode<strong>Manual</strong>DNS Server 0 . 0 . 0 . 0OKThe displayed image may differ depending onthe model.▶English
■■Network Setup (WPS(PBC))How to set up using WPS(PBC)If your router has a WPS(PBC) button, follow these steps:1. Go to Network Settings screen. To enter it, follow the directions of NetworkSettings.2. Select the WPS(PBC).Network Settings2/6◀3. Press the WPS(PBC) button on your routerwithin 2 minutes. Your TV <strong>au</strong>tomaticallyacquires all the network setting values itneeds and connects to your network.Select a network connection type.WiredWireless(general)WPS(PBC)One Foot ConnectionConnect to the Wireless Routereasily by pressing the WPS(PBC)button. Choose this if yourWireless Router supports PushButton Configuration(PBC).PreviousNextCancel▶4. The network test screen appears, andnetwork setting is done.●●The displayed image may differ depending on themodel.English
■■Network Setting (One Foot Connection)The One Foot Connection make you easy to connect samsung TV and samsungwireless router by placing samsung wireless router within 1 foot(25cm) fromsamsung TV. If your wireless router does not support One Foot Connection, youmust connect using one of the other methods.NNYou can check for equipment that supports One Foot Connection on. www.samsung.<strong>com</strong>◀▶English
How to set up using One Foot ConnectionTurn on the power of wireless router and TV.1. Go to Network Settings screen. To enter it,follow the directions of Network Settings.Network SettingsSelect a network connection type.Wired2/6◀2. Select the One Foot Connection.3. Place the wireless router in parallel with the<strong>Samsung</strong> Wireless LAN adapter giving a gapno larger than 25cm.●●Wireless(general)WPS(PBC)One Foot ConnectionConnect to wireless network<strong>au</strong>tomatically if your Wireless Routersupports One Foot Connection.Select this connection type afterplacing the Wireless Router within10 inches(25cm) of Your TV.PreviousNextCancelThe displayed image may differ depending on themodel.▶English
◀NNIf One Foot Connection does not connect your TV to your Router, a pop-upwindow appears on the screen notifying you of the failure. If you want to tryusing One Foot Connection again, reset the wireless router, disconnect the<strong>Samsung</strong> Wireless LAN adapter and then try again from Step 1. You can alsochoose one of the other connection setup methods.4. The network connection screen appears, and network setting is done.5. Place the AP in a desired location.N N If the AP settings change or you install a new AP, you must perform the OneFoot Connection procedure again, beginning from Step 1.▶English
■■Network Settings (Plug & Access)Plug & Access function make you easy to connect samsung TV and samsungwireless router by using USB memory stick. If your wireless router does notsupport Plug & Access, you must connect using one of the other methods.NNYou can check for equipment that supports Plug&Access on www.samsung.<strong>com</strong>.◀▶English
◀How to set up using Plug & Access functionTurn on the power of wireless router and TV.1. Insert USB memory stick into our <strong>Samsung</strong> wireless router and checkingwireless router’s LED status (Blinking → On).2. Then take USB memory out and insert it into <strong>Samsung</strong> TV.3. Wait until the connection is <strong>au</strong>tomatically established.N N If Plug & Access does not connect your TV to your wireless router a popupwindow appears on the screen notifying you of the failure. If you wantto try using Plug & Access again, reset the wireless router disconnect the<strong>Samsung</strong> Wireless LAN adapter and then try again from Step 1. You canalso choose one of the other connection setup methods.▶English
4. The network connection screen appears, and network setting is done.5. Place the wireless router in a desired location.N N If the wireless router settings change or you install a new wireless router youmust perform the Plug & Access procedure again, beginning from Step 1.◀▶English
◀If Your TV Fails to Connect to the InternetYour TV may not be able to connect to the Internet bec<strong>au</strong>se your ISP has permanently registeredthe MAC address (a unique identifying number) of your PC or modem, which it then<strong>au</strong>thenticates each time you connect to the Internet as a way of preventing un<strong>au</strong>thorizedaccess. As your TV has a different MAC address, your ISP can not <strong>au</strong>thenticate its MAC address,and your TV can not connect.To resolve this problem, ask your ISP about the procedures required to connect devicesother than a PC (such as your TV) to the Internet.If your Internet service provider requires an ID or password to connect to the Internet, yourTV may not be able to connect to the Internet. If this is the case, you must enter your ID orpassword when connecting to the Internet.The internet connection may fail bec<strong>au</strong>se of a firewall problem. If this is the case, contactyour Internet service provider.If you cannot connect to the Internet even after you have followed the procedures of yourInternet service provider, please contact <strong>Samsung</strong> Electronics.▶English
❑❑Setting the TimeOOMENUm → System → Time → ENTERE■■Time●●Clock: Setting the clock is for using various timer features of the TV.◀OOThe current time will appear every time you press the INFO button.NNIf you disconnect the power cord, you have to set the clock again.––Clock Mode (Auto / <strong>Manual</strong>)Auto: Set the current time <strong>au</strong>tomatically using the time from a digitalchannel.NNThe antenna must be connected in order to set the time <strong>au</strong>tomatically.<strong>Manual</strong>: Set the current time manually.N N Depending on the broadcast station and signal, the <strong>au</strong>to time set upmay not be correct. In this case, set the time manually.▶English
◀––Clock Set: Set the Date and Time.NNAvailable only when Clock Mode is set to <strong>Manual</strong>.NNYou can set the Date and Time directly by pressing the number buttonson the remote control.––Time Zone (Auto / <strong>Manual</strong>) (depending on the country): Set the time zoneto GMT.NNAvailable only when the Clock Mode is set to Auto.Using the Sleep TimerOOMENUm → System → Time → ENTERE▶●●Sleep Timer t: Automatically shuts off the TV after a preset period oftime. (30, 60, 90, 120, 150 and 180 minutes).NNTo cancel Sleep Timer, select Off.English
Setting the On / Off Timer●On Timer 1 / On Timer 2 / On Timer 3: Threedifferent on timer settings can be made. Youmust set the clock first.SetupOn Timer 1Sun Mon Tue Wed Thu Fri SatOffSetup: Select Off, Once, Everyday,Time 12:00Mon~Fri, Mon~Sat, Sat~Sun or <strong>Manual</strong> toVolume 20◀set at you convenience. If you select <strong>Manual</strong>,you can set up the day you want to activatethe timer.SourceTVAntennaCableChannel 3Close▶N The c mark indicates the day is selected.●The displayed image may differ depending onthe model.English
◀Time: Set the hour and minute.Volume: Set the desired volume level.Source: Select TV or USB content to be played when the TV is turned on<strong>au</strong>tomatically. (USB can be selected only when a USB device is connected tothe TV)Antenna (when the Source is set to TV): Select ATV or DTV.Channel (when the Source is set to TV): Select the desired channel.Music / Photo (when the Source is set to USB): Select a folder in the USBdevice containing music or photo files to be played when the TV is turned on<strong>au</strong>tomatically.N N Auto Power Off (available only when the TV is turned on by Timer): TheTV will be <strong>au</strong>tomatically turned off after 4 hours of being left idle to preventoverheating.▶English
NNNOTE◀●●●●●●●●●●If there is no music file on the USB device or the folder containing amusic file is not selected, the Timer function does not operate correctly.When there is only one photo file in the USB, the Slide Show will notplay.If a folder name is too long, the folder cannot be selected.Each USB you use is assigned its own folder. When using more than oneof the same type of USB, make sure the folders assigned to each USBhave different names.It is re<strong>com</strong>mended that you use a USB memory stick and a multi cardreader when using On Timer. The function may not work with USBdevices with a built-in battery, MP3 players, or PMPs made by somemanufacturers bec<strong>au</strong>se these devices take a long time to be recognized.▶English
● Off Timer 1 / Off Timer 2 / Off Timer 3:Three different off timer settings can bemade. You must set the clock first.SetupOff Timer 1Sun Mon Tue Wed Thu Fri SatOff◀Setup: Select Off, Once, Everyday,Mon~Fri, Mon~Sat, Sat~Sun or <strong>Manual</strong> toset at you convenience. If you select <strong>Manual</strong>,you can set up the day you want to activatethe timer.N The c mark indicates the day is selected.Time: Set the hour and minute.●Time 12:00CloseThe displayed image may differ depending onthe model.▶English
❑❑Locking ProgrammeOOMENUm → System → Security → ENTERE■■SecurityThe PIN input screen appears before the setup screen.●●Enter your 4-digit PIN, the def<strong>au</strong>lt of which is “0-0-0-0”. Change the PIN usingthe Change PIN option.◀●●Channel Lock (Off / On): Lock channels in channel list, to prevent un<strong>au</strong>thorizedusers, such as children, from watching unsuitable programme.▶NNAvailable only when the Source is set to TV.English
●●●●Programme Rating Lock: Prevent un<strong>au</strong>thorized users, such as children, fromwatching unsuitable Programme with a userdefined 4-digit PIN code. If selectedchannel is locked,the “\” symbol will be displayed.Change PIN: Change your personal ID number required to set up the TV.N N If you forget the PIN code, press the remote control buttons in the followingsequence, which resets the PIN to “0-0-0-0”: POWER (off) → MUTE → 8 → 2→ 4 → POWER (on).◀▶English
❑❑Economical Solutions■■Eco SolutionOOMENUm → System → Eco Solution → ENTERE●●Energy Saving (Off / Low / Medium / High / Picture Off) t: Thisadjusts the brightness of the TV in order to reduce power consumption. If youselect Picture Off, the screen is turned off, but the sound remains on. Pressany button except volume button to turn on the screen.◀●●Eco Sensor (Off / On): To enhance your power savings; the picture settings will<strong>au</strong>tomatically adapt to the light in the room.▶NNIf you adjust the Backlight, the Eco Sensor will be set to Off.Min Backlight: When Eco sensor is On, the minimum screen brightness canbe adjusted manually.N N If Eco Sensor is On, the display brightness may change (be<strong>com</strong>e slightlydarker or brighter) depending on the surrounding light intensity.English
●●No-Signal Power Off (Off / 15 min / 30 min / 60 min): To avoid unnecessaryenergy consumption, set how long you want the TV to remain on if it’s notreceiving a signal.NNDisabled when the PC is in power saving mode.●●Auto Power Off (Off / On): The TV will be <strong>au</strong>tomatically turned off after 4 hoursof being left idle to prevent overheating.◀▶English
❑❑Other FeaturesOOMENUm → System → ENTERE◀■■Language●●Teletext Language: Set a desired language for teletext.NNEnglish is the def<strong>au</strong>lt in cases where the selected language is unavailable inthe broadcast.●●Preference (Primary Audio Language / Secondary Audio Language /Primary Subtitle Language / Secondary Subtitle Language / PrimaryTeletext Language / Secondary Teletext Language): Select a language,which will be the def<strong>au</strong>lt language when a channel is selected.▶■■SubtitleUse this menu to set the Subtitle mode.●●●●Subtitle (Off / On): Switches subtitles on or off.Subtitle Mode (Normal / Hearing Impaired): Sets the subtitle mode.English
●●Subtitle Language: Sets the subtitle language.NNIf the programme you are watching does not support the Hearing Impairedfunction, Preferred <strong>au</strong>tomatically activates even if the Hearing Impairedmode is selected.NNEnglish is the def<strong>au</strong>lt in cases where the selected language is unavailable inthe broadcast.◀■■Digital Text (Disable / Enable)(New Zealand only)If the programme broadcasts with digital text, this feature is enabled.▶■■Auto Protection Time (Off / 2 hours / 4 hours / 8 hours / 10 hours)If the screen remains idle with a still image for a certain period of time defined bythe user, the screen saver is activated to prevent the formation of ghost images onthe screen.English
■■General●●Game Mode (Off / On): When connecting to a game console such asPlayStation or Xbox, you can enjoy a more realistic gaming experience byselecting game mode.NNNOTE●●Prec<strong>au</strong>tions and limitations for game mode◀––To disconnect the game console and connect another external device,set Game Mode to Off in the setup menu.––If you display the TV menu in Game Mode, the screen shakes slightly.▶●●●●●●Game Mode is not available when the input source is set to TV or PC.After connecting the game console, set Game Mode to On.Unfortunately, you may notice reduced picture quality.If Game Mode is On:––Picture mode is set to Standard and Sound mode is set to Movie.English
●●BD Wise (Off / On): Provides the optimal picture quality for <strong>Samsung</strong> DVD,Blu-ray and Home Theatre products which support BD Wise. WhenBD Wise is turned On, the picture mode is <strong>au</strong>tomatically changed to theoptimal resolution.NNAvailable when connecting <strong>Samsung</strong> products that support BD Wisethrough a HDMI cable.●●Boot Logo (Off / On): Display <strong>Samsung</strong> logo when the TV is turned on.◀●●TV Name: Sets the TV name so you can find it easily on a mobile device.NNIf you select User Input, you can type on the TV using the OSK (On Screen▶Keyboard).English
■■Anynet+(HDMI-CEC)For details on set up options, refer to the “Anynet+(HDMI-CEC)” instructions.■■DivX® Video On DemandShows the registration code <strong>au</strong>thorized for the TV. If you connect to the DivX website and register, you can download the VOD registration file. If you play the VODregistration using Media contents, the registration is <strong>com</strong>pleted.NNFor more information on DivX® VOD, visit “http://vod.divx.<strong>com</strong>”.◀■■Network Remote Control (On / Off)▶Turn on/off or give permission to <strong>Samsung</strong> mobile phones devices. You must havea <strong>Samsung</strong> Mobile phone/device which supports Network Remote Control. Formore details, refer to each device’s manual.English
❑❑Picture In Picture (PIP)■■PIP tYou can watch the TV tuner and one external video source simultaneously. PIP(Picture-in-Picture) does not function in the same mode.OOMENUm → System → PIP → ENTERE◀▶English
NNNOTE◀●●●●●●●●●●●●When Double (à, Œ) mode has been set in PIP, the Picture Size cannotbe set.For PIP sound, refer to the Sound Select instructions.If you turn the TV off while watching in PIP mode, the PIP window willdisappear.You may notice that the picture in the PIP window be<strong>com</strong>es slightlyunnatural when you use the main screen to view a game or karaoke.While Child Lock and SMART HUB are in operation the PIP functioncannot be used.The PIP function is not available in 3D mode.NN3D is not supported. for LED 6003 Series▶English
●●PIP settingsMain pictureComponent, HDMI, PCSub pictureTV●●PIP (Off / On): Activate or deactivate the PIP function.●●Channel: Select the channel for the sub-screen.●●Size (õ / ã / à / Œ): Select a size for the sub-picture.◀●●Position (ã / – / — / œ): Select a position for the sub-picture.NNIn Double (Œ / à) mode, Position cannot be selected.▶●●Sound Select (Main / Sub): You can choose the desired sound (Main /Sub) in PIP mode.English
❑❑Support MenuOOMENUm → Support → ENTERE■■e-<strong>Manual</strong>You can read the introduction and instructions about the TV features stored in yourTV.NNFor the detailed information about e-<strong>Manual</strong> Screen, refer to “How to view the◀■■e-<strong>Manual</strong>” in User <strong>Manual</strong>.Self Diagnosis▶NNSelf Diagnosis might take few seconds, this is part of the normal operation ofthe TV.●●Picture Test (Yes / No): Use to check for picture problems.English
●●Sound Test (Yes / No): Use the built-in melody sound to check for soundproblems.NNIf you hear no sound from the TV’s speakers, before performing the soundtest, make sure Speaker Select is set to TV Speaker in the Sound menu.NNThe melody will be heard during the test even if Speaker Select is set toExternal Speaker or the sound is muted by pressing the MUTE button.◀●●Signal Information: (digital channels only) HDTV channel’s reception quality iseither perfect or the channels are unavailable. Adjust your antenna to increasesignal strength.▶English
●●Troubleshooting: If the TV seems to have a problem, refer to this description.NNIf none of these troubleshooting tips apply, contact the <strong>Samsung</strong> customerservice centre.■■Software UpgradeSoftware Upgrade can be performed via a broadcasting signal or by networkconnection or downloading the latest firmware from “www.samsung.<strong>com</strong>,” to aUSB memory device.◀▶English
Installing the Latest Version◀●●By USB: Insert a USB drive containing thefirmware upgrade file, downloaded from“www.samsung.<strong>com</strong>,” into the TV. Pleasebe careful not to disconnect the power orremove the USB drive until upgrades are<strong>com</strong>plete. The TV will be turned off and on<strong>au</strong>tomatically after <strong>com</strong>pleting the firmwareupgrade. When software is upgraded,●●TV Rear PanelUSBThe displayed image may differ depending on themodel.video and <strong>au</strong>dio settings you have made will return to their def<strong>au</strong>lt settings. Weadvise you to write down your settings so that you can easily reset them afterthe upgrade.▶English
◀●●●●By Online: Upgrade the software using the Internet.NNFirst, configure your network. For detailed procedures on using the NetworkSetup, refer to the “Network Connection” instructions.NNIf the internet connection doesn’t operate properly, the connection may bebroken. Please retry downloading. If the problem persists, download byUSB and upgrade.By Channel: Upgrade the software using the broadcasting signal.NNThis function may not be supported depending on the language.NNIf the function is selected during the software transmission period, softwarewill be <strong>au</strong>tomatically searched and downloaded.NNThe time required to download the software is determined by the signalstatus.▶English
●●Alternative Software (backup): Displays the software version downloadedthrough By Online. During the software upgrading, When the Upgrade willdiscontinue from last step, this function be activated.●●Standby Mode Upgrade (Off /1 hour later / 2 hours later / 00:00 / 02:00 /12:00 / 14:00): A manual upgrade will be <strong>au</strong>tomatically performed at selectedtime. Since the power of the unit is turned on internally, the screen may beturned on slightly for the LED product. This phenomenon may continue formore than 1 hour until the software upgrade is <strong>com</strong>plete.◀■■Contact <strong>Samsung</strong>▶View this information when your TV does not work properly or when you want toupgrade the software. You can find information regarding our call centres, and howto download products and software.English
Advanced Features❑❑Using the 3D functionOOMENUm → Picture → 3D → ENTERENN3D is not supported. for LED 6003 Series◀■■3DThis exciting new feature enables you to view 3D content. In order to fully enjoy thisfeature, you must purchase a pair of <strong>Samsung</strong> 3D Active Glasses (SSG-3100GB,SSG-S3300GR, SSG-3300CR, SSG-3700CR) to view 3D video. <strong>Samsung</strong> 3DActive Glasses are sold separately. For more detailed purchasing information,contact the retailer where you purchased this TV.▶English
❑❑Viewing TV using the 3D functionIMPORTANT HEALTH AND SAFETY INFORMATION FOR 3D PICTURES.Read and understand the following safety information before using the TV’s 3Dfunction.[[WARNING◀●●●●Some viewers may experience dis<strong>com</strong>fort while viewing 3D TV such asdizziness, n<strong>au</strong>sea and headaches. If you experience any such symptom,stop viewing 3D TV, remove 3D Active Glasses and rest.Watching 3D images for an extended period of time may c<strong>au</strong>se eye strain. Ifyou feel eye strain, stop viewing 3D TV, remove your 3D Active Glasses andrest.▶English
●●A responsible adult should frequently check on Children who are using the3D function. If there are any reports of tired eyes, headaches, dizziness, orn<strong>au</strong>sea, have the child stop viewing 3D TV and rest.●●Do not use the 3D Active Glasses for other purposes (such as generaleyeglasses, sunglasses, protective goggles, etc.)◀●●Do not use the 3D function or 3D Active Glasses while walking or movingaround. Using the 3D function or 3D Active Glasses while moving aroundmay result in injuries due to running into objects, tripping, and/or falling.▶English
●●3D Mode: Select the 3D input format.NNIf you want to feel the 3D effect fully, please wear the 3D Active Glassesfirst, and then select 3D Mode from the list below that provides the best 3Dviewing experience.NNWhen watching 3D images, turn on 3D Active Glasses.3D ModeOperation3D Off Turns the 3D function off.◀2D → 3DSide by SideChanges a 2D image to 3D. for LED 6400 series and aboveDisplays two images next to each other.▶Top & BottomDisplays one image above another.NNSome file format may not be supported the "2D → 3D."N N “Side by Side” and “Top & Bottom” are available when the resolution is720p, 1080i and 1080p in DTV, HDMI and USB mode or when set to PCand the PC is connected through an HDMI/DVI cable.English
◀●●●●●●●●●●3D Perspective (-5 ~ +5) for LED 6400 series and above : Adjust overall 3Dperspective of on-screen image.Depth (1~10) for LED 6400 series and above : Adjust overall depth.L/R Change (L/R Image / R/L Image): Swap the left and right pictures.3D → 2D (Off / On): Displays the image for the left eye only.NNThis function is deactivated when 3D Mode set to “2D → 3D” or Off.3D Optimisation: The overall adjustment of 3D effect.▶English
NNSupport resolution (16:9 only)ResolutionFrequency (Hz)1280 x 720p 50 / 60 Hz1920 x 1080i 50 / 60 Hz1920 x 1080p 24 / 30 / 50 / 60 Hz◀Resolution supported for HDMI PC modeThe resolution for HDMI PC mode is optimized to 1920 x 1080 input.An input resolution other than 1920 x 1080 may not be displayed properly in 3Ddisplay or full screen mode.▶English
How to watch the 3D image●●Method 1NNSome 3D modes may not be available depending on the format of the imagesource.NNTo watch in 3D, wear 3D Active Glasses and press the power button on theglasses.◀1. Press the MENU button on your remote, use the uor d button to select Picture, and then press theENTERE button.2. Use the u or d button to select 3D, and thenpress the ENTERE button.3D3D ModeL/R Change3D → 2D3DL/R ImageOff3D Optimisation 0▶●●The displayed image may differdepending on the model.English
3. Use the u or d button to select 3D Mode,and then press the ENTERE button.4. Using the l or r buttons on your remotecontrol, select the 3D Mode of the image youwant to view.●●3D modeCancelThe displayed image may differ depending onthe model.◀▶English
●●Method 21. Press the 3D button on your remote. and then you can view the 3D image.2. If you want to change 3D options (such as 3D Perspective), press the MENUbutton on your remote, and then select Picture.3. Go to Step 3 in the “Method 1”, and follow the directions from that point on.NNTo exit the 3D mode, press the 3D button on your remote again.◀▶English
Supported formats and operating specifications for Standard HDMI 3DNNThe 3D formats indicated below are re<strong>com</strong>mended by the HDMI associationand must be supported.Source signal formatStandard HDMI 1.4 3D1920x1080p@24Hz x 21920x2205p@24Hz1280x720p@60Hz x 21280x1470p@60Hz◀1280x720p@50Hz x 21280x1470p@50Hz▶English
Before using 3D function...NNRe<strong>com</strong>mended 3D operating distanceRe<strong>com</strong>mendedpairing distance50cm2~6mRe<strong>com</strong>mendedviewing distance2~6m (6 to 19.5 ft)◀Re<strong>com</strong>mendedpairing distance50cm (1.6 ft)Re<strong>com</strong>mendedviewing distance▶English
NNNOTE●●3D Mode is set to Off <strong>au</strong>tomatically when accessing Smart Hub ore-<strong>Manual</strong> functions.●●3D Mode is set to memorised configuration value <strong>au</strong>tomatically, whenchanging the input source.●●Some Picture functions are disabled in 3D mode.●●PIP is not supported in 3D mode.◀●●3D Active Glasses from <strong>Samsung</strong>’s previous product (IR type) or other▶manufacturers not be supported.English
◀●●●●●●●●When the TV is initially powered on, may take some time until the 3D displayis optimized.The 3D Active Glasses may not work properly if there is any other 3Dproduct or electronic devices turned on near the glasses or TV. If there is aproblem, keep other electronic devices as far away as possible from the 3DActive Glasses.Be sure to stay within the viewing angle and optimum TV viewing distancewhen watching 3D pictures. Otherwise, you may not be able to enjoy proper3D effects.The ideal viewing distance should be three times or more the height of thescreen. We re<strong>com</strong>mend sitting with viewer’s eyes on a level with the screen.▶English
❑❑Getting Started with Smart HubNNSome functions may not be supported depending on the country.FeaturesSearch AllSocial TVEasily search and accesscontent from diverse sources(e.g. applications, Your Video,AllShare).Share your TV viewingexperience with your friendsvia social networking service(SNS).◀Your VideoWeb Browser▶Enjoy your movie wathingwith a customizedvideo on demand (VOD)re<strong>com</strong>mendation service.Access the web and watch TVat the same time.* 6600 series and above* This feature is limited to certainregionsEnglish
Smart Hub brings useful and entertainingcontents and services directly from the web toyour TV.SearchYour Video<strong>Samsung</strong> AppsConnect to the Internet and enjoy a variety of contents throuth Smart Hub.This feature may not be available in some countries.For some of the countries listed, local language characters might not be displayed properly.The Gateway to all content integrated in oneplaceFavouritesPhotosChannelMusicGuideSchedule Man...Record TVSourceWeb BrowserAllShareVideos◀●●It’s all integrated to guide you to easier anddiverse entertainment choices.●●a Login b Sort by { Edit Mode } SettingsThe displayed image may differ depending on themodel.▶●●●●●●Control your entertainment life with easy and simple user friendly UI.Access to diverse Apps that are adding up every day.Customize your TV, by App grouping & sorting to your taste.English
Screen DisplayYou can search for varioustypes of content thatcan be used on yourTV. Enter a keyword tosearch for media, variousapplications, or onlineinformation that you canuse on the TV.TV Screen: Displays thecurrent input sourcescreen..FavouritesSearchYour Movie<strong>Samsung</strong> AppsConnect to the Internet and enjoy a variety of contents throuth Smart Hub.This feature may not be available in some countries.For some of the countries listed, local language characters might not be displayed properly.Channel Guide Record TV Web Browser VideosExit: Exits the SMART HUB.Application service: You canexperience various serviceprovided by samsungRe<strong>com</strong>mended Applications:Displays the re<strong>com</strong>mendedservice by <strong>Samsung</strong>. You arenot able to add or delete aservice in this list.◀MusicPhotosSchedule Manager Source AllSharea Login b Sort by { Edit Mode } SettingsInstalled Applicationslist: Displays the installedapplications in the TV.▶Information: Displaysnotices, new applications,and advertisementsbrought to you by<strong>Samsung</strong> productintroductions.Controls:●●a Red (Login): To log in to Smart Hub .●●● ●● ●b Green (Sort by): To sort the applications by category.{ Yellow (Edit Mode): You can edit the applications (such asmove, making folder).} Blue (Settings): Edit and configure applications and SmartHub settings.NNThe colour buttons may work differently depending on theapplication.English
NNNOTE●●Configure the network setting before using Smart Hub. For more information,refer to “Network Settings”.●●Unsupported fonts within the provider’s content will not display normally.●●Slow responses and/or interruptions may occur, depending on your networkconditions.◀●●●●Depending on the region, English may be the only language supported forapplication services.This feature is not available in some locations.▶English
●●●●●●If you experience a problem using an application, please contact the contentprovider.According to circumstances of the contents provider, an application’s updatesor t he application itself may be discontinued.Depending on your country’s regulations, some applications may have limitedservice or not be supported.◀▶English
◀Account LoginFor an application with multiple accounts, select^ to access the different accounts.NNFor a more enjoyable application experience,register and log in to your account.NNFor instructions on creating an account, referto “How to create an Smart Hub ID”.●●Smart Hub IDPasswordLoginPress [ENTER]Press [ENTER]Remember Smart Hub Account PasswordLoginCreate AccountCancelFind PasswordThe displayed image may differ depending on themodel.▶English
◀1. Press the Red button in the Smart Hub home page.2. Select ^ by pressing the u / d / l / r button. The account list appears.NNIf you want to create an account, select Create Account then the createaccount OSD window will appear.3. Select the desired Smart Hub ID, and the press the ENTERE button.4. After selecting Smart Hub ID, enter the Password using the remote control.NNWhen login succeeds, Smart Hub ID will be displayed on the screen.▶English
◀How to create a Smart Hub IDBefore creating a Smart Hub ID, you should download the application first on the<strong>Samsung</strong> Apps.1. Press the Red button. The Login screen appears.2. Select Create Account. The Create Account screen will appear.3. Press the ENTERE button to enter a new Smart Hub ID. The Keypad screen willappear.4. Using the keypad screen, enter a Smart Hub ID.NNA Smart Hub ID must be created in “sample@sample.<strong>com</strong>” form.▶English
◀Using the KeypadPressing the TTX/MIX button on the remote while you are using the ScreenKeypad enables you to change the text fields to lower case, capitalized case,upper case, numbers and icons.Using the Green b button on the remote control to change the input mode. (T9/ABC)You can change the language by using the TOOLS button.You can use this Screen Keypad in a several Smart Hub applications.Method 1: Using keypad of ABC type.4-1. For example, suppose that you want to input “105Chang”.4-2. Press the TTX/MIX button on the remote 3 times to change the input modefrom lower case to numbers.4-3. Press the 1, 0 and 5 button in numerical order.▶English
◀4-4. Press the TTX/MIX button on the remote 4 times to change the input modefrom numbers to upper case.4-5. Press the 2 button on the remote 3 times to input C.4-6. Press the TTX/MIX button on the remote 3 times to change the input modefrom upper case to lower case.4-7. Press buttons on the remote to input the rest of “Chang”. When done, pressthe ENTERE button.Method 2: Using the Keypad of T9 type.4-1. For example, suppose that you want to input “105Chang”4-2. Press the TTX/MIX button on the remote 3 times to change the input modefrom lower case to numbers.4-3. Press the 1, 0 and 5 button in numerical order.▶English
4-4. Press the TTX/MIX button on the remote 4 times to change the input modefrom numbers to upper case.4-5. Press numbers in sequence: 2, 4, 2, 6, 4. A window will appear displaying alist of words that can be entered using the selected numbers. Select “Chang”from the list.NNIf “Chang” cannot be found in the list, select + to create your owndictionary.Add your own word to your dictionary◀▶English
◀5. Using the remote control, enter the Password.●●●●●●Password must be 6~12 words.You can delete the entered character using the PRE-CH button.Using the (REW) or µ (FF) button, you can select icon you want to enterin icon keypad screen.6. Account created. You can use the services provided by all users of your <strong>Samsung</strong>TV with a single login by linking the users’ account to the TV ID. If you want toregister a service site ID, select Connect Service. Service Site list will appear onthe screen.NNIf you want to register service later, select Connect Later.▶English
7. Select Service of the Service Site you want, then press the ENTERE button.8. Using number buttons, enter your application site ID and password. When done,select OK.◀9. Registered successfully. If you add anotherservice site, select Yes. then press theENTERE button, go to step 7.10. When <strong>com</strong>pleted, select OK. Then press theENTERE button.Account ManagementService ManagerResetPropertiesSettingsClose▶●The displayed image may differ depending onthe model.English
❑ Setting up Smart Hub■SettingsConfigure Smart Hub settings from this screen.Press } button to enter Settings.Account ManagementSettings●Account ManagementService ManagerResetRegister Service Account: Register loginProperties◀information for service sites.Change Password: Change accountpassword.●CloseThe displayed image may differ depending onthe model.▶Remove from TV Account List: Delete anaccount from the list of accounts.Deactivate Account: Withdraw membership from Smart Hub.English
◀●●Service ManagerTicker Autorun: You can set Ticker Autorun to <strong>com</strong>e on when powering on theTV.NNThe Ticker application provides useful News, Weather, and Stock Marketinformation. The Ticker application on Smart Hub must be downloaded to usethis feature.NNDepending on your country, Ticker application may have a different service ornot be supported.Channel Bound Service (Off / On): Some channels support applications as anInternet data service, allowing you to access the Internet service while watchingTV.NNOnly available if supported by the broadcaster▶English
●●Reset: Resets Smart Hub settings to factory def<strong>au</strong>lt settings. If you want resetSmart Hub, Enter password.NNThe def<strong>au</strong>lt password set is “0-0-0-0.”N N If you forget the password you created, press the following sequence of remotecontrol buttons to reset the password to “0-0-0-0”: POWER (off) → MUTE →8 → 2 → 4 → POWER (on).◀▶English
●●PropertiesMore: Display information about Smart Hub.Terms of Service Agreement: Display the Terms of Service Agreement.◀▶English
❑❑Using the Smart Hub service◀■■<strong>Samsung</strong> Apps<strong>Samsung</strong> Apps is a store for downloading applications to be used on <strong>Samsung</strong>TV/AV equipment.Users can enjoy a variety of contents such as videos, music, photos, games,useful information etc. using the downloaded applications.Additional applications will be available in the future.▶English
NNUsing the colour buttons with the <strong>Samsung</strong> Apps.●●a Red (Login): To log in to the internetWhat’s New?service.What’s New?VideoWel<strong>com</strong>e to <strong>Samsung</strong> Apps! More apps are in store for you to enjoy.Accu Weather●●b Green (List View / Thumbnail View):To change the view mode.GameSportsLifestyleInformationOtherMy AccountHelpTV store Test User001World ClockTV store Test User002TwitterTV store Test User003FacebookTV store Test User004Picasa WebTV store Test User005a Login b Thumbnail View µ page R Return◀●●The displayed image may differ depending on themodel.▶English
● ●●●●●} Blue (Sort by): To sort the applications by Re<strong>com</strong>mended, Mostdownloaded, Most recent or Name.πµ (Page): Move to previous or next page.R Return: Moves to previous menu.◀▶English
Using the <strong>Samsung</strong> Apps by categoryThe following categories are available:●●What’s New?: Displays newly registered applications.●●Video: Displays various video media such as movies, TV shows and short lengthvideos.●●Game: Displays various games such as sudoku and chess.◀●●●●Sports: Displays various sports media such as match information, images andshort length video.Lifestyle: Includes various lifestyle media services such as music, personal photomanagement tools and social networking such as Facebook and Twitter.▶English
●●●●●●●●Information: Includes various information services such as news, stocks andweather.Other: Includes other miscellaneous services.My Account: Displays the application list and your cyber cash balance.NNStarting in the middle of 2010 (US and Korea only), you can purchase cybercashfor buying applications through tv.samsung.<strong>com</strong>.Help: If you have questions about Smart Hub, check this section first.◀▶English
◀[Legal Statement]Due to the various capabilities of products featuring the <strong>Samsung</strong> Smart Hub -Content Service, as well as limitations in the available content, certain features,applications, and services may not be available on all devices or in all territories.Some features on Smart Hub may also require additional peripheral devices ormembership fees that are sold separately. Please visit http://www.samsung.<strong>com</strong> for more information on specific device information and content availability.The services and availability of content through Smart Hub are subject tochange from time to time without prior notice.▶English
■■Skype For LED 6600 series and aboveSkype created a little piece of software thatmakes <strong>com</strong>municating with people around theworld easy and fun. With Skype you can sayhello or share a l<strong>au</strong>gh with anyone, anywhere.And if both of you are on Skype, it’s free.Communicate with people around the world!ContactChatHistoryCall phonesSettingsEcho / Sound Test SerivceVoice CallVoice CallsamsungChata Sign Out { Add a Contact R Return◀NNFor more information, download the Skypeuser's manual from “www.samsung.<strong>com</strong>.”●●The displayed image may differ depending on themodel.▶English
◀■■Web Browser For LED 6600 series and above1. To open Web Browser, press the l / r / u / d buttons to select WebBrowser, and then press the ENTERE button. The Web Browser may bedisplayed differently with PC.2. The Web Browser is not <strong>com</strong>patible with a Java application.3. When attempted to download a file, but the file could not be saved and an errormessage appeared.4. Access may be blocked to some websites or to web browsers operated bycertain businesses.5. Playback of Flash video may be restricted.6. E-<strong>com</strong>merce, for purchasing products online, is not supported.▶English
◀7. Scrolling a web page that allows only part (and not the whole) of the page to bescrolled may c<strong>au</strong>se corrupted characters.8. ActiveX is not supported.9. Some options cannot be accessed in Tab mode. (To access such options,switch to Pointer mode.)10. Some text may appear corrupted bec<strong>au</strong>se the number of supported fonts islimited.11. The response to a <strong>com</strong>mand on the remote or the screen display may bedelayed temporarily if a web page is currently loading.12. The loading of a web page may delay or stop with some web pages.13. Copy and Paste are not supported.▶English
◀14. When writing emails or posting messages, some functions (Such as changingthe size or colors.) may not be supported.15. The number of bookmarks and logs that can be saved is limited.16. The maximum number of windows that can open at the same time may varydepending on the browsing condition or TV model.17. The web browsing speed depends on the network conditions.18. PIP will <strong>au</strong>tomatically be deactivated if a video is played in the browser. Videosmay not <strong>com</strong>mence playback after PIP interruption and a possible refresh forthe page may be required.19. The Web Browser can play MP3 <strong>au</strong>dio files only.20. The function for importing or exporting bookmarks is <strong>com</strong>patible with bookmarkfiles in a particular file format only.(Compatible format: Netscape-bookmark-file-1)▶English
◀21. When you import or export the bookmark, the folder tree is not included.22. If you import the bookmark file to a Computer from a TV, the bookmark file willbe saved in “<strong>Samsung</strong> SmartTV Bookmark” folder.23. If the time is not set in the menu (System → Time → Clock), the historyinformation may not be saved.24. Visited web site history is saved in chronological order and It will be removedfrom the list according to oldest page accessed.25. Some video or <strong>au</strong>dio content may not play during Flash playback depending onthe video/<strong>au</strong>dio codec supported.▶English
❑❑Troubleshooting for SMART HUBProblemPossible SolutionSome application contents onlyappear in English. How can I changethe language?The Application content language may be different from theapplication user interface language.The ability to change the language depends on the serviceprovider.◀Some application services do notwork.When a network error occurs, I canonly use the setting menu.Check with the service provider.Refer to the help website for application service providerinformation.If network connection doesn’t work, your service might belimited, as all functions except the setting menu are needed toconnect to the internet.▶English
◀All content and services accessible through this device belong to third parties and are protected bycopyright, patent, trademark and/or other intellectual property laws. Such content and services areprovided solely for your personal non<strong>com</strong>mercial use. You may not use any content or services in amanner that has not been <strong>au</strong>thorized by the content owner or service provider. Without limiting theforegoing, unless expressly <strong>au</strong>thorized by the applicable content owner or service provider, you may notmodify, copy, republish, upload, post, transmit, translate, sell, create derivative works, exploit, or distributein any manner or medium any content or services displayed through this device.YOU EXPRESSLY ACKNOWLEDGE AND AGREE THAT USE OF THE DEVICE IS AT YOUR SOLE RISKAND THAT THE ENTIRE RISK AS TO SATISFACTORY QUALITY, PERFORMANCE AND ACCURACYIS WITH YOU. THE DEVICE AND ALL THIRD PARTY CONTENT AND SERVICES ARE PROVIDED “ASIS” WITHOUT WARRANTY OF ANY KIND, EITHER EXPRESS OR IMPLIED. SAMSUNG EXPRESSLYDISCLAIMS ALL WARRANTIES AND CONDITIONS WITH RESPECT TO THE DEVICE AND ANY CONTENTAND SERVICES, EITHER EXPRESS OR, IMPLIED, INCLUDING BUT NOT LIMITED TO, WARRANTIESOF MERCHANTABILITY, OF SATISFACTORY QUALITY, FITNESS FOR A PARTICULAR PURPOSE, OFACCURACY, OF QUIET ENJOYMENT, AND NON-INFRINGEMENT OF THIRD PARTY RIGHTS. SAMSUNGDOES NOT GUARANTEE THE ACCURACY, VALIDITY, TIMELINESS, LEGALITY, OR COMPLETENESSOF ANY CONTENT OR SERVICE MADE AVAILABLE THROUGH THIS DEVICE AND DOES NOTWARRANT THAT THE DEVICE, CONTENT OR SERVICES WILL MEET YOUR REQUIREMENTS, OR THATOPERATION OF THE DEVICE OR SERVICES WILL BE UNINTERRUPTED OR ERROR-FREE.▶English
◀UNDER NO CIRCUMSTANCES, INCLUDING NEGLIGENCE, SHALL SAMSUNG BE LIABLE, WHETHERIN CONTRACT OR TORT, FOR ANY DIRECT, INDIRECT, INCIDENTAL, SPECIAL OR CONSEQUENTIALDAMAGES, ATTORNEY FEES, EXPENSES, OR ANY OTHER DAMAGES ARISING OUT OF, OR INCONNECTION WITH, ANY INFORMATION CONTAINED IN, OR AS A RESULT OF THE USE OF THEDEVICE, OR ANY CONTENT OR SERVICE ACCESSED BY YOU OR ANY THIRD PARTY, EVEN IFADVISED OF THE POSSIBILITY OF SUCH DAMAGES.Third party services may be changed, suspended, removed, terminated or interrupted, or access may bedisabled at any time, without notice, and <strong>Samsung</strong> makes no representation or warranty that any contentor service will remain available for any period of time. Content and services are transmitted by third partiesby means of networks and transmission facilities over which <strong>Samsung</strong> has no control. Without limitingthe generality of this disclaimer, <strong>Samsung</strong> expressly disclaims any responsibility or liability for any change,interruption, disabling, removal of or suspension of any content or service made available through thisdevice. <strong>Samsung</strong> may impose limits on the use of or access to certain services or content, in any case andwithout notice or liability.<strong>Samsung</strong> is neither responsible nor liable for customer service related to the content and services. Anyquestion or request for service relating to the content or services should be made directly to the respectivecontent and service providers.▶English
◀❑❑About AllShareAllShare connects your TV and <strong>com</strong>patible <strong>Samsung</strong> mobile phones/ devicesthrough a network. You can play media contents including videos, photos andmusic saved on your mobile phones or the other devices (such as your PC) bycontrolling them on the TV via the network.N N For more information, visit “www.samsung.<strong>com</strong>” or contact the <strong>Samsung</strong> callcentre. Mobile devices may need additional software installation. For details,refer to each device’s user’s guide.▶English
◀NNIf your <strong>Samsung</strong> TV connects to a non-<strong>Samsung</strong> DLNA server, a <strong>com</strong>patibilityissue may occur during video playback.NNBy connecting your <strong>Samsung</strong> TV to a network via AllShare, you can use<strong>Samsung</strong>’s original functions as follows:––Playback of various video formats (DivX,XVID, MP4, 3GPP, AVI, ASF, MKV,etc.)––Video thumbnail feature––Bookmark function (to resume video playback)––Auto-chaptering (scene navigation)––Digital content management––Compatibility with various subtitle formats (SRT, SMI, SUB, TXT, TTXT)––Search with file names––And many othersNNTo use the original DLNA functions of <strong>Samsung</strong> fully, it is re<strong>com</strong>mended thatyou use the AllShare software provided with your TV.English▶
❑❑Setting Up AllShareOOMENU → Network → AllShare Settings → ENTERE◀■■AllShare Settings●●Media (On / Off): Enables or disables the mediafunction. When the media function is on, Mediacontents play can be controlled by a mobile phoneor other devices that support DLNA DMC.AllShare SettingsMedia▶●●The displayed image may differdepending on the model.English
■■MediaShows a list of mobile phones or connected devices which have been set up withthis TV for using the Media function.NNThe Media function is available in all devices which support DLNA DMC.◀●●●●Allowed / Denied: Allows/Blocks the the devices.Delete: Deletes the devices from the list.N N This function only deletes the name of the device from the list. If the deleteddevice is turned on or tries to connect to the TV, it may appear on the listagain.▶English
Using the Media FunctionAn alarm window appears informing the user that the media contents (videos, photos,music) sent from a mobile phone will be displayed on your TV. The contents are played<strong>au</strong>tomatically 3 seconds after the alarm window appears. If you press the RETURN orEXIT button when the alarm window appears, the media contents are not played.NNNOTE◀●●If the media function executes for the first time, the warning popup windowappears. Press the ENTERE button to select Allow, then you can use Mediafunction on that device.▶English
●●To turn off the media contents transmission from the mobile phone, set Mediato Off in the AllShare Settings.●●Contents may not be played on your TV depending on their resolution andformat.●●The ENTERE and l / r buttons may not work depending on the type ofmedia content.◀●●Using the mobile device, you can control the media playing. For details, refer toeach mobile’s user’s guide.▶English
What is Anynet+? tAnynet+ is a function that enables you to control all connected <strong>Samsung</strong> devices thatsupport Anynet+ with your <strong>Samsung</strong> TV’s remote. The Anynet+ system can be usedonly with <strong>Samsung</strong> devices that have the Anynet+ feature. To be sure your <strong>Samsung</strong>device has this feature, check if there is an Anynet+ logo on it.NNNOTE◀●●●●You can only control Anynet+ devices using the TV remote control, not thebuttons on the TV.The TV remote control may not work under certain conditions. If this occurs,reselect the Anynet+ device.▶●●The Anynet+ functions do not operate with other manufacturers’ products.English
For the method of connecting external devices , refer to the supported user manual.NNNOTE●●Connect the Optical cable between the DIGITAL AUDIO OUT (OPTICAL) jackon your TV and the Digital Audio Input on the Home Theatre.◀●●When following the connection above, the Optical jack only outputs 2 channel<strong>au</strong>dio. You will only hear sound from the Home Theatre’s Front, Left and Rightspeakers and the subwoofer. If you want to hear 5.1 channel <strong>au</strong>dio, connectthe DIGITAL AUDIO OUT (OPTICAL) jack on the DVD / Satellite Box (i.e.Anynet Device 1 or 2) directly to the Amplifier or Home Theatre, not the TV.▶English
●●●●●●●●You can connect only one Home Theatre.You can connect an Anynet+ device using the HDMI cable. Some HDMI cablesmay not support Anynet+ functions.Anynet+ works when the AV device supporting Anynet+ is in the standby or onstatus.Anynet+ supports up to 12 AV devices in total. Note that you can connect upto 3 devices of the same type.◀▶English
Anynet+ MenuThe Anynet+ menu changes depending on the type and status of the Anynet+ devicesconnected to the TV.Anynet+ MenuDescriptionView TVChanges Anynet+ mode to TV broadcast mode.Device ListShows the Anynet+ device list.(device_name) MENUShows the connected device menus. E.g. If a DVD recorder is connected,the disc menu of the DVD recorder will appear.◀(device_name) TOOLSShows the tools menu of the connected device. E.g. If a DVD recorder isconnected, the play menu of the DVD recorder will appear.▶NNDepending on the device, this menu may not be available.(device_name) Title MenuShows the title menu of the connected device. E.g. If a DVD recorder isconnected, the title menu of the DVD recorder will appear.NNDepending on the device, this menu may not be available.ReceiverSound is played through the receiver.English
❑❑Setting Up Anynet+■■Anynet+ (HDMI-CEC) (Off / On) tOOMENU → System → Anynet+(HDMI-CEC) → ENTERETo use the Anynet+ Function, Anynet+ (HDMI-CEC) must be set to On.NNWhen the Anynet+ (HDMI-CEC) function is disabled, all the Anynet+ relatedoperations are deactivated.◀■■Auto Turn Off (No / Yes)▶Setting an Anynet+ Device to turn off <strong>au</strong>tomatically when the TV is turned off.NNIf Auto Turn Off is set to Yes, running external devices will turn off at the sametime as the TV powers off.NNMay not be enabled depending on the device.English
◀❑❑Switching between Anynet+ Devices1. Press the TOOLS button to select Anynet+ (HDMI-CEC). And then press theENTERE button to select Device List.NNIf you cannot find a device you want, select Refresh to refresh the list.2. Select a device and press the ENTERE button. You can switch to theselected device.NNThe Device List menu will only appear when you set Anynet+ (HDMI-CEC)to On in the System menu.●●Switching to the selected device may take up to 2 minutes. You cannotcancel the operation during the switching operation.▶●●If you have selected external input mode by pressing the SOURCE button,you cannot use the Anynet+ function. Make sure to switch to an Anynet+device by using the Device List.English
◀❑❑Listening through a ReceiverYou can listen to sound through a receiver (i.e Home Theatre) instead of the TVSpeaker.1. Select Receiver and set to On.2. Press the EXIT button to exit.NNIf your receiver supports <strong>au</strong>dio only, it may not appear in the device list.NNThe receiver will work when you have properly connected the optical in jackof the receiver to the DIGITAL AUDIO OUT (OPTICAL) jack of the TV.N N When the receiver (i.e Home Theatre) is set to On, you can hear soundoutput from the TV’s Optical jack. When the TV is displaying a DTV (air)signal, the TV will send out 5.1 channel sound to the receiver. When thesource is a digital <strong>com</strong>ponent such as a DVD and is connected to the TV viaHDMI, only 2 channel sound will be heard from the receiver.▶English
❑❑Troubleshooting for Anynet+◀ProblemAnynet+ does not work.Possible Solution••Check if the device is an Anynet+ device. The Anynet+ systemsupports Anynet+ devices only.••Only one receiver (home theatre) can be connected.••Check if the Anynet+ device power cord is properly connected.••Check the Anynet+ device’s Video/Audio/HDMI cable connections.••Check whether Anynet+ (HDMI-CEC) is set to On in the Anynet+setup menu.••Check whether the TV remote control is in TV mode.••Check whether the remote control is Anynet+ <strong>com</strong>patible.••Anynet+ doesn’t work in certain situations. (Searching channels,operating Smart Hub or Plug & Play (initial setup), etc.)••When connecting or removing the HDMI cable, please make sure tosearch devices again or turn your TV off and on again.••Check if the Anynet+ Function of Anynet+ device is set on.▶English
I want to start Anynet+.••Check if the Anynet+ device is properly connected to the TV andcheck if the Anynet+ (HDMI-CEC) is set to On in the Anynet+Setup menu.••Press the TOOLS button to display the Anynet+ menu and select amenu you want.••Select View TV in the Anynet+ menu.••Press the SOURCE button on the TV remote control and select anon- Anynet+ device.I want to exit Anynet+.◀The message “Connecting toAnynet+ device...” appears onthe screen.••You cannot use the remote control when you are configuringAnynet+ or switching to a view mode.••Use the remote control when the Anynet+ setting or switching toview mode is <strong>com</strong>plete.••You cannot use the play function when Plug & Play (initial setup) isin progress.▶The Anynet+ device does notplay.English
The connected device is notdisplayed.••Check whether or not the device supports Anynet+ functions.••Check whether or not the HDMI cable is properly connected.••Check whether Anynet+ (HDMI-CEC) is set to On in the Anynet+setup menu.••Search Anynet+ devices again.••You can connect an Anynet+ device using the HDMI cable only.Some HDMI cables may not support Anynet+ functions.••If connection is terminated bec<strong>au</strong>se there has been a powerinterruption or the HDMI cable has been disconnected, pleaserepeat the device scan.••Connect the optical cable between TV and the receiver.◀The TV sound is not outputthrough the receiver.▶English
❑❑Using the Smart HubEnjoy photos, music and movie files saved on aUSB Mass Storage Class (MSC) device.SearchYour Movie<strong>Samsung</strong> Apps1. Press the SMART HUB button.Connect to the Internet and enjoy a variety of contents throuth Smart Hub.This feature may not be available in some countries.For some of the countries listed, local language characters might not be displayed properly.◀2. Press the d or u button to select desiredmenu (Videos, Photos, Music), then pressthe ENTERE button.●●FavouritesPhotosChannelMusicGuideRecord TVWeb BrowserVideosSchedule Man... Source AllSharea Login b Sort by { Edit Mode } SettingsThe displayed image may differ depending on themodel.▶English
◀❑❑Connecting a USB Device1. Turn on your TV.2. Connect a USB device containingrecorded tv for LED 6400 series and above , photo,music and movie files to theUSB [1(HDD), 2 or 3] port on the back orside panel of the TV.3. When USB is connected to the TV, popupwindow appears. Then you can selectConnected Device.NNIf an external USB device connected to the TV’s USB port draws an excessiveamount of current from the port, the message “USB Power overload” appearson the screen. This is not a problem with the TV, which provides the standardcurrent from its USB ports, but a problem with the external device. Pleasecontact the manufacturer of the device for support.●●TV Rear PanelUSB DriveThe displayed image may differ depending on themodel.▶English
❑❑Connecting to the PC through networkYou can play pictures, music and videos saved on your PC through a networkconnection in the AllShare mode.1. For more information on how to configure your network, refer to “NetworkMenu”.◀●●You are re<strong>com</strong>mended to locate both TV and PC in same subnet. The first3 parts of the subnet address of the TV and the PC IP addresses should bethe same and only the last part (the host address) should be changed. (e.g.IP Address: 123.456.789.**)▶2. Using a LAN cable, connect between the external modem and the PC ontowhich the AllShare PC Software will be installed.●●You can connect the TV to the PC directly without connecting it through aSharer (Router).English
NNFunctions that are not supported when connecting to a PC through a network:●●●●●●The Background Music and Background Music Setting functions.Sorting files by preference in the Photos, Music, and Videos folders.The π (REW) or µ (FF) button while a movie is playing.NNDivX DRM, Multi-<strong>au</strong>dio, embedded captions are not supported.NNAllShare PC Software should be permitted by the firewall programme on your PC.◀▶English
◀NNWhen you use media contents mode through a network connection, depending onthe functions of the provided server:●●●●●●The sorting method may vary.The Resume, which resumes playing of a video, may not be supported.––The Resume function does not support multiple users. (It will have onlymemorised the point where the most recent user stopped playing.)The l or r button may not work depending on the content information.NNYou may experience file stuttering while playing a video in Smart Hub contentsthrough a network connection.▶English
Before using media contents functions...NNIt might not work properly with unlicenced multimedia files.NNNeed-to-Know List before using media contents●●MTP (Media Transfer Protocol) is not supported.●●The file system supports FAT16, FAT32 and NTFS.◀●●●●Certain types of USB Digital camera and <strong>au</strong>dio devices may not be <strong>com</strong>patiblewith this TV.Media contents only supports USB Mass Storage Class (MSC) devices.MSC is a Mass Storage Class Bulk-Only Transport device. Examples of MSCare Thumb drives, Flash Card Readers and USB HDD (USB HUB are notsupported). Devices should be connected directly to the TV’s USB port.▶English
●●Before connecting your device to the TV, please back up your files to preventthem from damage or loss of data. SAMSUNG is not responsible for any datafile damage or data loss.●●Connect a USB HDD to the dedicated USB 1 (HDD) port.●●Do not disconnect the USB device while it is loading.●●The higher the resolution of the image, the longer it takes to display on thescreen.◀●●●●The maximum supported JPEG resolution is 15360X8640 pixels.For unsupported or corrupted files, the “Not Supported File Format” messageis displayed.▶●●If the files are sorted by Folder View, up to 1000 files can be displayed in eachfolder.English
●●MP3 files with DRM that have been downloaded from a non-free site cannotbe played. Digital Rights Management (DRM) is a technology that supportsthe creation, distribution and management of the content in an integrated and<strong>com</strong>prehensive way, including the protection of the rights and interests of thecontent providers, the prevention of the illegal copying of contents, as well asmanaging billings and settlements.●●If more than 2 PTP devices are connected, you can only use one at a time.◀●●If more than two MSC devices are connected, some of them may not berecognized. A USB device that requires high power (more than 500mA or 5V)may not be supported.▶●●If an over-power warning message is displayed while you are connecting orusing a USB device, the device may not be recognized or may malfunction.English
●●If the TV has been no input during time set in Auto Protection Time, theScreensaver will run.●●The power-saving mode of some external hard disk drives may be released<strong>au</strong>tomatically when connected to the TV.●●If a USB extension cable is used, the USB device may not be recognized or thefiles on the device may not be read.◀●●If a USB device connected to the TV is not recognized, the list of files on thedevice is corrupted or a file in the list is not played, connect the USB device tothe PC, format the device and check the connection.▶●●If a file deleted from the PC is still found when Smart Hub contents is run, usethe “Empty the Recycle Bin” function on the PC to permanently delete the file.English
Screen DisplayMove to the file you desired using the u / d / r / l buttons and then press theENTERE or (Play) button. The file is played.Device name: Displays aconnected device name.MusicSUMHome: Return to contenthome◀File List Section: Youcan confirm the files andgroups that is sorted byeach category.Upper FolderI Love MusicMingMusic_1No SingerMusic_2No SingerMusic_3No SingerMusic_4No SingerSweet CandyMusic_5No SingerMusic_6No SingerMusic_7No SingerMusic_8No SingerMusic_9No SingerChange Contents/Device:Changes the content type orconnected device.Sorting: Displays sortingstandard. Sorting standardis different depending on thecontents.Edit Mode: Select and playmultiple files or assign themto My Playlist. This function isavailable only for Music.▶Page bar: Moves to another page containing a list of files.English
◀❑❑Recorded TVfor LED 6400 series and aboveNNThis function may not be supported depending on the region.To use the recording or Timeshift function, the connected USB device must beavailable for recording. Device format is re<strong>com</strong>mended to use USB HDD.NNDuring the Device formatting, do not disconnect the device while formatting isin progress. If you format the device, all files will be deleted.NNBefore formatting your device to the tv, please back up your files to preventthem from damage or loss of data. SAMSUNG is not responsible for any datafile damage or data loss.N N The reading/writing performance and controller of USB hard disk drives vary.Accordingly, some USB hard disk drives may fail a performance test. A USBhard disk drive that fails a performance test cannot be used with a PVR.▶English
■■Timer Recording (in Schedule Manager)Allows you to make a reservation to record a programme scheduled for broadcast.Set the current time first to use this function.◀Using the Timer Recording function (digital channels only)1. Press the ENTERE button to select Schedule Manager. The ScheduleManager screen will be displayed.2. Press the ENTERE button to add manual booking. A pop up screen willappear.▶English
3. Press the l or r button to select the Timer Recording.NNWe re<strong>com</strong>mend using a USB HDD with at least 5 400 rpm, but a USBHDD of RAID type is not supported.NNA USB storage device cannot record until it <strong>com</strong>pletes the DevicePerformance Test.4. Press the l / r / u / d buttons to set the Antenna, Channel, Repeat, Date,Start Time or End Time.◀▶English
◀To record a current broadcasting programmeAllows you to record a programme currently being broadcasted.Set the current time first to use this function.1. When you watch a broadcast programme, press the (REC) button on theremote to record. A pop up window will appear.NNWe re<strong>com</strong>mend using a USB HDD with at least 5 400 rpm, but a USB HDDof RAID type is not supported.NNA USB storage device cannot record until it <strong>com</strong>pletes the DevicePerformance Test.2. Select Length to set up the recording time, and then select OK.▶English
◀Using the Timeshift functionIf you missed a live broadcast, you can see from the recorded broadcast using thisfeature.1. When you watch a broadcast programme, press the (Play) button on theremote to start the Timeshift function.2. If you want to stop the Timeshift function, press the (Stop) button on theremote.NNThe Timeshift mode operates for a maximum of 90 minutes.NNAfter the Timeshift mode function has run for the maximum time, the timeinformation will be fixed to “00:00:00.”NNThe Timeshift function is not supported for analogue channels.NNThe Timeshift functions are disabled for channels locked with ChannelLock.▶English
Before using the Timeshift and a record function...[[Recorded videos are DRM (digital rights management) protected and cannot beplayed on a PC or other TVs. Note that files saved on the TV cannot be usedafter the main board is changed.NNNOTE●●We re<strong>com</strong>mend using a USB HDD with at least 5 400 rpm, but a USB HDDof RAID type is not supported.◀●●The availability of both recording and the Timeshift function may differdepending on picture quality and the free space on the hard disk drive.▶●●Note that if you have p<strong>au</strong>sed the recording the TV will <strong>au</strong>tomatically resumeplayback.English
●●If the 5% free memory space limit of the USB storage device is reached, thecurrent recording process will be closed.●●When recording is performed by both the PVR (Personal Video Recorder)function and a device that supports the HDMI-CEC feature, recording by thePVR function takes precedence.●●During a playback or the Timeshift, the picture will be displayed accordingto the display settings of the TV.◀●●If you change the input source during recording, the screen will go blankuntil the change is <strong>com</strong>pleted.▶English
●●●●●●If the USB device has failed the Device Performance Test, the USB devicemust go through the Device Format and Device Performance Test againbefore you record with the Guide or Channel.The Timeshift functions can only be used with a USB storage device that<strong>com</strong>pleted the Device Performance Test.If you attempt the recording or Timeshift function with a device that did nothave the Device Performance Test, the function will not start.◀▶English
●●If you press (REC) on the remote control while the Channel screen isbeing displayed or record with Timer Recording, the TV may start or stoprecording 1 or 2 seconds later than you intended due to the time needed toprocess the <strong>com</strong>mand.●●If a USB device dedicated to recording is connected, existing Timeshift orrecording files that were saved abnormally will <strong>au</strong>tomatically be deleted.●●If you switch to external input mode during recording, the recording will◀●●continue but the (REC) button will be disabled.If any function that turns off the TV (Sleep Timer, Off timer, etc.) is set▶for a time that conflicts with recording, the TV will be turned off once therecording is <strong>com</strong>plete.English
Playing Recorded TV Programme1. Press the l / r / u / d button to select the desired file in the file list.2. Press the ENTERE button or (Play) button.●●The selected file is displayed on the top with its playing time.●●During playing the recorded TV programme, you can search using the l andr button.◀●●You can use (REW) and µ (FF) buttons during playback.▶English
■■VideosPlaying Video1. Press the l/r/u/d button to select thedesired file in the file list.2. Press the ENTERE button or (Play)button.1:02:15 / 2:04:101:02:15 / 2:04:10◀●●●●The selected file is displayed on the topwith its playing time.If video time information is unknown,●●The displayed image may differ depending on themodel.▶play time and progress bar are not displayed.●●During playing the video, you can search using the l and r button.●●You can use (REW) and µ (FF) buttons during playback.English
●●NNIn this mode, you can enjoy movie clips contained on a Game, but youcannot play the Game itself.Supported Subtitle Formats◀Name File extension FormatMPEG-4 time-based text .ttxt XMLSAMI .smi HTMLSubRip .srt string-basedSubViewer .sub string-basedMicro DVD .sub or .txt string-based▶English
●●Supported Video Formats◀File Extension Container Video Codec Resolution*.avi*.mkv*.asfAVIMKVASFFrame rate(fps)Bit rate(Mbps)DivX 3.11 / 4.x / 5.1 / 6.0 1920x1080 6 ~ 30 8XviD 1920x1080 6 ~ 30 8H.264 BP / MP / HP 1920x1080 6 ~ 30 25MPEG4 SP / ASP 1920x1080 6 ~ 30 8Motion JPEG 1920x1080 6 ~ 30 8DivX 3.11 / 4.x / 5.1 / 6.0 1920x1080 6 ~ 30 8XviD 1920x1080 6 ~ 30 8H.264 BP / MP / HP 1920x1080 6 ~ 30 25MPEG4 SP / ASP 1920x1080 6 ~ 30 8Motion JPEG 800x600 6 ~ 30 8Audio CodecMP3 / AC3/ LPCM /ADPCM /DTS CoreMP3 / AC3/ LPCM /ADPCM /WMA*.wmv ASF Window Media Video v9 1920x1080 6 ~ 30 25 WMA*.mp4MP4H.264 BP / MP / HP 1920x1080 6 ~ 30 25MPEG4 SP / ASP 1920x1080 6 ~ 30 8XVID 1920x1080 6 ~ 30 8MP3 /ADPCM /AAC▶English
File Extension Container Video Codec Resolution*.3gp3GPPFrame rate(fps)Bit rate(Mbps)Audio CodecH.264 BP / MP / HP 1920x1080 6 ~ 30 25 ADPCM /MPEG4 SP / ASP 1920x1080 6 ~ 30 8AAC / HE-AAC*.vroVROVOBMPEG1 352x288 24 / 25 / 30 30 AC3 / MPEGMPEG2 1920x1080 24 / 25 / 30 30 / LPCM◀*.mpg*.mpeg*.ts*.tp*.trpPSTSMPEG1 352x288 24 / 25 / 30 30MPEG2 1920x1080 24 / 25 / 30 30H.264 1920x1080 6 ~ 30 25MPEG2 1920x1080 24 / 25 / 30 30H.264 1920x1080 6 ~ 30 25VC1 1920x1080 6 ~ 30 25AC3 / MPEG/ LPCM /AACAC3 / AAC /MP3 / DD+ /HE-AAC▶English
Other RestrictionsNNNOTE●●Video content will not play, or not play correctly, if there is an error in thecontent or the container.●●Sound or video may not work if the contents have a standard bitrate/frame rateabove the <strong>com</strong>patible Frame/sec listed in the table above.●●If the Index Table is in error, the Seek (Jump) function is not supported.◀●●●●Video content can not be played, if there are many contents in one file.You may experience file stuttering while playing a video through a networkconnection.▶English
Video Decoder••Supports up to H.264, Level 4.1••H.264 FMO / ASO / RS, VC1 SP / MP / AP L4and AVCHD are not supported.••XVID, MPEG4 SP, ASP:−−Below 1280 x 720: 60 frame maxAudio Decoder••Supports up to WMA 7, 8, 9, STD••WMA 9 PRO does not support 2 channel excessmulti channel or lossless <strong>au</strong>dio.••WMA sampling rate 22050Hz mono is notsupported.−−Above 1280 x 720: 30 frame max••GMC 2 over is not supported.◀▶English
◀Playing movie file continuously (Resume Play)If you exit the playing Videos function, it can be played later from the point where itwas stopped.NNThe Resume function does not support multiple users. (It will have only memorisedthe point where the most recent user stopped playing.)1. Select the movie file you want to play continuously by pressing the l or r buttonto select it from the file list section.2. Press the (Play) / ENTERE button.NNA triangle icon will appear on the progress bar when the playback starts.3. Press the TOOLS button, and then select Resume. The Movie will begin to playfrom where it was stopped.▶English
■■Music◀Playing Music1. Press the l / r / u/ d button to select thedesired music file in the file list.2. Press the ENTERE button or (Play)button.●●During playing the music, you can searchusing the (REW) and µ (FF) button.I Love YouMingNNOnly displays the files with MP3 extension.Other file extensions are not displayed, even if they are saved on the same USBdevice.NNIf the sound is abnormal when playing MP3 files, adjust the Equalizer in theSound menu. (An over-modulated MP3 file may c<strong>au</strong>se a sound problem.)●●Music Playlist 13/30LoveR&B2011-01-011.2MB01:01/03:12Music_1No SingerMusic_2No SingerMusic_3No SingerI Love YouMingMusic_4No SingerMusic_5No SingerMusic_6No SingerMusic_7No SingerMusic_8No SingerThe displayed image may differ depending on themodel.▶English
◀Creating My Playlist1. On the Music screen in the SMART HUB menu, press the l / r / u / d buttonto select Edit Mode, and then press the ENTERE button.2. Press the l / r / u / d button to select the tracks you want to add and press theENTERE button.NNThe check box appears to the left of the selected files.NNTo select all the files in the current page, select Select All at the top.3. Press the l / r / u / d button to select Add to My Playlist.NNNote that selecting My Playlist Initialize will return My Playlist to the def<strong>au</strong>ltplaylist.▶English
4. Press the ENTERE button. The message Selected items added to My Playlist.is displayed.5. The newly created or updated playlist will be in the main Music page.◀Playing My PlaylistSelect the My Playlist folder and it will play <strong>au</strong>tomatically. Press the u or d button toselect a different music file within the play list.NNTo delete a file from My Playlist, select the recycle bin icon next to the file youwant to delete by using the direction buttons.▶English
Playing the selected music files1. On the Music screen in the SMART HUB menu, press the l / r / u / d buttonto select Edit Mode, and then press the ENTERE button.2. Press the l / r / u / d button to select the desired music file in the file list, andthen ENTERE button.NNNOTE●●The check box mark appears to the left of the selected files.◀●●To select all the files in the current page, select Select All at the top.▶●●To cancel a selection, press the ENTERE button again.3. Press the l / r / u / d button to select Play. The selected music files will beplay.English
■■PhotosViewing a Photo (or Slide Show)1. Press the l/r/u/d button to select thedesired file in the file list.Normal Friends.jpg 1024 X 768 2011/01/03◀2. Press the ENTERE button.●●●●●●When you press the (Play) buttonin the file list, slide show will be startedimmediately.All files in the file list section will be displayedin the slide show.During the slide show, files are displayed in order from currently being shown.NNMusic files can be <strong>au</strong>tomatically played during the slide show if the BackgroundMusic is set to On.NNThe Background Music cannot be changed until the BGM has finished loading.●●The displayed image may differ depending on themodel.▶English
❑❑Media Contents - Additional FunctionSorting the file listTo sort files in the file list, select the Sorting by using the l / r / u / dbutton. And then press the ENTERE button.CategoryOperationsRecordedTVVideos Music Photos◀Def<strong>au</strong>lt Def<strong>au</strong>lt is sorted by Title without Group >Folder ViewDisplays the whole folder. You can viewthe file name and thumbnail by selectingthe folder.> > >▶TitleSorts and displays the file title in Symbol/Number/Alphabet/Special order.> > >Latest Date Sorts and shows files by the latest date. > >English
CategoryOperationsRecordedTVVideos Music PhotosEarliest Date Sorts and shows files by the earliest date. > >ArtistAlbumSorts the music file by artist in alphabeticalorder.Sorts the music file by album inalphabetical order.>>◀Genre Sorts music files by the genre. >Monthly Sorts and shows photo files by month. >▶English
Videos / Music / Photos Play Option menuDuring playback using Videos or Photos function, press the TOOLS button.The following functions are enabled during playback.CategoryOperationsRecordedTVVideos Music PhotosList Return to the file list. > > > >◀Previous /NextShuffleGo to previous / next photo file. >You can play the music sequentially orrandomly.>▶ResumeA movie file will begin to play from where itwas stopped.>Set SectionRepeatYou can set up the function to repeat somesection. You can also watch some sectionyou want to.>EditFavoritesSet files you watch frequently as favorites. >SceneSearchYou can search scene divided into 5 chaptersyou want.>English
CategoryOperationsRecordedTVVideos Music PhotosTitle Search You can move directly to another Title. >Time SearchYou can search the movie using l and rbuttons at intervals of 1 minute.>SubtitleYou can view a subtitle. You can select aspecific language if the subtitle file containsmultiple languages.>◀RepeatModePicture SizeYou can play movie and music filesrepeatedly.You can adjust the picture size to yourpreference.> >>▶PictureModeYou can change the Picture Mode. > >Sound Mode You can change the Sound Mode. > > >English
CategoryOperationsRecordedTVVideos Music PhotosAudioLanguageYou can enjoy video in one of supportedlanguages as required. The function isonly enabled when stream-type files whichsupport multiple <strong>au</strong>dio formats are played.>SubtitleSettingDisplays the Subtitle Setting. You can setup a subtitle option.>◀Play / P<strong>au</strong>seStart SlideShow /StopSlide ShowYou can start or stop. Alternatively, the (Play) or (P<strong>au</strong>se) button on the remotecan be used.> >You can start or stop a slide show. >▶Slide ShowSpeedYou can select the slide show speed duringthe slide show. Alternatively, the (Rew) orµ (FF) button on the remote can be used.>English
◀CategorySlide ShowEffectBackgroundMusic OnBackgroundMusicSettingZoomOperationsRecordedTVVideos Music PhotosYou can set various slide show effects. >You can start or stop a background music. >You can set and select background musicwhen watching a photo file or slide show.You can zoom into images in full screenmode.Rotate You can rotate images. >NNPressing the INFO button while a device name is selected will displayinformation about the selected device name.NNPressing the INFO button while a file is selected will display information aboutthe selected file.>>▶UIfdS34English
Other Information❑❑TroubleshootingIf you have any questions about the TV, first refer to this list. If none of thesetroubleshooting tips apply, please visit “www. samsung.<strong>com</strong>,” then click on Support,or contact the call centre listed on the back-cover of this manual.◀IssuesPicture QualitySolutions and ExplanationsFirst of all, please perform the Picture Test and confirm that your TV isproperly displaying test image.(go to MENU - Support - Self Diagnosis - Picture Test)If the test image is properly displayed, the poor picture may c<strong>au</strong>sed by thesource or signal.▶English
IssuesSolutions and Explanations◀The TV image does not look asgood as it did in the store.The picture is distorted: macroblock error, small block, dots,pixelization••If you have an analogue cable/set top box, upgrade to a digital set topbox. Use HDMI or Component cables to deliver HD (high definition)picture quality.••Cable/Satellite subscribers: Try HD stations from the channel line up.•N• Antenna connection: Try HD stations after performing Auto programme.N Many HD channels are up scaled from SD(Standard Definition)contents.••Adjust the Cable/Set top box video output resolution to 1080i or 720p.••Make sure you are watching the TV at the minimum re<strong>com</strong>mendeddistance based on the size and definition of the signal.••Compression of video contents may c<strong>au</strong>se picture distortion especially infast moving pictures such as sports and action movies.••Low signal level or bad quality can c<strong>au</strong>se picture distortion. This is not aTV issue.••Mobile phones used close to the TV (cca up to 1m) may c<strong>au</strong>se noise inpicture on analogue and digital TV.▶English
IssuesSolutions and ExplanationsColour is wrong or missing.••If you’re using a <strong>com</strong>ponent connection, make sure the <strong>com</strong>ponentcables are connected to the correct jacks. Incorrect or loose connectionsmay c<strong>au</strong>se colour problems or a blank screen.••Adjust the Picture options in the TV menu (go to Picture Mode / Colour/ Brightness / Sharpness)••Adjust Energy Saving option in the TV menu (go to MENU – System –Eco Solution – Energy Saving)••Try resetting the picture to view the def<strong>au</strong>lt picture settings (go to MENU- Picture - Reset Picture)There is poor colour orbrightness.◀There is a dotted line on theedge of the screen.••If the picture size is set to Screen Fit, change it to 16:9.••Change cable/satellite box resolution.••If you are using an AV <strong>com</strong>posite input, connect the video cable (yellow)to the Green jack of <strong>com</strong>ponent input 1 on the TV.▶The picture is black and white.When changing channels, thepicture freezes or is distorted ordelayed.••If connected with a cable box, please try to reset the cable box.Reconnect the AC cord and wait until the cable box reboots. It may takeup to 20 minutes.••Set the output resolution of the cable box to 1080i or 720p.English
IssuesSound QualitySolutions and ExplanationsFirst of all, please perform the Sound Test to confirm that your TV <strong>au</strong>diois properly operating. (go to MENU - Support - Self Diagnosis - SoundTest)If the <strong>au</strong>dio is OK, the sound problem may c<strong>au</strong>sed by the source or signal.There is no sound or the soundis too low at maximum volume.••Please check the volume the of external device connected to your TV.◀The picture is good but there isno sound.••Set the Speaker Select option to TV Speaker in the sound menu.••If you are using an external device, make sure the <strong>au</strong>dio cables areconnected to the correct <strong>au</strong>dio input jacks on the TV.••If you are using an external device, check the device’s <strong>au</strong>dio outputoption (ex. you may need to change your cable box’s <strong>au</strong>dio option toHDMI when you have a HDMI connected to your TV).••If you are using a DVI to HDMI cable, a separate <strong>au</strong>dio cable is required.••If your TV has a headphone jack, make sure there is nothing plugged intoit.▶English
IssuesThe speakers are making aninappropriate noise.Solutions and Explanations••Check the cable connections. Make sure a video cable is not connectedto an <strong>au</strong>dio input.••For antenna or cable connections, check the signal strength. Low signallevel may c<strong>au</strong>se sound distortion.◀No Picture, No VideoThe TV turns off <strong>au</strong>tomatically.RF(Cable/Antenna) ConnectionThe TV is not receiving allchannels.••Ensure the Sleep Timer is set to Off in the Setup menu.••If your PC is connected to the TV, check your PC power settings.••Make sure the AC power cord is plugged in securely to the wall outletand the TV.••When watching TV from an antenna or cable connection, the TV will turnoff after 10 ~ 15 minutes if there is no signal.••Make sure the Antenna cable is connected securely.••Please try Plug & Play (Initial setup) to add available channels to thechannel list. Go to MENU - System - Plug & Play (Initial setup) and waitfor all available channels to be stored.••Verify the Antenna is positioned correctly.▶English
IssuesSolutions and ExplanationsThe picture is distorted: macroblock error, small block, dots,pixelization.••Compression of video contents may c<strong>au</strong>se picture distortion, especiallywith fast moving pictures such as sports and action movies.••A low signal can c<strong>au</strong>se picture distortion. This is not a TV issue.PC ConnectionA “Mode Not Supported”message appears.••Set your PC’s output resolution so it matches the resolutions supportedby the TV.◀“PC” is always shown on thesource list, even if a PC is notconnected.The video is OK but there is no<strong>au</strong>dio.••This is normal; “PC” is always shown on the source list, regardless ofwhether a PC is connected.••If you are using an HDMI connection, check the <strong>au</strong>dio output setting onyour PC.▶Network ConnectionThe wireless network connectionfailed.••The <strong>Samsung</strong> Wireless USB dongle is required to use a wireless network.••Make sure the Network Connection is set to Wireless.••Make sure the TV is connected to a wireless IP sharer (router).English
IssuesSolutions and ExplanationsRecording / Timeshift for LED 6400 and 6600 SeriesThe USB device is notrecognized or a Device Format,Checking Device or DevicePerformance Test fails.••See the manual for the USB device to check that the USB devicesupports recording.••If the USB device has a lock, ensure it is off.••Check that the USB device can be formatted when connected to thePC. Connect the USB to the TV and format it. (Formatting may failintermittently.)••If a Device Performance Test or formatting failed, it means that thereis a problem with the USB hardware or the performance of the USBhardware is too low.••If the USB device has a lock, ensure it is off.••Recover the USB device using the recovery function in CheckingDevice.◀A message prompts me toformat a USB device that hasbeen working well.▶English
IssuesSolutions and ExplanationsThe recording function does notwork.••Check that a USB device is connected.••Check that the channel is a recordable digital channel.••If the signal is weak or does not exist, the recording function will<strong>au</strong>tomatically be closed.••The TV will not record if the USB device has no free memory space.Check that this is not the case.••Check that a USB device is connected.••Radio channels and analogue broadcasts are not supported.••Data broadcast channels are not supported.••If the signal is weak or does not exist, the Timeshift Mode function will<strong>au</strong>tomatically be closed.••Timeshift Mode cannot be performed if the USB device has no freememory space. Check that this is not the case.◀Timeshift Mode does not work.▶English
◀IssuesA message indicates aperformance test failure, and therecording and Timeshift Modefunctions do not work.A scheduled recording hasfailed.Several recording devices areconnected but the TV stoppedrecording.Solutions and Explanations••These problems may occur if you use a low-capacity USB device thatdoes not support recording. We re<strong>com</strong>mend using a USB HDD with atleast 5 400 rpm, but a USB HDD of RAID type is not supported.••A scheduled recording is disabled for certain operations (formatting,performance test, error checking, deleting) that access the file system ofa USB device.••If there is no USB device connected, the TV will not record even if thescheduled time is reached.••The TV will not record if the USB device has no free memory space.Check that this is not the case.••If you record a channel locked with Parental lock, the PIN input windowwill appear when you try to play back the recording.••If multiple recording devices are connected and the device set as Def<strong>au</strong>ltRecording Device has no free memory space, the recording functionwill be closed. Attempt recording again. The device with the most freememory space will <strong>au</strong>tomatically be set as Def<strong>au</strong>lt Recording Device andthe TV will start recording.▶English
IssuesSolutions and ExplanationsOthersThe picture won’t display in fullscreen.••HD channels will have black bars on either side of the screen whendisplaying up scaled SD (4:3) contents.••Black bars on the top and bottom will appear during movies that haveaspect ratios different from your TV.••Adjust the picture size options on your external device or TV to fullscreen.◀A “Mode Not Supported”message appears.There is a plastic smell from theTV.••Check the supported resolution of the TV, and adjust the externaldevice’s output resolution accordingly. Refer to the resolution settings inthe user manual.••This smell is normal and will dissipate over time.▶English
IssuesSolutions and ExplanationsThe TV Signal Information isunavailable in the Self DiagnosisTest menu.••This function is only available with digital channels from an Antenna / RF/Coax connection.The TV is tilted to the side.••Remove the base stand from the TV and reassemble it.There are difficulties assemblingthe stand base.••Make sure the TV is placed on a flat surface. It is necessary to usemagnetized screw driver if you cannot remove the screws from the TV,unnecessary use a magnetized screw driver.◀The channel menu is greyedout. (unavailable)••The Channel menu is only available when the TV source is selected.▶English
IssuesSolutions and ExplanationsYour settings are lost after 30minutes or every time the TV isturned off.••If the TV is in the Store Demo mode, it will reset <strong>au</strong>dio and picturesettings every 30 minutes. Change the settings from Store Demo modeto Home Use mode in the Plug & Play (Initial setup) procedure. Pressthe SOURCE button to select TV mode, and go to MENU → System →Plug & Play (Initial setup) → ENTERE.••Check the cable connections and reconnect them.••Loss of <strong>au</strong>dio or video can be c<strong>au</strong>sed by using overly rigid or thickcables. Make sure the cables are flexible enough for long term use. Ifmounting the TV to the wall, we re<strong>com</strong>mend using cables with 90 degreeconnectors.••This is part of the product’s design and is not a defect.◀You have intermittent loss of<strong>au</strong>dio or video.You see small particles whenyou look closely at the edge ofthe frame of the TV.▶English
IssuesSolutions and ExplanationsThe PIP menu is not available.••PIP functionality is only available when you are using a HDMI, PC or<strong>com</strong>ponents source.You turned the TV off 45minutes ago, and it turned onagain.••It is normal. The TV operates the OTA (Over The Aerial) function itself toupgrade firmware downloaded whilst your watching TV.There are recurrent picture/sound issues.••Check and change the signal/source.◀A reaction may occur betweenthe rubber cushion pads on thebase stand and the top finish ofsome furniture.• • To prevent this, use felt pads on any surface of the TV that <strong>com</strong>es indirect contact with furniture.▶English
◀❑❑Teletext Feature(depending on the country)The index page of the Teletext service gives you information on how to use theservice. For Teletext information to be displayed correctly, channel reception mustbe stable. Otherwise, information may be missing or some pages may not bedisplayed.NNYou can change Teletext pages by pressing the numeric buttons on the remotecontrol.▶English
(Teletext on/mix/off)8(store)4(size)9(hold)Activates the Teletext mode for the current channel. Press the button twice to overlapthe Teletext mode with the current broadcasting screen. Press it one more time to exitteletext.Stores the Teletext pages.Displays the teletext on the upper half of the screen in double-size. To move the text tothe lower half of the screen, press it again. For normal display, press it once again.Holds the display at the current page, in the case that there are several secondarypages that follow <strong>au</strong>tomaticially. To undo, press it again.◀▶English
Colour buttons (red,green, yellow, blue)0(mode)1(sub-page)(size)If the FASTEXT system is used by the broadcasting <strong>com</strong>pany, the different topics on aTeletext page are colour-coded and can be selected by pressing the coloured buttons.Press the colour corresponding to the topic of your choice. A new colourcoded page isdisplayed. Items can be selected in the same way. To display the previous or next page,press the corresponding coloured button.Selects the Teletext mode (LIST/ FLOF).If pressed during LIST mode, switches themode to List save mode. In List save mode, you can save a Teletext page into a listusing the 8(store) button.Displays the available sub-page.◀▶English
2Displays the next Teletext page.(page up)3Displays the previous Teletext page.(page down)6Displays the index (contents) page at any time while you are viewing Teletext.(index)5(reveal)Displays the hidden text (answers to quiz games, for example). To display the normalscreen, press it again.◀7(cancel)Shrinks the Teletext display to overlap with the current broadcast.▶English
Typical Teletext pagePartContentsASelected page number.◀BCBroadcasting channel identity.Current page number or search indications.▶DDate and time.EText.FStatus information. FASTEXT information.English
❑❑LicenceTheaterSound, SRS andsymbol are trademarks of SRS Labs, Inc.TheaterSound technology is incorporated under licence form SRS Lab, Inc.Manufactured under licence from Dolby Laboratories. Dolby and the double-D symbol aretrademarks of Dolby Laboratories.◀Manufactured under licence under U.S. Patent #’s: 5,451,942; 5,956,674; 5,974,380;5,978,762; 6,487,535 & other U.S. and worldwide patents issued & pending. DTS andthe Symbol are registered trademarks. & DTS 2.0+ Digital Out and the DTS logos aretrademarks of DTS, Inc. <strong>Product</strong> Includes software. © DTS, Inc. All Rights Reserved.▶English
◀DivX Certified® to play DivX® video up to HD 1080p, including premium content.DivX®, DivX Certified® and associated logos are trademarks of DivX, Inc. and are usedunder licence.ABOUT DIVX VIDEO: DivX® is a digital video format created by DivX, Inc. This is an official DivX Certified®device that plays DivX video. Visit www.divx.<strong>com</strong> for more information and software tools to convert yourfiles into DivX video.ABOUT DIVX VIDEO-ON-DEMAND: This DivX Certified® device must be registered in order to playpurchased DivX Video-on-Demand (VOD) movies. To obtain your registration code, locate the DivX VODsection in your device setup menu. Go to vod.divx.<strong>com</strong> for more information on how to <strong>com</strong>plete yourregistration.Covered by one or more of the following U.S. patents : 7,295,673; 7,460,668; 7,515,710; 7,519,274Open Source Licence NoticeIn the case of using open source software, Open Source Licences are available on the product menu.Open Source Licence Notice is written only English.English