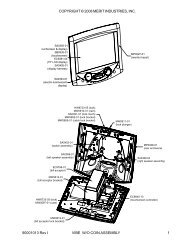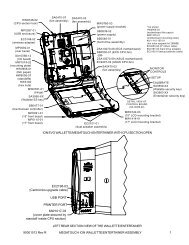
Monitor / Touchscreen Removal and Installation - Megatouch
Monitor / Touchscreen Removal and Installation - Megatouch
Monitor / Touchscreen Removal and Installation - Megatouch

You also want an ePaper? Increase the reach of your titles
YUMPU automatically turns print PDFs into web optimized ePapers that Google loves.
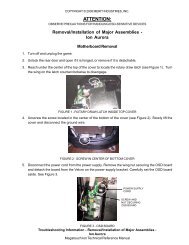
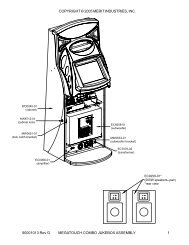
COPYRIGHT © 2008 MERIT INDUSTRIES, INC.ATTENTION:OBSERVE PRECAUTIONS FOR HANDLING ESD-SENSITIVE DEVICES<strong>Removal</strong>/<strong>Installation</strong> of Major Assemblies -Ion Aurora (cont’d)2. If replacing only the monitor: Carefully place the touchscreen over the new monitor in the samemanner it was attached to the old monitor, making sure that the screen is properly <strong>and</strong> evenlyaligned over the monitor glass. Clean the front of the touchscreen with an alcohol wipe once it isin place. Reattach the fish paper foam tape strip to the top edge of the monitor (17” games only;see Figure 8). You may need to attach the provided wire clamps to the rear of the monitor assembly.If so, note their location on the rear of the monitor your removed.If replacing only the touchscreen: Carefully place the new touchscreen over the monitor in thesame manner as the old screen, making sure that the screen is properly <strong>and</strong> evenly aligned overthe monitor glass. Clean the front of the touchscreen with an alcohol wipe once in place.If replacing both the monitor <strong>and</strong> the touchscreen: Carefully place the new touchscreen over thenew monitor in the same manner that the old touchscreen <strong>and</strong> monitor were attached, makingsure that the screen is properly <strong>and</strong> evenly aligned over the monitor glass. Clean the front of thetouchscreen with an alcohol wipe once it is in place. Reattach the fish paper foam tape strip to thetop edge of the monitor/touchscreen assembly (17” games only; see Figure 8). You may need toattach the provided wire clamps to the rear of the monitor assembly. If so, note their location on therear of the monitor your removed.3. For 17” games: Replace the left <strong>and</strong> right mounting brackets on the monitor <strong>and</strong> secure each with2 screws. Carefully slide the new monitor into the bezel, making certain that the edge of themonitor with the fish paper is secured underneath the touchscreen controller’s mounting plate.Ensure that the monitor is properly centered, then secure the mounting brackets to the bezel with4 screws. See Figure 8.For 19” <strong>and</strong> Widescreen games: Carefully slide the new monitor assembly into the bezel, makingsure (on st<strong>and</strong>ard 19” models) that the strip of fish paper is secured between the edge of theassembly with the Velcro <strong>and</strong> lamp mounting bracket. Ensure that the monitor is properly centered,then secure the LCD bracket to the bezel with 4 screws. See Figure 9.4. For 17” games: Line up the touchscreen controller on the rectangular piece of fish paper. If youreplaced the touchscreen, connect the touchscreen controller cable to the touchscreen controller<strong>and</strong> secure with 2 tie wraps, making sure that the wraps go around the fish paper. Position thistouchscreen controller assembly on the mounting plate <strong>and</strong> secure with 2 screws. See Figure 7.For 19” games: Replace the inverter on the Velcro. Place the rectangular piece of fish paper onthe mounting holes on the LCD bracket. If you replaced the touchscreen, carefully connect thetouchscreen controller cable to the touchscreen controller <strong>and</strong> secure with 2 tie wraps. Positionthe touchscreen controller on top of the fish paper <strong>and</strong> secure to the LCD bracket with 2 screws orsimply with Velcro. See Figure 7.For Widescreen games: Resecure the two st<strong>and</strong>offs to the touchscreen controller bracket, makingsure that the st<strong>and</strong>offs secure this bracket to the rear of the monitor. If you replaced thetouchscreen, carefully connect the touchscreen controller cable to the touchscreen controller,<strong>and</strong> secure it with two tie wraps. Position the touchscreen controller over the two st<strong>and</strong>offs <strong>and</strong>secure it in place with two screws (see Figure 7). Replace the inverter on the Velcro.Troubleshooting Information - <strong>Removal</strong>/<strong>Installation</strong> of Major Assemblies -Ion Aurora<strong>Megatouch</strong> Ion Technical Reference Manual