
You also want an ePaper? Increase the reach of your titles
YUMPU automatically turns print PDFs into web optimized ePapers that Google loves.
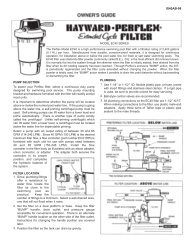
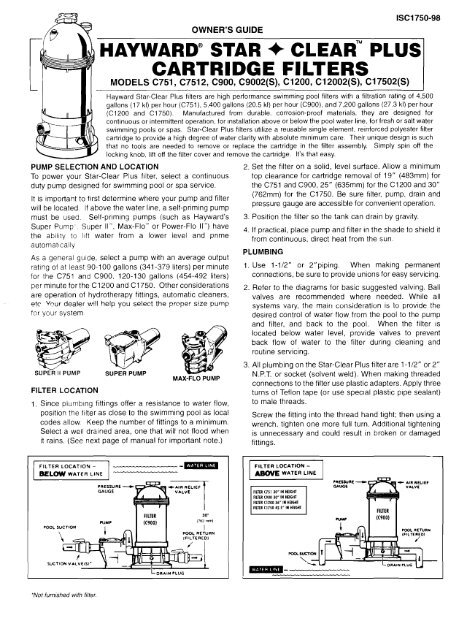
SUPER II PUMPFILTER LOCATIONSUPER PUMPOWNER'S GUIDEMAX-FLO PUMPISC1750-98HAYWARD® STAR" CLEAR PLUSCARTRIDGE FILTERSMODELS C751, C7512, C900, C9002(S), C1200, C12002(S), C17502(S)<strong>Hayward</strong> <strong>Star</strong>-<strong>Clear</strong> <strong>Plus</strong> filters are high performance swimming pool filters with a filtration rating of 4,500gallons (17 kl) per hour (C751), 5,400 gallons (20,S kl) per hour (C900), and 7,200 gallons (27.3 kl) per hour(C1200 and C1750). Manufactured from durable, corrosion-proof materials, they are designed forcontinuous or intermittent operation, for Installation above or below the pool water line, for fresh or salt waterswimming pools or spas. <strong>Star</strong>-<strong>Clear</strong> <strong>Plus</strong> filters utilize a reusable single element, reinforced polyester filtercartridge to provide a high degree of water clarity with absolute minimum care. Their unique design is suchthat no tools are needed to remove or replace the cartridge in the filter assembly, Simply spin off thelocking knob, lift off the filter cover and remove the cartridge. It's that easy.PUMP SELECTION AND LOCATION2. Set the filter on a solid, level surface. Allow a minimumTo power your <strong>Star</strong>-<strong>Clear</strong> <strong>Plus</strong> filter, select a continuous top clearance for cartridge removal of 19" (483mm) forduty pump designed for swimming pool or spa service. the C751 and C900, 25" (635mm) for the C1200 and 30"It is important to first determine where your pump and filterwill be located. If above the water line, a self-priming pumpAs a general guide, select a pump with an average outputrating of at least 90-100 gallons (341-379 liters) per minutefor the C751 and C900, 120-130 gallons (454-492 liters)per minute for the C1200 and C1750. Other considerationsare operation of hydrotherapy fittings, automatic cleaners,etc Your dealer will help you select the proper size pumpfor your system1. Since plumbing fittings offer a resistance to water flow,position the filter as close to the swimming pool as localcodes allow. Keep the number of fittings to a minimum.Select a well drained area, one that will not flood whenit rains. (See next page of manual for important note.)(762mm) for the C1750. Be sure filter, pump, drain andpressure gauge are accessible for convenient operation.must be used. Self-priming pumps (such as <strong>Hayward</strong>'s 3. Position the filter so the tank can drain by gravity.Super Pump'. Super II'", Max-Flo'" or Power-Flo II'") have 4. If practical, place pump and filter in the shade to shield itthe ability to 11ft water from a lower level and prime from continuous, direct heat from the sun.automaticallyPLUMBING1. Use 1-1/2" or 2"piping. When making permanentconnections, be sure to provide unions for easy servicing.2. Refer to the diagrams for basic suggested valving. Ballvalves are recommended where needed. While allsystems vary, lrle main consideration is to provide thedesired control of water flow from the pool to the pumpand filter, and back to the pool. When the filter ISlocated below water level, provide valves to preventback flow of water to the filter during cleaning androutine servicing.3. All plumbing on the <strong>Star</strong>-<strong>Clear</strong> <strong>Plus</strong> filter are 1-1/2" or 2"N.P.T. or socket (solvent weld). When making threadedconnections to the filter use plastic adapters. Apply threeturns of Teflon tape (or use special plastic pipe sealant)to male threads.Screw the fitting into the thread hand tight: then using awrench, tighten one more full turn. Additional tighteningis unnecessary and could result in broken or damagedfittings.FIL TER LOCATION BELOW WATER LINE--------_U·"I;'''I''FILTER LOCATION ABOVE WATER LINEPOOL SUCTIONPUMP30"(762 mm)IPOOL RETURNIFILTeREDlFILTER USI 30" IN NEIGHTFlLlIA (900 30" IN NEIGHTFILlIA (1200 36" IN HEIGHTFlLlIA (1150 42.5" IN HEIGHTISUCTION VAL V:EI~SI~·_.l.~-=;/3.~::r:~~::~=:J.f'OCIl.6UCTION""----'Not furnished with filter.
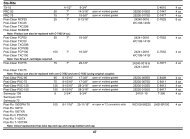
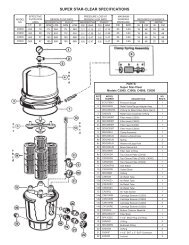
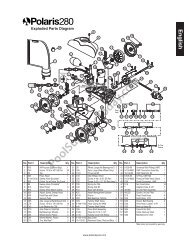
4. Connect the pool suction plumbing between theskimmer, pool outlet, etc. and the pump.5. Install the pool return plumbing.6. If pressure gauge IS not Installed, apply Teflon tape tothe gauge threads, and carefully screw the gauge intothe threaded hole in the filter head.7. A filter drain plug is furnished with each filter and is allthat is needed for complete filter draining. A manual airrelief valve is furnished to aid in bleeding off unwantedair when starting the filter. The auto air relief providesair removal during operation.8. All electrical connections should be made Inaccordance with local codes.9. Check for joint leaks before operating.10. Refer to pump instruction booklet for pump information.EFFECTIVE PRESSURE LOSS AT MAXIMUMMODEL FILTRATION DESIGN FLOW RATE DESIGN FLOW RATE WORKING REQUIRED CLEARANCENO. AREA RESIDENTIAL PUBLIC RESIDENTIAL PUBLIC PRESSURE SIDE ABOVEC751iFT' M' I GPM LPM GPM LPM PSI I BAR I PSI I BAR I PSI i BAR INCH CM INCH i CM75 7.0I75 ! 284 29! 110 1.80 I 012iI 0.00 000 50 I 3.45 18 46 I!'9 48I34 129 i 360 I 0.24 0.20 I 001 i 50 I 3.45 i 18 46 ., 9I48120 112 I 120 454 I 45 i 170 ! 7.20 ! 0.48 0.50 003 50! ! 3.45 I 18 46 25 64C900 90 8.4 I 90 : 341C1200!IIC751275 70 75 284 28106 I 0.2510.02000 I 0.00 50 3.45 18 46 19 48C9002(S) 90 8.4 90 341 34 129 0.50 0.03 0.00 000 50 I 3.45 18 46 19 48C12002(S) 120 11.2 120 454 45 170 I 1.00 I 0.07 000 000 50 3.45 18 46 25 64C17502(S) 175 16.3! 120 I454 60 227 I 100 I 007 I 010 , 0.00 I 50 3.45 18!46 30 76I!iPARTSModels C751, C7512, C900, C9002(S) andC1200, C12002(S) and C17502(S) FiltersREF. PART DESCRIPTION NO.NO. NO. REO'D.1a CX900G Locking Knob 1~b ! CX1750G ! Locking Knob I2 CX900H a-Ring3 CX900W Washeri1 I I~6a CX900B Filter Head w/Directional Vent Valve (C900)i14 CX900J E-Ring5 CX900D Guide Cone6b CX1200B Filter Head w/Directional Vent Valve (C1200) I 16c CXt750B Filter Head w/Directional Vent Valve (C1750) 1IC ~-(~~7 C-900F Filter Head a-Ring 18a CX900AA Filter Body-1-1/2" FIP 18b CX900AA2 Filter Body-2' FIP 1cd9 ECX2709 Pressure Gauge 1lOa CX760RE Cartridge Element (C751. C7512) 1lOb ' CX900RE Cartridge Element (C900) I 110c CX1200RE Cartridge Element (C 1200) 110d CX1750RE Cartridge Element (CI750) 1lla CX800Z2 Tie Rod (C900) 1llb CXll00Z2 Tie Rod (C1200) 1a11 bllc CX1750RE Tie Rod (C1750) 112a CX800Z4 Auto Air Relief Tube (C900) 112b CXll00Z4 Auto Air Relief Tube (CI200) 112c CX1750Z4 Auto Air Relief Tube (C 1750) 113 CX250Z14 1/2" Drain Plug 114 SPX605Z2 Drain Plug a-Ring 115 CX900K 2" PVC Socket Connector. Set 01 2 (Not Shown) 216 ECX1322A Directional Vent Valve wiG-Ring 1
BEFORE STARTING THE FILTERSuperchlorinate the pool water by adding unstabilizedgranular or liquid chlorine. Stabilized forms of chlorine arerecommended for normal daily use after the initial cleanup of the water. Follow chemical manufacturer'srecommendations for superchlorination and daily use.STARTING THE FILTERBe sure filter drain plug is closed. Open manual air reliefvalve a few turns and open the suction and return valves(when used). CAUTION: All suction and dischargevalves must be open when starting the system. Failureto do so could cause severe personal injury and/orproperty damage. Be sure locking knob is secure (handtighten--only slight pressure is required).Stand clear of the filter and prime and start the pump,following the manufacturer's instructions. Air trapped in thesystem will automatically vent to the pool and out air reliefvalve. Close air relief valve as soon as air is vented.FILTERINGFiltration starts as soon as flow is steady through the filter.As the filter cartridge removes dirt from the pool water, theaccumulated dirt causes a resistance to flow. As a result,the gauge pressure will rise and the flow will decrease.When the pressure rises 7-10 psi (.49-.70 Bar) above thestarting pressure, or when flow decreases below desiredrate, clean or replace the filter cartridge.CLEAN/REPLACE CARTRIDGERemoving Cartridge Element1. Shut off the pump.2. If filter is located below water level, close valves (orblock off suction and discharge lines) to preventbackflow of water from the pool.3. Unscrew and remove drain plug and allow water to drainfrom filter. Close drain plug. (Note: To assist drainingprocess: open air vent a few turns.)4. Unscrew and remove locking knob (counterclockwisedirection).5. Carefully lift off top cover to gain access to filtercartridge.6. Lift out cartridge and clean. Or, replace with clean, sparecartridge. (See Cleaning Cartridge.)Reinstalling Cartridge Element1. Clean any collected debris from the bottom of filter body.2. Carefully replace cartridge element over tie rod and intofilter body ensuring that the cartridge sits evenly on thecollector hub in bottom of filter body.3. Place cover on filter body (being sure filter head a-ringis in place). Fit tie rod end through center hole. Be surea-ring on dome is in place and clean.4. Tighten locking knob in clockwise direction. (Hand tightonly.)5. Proceed as in STARTING THE FILTER.Cleaning CartridgeThe cartridge filter element can be cleaned by pressurewashing inside and out with a garden hose. (The cartridgeis easier to clean when dry.) After hosing the cartridge, forbest results, allow cartridge to dry and carefully brushpleated surface areas to remove fine particles.Algae, suntan oil and body oils can form a coating on thecartridge pleats which may not be thoroughly removed byhosing. To remove such materials, soak the cartridge in asolution of filter element cleaner (various brands availableat pool dealer). Follow manufacturer's directions for useand allow an hour for soaking. Hose thoroughly beforereinstalling in filter.If calcium or mineral deposits are excessive, the cartridgemay be restored to "like new" condition by soaking inmuriatic acid. Use commercially available 20% muriaticacid added to water in 1 to 1 ratio. Use a plastic containerand take extreme care when handling cleaning agents asthey can be harmful to eyes. skin and clothing. Aftercleaning, flush with water.A spare cartridge filter element is an excellent investment.It provides convenience and ensures that your filter willalways be ready to operate at peak efficiency.<strong>Hayward</strong> cartridges are specially designed and engineeredfor use in <strong>Star</strong>-<strong>Clear</strong> <strong>Plus</strong> filters. For best results, use onlygenuine <strong>Hayward</strong> <strong>Star</strong>-<strong>Clear</strong> cartridges in your filter. OrderModel No. CX760RE, CX900RE. CX1200RE or CX1750REfrom your dealer. The <strong>Hayward</strong> name is your guarantee ofquality.VACUUMINGVacuuming can be performed directly into the filter wheneverneeded. Clean cartridge after vacuuming, if required.WINTERIZING (Filter)In areas where sub-freezing temperatures can beexpected. the filter should be drained and/or removed fromits operating location and stored indoors. Remove andclean cartridge. Reinstall cartridge in filter tank. Tightenlocking knob only a few turns when storing.SERVICE & REPAIRSConsult your local authorized <strong>Hayward</strong> dealer or servicecenter. No returns may be made directly to the factorywithout the expressed written authorization of <strong>Hayward</strong>Pool Products, Inc.
ALGAE CONTROLAlgae is a form of plant life which can vary in size from a fewthousandths of an inch to the size of a small tree. Of themany forms of algae, those most frequently found inswimming pool water are microscopic in size and green incolor.Algae readily grows in sunlight and can, under favorableconditions, quickly overgrow a swimming pool turning itcompletely green in just a few hours. On the other hand,swimming pool water can be kept unfavorable to algaegrowth simply by maintaining a chlorine level of at least 1.0ppm in the water at all times. The chlorine level should bechecked at least once a day using a suitable test kit.If algae condition develops and the pool water "blooms"green, superchlorination of the pool will be necessary toclear it. Add unstabilized granUlar chlorine. or liquidchlorine. Follow chemical manufacturer's recommendationfor superchlorination. The algae will quickly becomeinactive and can then be removed by the filter. Live algae,on the other hand, multiplies so fast that the filter cannotkeep up with its growth rate.When correctly used, commercial algaecides are effectiveagainst algae, though algaecides should be used inconjunction with, and not as a substitute for, regularchlorination or superchlorination.Maintaining a chlorine level of at least 1.0 ppm in the poolwater at all times is the most effective way to prevent algaegrowth in swimming pools.POOL CHEMISTRY GUIDELINESSUGGESTED POOL CHEMISTRY LEVELSACTION REQUIRED TO CORRECT POOL CHEMISTRYTO RAISETO LOWERpH 7.2 to 7.6 Add Soda Ash Add Muriatic Acid or Sodium BisulphateTOTAL ALKALINITY 100 to 130 ppm Add Sodium Bicarbonate Add Muriatic AcidCHLORINE (UNSTABILIZED) 0.3 to 1.0 ppm Add Chlorine Chemical No action - chlorine will naturally dissipateCHLORINE (STABILIZED) 1.0 to 3.0 ppm Add Chlorine Chemical No action - chlorine will naturally dissipateCHLORINE STABILIZER40 to 70 ppm Add StabilizerDilution - partially drain & refill pool with water(Cyanuric Acid)that has not been treated with Cyanuric Acid.NOTE: ANSI/NSPI-4 Article 4, standard for above-ground and on-ground pools, advises that components such as thefiltration system, pumps and heater be positioned so as to prevent their being used as a means of access tothe pool by young children.HAYWARD POOL PRODUCTS, INC.Corporate Headquarters:620 Division SlreetElizabeth. NJ 07207Canada:2880 Plymouth DriveOakville. Ontario L6H 5R4U.S.AI <strong>Hayward</strong> Industrial DnveClemmons. NC 27012Europe:Pare Industriel de la plaine de J' AinAllee des Chenes01150 Sainr VulbasFrance2935 Sideo DriveNashville. TN 372042875 Pomona Blvd.Pomona. CA 91768Rev. 10/98 © 1999 <strong>Hayward</strong> Printed in USA.