PDF: High-resolution (30Mb) - Craft Focus Magazine
PDF: High-resolution (30Mb) - Craft Focus Magazine
PDF: High-resolution (30Mb) - Craft Focus Magazine

Create successful ePaper yourself
Turn your PDF publications into a flip-book with our unique Google optimized e-Paper software.
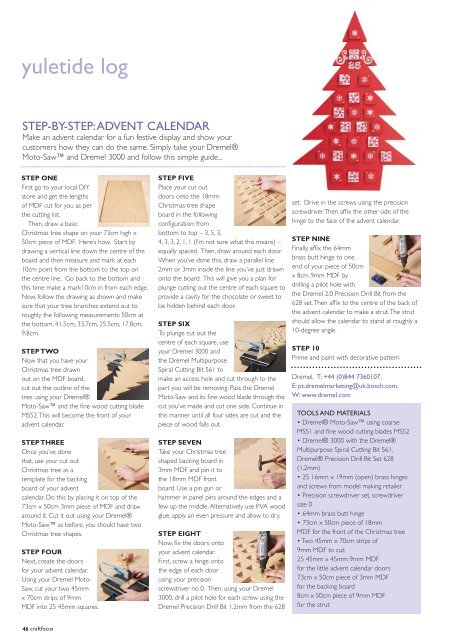
yuletide logSTEP-BY-STEP: ADVENT CALENDARMake an advent calendar for a fun festive display and show yourcustomers how they can do the same. Simply take your Dremel®Moto-Saw and Dremel 3000 and follow this simple guide...STEP ONEFirst go to your local DIYstore and get the lengthsof MDF cut for you as perthe cutting list.Then, draw a basicChristmas tree shape on your 73cm high x50cm piece of MDF. Here’s how. Start bydrawing a vertical line down the centre of theboard and then measure and mark at each10cm point from the bottom to the top onthe centre line. Go back to the bottom andthis time make a mark10cm in from each edge.Now, follow the drawing as shown and makesure that your tree branches extend out toroughly the following measurements: 50cm atthe bottom, 41.5cm, 33.7cm, 25.5cm, 17.8cm,9.8cm.STEP TWONow that you have yourChristmas tree drawnout on the MDF board,cut out the outline of thetree using your Dremel®Moto-Saw and the fine wood cutting bladeMS52. This will become the front of youradvent calendar.STEP THREEOnce you’ve donethat, use your cut outChristmas tree as atemplate for the backingboard of your adventcalendar. Do this by placing it on top of the73cm x 50cm 3mm piece of MDF and drawaround it. Cut it out using your Dremel®Moto-Saw as before, you should have twoChristmas tree shapes.STEP FOURNext, create the doorsfor your advent calendar.Using your Dremel Moto-Saw, cut your two 45mmx 70cm strips of 9mmMDF into 25 45mm squares.STEP FIVEPlace your cut outdoors onto the 18mmChristmas tree shapeboard in the followingconfiguration: frombottom to top – 3, 5, 3,4, 3, 3, 2, 1, 1 (I’m not sure what this means) –equally spaced. Then, draw around each door.When you’ve done this, draw a parallel line2mm or 3mm inside the line you’ve just drawnonto the board. This will give you a plan forplunge cutting out the centre of each square toprovide a cavity for the chocolate or sweet tobe hidden behind each door.STEP SIXTo plunge cut out thecentre of each square, useyour Dremel 3000 andthe Dremel MultipurposeSpiral Cutting Bit 561 tomake an access hole and cut through to thepart you will be removing. Pass the DremelMoto-Saw and its fine wood blade through thecut you’ve made and cut one side. Continue inthis manner until all four sides are cut and thepiece of wood falls out.STEP SEVENTake your Christmas treeshaped backing board in3mm MDF and pin it tothe 18mm MDF frontboard. Use a pin gun orhammer in panel pins around the edges and afew up the middle. Alternatively use PVA woodglue, apply an even pressure and allow to dry.STEP EIGHTNow, fix the doors ontoyour advent calendar.First, screw a hinge ontothe edge of each doorusing your precisionscrewdriver no 0. Then, using your Dremel3000, drill a pilot hole for each screw using theDremel Precision Drill Bit 1,2mm from the 628set. Drive in the screws using the precisionscrewdriver. Then affix the other side of thehinge to the face of the advent calendar.STEP NINEFinally, affix the 64mmbrass butt hinge to oneend of your piece of 50cmx 8cm 9mm MDF bydrilling a pilot hole withthe Dremel 2.0 Precision Drill Bit from the628 set. Then affix to the centre of the back ofthe advent calendar to make a strut. The strutshould allow the calendar to stand at roughly a10-degree angle.STEP 10Prime and paint with decorative patternDremel, T: +44 (0)844 7360107,E: pt.dremelmarketing@uk.bosch.com,W: www.dremel.comTOOLS AND MATERIALS• Dremel® Moto-Saw using coarseMS51 and fine wood cutting blades MS52• Dremel® 3000 with the Dremel®Multipurpose Spiral Cutting Bit 561,Dremel® Precision Drill Bit Set 628(1,2mm)• 25 16mm x 19mm (open) brass hingesand screws from model making retailer• Precision screwdriver set, screwdriversize 0• 64mm brass butt hinge• 73cm x 50cm piece of 18mmMDF for the front of the Christmas tree• Two 45mm x 70cm strips of9mm MDF to cut:25 45mm x 45mm 9mm MDFfor the little advent calendar doors73cm x 50cm piece of 3mm MDFfor the backing board8cm x 50cm piece of 9mm MDFfor the strut46 craftfocus