EZ FLO Valve Tap Kit Automatic Fertilization System - Irrigation Direct
EZ FLO Valve Tap Kit Automatic Fertilization System - Irrigation Direct
EZ FLO Valve Tap Kit Automatic Fertilization System - Irrigation Direct

You also want an ePaper? Increase the reach of your titles
YUMPU automatically turns print PDFs into web optimized ePapers that Google loves.
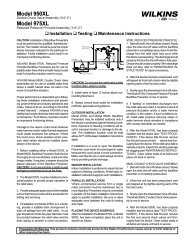
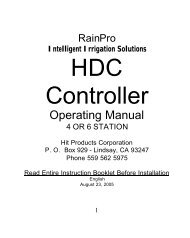
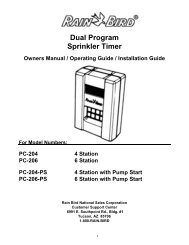
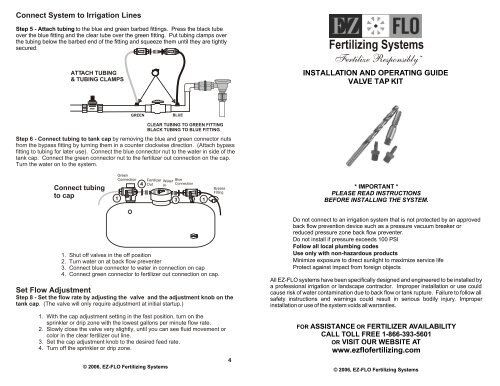
FertilizerOutGREEN1 2WaterInBLUEConnect <strong>System</strong> to <strong>Irrigation</strong> LinesStep 5 - Attach tubing to the blue and green barbed fittings. Press the black tubeover the blue fitting and the clear tube over the green fitting. Put tubing clamps overthe tubing below the barbed end of the fitting and squeeze them until they are tightlysecured.ATTACH TUBING& TUBING CLAMPSFertilizing <strong>System</strong>sFertilize ResponsiblyTMINSTALLATION AND OPERATING GUIDEVALVE TAP KITGREENBLUECLEAR TUBING TO GREEN FITTINGBLACK TUBING TO BLUE FITTINGStep 6 - Connect tubing to tank cap by removing the blue and green connector nutsfrom the bypass fitting by turning them in a counter clockwise direction. (Attach bypassfitting to tubing for later use). Connect the blue connector nut to the water in side of thetank cap. Connect the green connector nut to the fertilizer out connection on the cap.Turn the water on to the system.Connect tubingto capGreenConnection14Fertilizer WaterOut InSlowFastBlueConnection3 1BypassFitting* IMPORTANT *PLEASE READ INSTRUCTIONSBEFORE INSTALLING THE SYSTEM.1. Shut off valves in the off position2. Turn water on at back flow preventer3. Connect blue connector to water in connection on cap4. Connect green connector to fertilizer out connection on cap.Set Flow AdjustmentStep 8 - Set the flow rate by adjusting the valve and the adjustment knob on thetank cap. (The valve will only require adjustment at initial startup.)1. With the cap adjustment setting in the fast position, turn on thesprinkler or drip zone with the lowest gallons per minute flow rate.2. Slowly close the valve very slightly, until you can see fluid movement orcolor in the clear fertilizer out line.3. Set the cap adjustment knob to the desired feed rate.4. Turn off the sprinkler or drip zone.© 2006, <strong>EZ</strong>-<strong>FLO</strong> Fertilizing <strong>System</strong>s4· Do not connect to an irrigation system that is not protected by an approvedback flow prevention device such as a pressure vacuum breaker orreduced pressure zone back flow preventer.· Do not install if pressure exceeds 100 PSI· Follow all local plumbing codes· Use only with non-hazardous products· Minimize exposure to direct sunlight to maximize service life· Protect against impact from foreign objectsAll <strong>EZ</strong>-<strong>FLO</strong> systems have been specifically designed and engineered to be installed bya professional irrigation or landscape contractor. Improper installation or use couldcause risk of water contamination due to back flow or tank rupture. Failure to follow allsafety instructions and warnings could result in serious bodily injury. Improperinstallation or use of the system voids all warranties.FOR ASSISTANCE OR FERTILIZER AVAILABILITYCALL TOLL FREE 1-866-393-5601OR VISIT OUR WEBSITE ATwww.ezflofertilizing.com© 2006, <strong>EZ</strong>-<strong>FLO</strong> Fertilizing <strong>System</strong>s
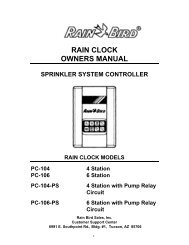
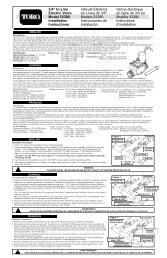
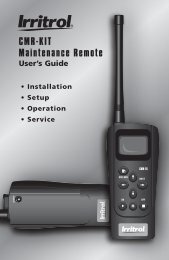
<strong>System</strong> InstallationTypical installationThe system is normally installed in a valve box, connected to the main line of the irrigationsystem after the back flow preventer and before the sprinkler valves. One unit will feed bothdrip and sprinkler zones that are downstream from the connection point.Step 3 - Drill one hole into the sprinkler main line on the upstream side of thevalve with the included 5/16” drill bit. Make sure the drill is straight and at a 90degree angle to the sprinkler pipe. Then drill one hole into the sprinkler main lineon the downstream side of the valve following the same procedure.To drip emitters<strong>Valve</strong> <strong>Tap</strong>ConnectionBack FlowPreventerDRILL HERETOP VIEWTo sprinklersWater FlowTo subsurfaceDownstreamUpstream<strong>Valve</strong> Box<strong>EZ</strong>-<strong>FLO</strong> Unit<strong>Valve</strong> BoxStep 1 - Locate the installation point.Connection must be made after an approved back flow prevention device. It is preferable tohave the tank cap above the installation point in the sprinkler line if possible but it is notrequired for efficient operation. The connection can be made either vertically or horizontallyin the sprinkler main line.To back yard<strong>FLO</strong>WStep 4 - Using the drill in the forward position, tap each of the two drilled holeswith the included 1/8” NPT tap by slowly drilling the tap in 70% to 80% of the lengthof the tap threads and then put the drill in reverse and slowly remove the tap.DO NOT DRILL TO THE FULL DEPTH OF THE TAP THREADS - THIS COULDCAUSE A LEAKY CONNECTION.TAP HEREINSTALL ONE FITTING ON EACHSIDE OF THE VALVESPRINKLERVALVE<strong>FLO</strong>WStep 2 - Shut off water by closing a valve at the back flow preventer or in the mainline upstream from the connection point. Relieve the pressure from the line at the exhaustvalve on the back flow preventer or by manually opening a sprinkler valve.Step 5 - Screw the 1/8” blue and green barbed fittings into the tapped holes.To avoid cross-threading, begin tightening by hand and then tighten with a 7/16”wrench or socket driver. The blue fitting should be screwed into the tapped holeon the upstream side of the valve and the green fitting should be screwed into thetapped hole on the downstream side of the valve. Tighten the fitting until thebeveled seating surface below the fitting nut seats into the pipe. (Teflon tape orpipe thread sealant may be used.)RELIEVEPRESSURESHUT OFFWATEROFFSCREW IN BLUEAND GREEN BARBEDFITTINGSGREENBLUE© 2006, <strong>EZ</strong>-<strong>FLO</strong> Fertilizing <strong>System</strong>s23