User manual - CNET Content Solutions
User manual - CNET Content Solutions
User manual - CNET Content Solutions

You also want an ePaper? Increase the reach of your titles
YUMPU automatically turns print PDFs into web optimized ePapers that Google loves.
Wind Top AE1920All-in-One (AIO) PCMS-A923 (V1.X) SystemG52-A9231XA
▍ Preface▍tableof contentsCopyright NoticeiiiTrademarksiiiRevision HistoryiiiUpgrade and WarrantyivAcquisition of Replaceable PartsivTechnical SupportivGreen Product FeaturesvEnvironmental PolicyvSafety InstructionsviCE Conformity viiiFCC-B Radio Frequency Interference Statement viiiWEEE Statementix1. Overview 1-1Packing <strong>Content</strong>s1-2System Overview1-3Mainboard Specifications1-9System Specifications1-10Component Replacement & Upgrade1-112. Getting Started 2-1Safety & Comfort Tips2-2Having Good Working Habits2-3Knowing the Keyboard (Optional)2-4Positioning Your System2-6Connecting Peripheral Devices2-7Connecting Power2-103. System Operations 3-1System Booting Setup for the first time3-2Creating System Recovery Disk3-3Touch Panel Calibration (Only for single-touch model)3-9Network Connection under Windows3-11RALINK Wireless LAN Connection (Optional)3-16SRS Premium Sound (Optional)3-18On-Screen Display (OSD)3-20Power Management3-23System Recovery3-25ii
MS-A923Copyright NoticeThe material in this document is the intellectual property of MICRO-STAR INTERNA-TIONAL. We take every care in the preparation of this document, but no guaranteeis given as to the correctness of its contents. Our products are under continual improvementand we reserve the right to make changes without notice.TrademarksAll trademarks are the properties of their respective owners.MSI ® is a registered trademark of Micro-Star Int’l Co., Ltd.Intel ® is a registered trademark of Intel Corporation.Realtek ® is a registered trademark of Realtek Semiconductor Corporation.Windows ® is a registered trademark of Microsoft Corporation.Revision HistoryRevision Revision History DateV1.1 first Release 2011/ 03iii
▍ PrefaceUpgrade and WarrantyPlease note that certain components preinstalled in the product may be upgradableor replaceable by user’s request. To learn more about upgrade limitation,please refer to the specifications in the <strong>User</strong>’s Manual. For any further informationabout the product users purchased, please contact the local dealer. Do not attemptto upgrade or replace any component of the product if you are not an authorizeddealer or service center, since it may cause the warranty void. It is strongly recommendedthat you contact the authorized dealer or service center for any upgradeor replace service.Acquisition of Replaceable PartsPlease be noticed that the acquisition of replaceable parts (or compatible ones) ofthe product users purchased in certain countries or territories may be fulfilled bythe manufacturer within 5 years at most since the product has been discontinued,depending on the official regulations declared at the time.■ Please contact the manufacturer via http://www.msicomputer.com/msi_user/msi_rma/ for the detailed information about the acquisition of spare parts.Technical SupportIf a problem arises with your system and no solution can be obtained from theuser’s <strong>manual</strong>, please contact your place of purchase or local distributor. Alternatively,please try the following help resources for further guidance.◙◙Visit the MSI website for FAQ, technical guide, BIOS updates, driver updatesand other information via http://www.msi.com/index.php?func=serviceContact our technical staff via http://ocss.msi.com/iv
MS-A923Green Product Features◙◙◙◙◙◙Reduced energy consumption during use and stand-byLimited use of substances harmful to the environment and healthEasily dismantled and recycledReduced use of natural resources by encouraging recyclingExtended product lifetime through easy upgradesReduced solid waste production through take-back policyEnvironmental Policy◙◙◙◙The product has been designed to enable proper reuse ofparts and recycling and should not be thrown away at itsend of life.<strong>User</strong>s should contact the local authorized point of collectionfor recycling and disposing of their end-of-life products.Visit the MSI website and locate a nearby distributor for further recyclinginformation: http://www.msi.com/index.php?func=html&name=service_worldwide.<strong>User</strong>s may also reach us at gpgreenteam@msi.com for informationregarding proper Disposal, Take-back, Recycling, and Disassembly ofMSI products.
▍ PrefaceSafety InstructionsRead the safety instructions carefully and thoroughly.All cautions and warnings on the equipment or user’s <strong>manual</strong> should benoted.Keep the <strong>User</strong>’s Guide that comes with the package for future reference.Keep this equipment away from humidity and high temperature.Lay this equipment on a reliable flat surface before setting it up.◙◙◙Make sure that the power voltage is within its safety range and hasbeen adjusted properly to the value of 100~240V before connecting theequipment to the power outlet. Do not disable the protective earth pinfrom the plug. The equipment must be connected to an earthed mainssocket-outlet.Always unplug the AC power cord before installing any add-on card ormodule to the equipment.Always disconnect the AC power cord or switch the wall socket off ifthe equipment would be left unused for a certain time to achieve zeroenergy consumption.The ventilator on the enclosure is used for air convection and to prevent theequipment from overheating. Do not cover the ventilator.Do not leave the equipment in an unconditioned environment with a storagetemperature above 60 O C (140 O F) or below 0 O C (32 O F), which may damagethe equipment.NOTE: The maximum operating temperature is around 40 O C.vi
MS-A923Never pour any liquid into the opening that could damage or cause electricalshock.Place the power cord in a way that people are unlikely to step on it. Do notplace anything on the power cord.When installing the coaxial cable to the TV Tuner, it is necessary to ensurethat the metal shield is reliably connected to protective earthing system ofthe building.Cable distribution system should be grounded (earthed) in accordance withANSI/NFPA 70, the National Electrical Code (NEC), in particular Section820.93, Grounding of Outer Conductive Shield of a Coaxial Cable.Always keep the strong magnetic or electrical objects away from the equipment.If any of the following situations arises, get the equipment checked by servicepersonnel:◙◙◙◙◙◙The power cord or plug is damaged.Liquid has penetrated into the equipment.The equipment has been exposed to moisture.The equipment does not work well or you can not get it work accordingto user’s <strong>manual</strong>.The equipment has dropped and damaged.The equipment has obvious sign of breakage.1. The optical storage devices are classified as CLASS 1 LASER PRODUCT. Use ofcontrols or adjustments or performance of procedures other than those specifiedis prohibited.2. Do not touch the lens inside the drive.廢 電 池 請 回 收For better environmental protection, waste batteries should be collectedseparately for recycling or special disposal.CAUTION:Danger of explosion if battery is incorrectly replaced. Replace only with thesame or equivalent type recommended by the manufacturer.vii
▍ PrefaceCE ConformityHereby, Micro Star International CO., LTD declares that this deviceis in compliance with the essential safety requirements and otherrelevant provisions set out in the European Directive.FCC-B Radio Frequency Interference StatementThis equipment has been tested and found to comply with thelimits for a Class B digital device, pursuant to Part 15 of theFCC Rules. These limits are designed to provide reasonableprotection against harmful interference in a residential installation.This equipment generates, uses and can radiate radiofrequency energy and, if not installed and used in accordance with the instruction<strong>manual</strong>, may cause harmful interference to radio communications. However, thereis no guarantee that interference will not occur in a particular installation. If thisequipment does cause harmful interference to radio or television reception, whichcan be determined by turning the equipment off and on, the user is encouraged totry to correct the interference by one or more of the measures listed below:■■■■Reorient or relocate the receiving antenna.Increase the separation between the equipment and receiver.Connect the equipment into an outlet on a circuit different from that towhich the receiver is connected.Consult the dealer or an experienced radio/television technician forhelp.Notice 1The changes or modifications not expressly approved by the party responsible forcompliance could void the user’s authority to operate the equipment.Notice 2Shielded interface cables and AC power cord, if any, must be used in order tocomply with the emission limits.VOIR LA NOTICE D’INSTALLATION AVANT DE RACCORDER AU RESEAU.This device complies with Part 15 of the FCC Rules. Operation is subject to thefollowing two conditions:1. this device may not cause harmful interference, and2. this device must accept any interference received, including interference thatmay cause undesired operation.viii
MS-A923WEEE Statement(English) Under the European Union (“EU”) Directive on Waste Electrical and Electronic Equipment,Directive 2002/96/EC, which takes effect on August 13, 2005, products of “electrical andelectronic equipment” cannot be discarded as municipal waste anymore and manufacturers ofcovered electronic equipment will be obligated to take back such products at the end of theiruseful life.(French) (Français) Au sujet de la directive européenne (EU) relative aux déchets des équipementélectriques et électroniques, directive 2002/96/EC, prenant effet le 13 août 2005, queles produits électriques et électroniques ne peuvent être déposés dans les décharges ou toutsimplement mis à la poubelle. Les fabricants de ces équipements seront obligés de récupérercertains produits en fin de vie.(German) (Deutsch) Gemäß der Richtlinie 2002/96/EG über Elektro- und Elektronik-Altgerätedürfen Elektro- und Elektronik-Altgeräte nicht mehr als kommunale Abfälle entsorgt werden, diesich auf 13.August, 2005 wirken. Und der Hersteller von bedeckt Elektronik-Altgeräte gesetzlichzur gebrachten Produkte am Ende seines Baruchbarkeitsdauer zurückzunehmen.(Spanish) (Español) Bajo la directiva 2002/96/EC de la Unión Europea en materia de desechosy/o equipos electrónicos, con fecha de rigor desde el 13 de agosto de 2005, los productos clasificadoscomo “eléctricos y equipos electrónicos” no pueden ser depositados en los contenedoreshabituales de su municipio, los fabricantes de equipos electrónicos, están obligados a hacersecargo de dichos productos al termino de su período de vida.(Italian) (Italiano) In base alla Direttiva dell’Unione Europea (EU) sullo Smaltimento dei MaterialiElettrici ed Elettronici, Direttiva 2002/96/EC in vigore dal 13 Agosto 2005, prodotti appartenentialla categoria dei Materiali Elettrici ed Elettronici non possono più essere eliminati come rifiutimunicipali: i produttori di detti materiali saranno obbligati a ritirare ogni prodotto alla fine del suociclo di vita.(Russian) (Русский) В соответствии с директивой Европейского Союза (ЕС) попредотвращению загрязнения окружающей среды использованным электрическим иэлектронным оборудованием (директива WEEE 2002/96/EC), вступающей в силу 13 августа2005 года, изделия, относящиеся к электрическому и электронному оборудованию, немогут рассматриваться как бытовой мусор, поэтому производители вышеперечисленногоэлектронного оборудования обязаны принимать его для переработки по окончании срокаслужбы.(Turkish) (Türkçe) Avrupa Birliği (AB) Kararnamesi Elektrik ve Elektronik Malzeme Atığı, 2002/96/EC Kararnamesi altında 13 Ağustos 2005 tarihinden itibaren geçerli olmak üzere, elektrikli veelektronik malzemeler diğer atıklar gibi çöpe atılamayacak ve bu elektonik cihazların üreticileri,cihazların kullanım süreleri bittikten sonra ürünleri geri toplamakla yükümlü olacaktır.ix
▍ Preface(Greek) (Ελληνικά) Σύμφωνα με την Οδηγία 2002/96/ΕΚ της Ευρωπαϊκής Ένωσης («ΕΕ») περίΑπόρριψης Ηλεκτρικού και Ηλεκτρονικού Εξοπλισμού (WEEE), η οποία λαμβάνει ισχύ στις 13Αυγούστου 2005, τα προϊόντα «ηλεκτρικού και ηλεκτρονικού εξοπλισμού» δεν είναι δυνατόν νααπορριφθούν πλέον ως κοινά απορρίμματα και οι κατασκευαστές κεκαλυμμένου ηλεκτρονικούεξοπλισμού είναι υποχρεωμένοι να πάρουν πίσω αυτά τα προϊόντα στο τέλος της ωφέλιμης ζωήςτους.(Polish) (Polski) Zgodnie z Dyrektywą Unii Europejskiej (“UE”) dotyczącą odpadów produktówelektrycznych i elektronicznych (Dyrektywa 2002/96/EC), która wchodzi w życie 13 sierpnia2005, tzw. “produkty oraz wyposażenie elektryczne i elektroniczne “ nie mogą być traktowanejako śmieci komunalne, tak więc producenci tych produktów będą zobowiązani do odbierania ichw momencie gdy produkt jest wycofywany z użycia.(Hungarian) (Magyar) Az Európai Unió („EU”) 2005. augusztus 13-án hatályba lépő, az elektromosés elektronikus berendezések hulladékairól szóló 2002/96/EK irányelve szerint az elektromosés elektronikus berendezések többé nem kezelhetőek lakossági hulladékként, és az ilyenelektronikus berendezések gyártói kötelessé válnak az ilyen termékek visszavételére azok hasznosélettartama végén.(Czech) (Čeština) Podle směrnice Evropské unie (“EU”) o likvidaci elektrických a elektronickýchvýrobků 2002/96/EC platné od 13. srpna 2005 je zakázáno likvidovat “elektrické a elektronickévýrobky” v běžném komunálním odpadu a výrobci elektronických výrobků, na které se tatosměrnice vztahuje, budou povinni odebírat takové výrobky zpět po skončení jejich životnosti.(Traditional Chinese ) ( 繁 體 中 文 ) 歐 盟 已 制 訂 有 關 廢 電 機 電 子 設 備 法 令 , 亦 即 自 2005 年 8 月 13 日生 效 的 2002/96/EC, 明 文 規 定 「 電 機 電 子 設 備 產 品 」 不 可 再 以 都 市 廢 棄 物 處 理 , 且 所 有 相 關 電子 設 備 製 造 商 , 均 須 在 產 品 使 用 壽 命 結 束 後 進 行 回 收 。(Simplified Chinese ) ( 简 体 中 文 ) 欧 盟 已 制 订 有 关 废 电 机 电 子 设 备 法 令 , 亦 即 自 2005 年 8 月 13 日 生效 的 2002/96/EC, 明 文 规 定 「 电 机 电 子 设 备 产 品 」 不 可 再 以 都 市 废 弃 物 处 理 , 且 所 有 相 关 电 子设 备 制 造 商 , 均 须 在 产 品 使 用 寿 命 结 束 后 进 行 回 收 。(Japanese) ( 日 本 語 ) 2005 年 8 月 13 日 以 降 にEU 加 盟 国 を 流 通 する 電 気 ・ 電 子 製 品 にはWEEE 指令 によりゴミ 箱 に× 印 のリサイクルマークの 表 示 が 義 務 づけられており、 廃 棄 物 として 捨 てることの 禁 止 とリサイクルが 義 務 づけられています。(Korean) (한국어) 2005년 8월 13일자로 시행된 폐전기전자제품에 대한 유럽연합(“EU”) 지침, 지침 2002/96/EC에 의거하여, “전기전자제품”은 일반 쓰레기로 폐기할 수 없으며 제품의 수명이 다하면 해당 전자제품의 제조업체가 이러한 제품을 회수할 책임이 있습니다.(Vietnam) (Tieng Viet) Theo Hướng dẫn của Liên minh Châu Âu (“EU”) về Thiết bị điện & điện tửđã qua sử dụng, Hướng dẫn 2002/96/EC, vốn đã có hiệu lực vào ngày 13/8/2005, các sản phẩmthuộc “thiết bị điện và điện tử” sẽ không còn được vứt bỏ như là rác thải đô thị nữa và các nhà sảnxuất thiết bị điện tử tuân thủ hướng dẫn sẽ phải thu hồi các sản phẩm này vào cuối vòng đời.(Thai) (ไทย) ภายใต้ข้อกำหนดของสหภาพยุโรป (“EU”) เกี่ยวกับของเสียจากอุปกรณ์ไฟฟ้าและอิเล็กทรอนิกส์ เลขที่ 2002/96/EC ซึ่งมีผลบังคับใช้ตั้งแต่วันที่ 13 สิงหาคม 2005 ผู้ใช้ไม่สามารถทิ้งผลิตภัณฑ์ที่เป็น “อุปกรณ์ไฟฟ้าและอิเล็กทรอนิกส์” ปะปนกับของเสียทั่วไปของชุมชนได้อีกต่อไป และผู้ผลิตอุปกรณ์อิเล็กทรอนิกส์ดังกล่าวจะถูกบังคับให้นำผลิตภัณฑ์ดังกล่าวกลับคืนเมื่อสิ้นสุดอายุการใช้งานของผลิตภัณฑ์
MS-A923(Indonesia) (Bahasa Indonesia) Sesuai dengan Regulasi Uni Eropa (“UE”) perihal WEEE (LimbahPeralatan Listrik dan Elektronik), Directive 2002/96/EC, yang berlaku sejak 13, 2005, produk“peralatan listrik dan elektronik” tidak lagi dapat dibuang sebagai sampah umum dan pabrikperalatan elektronik diwajibkan untuk mengambil kembali produk tersebut pada saat masa pakainyahabis.(Serbian) (Srpski) Po Direktivi Evropske unije (“EU”) o odbačenoj ekektronskoj i električnoj opremi,Direktiva 2002/96/EC, koja stupa na snagu od 13. Avgusta 2005, proizvodi koji spadajupod “elektronsku i električnu opremu” ne mogu više biti odbačeni kao običan otpad i proizvođačiove opreme biće prinuđeni da uzmu natrag ove proizvode na kraju njihovog uobičajenog vekatrajanja.(Netherlands) (Nederlands) De richtlijn van de Europese Unie (EU) met betrekking tot Vervuilingvan Electrische en Electronische producten (2002/96/EC), die op 13 Augustus 2005 in zal gaankunnen niet meer beschouwd worden als vervuiling. Fabrikanten van dit soort producten wordenverplicht om producten retour te nemen aan het eind van hun levenscyclus.(Romanian) (Română) În baza Directivei Uniunii Europene (“UE”) privind Evacuarea EchipamentuluiElectric şi Electronic, Directiva 2002/96/EC, care intră în vigoare pe 13 august, 2005,produsele din categoria “echipament electric şi electronic” nu mai pot fi evacuate ca deşeurimunicipale, iar fabricanţii echipamentului electronic vizat vor fi obligaţi să primească înapoi produselerespective la sfârşitul duratei lor de utilizare.(Portuguese) (Português) De acordo com a Directiva 2002/96/EC de Resíduos de EquipamentosEléctricos e Electrónicos da União Europeia (UE), efectiva desde o 13 de Agosto do ano2005, os produtos de “equipamento eléctrico e electrónico” não podem ser descartados comoresíduo municipal e os fabricantes do equipamento electrónico sujeitos a esta legislação estarãoobligados a recolhar estes produtos ao finalizar sua vida útil.(Swedish) (Svenska) Under Europeiska unionens (“EU”) Weee-direktiv (Waste Electrical andElectronic Equipment), Direktiv 2002/96/EC, vilket trädde i kraft 13 augusti, 2005, kan inteprodukter från “elektriska och elektroniska utrustningar” kastas i den vanliga hushållssopornalängre och tillverkare av inbyggd elektronisk utrustning kommer att tvingas att ta tillbaka sådanprodukter när de är förbrukade.(Finnish) (Suomi) Euroopan unionin (EU) 13.8.2005 voimaan tulleen sähkö- ja elektroniikkalaiteromuakoskevan direktiivin 2002/96/EY mukaisesti ”sähkö- ja elektroniikkalaitteita” ei saaenää hävittää talousjätteiden mukana. Direktiivin alaisen sähkö- tai elektroniikkalaitteen valmistajanon otettava laitteet takaisin niiden käyttöiän päättyessä.(Slovak) (Slovenčina) Na základe smernice Európskej únie („EU“) o elektrických a elektronickýchzariadeniach číslo 2002/96/ES, ktorá vstúpila do platnosti 13. augusta 2005, výrobky, ktorými sú„elektrické a elektronické zariadenia” nesmú byť zneškodňované spolu s komunálnym odpadoma výrobcovia patričných elektronických zariadení sú povinní takéto výrobky na konci životnostiprevziať naspäť.(Slovenian) (Slovenščina) Skladno z določili direktive Evropske unije (“EU”) o odpadni električniin elektronski opremi, Direktiva 2002/96/ES, ki je veljavna od 13. avgusta, izdelkov “električnein elektronske opreme” ni dovoljeno odstranjevati kot običajne komunalne odpadke, proizvajalcizadevne elektronske opreme pa so zavezani, da tovrstne izdelke na koncu njihove življenjskedobe sprejmejo nazaj.xi
▍ Preface(Danish) (Dansk) I henhold til direktiv fra den europæiske union (EU) vedrørende elektrisk ogelektronisk affald , Direktiv 2002/96/EC, som træder i kraft den 13. august 2005, må produktersom “elektrisk og elektronisk udstyr” ikke mere bortskaffes som kommunalt affald. Producenteraf det pågældende, elektroniske udstyr vil være forpligtet til at tage disse produkter tilbage vedafslutningen på produkternes levetid.(Norwegian) (Norsk) Under den europeiske unionens (“EU”) direktiv om deponering av elektroniskog elektrisk utstyr, direktiv 2002/96/EC, som trer i effekt 13. august 2005, kan ikke produkterav “elektronisk og elektrisk ustyr” lenger deponeres som husholdningsavfall og fabrikantene avdisse produktene er forpliktet å ta tilbake slike produkter ved slutten av produktets levetid.(Bulgarian) (български) Според директивата на Европейския съюз относно отпадъцитеот електрическо и електронно оборудване, директива 2002/96/EC, важаща от 13 август,2005 г., електрическо и електронно оборудване не може да се изхвърля заедно с битовитеотпадъци и производителите на такова оборудване са задължени да приемат обратносъответните продукти в края на експлоатационния им период.(Croatian) (Hrvatski) U okviru Direktive Europske Unije (“EU”) o Otpadnim električnim ielektroničkim uređajima, Direktiva 2002/96/EC, koja je na snazi od 13. kolovoza 2005., “električnii elektronički uređaji” se ne smiju više bacati zajedno s kućnim otpadom i proizvođači su obveznizbrinuti takve proizvode na kraju njihovog životnog vijeka.(Estonia) (Eesti) Vastavalt Euroopa Liidu (“EL”) direktiivile 2002/96/EÜ (elektri- ja elektroonikaseadmetejäätmete kohta), mis jõustus 13. augustil 2005, on keelatud kodumajapidamiste“elektri- ja elektroonikaseadmete” jäätmete hävitamine koos majapidamisjäätmetega, ja elektrijaelektroonikaseadmete tootjad on kohustatud sellised tooted pärast nende kasutuselt kõrvaldamisttagasi võtma.xii
Chapter 1OverviewWind Top AE1920 is integrated in design, selecting a stylish appearancewith a mirror screen, which displays the simplicity ofmodern individualism and the comfort of home. Furthermore, itis accompanied with the best computer features, such as instantmessage, low acoustics, energy saving, and 802.11 b/g/n wirelessinternet capability so you may roam freely in the realm ofcyberspace.
▍ OverviewPacking <strong>Content</strong>sWind Top SeriesAC/DC AdapterAC Power CordDriver/Utility Disk<strong>User</strong> Manual &Quick GuideLCD Display WiperKeyboard (Optional)Mouse (Optional)Stylus (Optional)* Please contact us immediately if any of the items isdamaged or missing.* The illustrations are for reference only and yourpacking contents may slightly vary depending onthe model you purchased.1-2
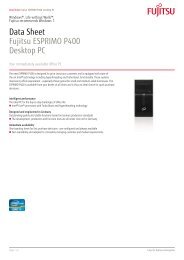
MS-A923System OverviewFront View1234451 Microphone- The built-in microphone can be used for video chatting online.2 Webcam- The built-in webcam with the microphone can be used for picture taking,video recoding, online conferencing and any other interactive applications.3 LCD Display- The 18.5-inch TFT LCD display is with an optimal resolution of 1366X 768 and standard proportion of 16:9 widescreen.4 Stereo Speakers- The built-in stereo speakers deliver high quality sound blaster withstereo system and Hi-Fi function supported.5 Power Indicator- The power indicator illuminates in green when the AIO PC is on, illuminatesin orange when the AIO PC is in sleep mode and turns offwhen the AIO PC is off.1-3
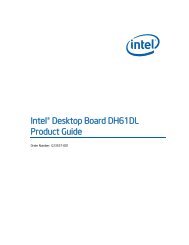
▍ OverviewRear View11214531106789ImportantWe suggest that you connect the AC/DC adapter to your AIO PC first and then connectthe AC power cord to the socket-outlet for safety concerns.1-4
MS-A9231 Ventilator- The ventilator on the enclosure is used for air convection and to preventthe equipment from overheating. Do not cover the ventilator.2Optical Disk Drive- A DVD Super-Multi drive is integrated for your home entertainment.(Blu-ray is optional.)3 Card Reader Drive- The built-in card reader may support various types of memory card,such as XD (eXtreme Digital), SD (Secure Digital), SDHC (SD HighCapacity), MS (Memory Stick), MS Pro (Memory Stick Pro) or MMC(Multi-Media Card) cards that usually used in devices like digital cameras,MP3 players, mobile phones and PDAs. Contact the local dealerfor further information and please be noted that the supported memorycards may vary without notice.4 Stand- Use this stand to position your system on a flat and stable surface.56Cable Routing Hole- Route the cables through the cable routing hole to avoid cable spaghettiwhen connecting devices.Power Jack- The AC/DC adapter converts AC power to DC power for this jack.Power supplied through this jack supplies power to the PC. To preventdamage to the PC, always use the supplied AC/DC adapter.7 USB Port- The USB (Universal Serial Bus) port is provided for attaching USBdevices such as mouse, keyboard, printer, scanner, camera, PDA orother USB-compatible devices.1-5
▍ Overview8 RJ-45 LAN Jack- The standard RJ-45 LAN jack is provided for connection to the LocalArea Network (LAN). You can connect a network cable to it.YellowGreen/ OrangeLED Color LED State ConditionLeft Yellow Off LAN link is not established.On (steady state)On (brighter & pulsing)LAN link is established.The computer is communicating withanother computer on the LAN.Right Green Off 10 Mbit/sec data rate is selected.On100 Mbit/sec data rate is selected.Orange On 1000 Mbit/sec data rate is selected.9 Microphone Jack (Pink)- This connector is provided for microphones.10 Headphone Jack (Green)- This connector is provided for headphones or speakers.1-6
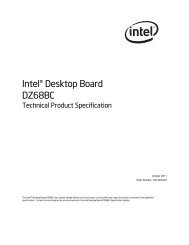
MS-A923Side View123645789101 Optical Disk Drive- A DVD Super-Multi drive is integrated for your home entertainment.(Blu-ray is optional.)2 Eject Button- Press the eject button to open the optical disk drive.3Eject Hole- Insert a thin, straight object (such as a paper clip) into the eject hole toopen the optical disk drive <strong>manual</strong>ly if the eject button does not work.4 Card Reader Drive- The built-in card reader may support various types of memory card,such as XD (eXtreme Digital), SD (Secure Digital), SDHC (SD HighCapacity), MS (Memory Stick), MS Pro (Memory Stick Pro) or MMC(Multi-Media Card) cards that usually used in devices like digital cameras,MP3 players, mobile phones and PDAs. Contact the local dealerfor further information and please be noted that the supported memorycards may vary without notice.1-7
▍ Overview5 USB Ports- The USB (Universal Serial Bus) port is provided for attaching USBdevices such as mouse, keyboard, printer, scanner, camera, PDA orother USB-compatible devices.6Ventilator- The ventilator on the enclosure is used for air convection and to preventthe equipment from overheating. Do not cover the ventilator.789Power Button- Press the power button to turn the system on and off.MENU Button- Press this button to view the OSD menu or enter into the sub menu.Right Button- This button indicates the cursor movement or OSD <strong>manual</strong> selectionin incremental values.Left Button- This button indicates the cursor movement or OSD <strong>manual</strong> selectionin decremental values.10 AUTO Button- Press this button to view the video mode menu or exit the submenu.1-8
MS-A923Mainboard SpecificationsProcessor■ Intel ® Atom Single/ Dual-Core Processor D425/ D525 (Optional)■ CPU Frequency 1.8 GHzChipset■ Intel ® NM10 Express ChipsetMemory■ 2 DDR3 800MHz SO-DIMM slots■ Supports the maximum of 4GBLAN■ Gigabit Fast Ethernet by Realtek ® RTL8111C GbE controllerAudio■ Chip integrated by Realtek ® ALC888■ Compliant with Azalia 1.0 specGraphics■ ATI ® Park-LP, M2 package size, DDR3, 512MB VRAM (Optional)■ Realtek ® RTD2382-GR multi-function display controllerForm Factor■ 210 mm (W) X 197 mm (H)1-9
▍ OverviewSystem SpecificationsDisplay■ 18.5” TFT LCD display with an optimal resolution of 1366 X 768■ Standard proportion of 16:9 widescreenRear Panel I/O■ 1 power jack■ 4 USB ports■ 1 RJ-45 LAN jack■ 1 microphone jack■ 1 headphone/ speaker jackCommunication■ Wired LAN: supported by Realtek ® RTL8111C GbE controller■ Wireless LAN: supported through Mini PCI-E WLAN module (Optional)Storage■ Hard Disk Drive: 2.5”, SATAII■ Optical Disk Drive: Slim DVD Super Multi■ Card Reader: all-in-one (SD, SD HC, MS, MS Pro, MMC, xD) card readerStereo Speaker■ 2 internal stereo speakers 3WWebCam■ 1.3MP WebCam with microphonePower Supply■ 65 watt AC/ DC adapter with active PFC■ Input: 100-240V~, 50-60Hz, 1.5A■ Output: 19V 3.42ADimension■ 476 mm (W) X 365 mm (H) X 49 mm (D)1-10
MS-A923Component Replacement & UpgradePlease note that certain components preinstalled in the product may be upgradableor replaceable by user’s request depending on the models users purchased.251431 CPU 2 Memory1-11
▍ Overview3 Hard Disk Drive 4 Mini PCI-E Card5 Optical Disk DriveIf the specified component has been determined by the MSI engineer orstore as problematic or defective and may incur the need for replacement,you may bring the product for repair along with the warranty card, purchaseinvoice or receipt to the MSI-authorized service center closest to your locationfor assistance.To learn more about upgrade limitation, please refer to the specifications in the<strong>User</strong>’s Manual. For any further information on the product users purchased,please contact the local dealer.Do not attempt to upgrade or replace any component of the product if you are notan authorized dealer or service center, since it may cause the warranty void. It isstrongly recommended that you contact the authorized dealer or service centerfor any upgrade or replace service.1-12
Chapter 2Getting StartedThis chapter provides you with the information on hardware setupprocedures. While connecting peripheral devices, be carefulin holding the devices and use a grounded wrist strap to avoidstatic electricity.
▍ Getting StartedSafety & Comfort TipsThe AIO PC is a portable platform that allows you to work anywhere. However,choosing a good workspace is important if you have to work with your PC for along period of time.■■■■■■■■Your work area should have enough illumination.Choose the proper desk and chair and adjust their height to fit your posturewhen operating.When sitting on the chair, adjust the chair’s back (if available) to supportyour back comfortably.Place you feet flat and naturally on the floor, so that your knees and elbowshave the proper position (about 90-degree) when operating.Put your hands on the desk naturally to support your wrists.Adjust the angle/position of the AIO PC to have an optimal view.Avoid using your PC in a place where discomfort may occur (such as onthe bed).The AIO PC is an electrical device. Please treat it with great care to avoidpersonal injury.1.2.3.4.5.Keep your hands and feet with optimal comfort.Adjust the angle and position of the monitor.Adjust the desk’s height.Sit straight and keep a good posture.Adjust the chair’s height.2-2
MS-A923Having Good Working HabitsHaving good working habits is important if you have to work with your AIO PCfor long periods of time; otherwise, it may cause discomfort or injury to you.Please keep the following tips in mind when operating.■■■Change your posture frequently.Stretch and exercise your body regularly.Remember to take a break after working for a period of time.2-3
▍ Getting StartedKnowing the Keyboard (Optional)▶Specifications■ Compatible with EU/UK/US/JP/KR language layout■ Isolated keycap for easy typing■ Low profile with silk printing technology■ USB interface for all Windows ® OS■ Keystroke life: 12 million■ Dimensions: 376.4 (L) X 155.09 (W) X 21.91 (H) mm■ Cable Length: 150cm■ Weight: 440g▶Features■ Multimedia function keys with AIO PC■ New isolated keycap for easy typing■ Soft-touch and tactile feedback for comfortable typing■ New concept elegant and slim keyboard in streamline shape■ Compact size for space saving■ Especially fit for MSI LCD display■ Compatible with Windows ® 2000/ ME/ XP/ Vista/ 7■ Built-in function hot keys■ Access favorite websites and applications with one touch hot keys* The illustration of keyboard is for reference only. Actual product specifications mayvary with territories.2-4
MS-A923▶Multimedia KeysFn + F7Backward to previous trackFn + F8Play and pauseFn + F9Forward to next trackFn + F10Mute functionFn + F11Volume downFn + F12Volume up▶Hot KeysFn + F1Launch the default E-Mail applicationsFn + F2Lanuch the default internet browser and go to the defaulthome pageFn + F3Back to the previous web pageFn + F4Forward to the next web pageFn + CCalculatorFn + ZSleep mode (energy saving)Fn + WWireless LANFn + KCamera2-5
▍ Getting StartedPositioning your SystemPositioning Your AIO PCStep 1. Place your AIO PC on a flat and steady surface such as a table ordesk.Step 2. Pull the stand open and tilt the LCD display to an angle of between 14and 24 degrees to suit your preference. This helps to reduce your eyestrain and muscle fatigue.0º 14º0º24º2-6
MS-A923Connecting Peripheral DevicesThe I/O (input/output) ports on the rear panel allow you to connect peripheraldevices. All devices listed here are for reference only.Connecting the USB DevicesThis AIO PC provides USB ports for connecting various USB devices, such asmouse, keyboard, digital camera, webcam, printer, external optical storage device,..and etc. To connect these devices, install the drivers for each device firstif necessary, and then connect the device to the AIO PC. This AIO PC is capableof auto detecting the USB devices installed, and if there is no detection of the devices,please <strong>manual</strong>ly enable the USB devices by going to Start Menu / ControlPanel / Add Hardware to add the new device.2-7
▍ Getting StartedConnecting the Communication Device Wired LANThe RJ-45 connector of the AIO PC allows you to connect the LAN (local areanetwork) devices, such as a hub, switch and gateway, to build a network connection.For more instructions or detailed steps on connecting to the LAN, please ask yourMIS staff or network manager for help.2-8
MS-A923 Wireless LAN (Optional)This AIO PC is equipped with wireless LAN module which allows users to performfast data transmission with standard IEEE 802.11 technology for wirelessLAN. This gives users the mobility to move around within a broad coverage areaand still be connected to the network.By using the 64-bit/128-bit Wired Equivalent Privacy (WEP) encryption technologyand Wi-Fi Protected Access feature, the optional built-in wirelesses LAN iscapable to achieve a more efficient and a more secure solution to the wirelesscommunication.For more instructions or detailed steps on connecting to the Wireless LAN, pleaseask your MIS staff or network manager for help.2-9
▍ Getting StartedConnecting PowerConnecting the AC PowerStep 1. Unpack the package to find the AC/DC adapter and AC power cord.Step 2. Assemble the AC/DC adapter and the AC power cord.Step 3. Plug the DC end of the adapter to the AIO PC, and the male end of theAC power cord to the electrical outlet.ImportantWe suggest that you connect the AC/DC adapter to your AIO PC first and thenconnect the AC power cord to the socket-outlet for safety concerns.Disconnecting the AC PowerStep 4. Unplug the AC power cord from the electrical outlet first.Step 5. Unplug the connector from the AIO PC.Step 6. Disassemble the AC power cord and the AC/DC adapter.ImportantWhen unplugging the AC power cord, always hold the connector part of the cord.Never pull the cord directly!3125462-10
Chapter 3System OperationsThis chapter provides you with essential information on systemoperations, such as system boot setup, recovery disk creation,network connection, SRS Premium Sound, and so on.Important• It is highly recommended that you create a system recoverydisk as the backup solution in the event of a catastrophic diskfailure or other accidents.• All information is subject to change without prior notice.
▍ System OperationsSystem Booting Setup for the first timeFor the first-time use, you will need to go over the following steps to start usingyour Wind Top Series AIO PC. The entire booting setup will take you around 30minutes.Step 1. Windows setup starts running. Please wait until Windows setup finishesthe progress loading.Step 2. Select the language of the operating system and click [Next] to continue.Step 3. Choose the “Country or region”, “Time and currency”, and “Keyboardlayout” you need. Click [Next] to continue.Step 4. Choose a user name for your account and name your computer to distinguishit on the network. Click [Next] to continue.Step 5. Set a password for your account to protect your user account from unwantedusers. (Leave this field blank if no need for password.) Click[Next] to continue.Step 6. Please read the license terms. Check the “I accept the license terms” boxand click [Next] to continue.Step 7. Select [Use recommended settings] for “Help protect your computer andimprove Windows automatically.”Step 8. Review your time and date settings. Click [Next] to continue.Step 9. Please choose a wireless network you intend to join from the providedWLAN list. Click [Next] to continue. You may also click [Skip] to skip thisstep and set up the WLAN later.Step 10. Followingly comes the anti-virus software screen. Click [Agree] to acceptthe license agreement terms and activate the anti-virus software.Alternatively, choose [No, I do not want to protect my PC.] to proceedwithout activating the anti-virus software.Step 11. The “Software Installation Menu” pops up. Click [Install] to continue.Step 12. The software is being installed. Please do not turn off the computerwhen software installation is running. When the progress bar completesloading, click [Finish] to continue.Step 13. The system enters the Windows 7 OS to start its personalized settings.Get ready to explore your AIO PC after the personalized settings aredone. Have fun with it!3-2
MS-A923Creating System Recovery DiskFor the first-time use, it is highly recommended that you create a system recoverydisk as the backup solution in the event of a catastrophic disk failure or other accidents.Before moving forward, please make sure your system booting setup iscomplete and go over the following procedures to get it done.Step 1. Double-click the “BurnRecovery” icon on the desktop to launch theRecovery Disc Creation Tool. Please note that it may take a while for theoperating system to prepare recovery files.Step 2. Click [Next] to start the image creation of the recovery disk.3-3
▍ System OperationsStep 3. Select [Create and burn a recovery disk] and click [Next] to continue.Alternatively, choose [Advanced] to bring forth advanced options.Choose between the provided options and click [Next] to continue.3-4
MS-A923Step 4. The progress bar starts running to create the image of recovery disk. Ittakes some time to finish the processing.Step 5. Follow the on-screen instructions to prepare enough number of blankDVD disks. Insert the blank DVD disk into the optical disk drive and click[Next] to continue.3-5
▍ System OperationsStep 6. The Windows Disc Image Burner pops up. Click [Burn] to start the burningprogress. It takes a while to finish the processing.3-6
MS-A923Step 7. On completion of the disk creation, click [Close] to exit and take out thedisk. Follow the on-screen instructions to create all recovery disks.Step 8. All recovery disks have been successfully created. Please store the diskscarefully and click [Next] to continue.3-7
▍ System OperationsStep 9. Check the following box if you want to remove the temporary files. Click[Finish] to complete recovery disk creation.3-8
MS-A923Touch Panel Calibration (Only for single-touch model)Wind Top Series AIO PC has touch panel function. If the mouse cursor can notmatch the move, users could use the IdeaCom TSC tool installed in system toadjust the accuracy of the touch panel. Please go over the following steps to getit done.Step 1. Locate the IdeaCom TSC tool at [Start] > [All Programs] > [IdeaComTSC].Step 2. Click [Calibration] to bring forth the default 9-point calibration. Follow theon-screen instructions to calibrate the touch panel.3-9
▍ System OperationsStep 3. For advanced settings, click [IdeaCom TSC] to launch the setup utility. Threecalibration modes are provided: 4 points, 9 points, and 25 points. We suggestthat users choose 9 points to adjust the touch panel. If users desire the bestprecision, then choose 25 points instead. Click [Calibration] to proceed andfollow the on-screen instructions to calibrate the touch panel.Important• Do not touch the screen directly with any sharp-pointed object.• Actual product specifications may vary with territories.3-10
MS-A923Network Connection under Windows Wired LANStep 1. Go to [Start] > [Control Panel].Step 2. Select [Connect to the Internet] under [Network and Internet].3-11
▍ System OperationsStep 3. Select [Broadband (PPPoE)] to connect using DSL or cable that requiresa user name and password.Step 4. Type the information from your Internet Service Provider (ISP) and click[Connect] to establish your LAN connection.3-12
MS-A923 Wireless LANStep 1. Go to [Start] > [Control Panel].Step 2. Select [Connect to the Internet] under [Network and Internet].3-13
▍ System OperationsStep 3. Select [Wireless] to connect using a wireless router or a wireless network.Step 4. A list of available WLAN connections pops up. Choose a connectionfrom the list or click [Open Network and Sharing Center] to establish anew connection.Step 5. To establish a new WLAN connection, select [Set up a new connectionor network] in [Network and Sharing Center].3-14
MS-A923Step 6. Followingly, choose [Manually connect to a wireless network] and click[Next] to continue.Step 7. Enter information for the wireless network you intend to add and click[Next] to proceed.Step 8. A new WLAN connection has been made. Click [Close] to exit or select[Change connection settings] to modify the WLAN settings.3-15
▍ System OperationsRALINK Wireless LAN Connection (Optional)Step 1. Right-click the Ralink Wireless LAN Card status icon in the lower rightcorner, and then click Launch Config Utility.Step 2. The window displays some available wireless networks. Choose a network,and then click Connect.3-16
MS-A923Step 3. There may prompt you to enter a key. Type the network key and thenclick OK.Step 4. Now, you’re ready to browse the Web wirelessly.3-17
▍ System OperationsSRS Premium Sound (Optional)SRS Premium Sound is a comprehensive suite of state-of-the-artaudio technologies that deliver a superior entertainment experiencefor playback of music, video and game content on the PC.With SRS Premium Sound your audio entertainment experiencewill sound better - more natural and immersive, with deeper bass,clearer dialog and outstanding surround sound.Features:■■■■■Premium audio experience for music, video and games on the PCImmersive surround sound experience from internal or external speakersand even headphonesGreater volume without degrading audio qualityCrystal clear dialogDeep, rich bassUsing the SRS Premium SoundStep 1. Double-click the Realtek HD Audio tray icon at the lower right corner ofthe screen to launch the SRS Premium Sound.Step 2. The Realtek HD Audio Manager pops up. Click the SRS tab and checkthe “Enable SRS ® Technology” box.3-18
MS-A923Step 3. Choose the audio content you are listening to. The SRS Premium Soundwill automatically process the specified audio signals to deliver enhancedaudio performance.Step 4. The following settings allow for specific control of SRS tuning parametersand are provided for External Speakers and Headphones.■■■■■■SRS Center: adjusts the center-channel soundSRS Space: adjusts the amount and width of the sound stageTruBass Level: adjusts the bass or low frequenciesTruBass Speaker Size: should be used to select the size of the speakersFocus Level: adjusts the frequencies that include vocals/voiceSRS Definition: adjusts the high frequenciesCAUTION: These settings are very sensitive and should be used by advancedusers.3-19
▍ System OperationsOn-Screen Display (OSD)The on-screen display (OSD) allows you to tune the viewing options of the monitor,such as brightness, contrast, positioning, and language. It can be activatedby buttons at the right side of the monitor.Step 1. Press the MENU button to bring up the OSD main menu. Use the Rightand Left arrow buttons to select the desired function menu and press theMENU button to enter. Use the Right and Left arrow buttons to select ortune the values to suit your personal preferences. After the settings aredone, press the AUTO button to exit.Adjusting contrast and brightnessAdjusting color3-20
MS-A923Adjusting signal sourceAdjusting positioning & timeoutSpecifying languageResetting systemReading system informationAdjusting wide screen mode3-21
▍ System OperationsStep 2. Press the Right & Left arrow buttons to adjust the system volume.Step 3. Press the AUTO button to view the video mode menu. Use the Right & Left arrowbuttons to select a desired mode and press the AUTO button to exit afterthe selection is made.3-22
MS-A923Power ManagementPower management of personal computers (PCs) and monitors has the potentialto save significant amounts of electricity as well as deliver environmentalbenefits.To be energy efficient, turn off your display or set your PC to sleep mode after aperiod of user inactivity.Power Management in Windows OS■[Power Options] in Windows OS allow you to control the power managementfeatures of your display, hard drive, and battery. Go to [Start]> [Control Panel] > [System and Security].Then click on the [Power Options] link.Select a power plan that suits your personal needs. You may also finetunethe settings by clicking [Change plan settings].3-23
▍ System Operations■The Shut Down Computer menu presents the options of Sleep (S3/S4)& Shut Down (S5) for rapid and easy management of your systempower.Waking the System UpThe computer shall be able to wake up from power saving mode in responseto a command from any of the following:■ the power button,■ the mouse,■ the keyboard.■■■■Energy Saving Tips:Utilize the(Fn + Z) sleep mode keys to turn into power savingmode.Tune the settings in Power Options under Windows OS to optimize yourPC’s power management.Install power saving software to manage your PC’s energy consumption.Always disconnect the AC power cord or switch the wall socket off ifyour PC would be left unused for a certain time to achieve zero energyconsumption.3-24
MS-A923System RecoveryImportantThe System Recovery Function is only available on systems bundled with WindowsOS and MSI utilities by default.The purposes for using the System Recovery Function may include:■ Restore the system back to the initial status of original manufacturer’sdefault settings.■ When some errors have occurred to the operating system in use.■ When the operating system is affected by virus and is not able to worknormally.Before using the System Recovery Function, please backup the important datasaved on your system drive to other storage devices.If the following solution fails to recover your system, please contact the authorizedlocal distributor or service center for further assistance.Recover the System with the F3 HotkeyIf the system encounters non-recoverable problems, it is always recommendedthat you try the F3 hotkey to recover your system with the recovery partitionof the hard disk drive first.Follow the instructions below to continue:1. Restart the system.2. Press the F3 hotkey on the keyboard when the following image appears.3-25
▍ System Operations3. Select [Windows Setup] from the Windows Boot Manager menu.4. Select [MSI Recovery Manager] to start the System Recovery Function; orselect [EXIT] to restart the system.5. The System Recovery Function will get your system back to default settings.Press [OK] to confirm.6. Press [OK] to reconfirm and start the System Recovery Function. Alternatively,press [Cancel] to stop.3-26
MS-A9237. The System Recovery Function is proceeding now.8. The following message indicates successful system recovery. Press [OK] torestart the system and access the Windows operating system as usual.Recover the System with the Recovery DisksIf the F3 hotkey recovery cannot work, try recovering your system with therecovery disks that you created beforehand.Follow the instructions below to continue:1. Insert the recovery disk into the optical disk drive and restart the system.2. Press the F11 hotkey on the keyboard when the following image appears.3-27
▍ System Operations3. Select the [CD/DVD] device as the boot device and press [Enter] to confirmthe selection.Press any key to reconfirm the selection when the following message appears.Press any key to boot from CD or DVD ...4. The Windows OS starts loading files.Windows is loading files ...5. The system recovery menu pops up. [Hard Disk Recovery] will format thewhole HDD. All data on the HDD will be erased while all settings will berestored to manufacturer default. Select [Hard Disk Recovery] only whenyour HDD is infected with fatal viruses and no solution can be found excepta clear cleanup of the HDD.3-28
MS-A923[System Partition Recovery] will format the C drive only. Only the C drivewill be restored to manufacturer default. Other drives will not be affected.It is highly recommended that users select [System Partition Recovery] torestore the system.6. The system recovery will format your HDD partition. Make sure that theimportant data have been backed up. Click [YES] to continue; click [NO] tostop the system recovery.Click [YES] again to reconfirm; click [NO] to stop the system recovery.3-29
▍ System Operations7. DO NOT turn off the system power while performing the system recoveryfunction, or it may cause unknown damage to the system.8. The following message indicates successful system recovery. Press [OK] torestart the system and access the Windows operating system as usual.9. If the recovery process is interrupted or failed, please repeat the recoveryprocedures from the beginning.3-30