RAS-50YH5/RAC-50YH5 - Hitachi Air Conditioning Products
RAS-50YH5/RAC-50YH5 - Hitachi Air Conditioning Products
RAS-50YH5/RAC-50YH5 - Hitachi Air Conditioning Products

Create successful ePaper yourself
Turn your PDF publications into a flip-book with our unique Google optimized e-Paper software.
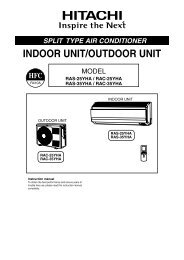
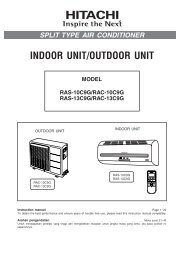
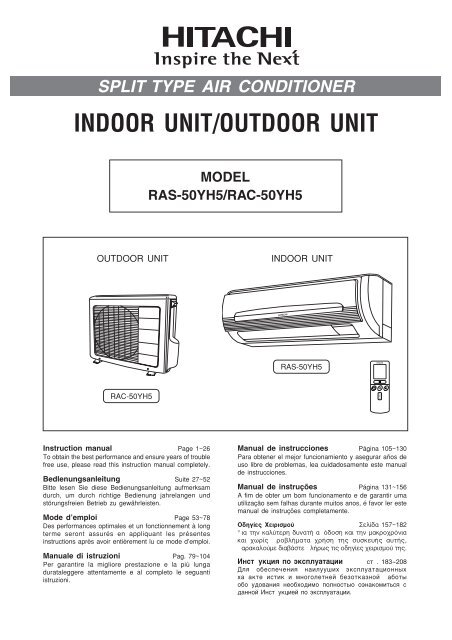
SPLIT TYPE AIR CONDITIONERINDOOR UNIT/OUTDOOR UNITENGLISHMODEL<strong>RAS</strong>-<strong>50YH5</strong>/<strong>RAC</strong>-<strong>50YH5</strong>OUTDOOR UNITINDOOR UNIT<strong>RAS</strong>-<strong>50YH5</strong><strong>RAC</strong>-<strong>50YH5</strong>Instruction manual Page 1~26To obtain the best performance and ensure years of troublefree use, please read this instruction manual completely.Bedlenungsanleitung Suite 27~52Bitte lesen Sie diese Bedienungsanleitung aufmerksamdurch, um durch richtige Bedienung jahrelangen undstörungsfreien Betrieb zu gewährleisten.Mode d’emploi Page 53~78Des performances optimales et un fonctionnement à longterme seront assurés en appliquant les présentesinstructions après avoir entièrement lu ce mode d’emploi.Manuale di istruzioni Pag. 79~104Per garantire la migliore prestazione e la più lungadurataleggere attentamente e al completo le seguantiistruzioni.Manual de instrucciones Página 105~130Para obtener el mejor funcionamiento y asegurar años deuso libre de problemas, lea cuidadosamente este manualde instrucciones.Manual de instruções Página 131~156A fim de obter um bom funcionamento e de garantir umautilização sem falhas durante muitos anos, é favor ler estemanual de instruções completamente.O‰ËÁ›Â˜ XÂÈÚÈÛÌÔ‡ ÂÏ›‰· 157~182° È· ÙËÓ Î·Ï‡ÙÂÚË ‰˘Ó·Ù‹ · fi‰ÔÛË Î·È ÙËÓ Ì·ÎÚÔ¯ÚfiÓÈ·Î·È ¯ˆÚ›˜ ÚÔ‚Ï‹Ì·Ù· ¯Ú‹ÛË Ù˘ Û˘Û΢‹˜ ·˘Ù‹˜,·Ú·Î·Ïԇ̠‰È·‚¿ÛÙ ϋڈ˜ ÙȘ Ô‰ËÁ›Â˜ ¯ÂÈÚÈÛÌÔ‡ Ù˘.Инст укция по эксплуатации ст . 183~208Для обеспечения наилууших эксплуатационныхха акте истик и многолетней безотказной аботыобо удования необходимо полностыо оэнакомиться сданной Инст укцией по эксплуатации.– 1 –
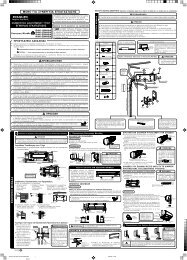
SAFETY PRECAUTION● Please read the “Safety Precaution” carefully before operating the unit to ensure correct usage of the unit.● Pay special attention to signs of “ ! Warning” and “ ! Caution”. The “Warning” section contains matters which,if not observed strictly, may cause death or serious injury. The “Caution” section contains matters which mayresult in serious consequences if not observed properly. Please observe all instructions strictly to ensure safety.● The sign indicate the following meanings.Make sure to connect earth line.The sign in the figure indicates prohibition.Indicates the instructions that must be followed.● Please keep this manual after reading.!WARNING!CAUTIONPRECAUTIONS DURING INSTALLATION● Do not reconstruct the unit.Water leakage, fault, short circuit or fire may occur if you reconstruct theunit by yourself.● Please ask your sales agent or qualified technician for the installation ofyour unit. Water leakage, short circuit or fire may occur if you install the unitby yourself.● Please use earth line.Do not place the earth line near water or gas pipes, lightning-conductor, orthe earth line of telephone. Improper installation of earth line may causeelectric shock.● A circuit breaker should be installed depending on the mounting site of theunit. Without a circuit breaker, the danger of electric shock exists.● Do not install near location where there is flammable gas. The outdoor unitmay catch fire if flammable gas leaks around it.● Please ensure smooth flow of water when installing the drain hose.!WARNINGPRECAUTIONS DURING SHIFTING OR MAINTENANCE● Should abnormal situation arises (like burning smell), please stop operating the unitand turn off the circuit breaker. Contact your agent. Fault, short circuit or fire mayoccur if you continue to operate the unit under abnormal situation.● Please contact your agent for maintenance. Improper self maintenance may causeelectric shock and fire.● Please contact your agent if you need to remove and reinstall the unit. Electricshock or fire may occur if you remove and reinstall the unit yourself improperly.PRECAUTIONS DURING OPERATION!WARNING● Avoid an extended period of direct air flow for your health.● Do not insert a finger, a rod or other objects into the air outlet or inlet. As thefan is rotating at a high speed, it will cause injury. Before cleaning, be sureto stop the operation and turn the breaker OFF.● Do not use any conductor as fuse wire, this could cause fatal accident.● During thunder storm, disconnect and turn off the circuit breaker.– 2 –
PRECAUTIONS DURING OPERATION● The product shall be operated under the manufacturer specification andnot for any other intended use.● Do not attempt to operate the unit with wet hands, this could cause fatalaccident.ENGLISH● When operating the unit with burning equipments, regularly ventilate theroom to avoid oxygen insufficiency.● Do not direct the cool air coming out from the air-conditioner panel to facehousehold heating apparatus as this may affect the working of apparatussuch as the electric kettle, oven etc.● Please ensure that outdoor mounting frame is always stable, firm andwithout defect. If not, the outdoor unit may collapse and cause danger.● Do not splash or direct water to the body of the unit when cleaning it as thismay cause short circuit.!CAUTION● Do not use any aerosol or hair sprays near the indoor unit. This chemicalcan adhere on heat exchanger fin and blocked the evaporation water flowto drain pan. The water will drop on tangential fan and cause water splashingout from indoor unit.● Please switch off the unit and turn off the circuit breaker during cleaning, thehigh-speed fan inside the unit may cause danger.● Turn off the circuit breaker if the unit is not to be operated for a long period.● Do not climb on the outdoor unit or put objects on it.● Do not put water container (like vase) on the indoor unit to avoid waterdripping into the unit. Dripping water will damage the insulator inside the unitand causes short-circuit.● Do not place plants directly under the air flow as it is bad for the plants.● When operating the unit with the door and windows opened, (the room humidity is always above80%) and with the air deflector facing down or moving automatically for a long period of time,water will condense on the air deflector and drips down occasionally. This will wet your furniture.Therefore, do not operate under such condition for a long time.● If the amount of heat in the room is above the cooling or heating capability of the unit (forexample: more people entering the room, using heating equipments and etc.), the preset roomtemperature cannot be achieved.● This is not intended for use by young children or infirm persons unless they have been adequatelysupervised by a responsible person to ensure that they can use the appliance safely.● Young children should be supervised to ensure that they do not play with the appliance.– 3 –
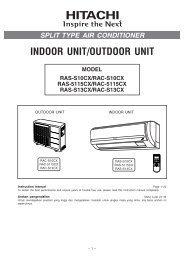
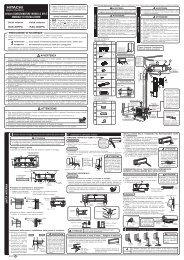
NAMES AND FUNCTIONS OF EACH PARTINDOOR UNIT<strong>Air</strong> filterTo prevent dust from coming into the indoor unit.(Refer page 21)Front panelIndoor unit indicatorsLight indicator showing the operating condition.(Refer page 5)Horizontal deflector ● Vertical deflector(<strong>Air</strong> Outlet)(Refer page 16)Remote controllerSend out operation signal to the indoor unit. So as tooperate the whole unit.(Refer page 6)OUTDOOR UNITDRAIN PIPECondensed water drain to outside.CONNECTING CORDAIR INLET (BACK, LEFT SIDE)AIR OUTLETMODEL NAME AND DIMENSIONSMODELWIDTH (mm)HEIGHT (mm)DEPTH (mm)<strong>RAS</strong>-<strong>50YH5</strong>780280210<strong>RAC</strong>-<strong>50YH5</strong>850650298– 4 –
Table 2: Duration (sec.) of eye-gaze and its relationshipwith turn-takingturn held by turn taken bypresenter A B CA gazed at B 0.220 0.589 0.299A gazed at C 0.387 0.391 0.791B gazed at A 0.161 0.205 0.078C gazed at A 0.308 0.215 0.355We also presume that turn-taking by the audienceis related with their interest level because they wantto know more and better when they are more attractedto the presentation.It is widely-known that eye-gaze informationplays a significant role in turn-taking (A.Kendon,1967; B.Xiao et al., 2011; K.Jokinen et al., 2011;D.Bohus and E.Horvitz, 2009). The existence ofposters, however, requires different modeling inposter conversations as the eye-gaze of the participantsare focused on the posters in most of the time.This is true to other kinds of interactions using somematerials such as maps and computers. Moreover,we investigate the use of backchannel informationby the audience during the presenter’s utterances.4.1 Relationship between Eye-gaze andTurn-takingWe identify the object of the eye-gaze of all participantsat the end of the presenter’s utterances. Thetarget object can be either the poster or other participants.Then, we measure the duration of the eyegazewithin the segment of 2.5 seconds before theend of the presenter’s utterances because the majorityof the IPUs are less than 2.5 seconds. It is listedin Table 2 in relation with the turn-taking events. Wecan see the presenter gazed at the person right beforeyielding the turn to him/her significantly longer thanother cases. However, there is no significant differencein the duration of the eye-gaze by the audienceaccording to the turn-taking events.4.2 Relationship between Joint Eye-gazeEvents and Turn-takingNext, we define joint eye-gaze events by the presenterand the audience as shown in Table 3. In thistable, we use notation of “audience”, but actuallythese events are defined for each person in the audi-Table 3: Definition of joint eye-gaze events by presenterand audiencewhopresentergazes at audience poster(I) (P)audience presenter (i) Ii Piposter (p) Ip PpTable 4: Statistics of joint eye-gaze events by presenterand audience in relation with turn-taking#turn held #turn taken totalby presenter by audience(self) (other)Ii 125 17 3 145Ip 320 71 26 417Pi 190 11 9 210Pp 2974 147 145 3266ence. Thus, “Ii” means the mutual gaze by the presenterand a particular person in the audience, and“Pp” means the joint attention to the poster object.Statistics of these events at the end of the presenter’sutterances are summarized in Table 4. Here,the counts of the events are summed over the twopersons in the audience. They are classified accordingto the turn-taking events, and turn-taking by theaudience is classified into two cases: the person involvedin the eye-gaze event actually took the turn(self), and the other person took the turn (other).The mutual gaze (“Ii”) is expected to be related withturn-taking, but its frequency is not so high. Thefrequency of “Pi” is not high, either. The most potentiallyuseful event is “Ip”, in which the presentergazes at the person in the audience before giving theturn. This is consistent with the observation in theprevious subsection.4.3 Relationship between Backchannels andTurn-takingAs shown in Section 3, verbal backchannels suggestthe listener’s interest level. Nodding is regarded asa non-verbal backchannel, and it is more frequentlyobserved in poster conversations than in simple spokendialogues.The occurrence frequencies of these events arecounted within the segment of 2.5 seconds beforethe end of the presenter’s utterances. They areshown in Figure 4 according to the joint eye-gaze5
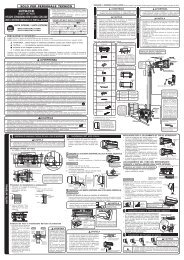
NAMES AND FUNCTIONS OF REMOTE CONTROL UNITREMOTE CONTROLLER● This controls the operation of the indoor unit. The range of control is about 7 meters. If indoor lighting is controlledelectronically, the range of control may be shorter.This unit can be fixed on a wall using the fixture provided. Before fixing it, make sure the indoor unit can be controlledfrom the remote controller.●●Handle the remote controller with care. Dropping it or getting it wet may compromise its signal transmission capability.After new batteries are inserted into the remote controller, the unit will initially require approximately 10 seconds torespond to commands and operate.RESET˚CH˚CHAUTOHEATDEHUMIDIFYCOOLFANFAN SPEEDLOWMEDHISLEEPINGSTOP (CANCEL)START (RESERVE)START/STOPTIMETIMER SETTIMER SELECTORON TIMEROFF TIMERAUTO SWING●●●●●●●●●●●Signal emitting window/transmission signPoint this window toward the indoor unit when controlling it.The transmission sign blinks when a signal is sent.DisplayThis indicates the room temperature selected, current time, timer status, functionand intensity of circulation selected.START/STOP buttonPress this button to start operation. Press it again to stop operation.SLEEP buttonUse this button to set the sleep timer.TEMPERATURE buttonsUse these buttons to raise or lower the temperature setting. (Keep pressed, andthe value will change more quickly.)TIME buttonUse this button to set and check the time and date.RESET buttonsFUNCTION selectorUse this button to select the operating mode. Every time you press it,the mode will change from (AUTO) to (HEAT) to (DEHUMIDIFY) to(COOL) and to (FAN) cyclically.FAN SPEED selectorThis determines the fan speed. Every time you press this button, the intensityof circulation will change from (AUTO) to (HI) to (MED) to (LOW)(This button allows selecting the optimal or preferred fan speed for each operationmode).AUTO SWING buttonControls the angle of the horizontal air deflector.TIMER controlUse this button to set the timer.● OFF-TIMER button Select the turn OFF time.● ON-TIMER button Select the turn ON time.● RESERVE button Time setting reservation.● CANCEL button Cancel time reservation.Precautions for Use● Do not put the remote controller in the following places.● Under direct sunlight.● In the vicinity of a heater.● Handle the remote controller carefully. Do not drop it on the floor,and protect it from water.● Once the outdoor unit stops, it will not restart for about 3 minutes(unless you turn the power switch off and on or unplug the powercord and plug it in again).This is to protect the device and does not indicate a failure.● If you press the FUNCTION selector button during operation, thedevice may stop for about 3 minutes for protection.– 6 –
VARIOUS FUNCTIONS●●■ Auto Restart ControlIf there is a power failure, operation will be automatically restarted when the power is resumed with previous operation modeand airflow direction.(As the operation is not stopped by remote controller.)If you intend not to continue the operation when the power is resumed, switch off the power supply.When you switch on the circuit breaker, the operation will be automatically restarted with previous operation mode and airflowdirection.Note: 1. If you do not require Auto Restart Control, please consult your sales agent or OFF by remote control.2. Auto Restart Control is not available when Timer or Sleep Timer mode is set.ENGLISHAUTOMATIC OPERATIONThe device will automatically determine the mode of operation, HEAT, COOL or DEHUMIDIFY depending on the current roomtemperature. The selected mode of operation will change when the room temperature varies. However the mode of operation willnot change when indoor unit connected to multi type outdoor unit.1Press the FUNCTION selector so that the display indicates the (AUTO)mode of operation.● When AUTO has been selected, the device will automatically determinethe mode of operation, HEAT, COOL or DEHUMIDIFY depending onthe current room temperature. However the mode of operation willnot change when indoor unit connected to multi type outdoor unit.● If the mode automatically selected by the unit is not satisfactory,manually change the mode setting (heat, dehumidify, cool or fan).RESETSTARTSTOPPress the (START/STOP) button.Operation starts with a beep.Press the button again to stop operation.■As the settings are stored in memory in the remote controller, you only haveto press the (START/STOP) button next time.You can raise or lower the temperature setting as necessary by maximum of3°C.°CPress the temperature button and the temperaturesetting will change by 1°C each time.●●The preset temperature and the actual room temperature may varysomewhat depending on conditions.The display does not indicate the preset temperature in the AUTO mode.If you change the setting, the indoor unit will produce a beep.Press the(FAN SPEED) button, AUTO and LOW is available.– 7 –
HEATING OPERATION●●Use the device for heating when the outdoor temperature is under 21°C.When it is too warm (over 21°C), the heating function may not work in order to protect the device.In order to keep reliability of the device, please use this device above -15°C of the outdoor temperature.˚C1Press the FUNCTION selector so that the display indicates(HEAT).RESET2Set the desired FAN SPEED with the (FAN SPEED) button(the display indicates the setting).(AUTO): The fan speed is HI at first and varies to MEDor LOW automatically when the presettemperature has been reached.(HI) : Economical as the room will become warmquickly.But you may feel a chill at the beginning.(MED) : Fan speed slow.(LOW) : Fan speed slower.˚C3Set the desired room temperature with the TEMPERATUREbuttons (the display indicates the setting).The temperature setting and the actual room temperature mayvary somewhat depending on conditions.STARTSTOPPress the (START/STOP) button. Heating operation startswith a beep. Press the button again to stop operation.■ As the settings are stored in memory in the remote controller, you onlyhave to press the (START/STOP) button next time.– 8 –
DEHUMIDIFYING OPERATIONUse the device for dehumidifying when the room temperature is over 16°C.When it is under 15°C, the dehumidifying function will not work.ENGLISH˚C1Press the FUNCTION selector so that the display indicates(DEHUMIDIFY).The FAN SPEED is set at LOW automatically.The FAN SPEED button does not work.RESET2Set the desired room temperature with the TEMPERATUREbutton (the display indicates the setting).The range of 20-26˚C is recommended asthe room temperature for dehumidifying.STARTSTOPPress the (START/STOP) button. Dehumidifying operationstarts with a beep. Press the button again to stop operation.■ As the settings are stored in memory in the remote controller, youonly have to press the (START/STOP) button next time.˚C■ Dehumidifying FunctionWhen the room temperature is higher than the temperature setting: The device will dehumidify the room,reducing the room temperature to the preset level.When the room temperature is lower than the temperature setting: Dehumidifying will be performed atthe temperature setting slightly lower than the current room temperature, regardless of the temperaturesetting. The function will stop (the indoor unit will stop emitting air) as soon as the room temperaturebecomes lower than the setting temperature.– 9 –
COOLING OPERATIONUse the device for cooling when the outdoor temperature is –10~43°C.If in doors humidity is very high (80%), some dew may form on the air outlet grille of the indoor unit.˚C1Press the FUNCTION selector so that the display indicates(COOL).Set the desired FAN SPEED with the(the display indicates the setting).(FAN SPEED) buttonRESET2(AUTO): The FAN SPEED is HI at first and varies toMED or LOW automatically when the presettemperature has been reached.(HI) : Economical as the room will become coolquickly.(MED) : Fan speed slow.(LOW) : Fan speed slower.˚C3Set the desired room temperature with the TEMPERATUREbutton (the display indicates the setting).The temperature setting and the actual room temperature mayvary some how depending on conditions.STARTSTOPPress the (START/STOP) button. Cooling operation startswith a beep. Press the button again to stop operation. Thecooling function does not start if the temperature setting ishigher than the current room temperature (even though the(OPERATION) lamp lights). The cooling function will start assoon as you set the temperature below the current roomtemperature.■ As the settings are stored in memory in the remote controller, youonly have to press the (START/STOP) button next time.– 10 –
FAN OPERATIONYou can use the device simply as an air circulator. Use this function to dry the interior of the indoorunit at the end of summer.ENGLISH12Press the FUNCTION selector so that the display indicates(FAN).Press the(FAN SPEED) button.RESETSTARTSTOPPress the (START/STOP) button. Fan operation starts witha beep. Press the button again to stop operation.FAN SPEED (AUTO)..... When the AUTO fan speed mode is set in the cooling/heating operation:For the heating operation● The fan speed will automatically change according to the temperatureof discharged air.● When the difference of room temperature and setting temperature islarge, fan starts to run at HI speed.● When the room temperature reaches setting temperature, fan speedchanges to LOW automatically.For the cooling operation● When the difference of room temperature and setting temperature islarge, fan starts to run at HI speed.● After room temperature reaches the preset temperature, the coolingoperation, which changes the fan speed and room temperature to obtainoptimum conditions for natural healthful cooling will be performed.– 11 –
HOW TO SET THE TIMERTIME, DAY,MONTH(current time,day, month)Time, Day, MonthAfter you change thebatteries;1 Set the current month andday with the TIMER controlbutton.MDMDOFF TIMERRESETON TIMERRESERVEOFF-Timer1 Press the (OFF-TIMER)button. The (OFF) mark blinkson the display.CANCELStartSTOPAMYou can set the device to turn offat the present time.ON-Timer●The device will turn onat the designated times.StopStart1 Press the (ON-TIMER)button the (ON) mark blinkson the display.AMON/OFF-TimerStartStop● The device will turn on (off) and off(on) at the designated times.● The switching occurs first at thepreset time that comes earlier.● The arrow mark appearing on thedisplay indicates the sequence ofswitching operations.1 Press the (ON-OFF)button so that the (OFF)mark blinks.PM2 Set the turn-off timewith the TIMER controlbutton.Press the (RESERVE)button.PM3 Press the (ON-TIMER) button so that the(OFF) mark lights andthe (ON) mark blinks.PMAMHow to Cancel ReservationPoint the signal window of the remote controller toward the indoor unit, and press the (CANCEL)button.The (RESERVED) sign goes out with a beep and the (TIMER) lamp turns off on the indoor unit.NOTEYou can set only one of the OFF-timer,ON-timer and ON/OFF-timer.– 12 –
2 Press the(TIME) button.3 Set the current time with theTIMER control button.4 Press the (TIME) button again.The time indication starts lightinginstead of flashing.ENGLISHAMPMPMPM● The time indication will disappearautomatically in 10 second.● To check the current time setting,press the (TIME) button twice.Example: The current time is 1:30 p.m.The setting of the current time isnow complete.2 Set the turn-off time with theTIMER control button.PM3 Point the signal window of the remote controller toward the indoor unit, andpress the (RESERVE) button.The (OFF) mark starts lighting instead of flashing and the sign (RESERVED)lights. A beep occurs and the (TIMER) lamp lights on the indoor unit.PMExample: The device will turn off at 11:00p.m.The setting of turn-off time is now complete.2 Set the turn-on time with theTIMER control button.3 Point the signal window of the remote controller toward the indoor unit, andpress the (RESERVE) button.The (ON) mark starts lighting instead of flashing and the (RESERVED) signlights. A beep occurs and the (TIMER) lamp lights on the indoor unit.AMAMExample:The device will turn on at 7:00 a.m.The setting of the turn-on time is now complete.4 Set the turn-on time with theTIMER control button.PMAM5 Point the signal window of the remote controller toward the indoor unit, andpress the (RESERVE) button.The (ON) mark starts lighting instead of flashing and the (RESERVED) signlights. A beep occurs and the (TIMER) lamp lights on the indoor unit.PMAMExample:The device will turn off at 10:30 p.m. and it will be turned onat 7:00 a.m.The settings of the turn-on/off times are now complete.●●The timer may be used in three ways: off-timer, on-timer, and ON/OFF (OFF/ON)-timer. Setthe current time at first because it serves as a reference.As the time settings are stored in memory in the remote controller, you only have to pressthe (RESERVE) button in order to use the same settings next time.– 13 –
HOW TO SET THE SLEEP TIMERSet the current time at first if it is not set before (see the pages for settingthe current time). Press the (SLEEP) button, and the display changes asshown below.HModeSleep timerIndication1 hour 2 hours 4 3 hours 7 hoursSleep timer off 14 4 4SLEEPSleep Timer: The device will continue working for the designatednumber of hours and then turn off.Point the signal window of the remote controller toward the indoorunit, and press the SLEEP button.The timer information will be displayed on the remote controller.The TIMER lamp lights with a beep from the indoor unit. When thesleep timer has been set, the display indicates the turn-off time.HExample: If you set 3 hours sleeptime at 11:38 p.m., the turn-offtime is 2:38 a.m.SleeptimerStartThe device will be turned off by the sleeptimer and turned on by on-timer.1 Set the ON-timer.2 Press the (SLEEP) button and set the sleep timer.HAMAMFor heating:In this case, the device will turn offin 2 hours (at 1:38 a.m.) and turnon early so that the presettemperature will be almost reachedat 6:00 next morning.How to Cancel ReservationPoint the signal window of the remote controller toward the indoor unit, and press the (CANCEL)button.The (RESERVED) sign goes out with a beep and the (TIMER) lamp turns off on the indoor unit.– 14 –
Explanation of the sleep timerThe device will control the FAN SPEED and room temperature automaticallyso as to be quiet and good for people’s health.ENGLISHNOTE● If date or current time is not set, sleep timer can not be set.● If you set the sleep timer after the off-, on/off- or off/on-timer has beenset, the sleep timer becomes effective instead of the off-, on/off- or off/on-timer set earlier.● You can not set other timer during sleep timer operation.● After sleep timer time is up and when press sleep button again, thesleep timer will be set as last setting.● Sleep timer effective only once.– 15 –
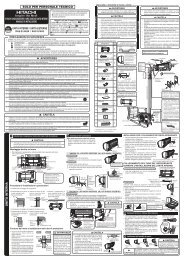
ADJUSTING THE AIR DEFLECTOR1Adjustment of the conditioned air in the upward and downwarddirections.The horizontal air deflector is automatically set to the properangle suitable for each operation. The deflector can be swungup and down continuously and also set to the desired angleusing the “ (AUTO SWING)” button.RESET● If the “ (AUTO SWING)” button is pressed once,the horizontal air deflector swings up and down. If thebutton is pressed again, the deflector stops in its currentposition. Several seconds (about 6 seconds) may berequired before the deflector starts to move.● Use the horizontal air deflector within the adjusting rangeshown on the right.● When the operation is stopped, the horizontal air deflectormoves and stops at the position where the air outletcloses.When cooling,dehumidifyingVerticalabout 15about 60! CAUTION● In “Cooling” operation, do not keep the horizontal airdeflector swinging for a long time. Some dew may formon the horizontal air deflector and dew may drop.When heatingVerticalabout 452Adjustment of the conditioned air to the left and right.Hold the vertical air deflector as shown in the figure and adjustthe conditioned air to the left and right.about 30– 16 –
HOW TO EXCHANGE THE BATTERIES IN THE REMOTE CONTROLLER12Remove the cover as shown in the figure and take out theold batteries.=Install the new batteries.The direction of the batteries should match the marks in thecase.Push and pull to thedirection of arrowENGLISH!CAUTION1. Do not use new and old batteries, or different kinds of batteriestogether.2. Take out the batteries when you do not use the remote controllerfor 2 or 3 months.– 17 –
THE IDEAL WAYS OF OPERATIONSuitable Room TemperatureInstall curtain or blinds! WarningIt is possible toFreezing temperatureis bad for health and awaste of electric power.reduce heatentering theroom throughwindows.Ventilation! CautionDo not close the room for a long period oftime. Occasionally open the door and windowsto allow theentrance offresh air.Effective Usage Of TimerAt night, please use the “OFF or ON timeroperation mode”, together with your wake uptime in the morning. This will enable you toenjoy a comfortable room temperature. Pleaseuse the timer effectively.Do Not Forget To Clean The <strong>Air</strong> FilterDusty air filter will reduce the air volume andthe cooling efficiency. To prevent from wastingelectric energy, please clean the filter every 2weeks.Please Adjust Suitable TemperatureFor Baby And ChildrenPlease pay attention to the room temperatureand air flow direction when operating the unitfor baby, children and old folks who havedifficulty in movement.– 18 –
FOR USER’S INFORMATIONThe <strong>Air</strong> Conditioner And The Heat Source In The RoomENGLISH! CautionIf the amount of heat in the room is above the coolingcapability of the air conditioner (for example: morepeople entering the room, using heating equipmentsand etc.), the preset room temperature cannot beachieved.Not Operating For A Long TimeWhen the indoor unit is not to be used for a longperiod of time, please switch off the power from themains. If the power from mains remains “ON”, theindoor unit still consumes about 8W in the operationcontrol circuit even if it is in “OFF” mode.OFFWhen Lightning Occurs! WarningTo protect the whole unit during lightning, pleasestop operating the unit and remove the plug from thesocket.Interference From Electrical <strong>Products</strong>! Inverter-typefluorescentlamp.CautionTo avoid noise interference, please place the indoorunit and its remote controller at least 1m away fromelectrical products.To preventinterference,place at least1m away.TV– 19 –
ATTACHING THE AIR CLEANSING FILTERS! CAUTIONCleaning and maintenance must be carried out only by qualified service personal. Before cleaning,stop operation and switch off the power supply.1Open the front panel.● Pull up the front panel by holding it at both sideswith both hands.2Remove the filter.● Push upward to release the claws and pull out thefilter.3Attaching the air cleansing filters to the filter.● Attach the air cleansing filters to the frame by gentlycompress its both sides and release after insertioninto filter frame.! CAUTIONDo not bend the air cleansingfilter as it may cause damage tothe structure.4Attach the filters.● Attach the filters by ensuring that the surface written“FRONT” is facing front.● After attaching the filters, push the front panel atthree arrow portion as shown in figure and close it.NOTE● In case of removing the air cleansing filters, please follow the above procedures.● The cooling capacity is slightly weakened and the cooling speed becomes slower when the aircleansing filters are used. So, set the fan speed to "HIGH" when using it in this condition.● <strong>Air</strong> cleansing filters are washable and reusable up to 20 times by using vacuum cleaner or water rinseunder running tap water. Type number for this air cleansing filter is . Please use thisnumber for ordering when you want to renew it.● Do not operate the air conditioner without filter. Dust may enter the air conditioner and fault may occur.– 20 –
MAINTENANCE! CAUTIONCleaning and maintenance must be carried out only by qualified service personal. Before cleaning,stop operation and switch off the power supply.ENGLISH1. AIR FILTERClean the air filter, as it removes dust inside the room. In case the air filter is full of dust, the air flowwill decrease and the cooling capacity will be reduced. Further, noise may occur. Be sure to clean thefilter following the procedure below.PROCEDURE1Open the front panel and remove the filter● Gently lift and remove the air cleansing filterfrom the air filter frame.2Vacuum dust from the air filter and air cleansingfilter using vacuum cleaner. If there is toomuch dust, air filter only rinse under runningtap water and gently brush it with soft bristlebrush. Allow filters to dry in shade.3● Re-insert the air cleansing filter to the filterframe. Set the filter with “FRONT” mark facingfront, and slot them into the original state.● After attaching the filters, push the front panelat three arrow portions as shown in figureand close it.NOTE:● <strong>Air</strong> cleansing filter should be cleaned every month or sooner if noticeable loading occurs. Whenused overtime, it may loose its deodorizing function. For maximum performance, it is recommendedto replace it every 3-6 months depending on application requirements.! CAUTION● Do not wash with hot water at more than 40°C. The filter may shrink.● When washing it, shake off moisture completely and dry it in the shade; do not expose it directly tothe sun. The filter may shrink.● Do not use detergent on the air cleansing filter as some detergent may deteriorate the filterelectrostatic performance.– 21 –
2. Washable Front Panel● Remove the front panel and wash with cleanwater.Wash it with a soft sponge.After using neutral detergent, wash thoroughlywith clean water.● When front panel is not removed, wipe it witha soft dry cloth. Wipe the remote controllerthoroughly with a soft dry cloth.● Wipe the water thoroughly.If water remains at indicators or signalreceiver of indoor unit, it causes trouble.Method of removing the front panel.Be sure to hold the front panel with both handsto detach and attach it.Removing the Front PanelAttaching the Front PanelFlangeHoleProjection● When the front panel is fully opened withboth hands, push the right arm to the insideto release it, and while closing the front panelslightly, put it out forward.● Move the projections of the left and rightarms into the Flanges in the unit andsecurely insert them into the holes.! CAUTION● Do not splash or direct water to the body of the unit when cleaningit as this may cause short circuit.● Never use hot water (above 40°C), benzine, gasoline, acid, thinner ora brush, because they will damage the plastic surface and the coating.– 22 –
! CAUTIONCleaning and maintenance must be carried out only by qualified service personal. Before cleaning,stop operation and switch off the power supply.ENGLISH3. MAINTENANCE AT BEGINNING OF LONG OFF PERIOD●●Run the unit by setting the operation mode to(COOL), the temperature to 32°C and the fan speedto HI for about half a day on a fine day, and dry thewhole of the unit.Switch off the power plug.<strong>Air</strong>BlowREGULAR INSPECTIONPLEASE CHECK THE FOLLOWING POINTS BY QUALIFIED SERVICE PERSONAL EITHEREVERY HALF YEARLY OR YEARLY. CONTACT YOUR SALES AGENT OR SERVICE SHOP.1Is the earth line disconnected or broken?2Is the mounting frame seriously affected by rust and is theoutdoor unit tilted or unstable?3ConfirmIs the plug of power line firmly plugged into the socket?(Please ensure no loose contact between them).– 23 –
AFTER SALE SERVICE AND WARRANTYWHEN ASKING FOR SERVICE, CHECK THE FOLLOWING POINTS.CONDITIONCHECK THE FOLLOWING POINTSWhen it does not operate●●●Is the fuse all right?Is the voltage extremely high or low?Is the circuit breaker “ON”?When it does not cool wellWhen it does not hot well●●●●●Was the air filter cleaned?Does sunlight fall directly on the outdoor unit?Is the air flow of the outdoor unit obstructed?Are the doors or windows opened, or is there any source ofheat in the room?Is the set temperature suitable?Notes● In quiet operation or stopping the operation, the following phenomenamay occassionally occur, but they are not abnormal for the operation.(1) Slight flowing noise of refrigerant in the refrigerating cycle.(2) Slight rubbing noise from the fan casing which is cooled and thengradually warmed as operation stops.● The odor will possibly be emitted from the room air conditioner becausethe various odor, emitted by smoke, foodstuffs, cosmetics and so on,sticks to it. So the air filter and the evaporator regularly must be cleanedto reduce the odor.●●Please contact your sales agent immediately if the air conditioner still fails to operate normally after the aboveinspections. Inform your agent of the model of your unit, production number, date of installation. Please alsoinform him regarding the fault.Power supply shall be connected at the rated voltage, otherwise the unit will be broken or could not reach thespecified capacity.– 24 –
Please note:On switching on the equipment, particularly when the room light is dimmed, a slight brightness fluctuationmay occur. This is of no consequence.The conditions of the local Power Supply Companies are to be observed.Note● Avoid to use the room air conditioner for cooling operation when the outside temperature is below21°C (70°F).The recommended maximum and minimum operating temperatures of the hot and cold sidesshould be as below:ENGLISHIndoorOutdoorCoolingHeatingMinimum Maximum Minimum MaximumDry bulb °C 21 32 20 27Wet bulb °C 15 23 12 19Dry bulb °C 21 43 2 21Wet bulb °C 15 26 1 15MEMO..............................................................................................................................................................................................................................................................................................................................................................................................................................................................................................................................................................................................................................................................................................................................................................................................................................................................................................................................................................................................................................................................................................................................................................................................................................................................................................................................................................................................................................................................................................................................................................................................................................................................................................................................................................................................................................................................................................................................................................................................................................................................................................................................................................................................................................................................................................................................................................................................................................................................................................................................................................................................................................................................................................................................................................................................................................................................................................................................................................................................................................................................................................................................................................................................................................................................................................................................................................................................................................................................................................................................................................................................................................................................................................................................................................................................................................................................................................................................................................................................................................................................................................................................................– 25 –
MEMO...................................................................................................................................................................................................................................................................................................................................................................................................................................................................................................................................................................................................................................................................................................................................................................................................................................................................................................................................................................................................................................................................................................................................................................................................................................................................................................................................................................................................................................................................................................................................................................................................................................................................................................................................................................................................................................................................................................................................................................................................................................................................................................................................................................................................................................................................................................................................................................................................................................................................................................................................................................................................................................................................................................................................................................................................................................................................................................................................................................................................................................................................................................................................................................................................................................................................................................................................................................................................................................................................................................................................................................................................................................................................................................................................................................................................................................................................................................................................................................................................................................................................................................................................................................................................................................................................................................................................................................................................................................................................................................................................................................................................................................................................................................................................................................................................................................................................................................................................................................................................................................................................................................................................................................................................................................................................................................................................................................................................................................................................................................................................................................................................................................................................................................................................................................................................................................................................................................................................................................................................................................................................................................................................................................................................................................................................................................................................................................................................................................................................................................................................................................................................................................................................................................................................................................................................................................................................................................................................................................................................................................................................................................................................................................................................................................................................................................................................................– 26 –