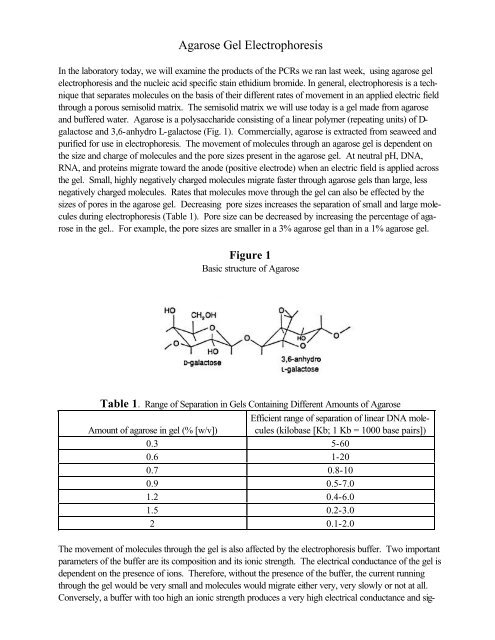
Agarose Gel Electrophoresis
Agarose Gel Electrophoresis
Agarose Gel Electrophoresis

You also want an ePaper? Increase the reach of your titles
YUMPU automatically turns print PDFs into web optimized ePapers that Google loves.
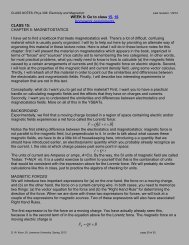
nificant amounts of heat. The heat that is produced by passing the electrical current through the gel can behot enough to denature the DNA so that it runs through the gel as single strands instead of double strandsor the heat may even melt the gel. The buffer we will use today is a 0.5X TBE solution containing0.045M Tris-borate and 0.001M EDTA. To make our 0.5X buffer we will dilute a 10X TBE Bufferstock solution. Do you remember the functions of Tris and EDTA?We will use the GIBCO/BRL Horizon 58 Horizontal <strong>Gel</strong> <strong>Electrophoresis</strong> Apparatus for our agaroseelectrophoresis today.I. Assembly for <strong>Gel</strong> CastingA. Assemble the gel unit (Fig. 2) on a level surface (check with bubble level) following the procedure outlinedbelow.B. Open the safety interlocking lid and insert the buffer tray in the tray support stand.C. Place the gel deck in the center of the buffer tray with the outermost, well visualization strip (redstripe) towards the left (negative) electrode.D. Slide the gel casting dams (wedges) down in the "V"-shape grooves of the buffer tray. Keep the flatedges of the wedges against the gel casting deck. Apply gentle pressure simultaneously to both wedgesto seat the sealing surfaces against the sides of the gel deck. Do not force the gel casting dams down,as this may displace the gel deck out of level.E. Insert the comb into the desired comb position slot, with the teeth in line with a red stripe. The combsfor this unit have 8-teeth that are 1 mm wide and 0.8 mm thick, 8-teeth that are 1 mm wide and 1.5 mmthick, or 14-teeth that are 0.5 mm wide and 0.8 mm thick.Figure 2<strong>Gel</strong> Apparatus
II. Preparing 1% <strong>Agarose</strong> for <strong>Gel</strong>sA. Weigh out 0.2 g of agarose into a 125 ml flask.B. Add 25 ml of autoclaved ddH 2 O to the flask.C. Microwave the flask for 1-2 min. Make sure that the mixture does not boil over. Stop the microwaveevery 30 s and swirl the flask. Continue to heat until the agarose is completely dissolved.D. After the agarose has completely dissolved, measure the volume of the contents of flask using a graduatedcylinder.E. Bring the volume up to 19 mL with autoclaved ddH 2 O and return the contents to the 125 ml flask.F. Add 1 mL of 10X TBE and swirl the flask.F. Microwave if necessary for 15-20 s.III. Pouring the <strong>Gel</strong>A. Pour the contents of the flask into the gel casting deck. Pour carefully so than not many air bubblesare created. Also make sure that the entire bottom of the casting deck is covered.B. Remove any air bubbles with a pipet.C. Allow the gel apparatus to stand undisturbed until the agarose gel solidifiesIV. Preparing the SamplesWe will mix our DNA with a loading buffer to prepare the sample for loading onto the agarose gel. Theloading buffer contains glycerol and two dyes, bromophenol blue and xylene cyanol (the recipe for a 5Xconcentration of this loading buffer is shown below in Table 2). We use a loading buffer for two reasons.First, the glycerol in the loading buffer helps to keep our DNA in the loading well. The teeth of the combthat are placed in the gel will form a series of wells or depressions in the gel when the comb is removed.These wells represent the spaces in the gel that will hold our sample when we load the gel. When we removethe comb, 0.5X TBE buffer will fill the wells. As we add our sample to the wells the volume of oursample displaces the buffer in the wells. Glycerol is denser than water, and consequently, the loadingbuffer very readily displaces the 0.5X TBE buffer in the wells. Since our samples of DNA are mixed withthe loading buffer they tend to stay in the wells instead of diffusing away. The second reason we use aloading buffer is that the two dyes that are in the loading buffer will help us track how the gel is running.When 0.5% to 1.4% agarose gels are used with 0.5X TBE, the bromophenol blue front runs at about thesame position in the gel as 300 bp dsDNA and the xylene cyanol front runs at about the same position inthe gel as 4,000bp dsDNA.
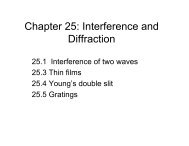
Table 2. Recipe for 5X Loading Buffer for DNA SamplesReagent Amount Final Conc.Glycerol 3.0 mL %Bromophenol Blue 0.025 g %Xylene Cyanol FF 0.025 g %Autoclaved ddH 2 Oup to 10 mLUse the table below to determine how much 5X loading buffer and autoclaved ddH 2 O you need to addto your sample.Table 3. Sample PreparationComponent Volume (µL) Final Conc.Autoclaved ddH 2 O ---5X Loading Buffer1XDNA Sample 4 ----Total Volume 5 ----V. 1 Kb DNA LadderIn addition to our DNA samples, we will run a lane on the gel that contains a series of DNA fragments ofknown size (Fig. 3). A subset of these fragments are small, being between 75 and 517 bp long. The remainingDNA fragments differ in size by about 1000 bp or 1 kilobase pairs (1 Kb). The dsDNA fragmentgenerated by our RT-PCR should be how long? Where would we expect our fragment to be in thegel relative to the DNA fragments in the 1 Kb ladder?Knowing that the 1 Kb ladder DNA is at a stock concentration of 1 µg/ml, how much of each componentwould you use below to prepare 10 µL of 1X loading buffer containing 1 Kb DNA ladder at a concentrationof 0.05 µg/µL.Table 4. DNA Standard PreparationComponent Volume (µL) Final Conc.Autoclaved ddH 2 O ---5X Loading Buffer1X1 Kb DNA Ladder 1 0.05 µg/µLTotal Volume 5 ----VI. Running the <strong>Gel</strong>A. Carefully remove the casting dams (wedges) from the casting deck. Make sure that you do not disturbthe comb.
B. Pour about 140 mL of 0.5X TBE into the buffer tray. The surface of the gel should be covered with1 to 2 mm of electrophoresis buffer (0.5X TBE).C. Gently remove the comb. To avoid tearing the bottom of the wells, gently wiggle the comb to free theteeth from the gel. Slightly lift up one side of the comb, then the other. Where do you think your samplegoes if you tear out the bottom of the wells?D. Remove any trapped air bubbles in the wells to ensure that the wells fill with buffer.E. Use a micropipet to load the samples onto the floor of the wells. Try not to bump the gel apparatuswhile you load your samples. If you do bump the apparatus you may dislodge you samples from thewells.F. Close the safety interlock lid.G. Connect the gel apparatus to the power supply. Red is positive and black is negative. Toward whichof these electrodes are our samples going to run?? That's right they are going to run toward the positiveelectrode. So connect the red wire to the right side of the apparatus and the black negative wire to theleft side of the apparatus.H. Switch on the power supply and set the voltage using the knob to about 100 Volts (101-104) whichshould be about 16-20 mamps (check with toggle switch). You should see bubbles being generated atthe negative electrode.I. Run the gel until the bromophenol blue front begins to migrate out of the gel.J. To stop the gel turn off the power supply.VII. Staining the gel with Ethidium Bromide and Visualizing the DNABandsWe will stain the DNA bands in our gel using ethidium bromide. Ethidium bromide intercalates (inserts itself)between A-T base pairs and fluoresces when illuminated with UV light. Ethidium bromide is knowto be a frame shift mutagen. Consequently, you do not want to let your skin come into contact theethidium bromide. Always wear gloves when handling gels stained with ethidium bromide. In addition,UV light is also dangerous. UV light can damage your eyes. Therefore, never look at a UV lightsource without eye protection!!!!!!!!A. To stain the gel with ethidium bromide, slide the gel off the casting deck into solution of ethidium bromideat a concentration of 0.5 µg/ml. Leave the gel soaking the stain for about 5 min.B. Destain the gel by transferring the gel to a container partially filled with ddH 2 O. You do not have touse autoclaved water unless you are going to destain for a very prolonged period of time. Allow the gelto destain for about 3 min.C. Place the gel on the UV trans-illuminator and low the protective plastic lid.
D. Turn on the illuminator. You should see DNA bands in the lanes that you loaded.E. To take a picture, lift up the protective plastic lid and place the camera unit on top. The camerashould be seated so that the gun handle is pointing toward you. Turn on the UV trans- illuminator andslowly squeeze the trigger on the camera. The camera settings should be F5.6 at 1 sec. After tripping theshutter, turn off the UV illuminator, and pull the white tab on the side of the camera. Pull out you pictureand wait 30 sec. Separate you picture from the backing. The picture does not have to be coated. Justthrow away the unwanted portions of the film.F. If you are done with gel, carefully wrap it up in paper towels throw it away in the biohazards trash.Figure 3. 1 Kb DNA Ladder