
Create successful ePaper yourself
Turn your PDF publications into a flip-book with our unique Google optimized e-Paper software.
MANUALE ISTRUZIONIOPERATING MANUALMANUEL D’INSTRUCTIONSBETRIEBSANLEITUNGMANUAL DE INSTRUCCIONES
GBLIMITED WARRANTYCongratulations on your purchase of this genuine <strong>Formula</strong> product. If anycomponent of the this new <strong>Formula</strong> product (hereinafter referred to as “warranteditem”) is found to be defective in materials or workmanship within theterms and conditions of this Limited Warranty (the "Agreement"), the defectivecomponent will be repaired or replaced, at the option of <strong>Formula</strong> (hereinafterreferred to as “<strong>Formula</strong>”), free of charge, within thirty (30) days afterreceipt of the product by <strong>Formula</strong>.1. NOT COVERED. This warranty does not cover damage resulting fromaccidents, alteration, neglect, misuse or abuse, contamination, lack of reasonableor proper maintenance, corrosion, improper assembly, repairsimproperly performed or replacement parts improperly installed, use ofreplacement parts or accessories not conforming to <strong>Formula</strong> 's specifications,use of component parts not manufactured or supplied by <strong>Formula</strong> ,modifications not recommended or approved in writing by <strong>Formula</strong> , ornormal wear and deterioration occasioned by the use of the product. Thiswarranty also does not cover any expenses related to the transportationof the warranted item to or from an authorized <strong>Formula</strong> Service Center,risk of loss of the item while in transit, labor costs to remove the product,or compensation for inconvenience or loss of use or profits while the productis not in service.2. PURCHASER. This warranty is made only with the original purchaser ofthe product and does not extend to any third parties. The rights of thePurchaser under this warranty may not be assigned.3. TERM. This limited warranty shall apply only in those instances where thedefect in material or workmanship appears within twelve (12) months ofthe date of purchase of the warranted items by the original Purchaser.This term shall not be extended for any items repaired or replaced underwarranty.4. ENTIRE AGREEMENT. This warranty supersedes any and all oral,express, implied or written warranties, statements or undertakings thatmay previously have been made, and contains the entire agreement ofthe parties with respect to the warranty of this product. Any and all warrantiesnot contained in this Agreement are specifically excluded.5. DAMAGES. Except as expressly provided by this warranty, <strong>Formula</strong><strong>Formula</strong> SHALL NOT BE RESPONSIBLE FOR ANY INCIDENTAL ORCONSEQUENTIAL DAMAGES ASSOCIATED WITH THE USE OFTHE WARRANTED ITEM OR A CLAIM UNDER THIS AGREEMENT,WHETHER THE CLAIM IS BASED ON CONTRACT, TORT OROTHERWISE. The foregoing statements of warranty are exclusive andin lieu of all other remedies. Some states do not allow the exclusion orlimitation of incidental or consequential damages, so thus limitation orexclusion may not apply to you.6. DISCLAIMER. ANY IMPLIED WARRANTY OF MERCHANTABILITYOR FITNESS FOR A PARTICULAR PURPOSE AND ALL IMPLIEDWARRANTIES ARISING FORM ACOURSE OF DEALING, USAGE OFTRADE, BY STATUTE OR OTHERWISE, IS HEREBY STRICTLY LIMI-
TED TO THE TERM OF THIS WRITTEN WARRANTY. This Agreementshall be the sole and exclusive remedy available to the Purchaser withrespect to this purchase. In the event of any alleged breach of any warrantyor any legal action brought by the purchaser based on alleged negligenceor other tortuous conduct by <strong>Formula</strong> , the Purchaser's sole andexclusive remedy will be repair or replacement of defective materials asstated above. No dealer and no other agent or employee of <strong>Formula</strong> isauthorized to modify, extend or enlarge this warranty. The performance ofany warranty service under this Agreement is not an admission or agreementthat the design or manufacture of a product is defective.7. PROCEDURE. In the event of a defect covered by this warranty, the purchasershould contact an authorized <strong>Formula</strong> Service Center or :To be honored, claims must be submitted within the twelve (12) monthwarranty period and within thirty (30) days of discovery of the defect ornonconformity. The determination whether the defect is covered by thiswarranty is within the sole discretion of <strong>Formula</strong>. <strong>Formula</strong> reserves theright to discontinue products and to change specifications for existing productsat any time without notice and shall not be obligated to incorporatenew features into products previously sold, even if those products arereturned under a warranty claim. <strong>Formula</strong> may replace defective partswith similar parts of similar quality in the event that identical parts are unavailableThe purchaser must obtain advance authorization in writing before returningany product to a <strong>Formula</strong> Service Center for warranty inspection. Areturn authorization number will be issued and must conspicuouslyappear on the outside of the product's packaging. The issuance of anauthorization number does not constitute acceptance of the claim, whichwill be evaluated by the Service Center upon its inspection of the product.The product should be securely packed to prevent damage during shipmentand must be accompanied by a letter specifying or including the followingitems of information:a. dated receipt or other proof of date of retail purchase;b. a copy of this warranty;c. <strong>Formula</strong> part number;d. detailed description of the problem experienced with the product,including a chronology of efforts made to correct the problem;e. identification of the components used in conjunction with the product;f. estimate of product usage: (i.e. accumulated time in service); andg. your name, address, and written authorization to ship the repaired productback to you freight collect ("C.O.D.").8. OTHER RIGHTS. This warranty gives you specific legal rights, and youmay also have other rights which vary from state to state.9. APPLICABLE LAW. Any disputes arising out of this Agreement or theuse of this product will be governed by the laws of the country of Italy andwill be decided by the Courts of Prato Italy.10.WARNING. This warranty is subject to the Italian laws.
GENERAL INDEXS.1 General rulesS.2 General safety rulesS.3 Braking system safety rulesForeword1.0 Installation1.1 Installation of the brake rotor1.2 Installing the kit2.0 <strong>Operating</strong> guidelines2.1 Lever reach adjustment2.2 Hose lenght adjustment2.3 Air bubble removal3.0 Maintenance3.1 Brake fluid replacementGBS.1 GENERAL RULESThis manual provides information for a safe and proper mountingand use of the braking system and for its rational maintenance.Constant compliance of its rules assures the braking system’sbest performances, duty economy, a longer lifetime and allows toavoid common causes of accidents which may occur duringoperation and maintenance.• WARNING Follow carefully the SAFETY RULES for a properuse of the braking system.In this handbook, within each paragraph, you will find the following safetynotices:• CAUTION: Directs your attention toward unsafe practiceswhich could result in damages to the equipment.• WARNING: Directs your attention toward unsafe practiceswhich could result in personal injury or damages to theequipment.
S.2 GENERAL SAFETY RULES• FORMULA’s brakes have been designed to be exclusively used ontwo-wheel vehicles driven by human propulsion. Any otherapplication may result in personal injury and voids the warranty byraising the manufacturer FORMULA from any and allresponsibilities for possible damages.• The operator charged with the installation shall be skilled, know wellthe braking system and have read both this operating manual andthe relevant enclosed documents from front to back.• Do not introduce your hands close to or within moving parts;always use strong five-fingered gloves ensuring sensitivity and apowerful grip.• Do not change the parameters of the braking system to obtain otherperformances than those established by the manufacturer.• Before starting any mounting operations, carefully check fordangerous conditions of the working site. If too dark, use allavailable light sources and make sure they work properlybefore starting to work.• Concentrate and take the due precautions before usingcomponents which could cause damages.• When using the bike, it is advisable to wear an helmet and to drivewith care and sense of responsibility.• All extraordinary maintenance operations have to be carriedout solely by personnel authorized by FORMULA.S.3 BRAKING SYSTEM SAFETY RULES• The brake rotor has to be assembled on wheels conceivedto be used with a disk brake. A wheel with spokes ofinsufficient section or with radially spoked wheels maycollapse under the action exerted by the braking system andresult in serious personal injury or accidents.• Check the spoke tension and condition frequently.A damaged spoke may break suddenly, interfere with the brakingsystem and result in serious personal injury or accidents.The bike frame or fork shall be suitable for mounting the brakingsystem. Only in this case, the correct dimensioning of the supportsand the suitable positioning of the elements which form it isassured.• Do not install the braking system by using adapters or supportssupplied by other manufacturers. This will void the braking systemwarranty immediately. Use only parts manufactured orrecommended by FORMULA.• THE BRAKING SYSTEM MAY NOT HAVE THE HIGHESTBRAKING EFFICIENCY WHEN NEW, THEREFORE A BREAKIN PERIOD AND LONGER DISTANCES SHOULD BEALLOWED FOR UNTIL THE SYSTEM IS BROKEN IN.
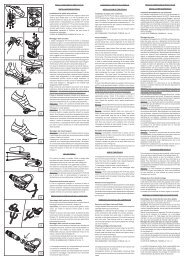
Universal Brake fluidExeceeds DOT 3and DOT 4Fig. 1FOREWORDRecommended lubricants and cleaningproductsHydraulic brake fluidUse only DOT 4 or Shell’s DonaxUB® hydraulic brake fluid fromsealed containers.Do not leave the container open over aperiod of time because this productabsorbs the moisture in the air, whichalters its physical characteristics.<strong>Formula</strong> recommends to replace thefluid in the system every 2 years.Donax UBBrake and Clutch Fluid1.0 L eWARNINGBesides damaging thepaintjob, the brake system’sfluid is extremely hazardous ifit comes in contact with theeyes or skin. In the event ofeye contact flush with freshwater and seek medicalassistance immediately.GreaseUse silicon grease for EPDM seals.<strong>Formula</strong> recommends: UNISILKONTKN 1011 by KLUBER.WARNINGUse of inappropriate type of greasemay compromise the integrity ofthe seals and cause damage to thesystem and therefore to the user.Fig. 2
1.0 INSTALLATION1.1 Installing the brakerotorWARNING: read the safety rulesPlace the disc brake A (fig. 1) on thehub B of a pre-assembled wheel,paying attention to the rotation sensegiven by the arrow C engraved on therotor’s flange, and lock it in place withthe specific M5 screws supplied whichhave to be tighten in a crosswisefashion with a 5,75 Nm ± 5%.Accurately clean the rotor from anytrace of grease or oil with isopropylalcohol.Fig. 31Fig. 41.2 Installing the kitProceed followingly:- Place the pump body on the bar inthe desired position and lock it inplace with the screw (1) using a tighteningtorque of 2,5 Nm ± 5%.The two screws have to be tightenedalternately and at thesame distance.If the hose length needs to be adjustedsee paragraph 2.3, if not proceed withthe positioning of the hose on the bicycle,bearing the following in mind:– the hose needs to be attached to thefork or frame in a way that does notinterfere with the free flow of fluidthrough the hose;– the hose should not make curvessmaller than a 40 mm diameter andshould not interfere with any movingpart of the bicycle;– for easy assembly of the hoses onthe bicycle, formula has developed acustom made hose holder zip tiethat can be ordered as anaccessory.
WARNINGAn incorrectly mounted tube or atube that is in contact with movingparts of the cicycle, can eliminatethe braking performance and causeserious accidents.55To adapt the frames or forks to thevarious diameters of brake rotorsavailable, FORMULA supplies differentadapters which can bemounted between the fork orframe and the brake caliper.CAUTIONOnly a correct mounting of thesystem and it’s various supportelements ensures the safety ofthe cyclist and the exceptionalperformance of FORMULA diskbrakes.Mount the caliper on the fork orframe by using the screws (5, fig.5) that come with the system.-First apply a light adhesive onthe screws and fix at 9Nm ±5%torque.Fig. 5WARNINGNever install the <strong>Formula</strong> brakesystem with adapters that arenot supplied by <strong>Formula</strong>. Thiswill void the warranty. To avoidserious accidents use onlyparts made by <strong>Formula</strong> andmounted on specially presetforks and frames.
= =Fig. 6Mount the wheel and lock it in placewith the quick release fix it with thefasteners, turn it slowly to check thatthe rotor is in the center of the brakepadsand none of the pads rub on therotor (fig. 6).Before riding the bike squeeze thebrake lever 2 or 3 times in order tobring the pads at the right distancefrom the rotor.WARNINGThe brake system needs a breakin period. FORMULA suggests tobrake at least a hundred timesbefore considering the systembroken in and fully efficient.2.0 OPERATING INSTRUC-TIONS2.1 Lever reach adjustmentB To adjust the lever position it isnecessary to remove the lockingknob A (Fig.7) and with a TORX® -T15 wrench act on the internalscrew of the lever by regulating thedistance H according to your preferences.Lock the knob in placeFig. 7again after completing the adjustments.WARNINGLever adjustments should bemade one time only whenmounted on the handlebar forthe first time.WARNINGIf damaged, it is vital to changethe dust cover. Failure toobserve this, results in gravedanger for the user.
D CBA2.2 Hose lenght adjustmentRemove the hose fitting connectorA (Fig 8) using an 8mm openwrench to loosen it. Once youhave decided for the desired hoselenght, cut the part in excess usinga cutter. Insert connector A again inthe hose and cut to measuremaking sure not to cause any oilleakage then assemble a newbiconical bush B and a new plug Cand tighten them firmly. Slightly coatthe biconical bush B and the screwthread with some grease thenretighten on the connector D theparts left on the pump.Fig. 8 WARNINGBe careful while using arazorsharp cutter or blade.Do not use blades or saws thatcould deform or lacerate thehose in such a way to cause lossof fluid or inefficiency of thesystem.AN UNNECESSARILY SHORTHOSE NOT ONLY CAUSESSTEERING PROBLEMS but canalso cause strain on the hosewhich may result in itsdisconnection from the caliper orpump lever. Using the correctlenght of the hose is vital toachieve maximum efficiency ofthe system.WARNINGShould biconical bush B (Fig 8)not be tightened enough, asprescribed, it might come loosewhile riding. This causes hosedetachment and consequently adangerous situation for the riderand for anyone found nearby.
CNote: Put a small quantity ofgrease on the connector’sthread.2.3 Air bubble removalEFig. 10Fig. 11Fig. 12ForewordThese operations, if necessary,must be performed aftercompleting hose adjustment.- Use a screwdriver introduced inthe specific slots to loosen andremove cover E (Fig. 10).- Loosen the grub screw C (Fig. 10)and remove the O-ring from thecoupling screw head having carenot to damage the particularlysmall-sized O-ring.- Place the syringe D filled with 10 mlof oil on the coupling and screw itfirmly in place.- Pull the lever and lock it to the handlebar by means of an elastic, asshown in figure 12.- With the syringe always steeredupward slowly suck out all the aircontained in the pipe. The presenceof air in the pipe is evidenced by thebubbles coming up through the fluidhead contained in the syringe;- Release the syringe piston andrepeat the procedure as manytimes as necessary until you haveremoved all the air from the pipe.WARNINGBefore removing the syringe itis necessary to release thepump lever that had previouslybeen locked (Fig. 12).Check out the quantity of oilcontained in the membraneinside the pump and if necessaryslightly press on the syringepiston to fill up the membrane.Attention, an excessive pressuremay damage the membrane.
- Remove then the syringe from theconnector.- Reassemble the grub screw andthe O-ring paying the latter specialattention.Remark:To invert the brake controlsprocede as follows:-Detach connector A (fig 13)from its pump and invert bothhoses. Reassemble byproceeding as in 2.3.Fig. 133.0 MAINTENANCEWARNING: read the safety rulesPeriodically clean the caliper in relationto the bike use, the route length, andthe weather conditions using abiodegradable degreaser suitable forthe caliper.Carefully clean all moving parts.CAUTION:ISOPROPYL ALCOHOL isrecommended to clean the discbrake. The use of any otherproduct may be hazardous tothe user.CAUTION: Do not touch therotor right after its use as itmight cause you severe injury.3.1 Changing the brakefluidPeriodically, in relation to the bikeuse it is necessary to entirelychange the system’s brake fluid.This operation must be carriedout only by personnel authorizedby <strong>Formula</strong>.
CERTIFICATO DI GARANZIAWARRANTY CERTIFICATECondizioni di Garanzia / Warranty ConditionsSi approvano espressamente le clausule, delle condizioni di garanzia,9) Foro competente, 10) Scelta della legislazione inderoga degli art.1341-1342 cod. civ.The point 7 and 8 are exspressly, according to Art. 1341-1342 civil code.Timbro del rivenditore/Retailer's stampNome e Cognome/NameIndirizzo/AddressCitt‡/CityStato/StateCap/ZipNumero di serie/Seriel numberTel./PhoneEt‡/AgeData di acquisto/Date PurchasedMod.Firma/SignatureDa compilare e spedire/To be filled in and sent
CERTIFICATO DI GARANZIAWARRANTY CERTIFICATECondizioni di Garanzia / Warranty ConditionsSi approvano espressamente le clausule, delle condizioni di garanzia,9) Foro competente, 10) Scelta della legislazione inderoga degli art.1341-1342 cod. civ.The point 7 and 8 are exspressly, according to Art. 1341-1342 civil code.Timbro del rivenditore/Retailer's stampNome e Cognome/NameIndirizzo/AddressCitt‡/CityStato/StateCap/ZipNumero di serie/Seriel numberTel./PhoneEt‡/AgeData di acquisto/Date PurchasedMod.Firma/SignatureConservare compilato/Coupon to be kept fillet-in
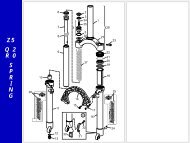
22232124202728292526181716151932313014331213341110987651234POMPAPump leverMaître-cylindrePumpeBomba
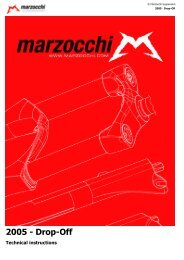
5756583839403700 36354748 4950515253594142PINZA FRENOCaliperEtrierBremssattelPinza
Note:NoteNoteNoteNote:
ScribaTech /Forlì