The Mayo Clinic Congruent Elbow Plates - ShoulderDoc.co.uk
The Mayo Clinic Congruent Elbow Plates - ShoulderDoc.co.uk
The Mayo Clinic Congruent Elbow Plates - ShoulderDoc.co.uk

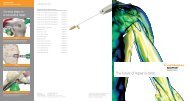
You also want an ePaper? Increase the reach of your titles
YUMPU automatically turns print PDFs into web optimized ePapers that Google loves.
THEFOR THE TREATMENT OF DISTAL HUMERUS AND OLECRANON FRACTURESPrinciple Based Internal FixationDesigned in <strong>co</strong>njunction with Shawn O’Dris<strong>co</strong>ll, M.D. and the <strong>Elbow</strong> Service at the <strong>Mayo</strong> <strong>Clinic</strong>, the <strong>Mayo</strong> <strong>Clinic</strong> <strong>Congruent</strong><strong>Elbow</strong> <strong>Plates</strong> by Acumed in<strong>co</strong>rporate Dr. O’Dris<strong>co</strong>ll’s fracture fixation principles, which have been proven successful with over12 years of clinical experience. <strong>The</strong> principles center around rigidly securing the articular fracture fragments and <strong>co</strong>mpressingthem to the shaft with plates that are pre-<strong>co</strong>ntoured to match the anatomy. Current <strong>co</strong>mplications, including elbow stiffness,hardware failure, hardware prominence and delayed union or non-union, can be minimized with the successful application ofthese new, next-generation implants.Seven Technical Objectives1) Every screw goes througha plate.2) Each screw engages a fragmenton the opposite side, that is alsofixed to a plate.3) Place as many screws as possible.4) Screws should be as long aspossible.5) Screws should engage as manyfragments as possible.6) Compression is achievedbetween the fragments andthe shaft.7) <strong>The</strong> plates should be strongand stiff to resist bending priorto union.Both the lateral epi<strong>co</strong>ndylar (green) and medial epi<strong>co</strong>ndylar (fuscia)plates are pre-<strong>co</strong>ntoured to match the bone with little or no bendingwhile achieving a low profile result and <strong>co</strong>rtical screw interdigitation.<strong>The</strong> olecranon plates provide multiple fixation options in theproximal fragment with 2.7mm or 3.5mm <strong>co</strong>rtical screws whileallowing for <strong>co</strong>mpression in the slots shown above.• <strong>Plates</strong> are pre-<strong>co</strong>ntoured to match the anatomy• Tubular undersurface for plate/bone stability• Low-profile screw plate interface• Peri-articular holes clustered for maximum fragment fixation• 2.7mm or 3.5mm screws for interdigitation• Compression slots• Slight under-<strong>co</strong>ntour• Plate thickness optimized for each regionMedial Epi<strong>co</strong>ndyle (Fuscia)Extra long (EL) • Long (L) • Short (S) • Medium (M) • Extended (EX)Lateral Epi<strong>co</strong>ndyleLeft (L)- BlueRight (R)- GreenShort (S)Long (L)LXLLLLSRS RLRXLELLSMEXLSXLOLXLORXLOlecranon (Aqua)Long (L)Standard (S)Extra Long (XL)Extra Long, Left (OLXL)Extra Long, Right (ORXL)Extra Long (XL)LCCoronoidPosterior (P)- GoldPRCLeft (LC)Right (RC)
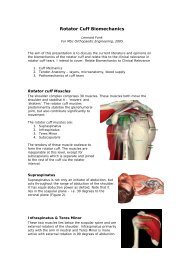
11) <strong>The</strong> articular fragments, which tend to be rotatedtoward each other in the axial plane, are reducedanatomically and provisionally held with 0.035” or 0.045”smooth Kirschner wires. It is essential that the wires beplaced close to the subchondral level to avoid interferencewith later screw placement, and away from wherethe plates will be placed on the lateral and medial<strong>co</strong>lumns (see Fig. 2A). One or two strategically placedpins can be used to provisionally hold the distalfragments aligned with the shaft.2A2A) Medial and lateral pre<strong>co</strong>ntoured plates are placed andheld apposed to the distal humerus, while one smooth2.0mm Steinmann pin is inserted through hole #2 (numberedfrom distal to proximal) of each plate through theepi<strong>co</strong>ndyles and across the distal fragments, to maintainprovisional fixation of the plates to the distal fragments.32B2B) A screw is placed in the slotted hole (#5) of eachplate, but not fully tightened, leaving some freedom for theplate to move proximally during <strong>co</strong>mpression later.Because the under surface of each plate is tubular in themetaphyseal and diaphyseal regions, the screw in the slottedhole only needs to be tightened slightly to provideexcellent provisional fixation of the entire distal humerus.3) Screws are inserted through hole #3 (numbered fromdistal to proximal) of the medial plate and across the distalarticular fragments from medial to lateral, and tightened.This step is repeated on the lateral side, using hole #1. Inyoung patients, 3.5mm <strong>co</strong>rtical screws are used (to preventbreakage), whereas long 2.7mm screws are used in patientswith osteoporotic bone. <strong>The</strong> distal screws should be aslong as possible, passing through as many fragments as possible,and engaging the <strong>co</strong>ndyle or epi<strong>co</strong>ndyle of the opposite<strong>co</strong>lumn.
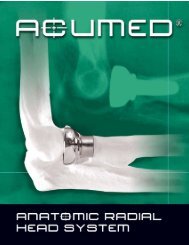
AcUMED®Copyright © 2002 Acumed, Inc.All rights reserved. Acumed is a registeredtrademark of Acumed. All other namesand brands are the property of theirrespective owners. Printed in the USA.AcUMED®5885 NW Cornelius Pass Rd.Hillsboro, OR 97124 USA1-888-627-9957 • www.acumed.netFBPL-07-04 • Effective 05/07/2002Patents Pending