w124 Adjustment of crank window on driver's door.pdf
w124 Adjustment of crank window on driver's door.pdf
w124 Adjustment of crank window on driver's door.pdf

You also want an ePaper? Increase the reach of your titles
YUMPU automatically turns print PDFs into web optimized ePapers that Google loves.
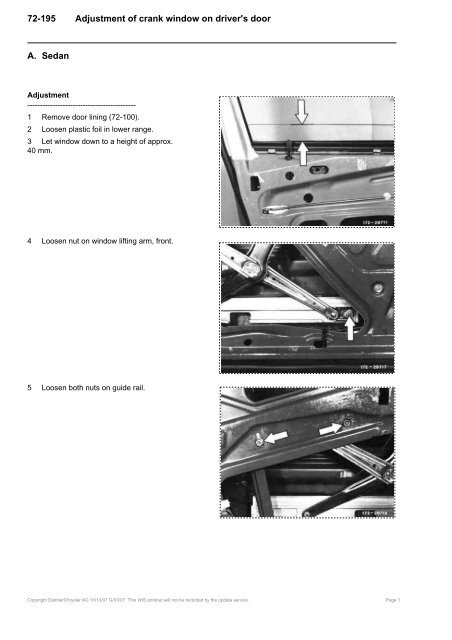
72-195 <str<strong>on</strong>g>Adjustment</str<strong>on</strong>g> <str<strong>on</strong>g>of</str<strong>on</strong>g> <str<strong>on</strong>g>crank</str<strong>on</strong>g> <str<strong>on</strong>g>window</str<strong>on</strong>g> <strong>on</strong> <strong>driver's</strong> <strong>door</strong>A. Sedan<str<strong>on</strong>g>Adjustment</str<strong>on</strong>g>-------------------------------------------1 Remove <strong>door</strong> lining (72-100).2 Loosen plastic foil in lower range.3 Let <str<strong>on</strong>g>window</str<strong>on</strong>g> down to a height <str<strong>on</strong>g>of</str<strong>on</strong>g> approx.40 mm.4 Loosen nut <strong>on</strong> <str<strong>on</strong>g>window</str<strong>on</strong>g> lifting arm, fr<strong>on</strong>t.5 Loosen both nuts <strong>on</strong> guide rail.Copyright DaimlerChrysler AG 10/13/07 G/03/07. This WIS printout will not be recorded by the update service. Page 1
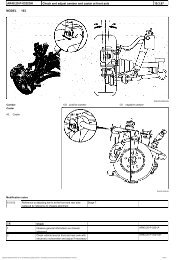
6 Push <str<strong>on</strong>g>window</str<strong>on</strong>g> at top into rear <str<strong>on</strong>g>window</str<strong>on</strong>g>running rail.7 Push <str<strong>on</strong>g>window</str<strong>on</strong>g> below in forward directi<strong>on</strong>into <str<strong>on</strong>g>window</str<strong>on</strong>g> running rail and tighten nut <strong>on</strong><str<strong>on</strong>g>window</str<strong>on</strong>g> lifting arm.8 Push rear nut <strong>on</strong> guide rail down andtighten.9 Tighten fr<strong>on</strong>t nut <strong>on</strong> guide rail.10 Grease guide members.11 Check <str<strong>on</strong>g>window</str<strong>on</strong>g> for easy operati<strong>on</strong>.Note : If the plastic foil is damaged duringrelease, replace and glue <strong>on</strong> with care.Copyright DaimlerChrysler AG 10/13/07 G/03/07. This WIS printout will not be recorded by the update service. Page 2
6 Close <str<strong>on</strong>g>crank</str<strong>on</strong>g> <str<strong>on</strong>g>window</str<strong>on</strong>g> until <str<strong>on</strong>g>crank</str<strong>on</strong>g> <str<strong>on</strong>g>window</str<strong>on</strong>g> isflush with fr<strong>on</strong>t edge to guide holder.7 With <str<strong>on</strong>g>window</str<strong>on</strong>g> correctly adjusted, the upperedge <str<strong>on</strong>g>of</str<strong>on</strong>g> glass will touch the inner lip <str<strong>on</strong>g>of</str<strong>on</strong>g> sealingframe al<strong>on</strong>g entire length.8 Tighten nuts <strong>on</strong> upper angle stops fr<strong>on</strong>tand rear.Note : A correcti<strong>on</strong> can be made by displacingrear screw <strong>on</strong> <str<strong>on</strong>g>window</str<strong>on</strong>g> lift guide rail and throughfr<strong>on</strong>t stop for upper lift restricti<strong>on</strong> (refer toitem 3).If required, the tilt and the l<strong>on</strong>gitudinaldirecti<strong>on</strong> <str<strong>on</strong>g>of</str<strong>on</strong>g> <str<strong>on</strong>g>crank</str<strong>on</strong>g> <str<strong>on</strong>g>window</str<strong>on</strong>g> can be additi<strong>on</strong>allycorrected after loosening the three screws <strong>on</strong><str<strong>on</strong>g>window</str<strong>on</strong>g> lifting rail.Copyright DaimlerChrysler AG 10/13/07 G/03/07. This WIS printout will not be recorded by the update service. Page 4
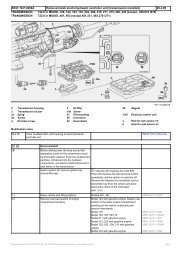
9 Tighten fr<strong>on</strong>t and rear screw <strong>on</strong> <str<strong>on</strong>g>window</str<strong>on</strong>g>lifting rail.10 Close <str<strong>on</strong>g>crank</str<strong>on</strong>g> <str<strong>on</strong>g>window</str<strong>on</strong>g> and adjust rear guidewedge by sliding in obl<strong>on</strong>g hole so that therear edge <str<strong>on</strong>g>of</str<strong>on</strong>g> the <str<strong>on</strong>g>window</str<strong>on</strong>g> c<strong>on</strong>tacts the guidewedge.11 Adjust lateral tilt (preload) <str<strong>on</strong>g>of</str<strong>on</strong>g> <str<strong>on</strong>g>crank</str<strong>on</strong>g> <str<strong>on</strong>g>window</str<strong>on</strong>g>in relati<strong>on</strong> to sealing frame by means <str<strong>on</strong>g>of</str<strong>on</strong>g>adjusting screws <strong>on</strong> fr<strong>on</strong>t and rear bearingbracket <str<strong>on</strong>g>of</str<strong>on</strong>g> vertical guide rail. For this purpose,remove trim outside <strong>on</strong> <strong>driver's</strong> <strong>door</strong> (88-800,secti<strong>on</strong> B).12 Remove rubber grommets and loosen nuts.Adjust <str<strong>on</strong>g>crank</str<strong>on</strong>g> <str<strong>on</strong>g>window</str<strong>on</strong>g> with both adjusting screwsin such a manner that, with the <str<strong>on</strong>g>window</str<strong>on</strong>g> closed,the upper edge <str<strong>on</strong>g>of</str<strong>on</strong>g> <str<strong>on</strong>g>window</str<strong>on</strong>g> pane is just restingagainst sealing frame when the <strong>door</strong> engagesin 1st detent <str<strong>on</strong>g>of</str<strong>on</strong>g> <strong>door</strong> lock.Copyright DaimlerChrysler AG 10/13/07 G/03/07. This WIS printout will not be recorded by the update service. Page 5
Note : If the adjustment <str<strong>on</strong>g>of</str<strong>on</strong>g> the lateral preload(initial tensi<strong>on</strong>) <strong>on</strong> bearing brackets <str<strong>on</strong>g>of</str<strong>on</strong>g> guiderail is no l<strong>on</strong>ger sufficient, additi<strong>on</strong>aladjustments can be made <strong>on</strong> guide shoes.By sliding the guide shoes in upward directi<strong>on</strong>,the preload will be increased, and will bereduced by sliding shoes downward.13 Adjust rear guide rail in slot in such amanner that the rear edge <str<strong>on</strong>g>of</str<strong>on</strong>g> the <str<strong>on</strong>g>crank</str<strong>on</strong>g> <str<strong>on</strong>g>window</str<strong>on</strong>g>abuts against sealing rubber <str<strong>on</strong>g>of</str<strong>on</strong>g> rear side<str<strong>on</strong>g>window</str<strong>on</strong>g> al<strong>on</strong>g entire length with <strong>door</strong> closed.14 Adjust lower lift restricti<strong>on</strong> with stop against<str<strong>on</strong>g>window</str<strong>on</strong>g> lift and <strong>on</strong> <str<strong>on</strong>g>window</str<strong>on</strong>g> lifting rail in such amanner that the upper edge <str<strong>on</strong>g>of</str<strong>on</strong>g> the <str<strong>on</strong>g>window</str<strong>on</strong>g>pane is flush with sealing rails.15 Up<strong>on</strong> completi<strong>on</strong> <str<strong>on</strong>g>of</str<strong>on</strong>g> adjusting jobs, greaseall sliding surfaces <strong>on</strong> <str<strong>on</strong>g>window</str<strong>on</strong>g> guide rails withMB slide paste, part no. 000 989 31 51.Stop <strong>on</strong> <str<strong>on</strong>g>window</str<strong>on</strong>g> lifting railCopyright DaimlerChrysler AG 10/13/07 G/03/07. This WIS printout will not be recorded by the update service. Page 6