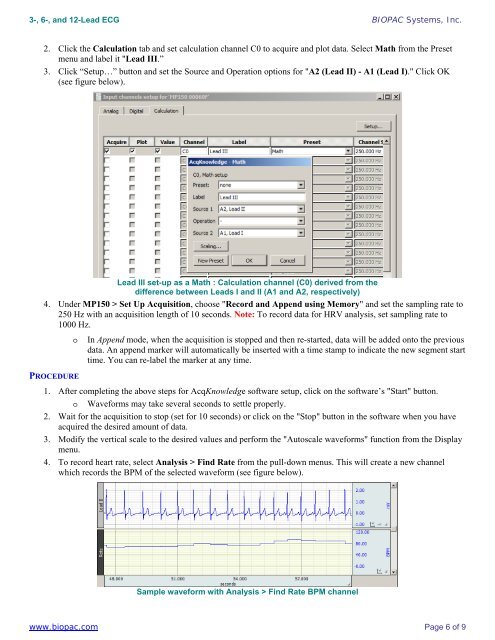
3-, 6-, <strong>and</strong> <strong>12</strong>-<strong>Lead</strong> <strong>ECG</strong> BIOPAC Systems, Inc.2. Click the Calculation tab <strong>and</strong> set calculation channel C0 to acquire <strong>and</strong> plot data. Select Math from the Presetmenu <strong>and</strong> label it "<strong>Lead</strong> III.”3. Click “Setup…” button <strong>and</strong> set the Source <strong>and</strong> Operation options for "A2 (<strong>Lead</strong> II) - A1 (<strong>Lead</strong> I)." Click OK(see figure below).<strong>Lead</strong> III set-up as a Math : Calculation channel (C0) derived from thedifference between <strong>Lead</strong>s I <strong>and</strong> II (A1 <strong>and</strong> A2, respectively)4. Under MP150 > Set Up Acquisition, choose "Record <strong>and</strong> Append using Memory" <strong>and</strong> set the sampling rate to250 Hz with an acquisition length of 10 seconds. <strong>Note</strong>: To record data for HRV analysis, set sampling rate to1000 Hz.oIn Append mode, when the acquisition is stopped <strong>and</strong> then re-started, data will be added onto the previousdata. An append marker will automatically be inserted with a time stamp to indicate the new segment starttime. You can re-label the marker at any time.PROCEDURE1. After completing the above steps for AcqKnowledge software setup, click on the software’s "Start" button.o Waveforms may take several seconds to settle properly.2. Wait for the acquisition to stop (set for 10 seconds) or click on the "Stop" button in the software when you haveacquired the desired amount of data.3. Modify the vertical scale to the desired values <strong>and</strong> perform the "Autoscale waveforms" function from the Displaymenu.4. To record heart rate, select Analysis > Find Rate from the pull-down menus. This will create a new channelwhich records the BPM of the selected waveform (see figure below).Sample waveform with Analysis > Find Rate BPM channelwww.biopac.com Page 6 of 9
3-, 6-, <strong>and</strong> <strong>12</strong>-<strong>Lead</strong> <strong>ECG</strong> BIOPAC Systems, Inc.Option # 1: 6-<strong>Lead</strong> <strong>ECG</strong>In order to acquire 6-lead <strong>ECG</strong> information, you will need to calculate the three augmented leads, also termed theGoldberger leads. These leads are derived from advanced vector-cardiography based on the three st<strong>and</strong>ard leads (<strong>Lead</strong>s I,II, <strong>and</strong> III). No additional electrodes or leads are required to obtain the augmented leads as they are functions of the threest<strong>and</strong>ard leads <strong>and</strong> can be calculated online or post-acquisition with the following formulas:aVR = - (<strong>Lead</strong> I + <strong>Lead</strong> II) / 2aVL = (<strong>Lead</strong> I - <strong>Lead</strong> III) / 2aVF = (<strong>Lead</strong> II + <strong>Lead</strong> III) / 2where <strong>Lead</strong> I correlates to software channel A1, <strong>Lead</strong> II correlate to software channels A2, <strong>and</strong> <strong>Lead</strong> III correlates tosoftware channel C01. Click on MP > Setup Channels <strong>and</strong> set three additional Calculation channels to acquire, plot <strong>and</strong> show values.2. Set each new calculation channel to the Expression preset (click “Setup…” button) <strong>and</strong> enter the formulas foraVR, aVL, or aVF in each Expression setup dialog.3. Click OK to close out of the dialog <strong>and</strong> proceed with the recording.Option # 2: <strong>12</strong>-<strong>Lead</strong> <strong>ECG</strong>In some remote cases 6-lead <strong>ECG</strong> does not give enough information about the electrical activity of the heart. It is possibleto add six more leads for a total of <strong>12</strong> leads, hence the title <strong>12</strong>-<strong>Lead</strong> <strong>ECG</strong>. The six new leads, called precordial leads, orchest leads, are arranged across the chest in a horizontal plane <strong>and</strong> record electrical flows moving anteriorly <strong>and</strong>posteriorly.To create the six precordial leads, each chest electrode is positive, <strong>and</strong> the whole body is used as the common ground. Thesix positive electrodes, creating the precordial leads V1 through V6 are positioned as shown in the diagram above <strong>and</strong>rotated through consecutive recording segments to provide <strong>12</strong>-lead <strong>ECG</strong> data. For continuous <strong>12</strong>-lead <strong>ECG</strong>, see <strong>Application</strong> <strong>Note</strong> #AH-206<strong>Note</strong>The optimum setup is Subject relaxed <strong>and</strong> in a supine position.You will record six 10-second segments, for a total recording of 60 seconds. You willrecord <strong>Lead</strong> I, <strong>Lead</strong> II <strong>and</strong> a Precordial (chest) lead in six positions (V1 through V6). Inaddition, <strong>Lead</strong> III <strong>and</strong> the "Augmented leads" (aVr, aVl, aVf) will be calculated. Eachchest electrode is positive <strong>and</strong> the whole body is used as the common ground.Wait at least 30 seconds after moving the precordial lead for each segment beforeclicking on "Start."A marker will be inserted each time you click "Start" <strong>and</strong> you can label markers afterrecording.You should not see excessive EMG artifact or baseline drift; if you do, checkconnections <strong>and</strong> repeat the segment.1. Segment 1: Precordial V1a. Confirm that the chest lead is still securely clipped to Subject at position V1.b. Click on the Start button.• Subject must maintain the same position for all segments.c. After 10 seconds, click on the Stop button.d. Review the data on the screen.• You should not see excessive EMG artifact or baseline drift; if you do, check connections <strong>and</strong>repeat the segment.www.biopac.com Page 7 of 9