

Introduction to Autodesk Inventor for F1 in Schools
Introduction to Autodesk Inventor for F1 in Schools
Introduction to Autodesk Inventor for F1 in Schools

You also want an ePaper? Increase the reach of your titles
YUMPU automatically turns print PDFs into web optimized ePapers that Google loves.
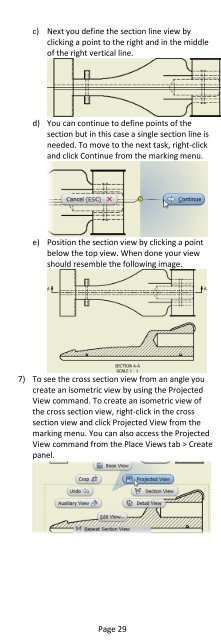
c) Next you def<strong>in</strong>e the section l<strong>in</strong>e view byclick<strong>in</strong>g a po<strong>in</strong>t <strong>to</strong> the right and <strong>in</strong> the middleof the right vertical l<strong>in</strong>e.d) You can cont<strong>in</strong>ue <strong>to</strong> def<strong>in</strong>e po<strong>in</strong>ts of thesection but <strong>in</strong> this case a s<strong>in</strong>gle section l<strong>in</strong>e isneeded. To move <strong>to</strong> the next task, right-clickand click Cont<strong>in</strong>ue from the mark<strong>in</strong>g menu.e) Position the section view by click<strong>in</strong>g a po<strong>in</strong>tbelow the <strong>to</strong>p view. When done your viewshould resemble the follow<strong>in</strong>g image.7) To see the cross section view from an angle youcreate an isometric view by us<strong>in</strong>g the ProjectedView command. To create an isometric view ofthe cross section view, right-click <strong>in</strong> the crosssection view and click Projected View from themark<strong>in</strong>g menu. You can also access the ProjectedView command from the Place Views tab > Createpanel.Page 29