HP LaserJet 4345 MFP Swing Plate Removal - ENX Magazine
HP LaserJet 4345 MFP Swing Plate Removal - ENX Magazine
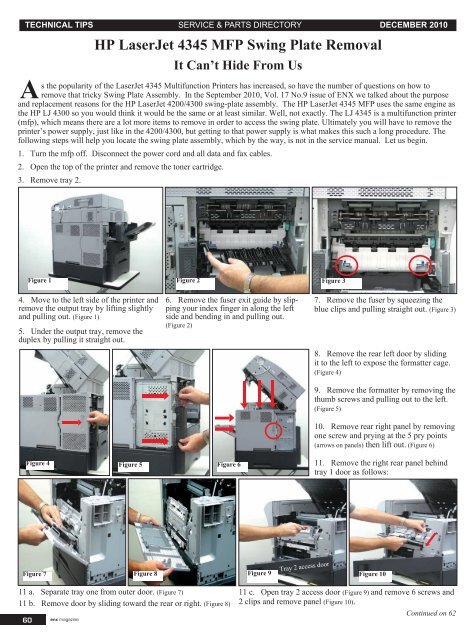
HP LaserJet 4345 MFP Swing Plate Removal - ENX Magazine

You also want an ePaper? Increase the reach of your titles
YUMPU automatically turns print PDFs into web optimized ePapers that Google loves.
TECHNICAL TIPS SERVICE & PARTS DIRECTORY DECEMBER 2010Continued from 60<strong>HP</strong> <strong>LaserJet</strong> <strong>4345</strong> <strong>MFP</strong> <strong>Swing</strong> <strong>Plate</strong> <strong>Removal</strong>Figure 11 Figure 12 Figure 1312. Remove top rear panel by lifting peg with small screw driver, (Figure 11) then liftpanel in the center and slide right. (Figure 12)13. Remove right fan shroud by removing2 screws. (Figure 13)Figure 14 Figure 15 Figure 1614 a. Remove rear metal shield by removing7 screws (Figure 14)14 b. And disconnecting fan cable.(Figure 15)15. Remove left rear cover, one screw.(Figure 16, red circle)16. Remove 2 formatter connectors, 2shouldered screws each and repositioncables. (Figure 16, red arrows)Figure 17 Figure 18 Figure 1917. Remove rear left metal PFC shield,10 screws. (Figure 17)18. Remove PFC power supply, 4screws and 3 connectors. (Figure 18)19 a. Remove rear duplex guide by removing2 screws. (Figure 19)Figure 20 Figure 21Figure 2219 b. Then pushing in lock button asshown in picture (Figure 20) and sliding outof the left side of printer.62 enx magazine20. Disconnect white ribbon cables from DC Controller and let hang, then disconnectred cables (Figure 21, yellow arrows) as well as the blue and red cable (Figure 21, red arrow) alsofrom DC Controller. Then push back through hole (Figure 21, red square) so all cables hangunder the power supply. Push PFC cables through hole (Figure 22, red circle), then remove3 screws (Figure 22, red arrows) in recessed area.Continued on 63
TECHNICAL TIPS SERVICE & PARTS DIRECTORY DECEMBER 2010Continued from 62<strong>HP</strong> <strong>LaserJet</strong> <strong>4345</strong> <strong>MFP</strong> <strong>Swing</strong> <strong>Plate</strong> <strong>Removal</strong>Figure 23 Figure 24Figure 23Figure 2521. At the front of the <strong>MFP</strong> remove thecontrol panel by prying under slots (3) attop, then disconnect cable. (Figure 23)22. Remove filler strip at front side ofADF. (Figure 24)23. Remove front panel by removing 2screws from top inside edge as shown and1 screw from right side (red arrows), thenprying tabs as marked, 2 front, 1 left (yellowarrows). (Figure 25)Figure 26 Figure 27 Figure 2824. Remove white fan plenum, 2 screws.(Figure 26)Figure 2925. Remove metal access panel underfan, 2 screws. (Figure 27)Figure 3026. Disconnect fan cable and thermistorcable as shown. (Figure 28)27. Remove 3 screws in recessed area.(Figure 28, red circles)28. Lift out printer power supply from leftand remove. (Figure 29)29. Remove power supply guide (seeinset) by pushing in lock button. (Figure 30)30. Remove cable protector behind powersupply guide by first loosening purple cable(Figure 31, red arrow) from guides just forslack. Then pry lock tabs on 3 sides of thecable protector and let hang from purplecable underneath power supply.31. Remove swing plate by removing 3screws, and slide down and out. (Figure 32)32. Reinstall new swing plate by lining uppegs in holes and inserting engagement footinto hole in front.Once the swing plate is changed, reversethe procedure to reassemble the printer. uFigure 31Figure 32This article is contributed by Parts Now! TechnicalSupport. If you have any questions, pleaseemail to: tsupport@partsnow.com or visit theirwebsite www.partsnow.com.enx magazine63