Dissolved Oxygen Sensor Maintenance - Atlas Scientific
Dissolved Oxygen Sensor Maintenance - Atlas Scientific
Dissolved Oxygen Sensor Maintenance - Atlas Scientific

You also want an ePaper? Increase the reach of your titles
YUMPU automatically turns print PDFs into web optimized ePapers that Google loves.
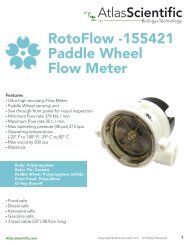
<strong>Atlas</strong><strong>Scientific</strong>Biology • Technology<strong>Dissolved</strong> <strong>Oxygen</strong> <strong>Maintenance</strong> Kit<strong>Dissolved</strong> <strong>Oxygen</strong><strong>Sensor</strong> <strong>Maintenance</strong><strong>Atlas</strong> <strong>Scientific</strong> <strong>Dissolved</strong> <strong>Oxygen</strong> <strong>Sensor</strong>s come with a replaceable HDPEsensing membrane and a refillable electrolyte chamber located inside theprobe. Although it is not necessary to replace the sensing membrane orelectrolyte solution during normal operation; the membrane can bedamaged if it is hit with fast moving debris in the water.If your dissolved oxygen sensor has not been in use for more than 1 year theHDPE sensing membrane can dry out and the internal electrolyte solutioncould leach out of the probe. This kit will get your dissolved oxygen sensorback in working order quickly.<strong>Atlas</strong>-<strong>Scientific</strong>.comCopyright © <strong>Atlas</strong> <strong>Scientific</strong> LLCAll Rights Reserved1
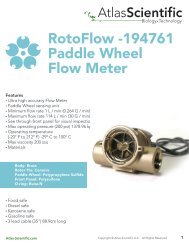
<strong>Atlas</strong><strong>Scientific</strong>Biology • Technology<strong>Dissolved</strong> <strong>Oxygen</strong> <strong>Maintenance</strong> Kit<strong>Sensor</strong> <strong>Maintenance</strong>1. Unscrew the pre-membraned cap from the tip of the sensorand discard. (FIG 1)2. Remove the cap from the bottle of D.O. Electrolyte Solution.Remove the 10mL syringe from packaging and attach hub needleto end of syringe as shown in FIG 2.3. Use needle and syringe to withdraw 5mL solution from bottleas shown in FIG 3.4. Insert needle into one of the four holes surrounding thesilver cathode. Inject solution until it leaks out of a fill hole(SEE FIG 4).5. Replace cap by threading on sensor clockwise(Opposite of FIG 1).FIG. 1 FIG. 2 FIG. 3 FIG. 45mL)TO REMOVE CAP TURNCOUNTERCLOCKWISEInject untilliquid leaks out.Make sure topush needlein and out toavoid bubbles.Fill volume isapproximately5mL<strong>Atlas</strong>-<strong>Scientific</strong>.comCopyright © <strong>Atlas</strong> <strong>Scientific</strong> LLCAll Rights Reserved2