HOLLANDIA 300 MEDIUM - Donmar
HOLLANDIA 300 MEDIUM - Donmar
HOLLANDIA 300 MEDIUM - Donmar
- No tags were found...

Create successful ePaper yourself
Turn your PDF publications into a flip-book with our unique Google optimized e-Paper software.
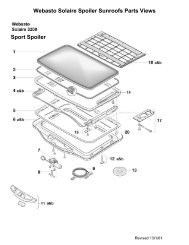
Installation Instructions – Hollandia <strong>300</strong> MediumBefore beginning the installation, make sure allrequired parts are in the box.Check the functionality of the sunroof.Note: The sunroof needs to be calibrated first.• Close the sunroof completely by continuousfunction. Hold the switch for at least 5seconds.• Open the roof completely. The roof will bepositioned to its full open position (this can berecognized by a click). The SCU has now beencalibrated. To check this, confirm the sunroofcan be operated by soft touch.Look in the Webasto Hollandia application listfor the correct installation information. If theinstallation information is not available, pleasecontinue with instructions 03 & 04. If available,skip to instruction 05.Check the outside of the vehicle. Take the followingissues into consideration:• Curvature of car roof• Width and length of roof skin• Presence of roof racks• Presence of rood profilesWebasto Product N.A., Inc. 2 www.webasto.us
Position the trimshell against the headliner of the vehicle.Use an awl to mark reference point B.Align the paper instruction template on the roof skin andapply paper masking tape to fix the template in place.Reference B should correspond with reference point Bof the paper template.Drill the three holes through the roof skin and headliner.Use a 5 mm bit.Cut out the interior template from the cardboard box.www.webasto.us 3 Webasto Product N.A., Inc.
Attach the cardboard template with three screws andwing nuts. Screws are not supplied. Cut-out theheadliner with a sharp Stanley knife.Remove the headliner. Remove sound proofingmaterial and roof stiffeners. The under side of the carroof should be free of any remains of mastic.Cut the hole in the roof. To prevent distortion the first cutshould be .75 inch inside the final cut line.Cut the final hole on the cut line.Webasto Product N.A., Inc. 4 www.webasto.us
Mount the clamp frame screws. It is important toinstall the middle front screw first. This screw centersthe clamp frame.• Apply black screws along the front and sides.• Apply the silver colored screws along the rear.See chapter “additional instructions forinstallation” for details.Make electrical connections.• Red wire: +30 Constant• Red/black wire: +15 Ignition controlled.• Green: groundInstall the motor and the sunroof control unit. Makesure that the spline of the motor shaft is locatedcorrectly in the gearwheel. Torque 5 Nm.Apply the velour label over the control buttons.Mount the elongation bar if necessary.See chapter “additional instructions forinstallation” for details.Webasto Product N.A., Inc. 6 www.webasto.us
Mount the trimshell. Start at the front and make surethat all tabs are fixed properly.Fix the sides and the rear of the trimshell. If applicablethe elongation bar (number 19) should be positionedin place.Install the trimshell attaching screws and mount thecontrol cover.See chapter “additional instructions forinstallation” for details.Mount the fuse and calibrate the sunroof.• Close the sunroof completely by continuousfunction. Hold the switch for at least 5seconds.• Open the roof completely. The roof will bepositioned to its full open position (this can berecognized by a click). The SCU has now beencalibrated. To check this, confirm the sunroofcan be operated by soft touch.www.webasto.us 7 Webasto Product N.A., Inc.
Soft headliner only:Cut out the hole in the soft headliner. Cut along theinside of the trimshell.Apply glue to the headliner material and trimshell.Stretch the headliner. Use a spatula with roundcorners to push the headliner material into the grooveof the trimshell.Webasto Product N.A., Inc. 8 www.webasto.us
3. Additional instructions for installationDry seal:The Hollandia <strong>300</strong> medium is provided with a dry seal. The dry seal is pre-installed on the upper frame andprovides water tight sealing against the vehicles roof skin. The new seal offers unique advantages:• Shorter installation time; No mastic or foam strip needs to be applied on the upper frame.• No clean up after installing the sunroof.Although the dry seal is made of high resistant flexible rubber, special precautionary measures need to betaken. Before placing the sunroof in the roof aperture, be sure that the edges of the roof aperture arerounded with a file. A sharp edge can damage the dry seal. Also dirt and burs need to be removed beforeinstalling the sunroof.www.webasto.us 9 Webasto Product N.A., Inc.
Installation of clamp frame:Like all other spoiler sunroofs of the Webasto Hollandia assortment, a clamp frame is provided to press theupper frame against the roof skin.Proceed as follows for a correct installation:Holding the clamp frame at an angle of 45 degrees, hook the front over the upper frame. Push the rearupwards and mount the middle screw at the back to prevent it from falling (do not tighten it completely). Insome cases it is necessary to pull the headliner downwards when installing the clamp frame. The centerfront at the notch in the clamp frame needs to align with the center rib on the upper frame. Align theseand mount the center screw. Now the remaining clamp frame screws can be installed.Webasto Product N.A., Inc. 10 www.webasto.us
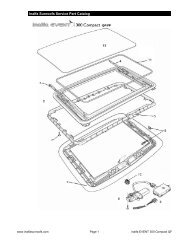
Installation of hard headliner trimshell:The Hollandia <strong>300</strong> medium can the finished with the standard hard headliner trim shell or with a softheadliner. In both situations the hard headliner trim shell needs to be installed.Hard headliner trimshell version:Before mounting the trim shell, check if thestabilization bracket is placed in the correctposition. The correct position is in the middle ofthe motor. For the installation of the trim shell,start at center front at the control panel. Check ifthe vertical edge center front is positioned in thestabilization bracket. If it is not the control buttonsare not accessible and are too deep behind thecontrol panel cover!Push the trim shell against the frame around theentire aperture and install the two clamp framescrews and control panel cover.Attention:When the height between the roof skin and the bottom of the vehicles headliner is too large, it may benecessary to pull the trim shell downwards, so it can follow the shape of the roof skin. Along the front sidethis can be done by applying the elongation bar at centre front between the trim shell and the motor.The elongation bar (see installation instructions figure 20) can be installed after the trim shell is installed andcan be customized by the installer.Soft headliner version:When installing the soft headliner version it is necessary to install the trim shell first. Depending on thevehicle it may be necessary to remove the flexible outer lip. This is done when the sunroof is installed farforward or if trim shell is interfering with the interior light and or the sun visors. The trim shell is installed inthe same way as for the hard headliner trim shell version. The new soft headliner can now be applied. Theaperture finishing process is as follows:• Cut out the headliner. For reference cut along the inside of the trim shell.• Apply glue to the slanted surface of the trim shell and the headliner material.• Stretch the headliner material and stick it to the trim shell. Use a spatula with rounded corners topush the remaining material into the groove.Attention:Installing the elongation bar may not be necessary.www.webasto.us 11 Webasto Product N.A., Inc.
4. Operating instructions4.1 Control panelFig. 1.1Pre-set position 1Pre-set position 2Tilt / OpenMove forwardsOne touch close4.2 Program sunroofFig. 2.1 Fig. 2.2 Fig. 2.32.1: Turn on the ignition2.2: Close the sunroof completely2.3: Open the sunroof completelyWebasto Product N.A., Inc. 12 www.webasto.us
4.3 Opening of sunroofFig. 2.4 Fig. 2.5 Fig. 2.6Opening the sunroof in sliding position2.4: Turn on the ignition2.5: Push the open button briefly, the sunroof will cycle to the fully open position.2.6: Push the open button again, the sunroof stops in that position.Fig. 2.7 Fig. 2.8 Fig. 2.9Opening sunroof in tilt position2.7: Turn on the ignition2.8: Push and hold the open button, the sunroof will stop in the tilt position.2.9: By pressing the button with continuous control, the panel closes to lower preset tilting positions.4.4 Closing of sunroofFig. 2.10 Fig. 2.11 Fig. 2.122.10: By pressing the switch using soft touch control, the panel will close2.11: Pressing the button again will stop the panel2.12: When pressing the (C) button, the panel will close completely regardless of the panel position.www.webasto.us 13 Webasto Product N.A., Inc.
4.5 Program two pre-set positionsFig. 2.13 Fig. 2.14 Fig. 2.152.13: Place the panel in the first desired position and press button (1) to store this position under button 1.2.14: Place the panel in the second desired position and press button (2) to store this position underbutton 2.2.15: By pressing on button (1) or (2), the panel will stop in the programmed preset position.4.5 Auto closeFig. 2.16 Fig. 2.17 Fig. 2.182.16: After turning off the ignition the sunroof will beep once to tell you that it will close after 3 seconds.2.17: After 3 seconds the panel will close.2.18: Roof is closed.4.5 Jamming protectionFig. 2.19 Fig. 2.20 Fig. 2.212.19: When closing the sunroof…2.20: …the sunroof will open automatically when the panel encounters an obstacle.2.21: When the obstacle is removed, the panel will close completely.Webasto Product N.A., Inc. 14 www.webasto.us
Webasto Product N.A., Inc.Org. 0X/200X Rev. 0X/200X P/N 5000XXXA