Tork Elevation Intuition Hand Towel Roll Dispenser
Tork Elevation Intuition Hand Towel Roll Dispenser
Tork Elevation Intuition Hand Towel Roll Dispenser

You also want an ePaper? Increase the reach of your titles
YUMPU automatically turns print PDFs into web optimized ePapers that Google loves.
Washroom <strong>Dispenser</strong> Service and Parts Manual<strong>Tork</strong> <strong>Elevation</strong> <strong>Intuition</strong> <strong>Hand</strong> <strong>Towel</strong> <strong>Roll</strong> <strong>Dispenser</strong>5511201, 5511281 Revision Date: 7-30-12<strong>Tork</strong> <strong>Elevation</strong> <strong>Intuition</strong> <strong>Hand</strong> <strong>Towel</strong> <strong>Roll</strong> <strong>Dispenser</strong>Table of ContentsGeneral Description & Replacement partsProduct Specifications, Part locations/descriptions…………………………………………………….2Replacing the lock / replacing the cassette mechanism ..…………………..…...……………………3Replacing the cover ………..………………………..…………………………….……………………...5Optional Direct Wire Kit……………………………………………………………………………………6Mounting & OperationInstallation Instructions …………………………………………………………………………………....7Filling the dispenser……………………………………………………………………………………....10Use/operation ………………..……………………………………………………………………………11Lock function – setting the lock mode…………………………………………………………………..12Stub roll feature ………...………………………………………………………………………………...13Maintenance & TroubleshootingCleaning & Maintenance / Battery Life Tips……………………………………………………………14Trouble shooting guide …………………………………………………………………………………..15Training/contacting SCA ………………………………………………………………………………...16Additional mounting informationMounting Template……………………………………………………………………………………….17ADAAG Guidelines ………………………………………………………………………………….……20Recessed installation …………………………………………………………………………………….211 of 21
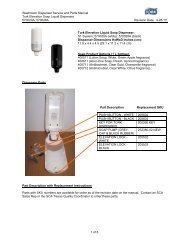
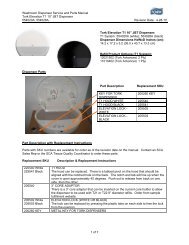
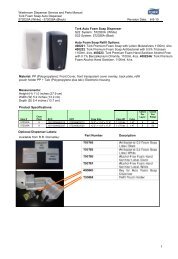
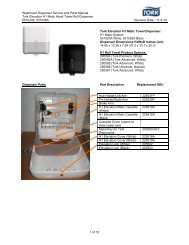
Washroom <strong>Dispenser</strong> Service and Parts Manual<strong>Tork</strong> <strong>Elevation</strong> <strong>Intuition</strong> <strong>Hand</strong> <strong>Towel</strong> <strong>Roll</strong> <strong>Dispenser</strong>5511201, 5511281 Revision Date: 7-30-12General Description & Replacement Parts<strong>Tork</strong> <strong>Intuition</strong> <strong>Hand</strong> <strong>Towel</strong> <strong>Roll</strong> <strong>Dispenser</strong>:H1 <strong>Elevation</strong> <strong>Intuition</strong> System: 5511201 (White),5511281 (Black)<strong>Dispenser</strong> Dimensions HxWxD Inches (cm)14.6 x 13.2 x 8.1 (37.3 x 33.7 x 20.7))<strong>Roll</strong> <strong>Towel</strong> Product Options:290094 - <strong>Tork</strong> Premium, White290095 - <strong>Tork</strong> Advanced Soft, White290092A - <strong>Tork</strong> Advanced, White290089 - <strong>Tork</strong> Advanced, White290088 - <strong>Tork</strong> Universal, Natural290087 - <strong>Tork</strong> Advanced, WhitePartsPart DescriptionReplacement SKULeft Pin Holder ArmRight Hub Holder ArmH1 <strong>Elevation</strong> <strong>Intuition</strong> Cassette -WhiteH1 <strong>Elevation</strong> <strong>Intuition</strong> Cassette -BlackBattery Compartment CoverH1 <strong>Elevation</strong> <strong>Intuition</strong> Hood –White (No brake arm or lockincluded in spare)H1 <strong>Elevation</strong> <strong>Intuition</strong> Hood –Black (No brake arm or lock2255200225528022552202255230included in spare)<strong>Roll</strong> Brake Assembly<strong>Elevation</strong> Lock (White) 205502<strong>Elevation</strong> Lock (Black) 205503Metal Key for <strong>Tork</strong> <strong>Dispenser</strong>s 20260 KEY2 of 21
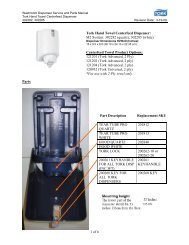
Washroom <strong>Dispenser</strong> Service and Parts Manual<strong>Tork</strong> <strong>Elevation</strong> <strong>Intuition</strong> <strong>Hand</strong> <strong>Towel</strong> <strong>Roll</strong> <strong>Dispenser</strong>5511201, 5511281 Revision Date: 7-30-12Replacing the <strong>Elevation</strong> Lock: 205502 (White); 205503 (Black)1 2 3 41. Use a small slot-head screwdriver to press the snap fit towards the lock housing. Push the lockdownwards at the same time.2. Repeat the procedure on the other side of the lock.3. Remove the old lock by pulling it through the hole in the cover.4. Insert the new lock. Push until a click sound is heard.____________________________________________________________________________________Replacing the H1 <strong>Elevation</strong> <strong>Intuition</strong> Cassette: 2255020 (White); 2255028 (Black)Cassette Assembly3 of 21
Washroom <strong>Dispenser</strong> Service and Parts Manual<strong>Tork</strong> <strong>Elevation</strong> <strong>Intuition</strong> <strong>Hand</strong> <strong>Towel</strong> <strong>Roll</strong> <strong>Dispenser</strong>5511201, 5511281 Revision Date: 7-30-12Replacing the H1 <strong>Elevation</strong> <strong>Intuition</strong> Cassette: 2255020 (White); 2255028 (Black)(Cont.d)1. Remove two Phillips head screws holding the cassette into the console.2. Lift the cassette out of the console using an upward and forward motion.3. Place the new cassette into the console. Make sure cassette is placed from top and is place ontothe hooks in the back of the console.4. Replace the screws, making sure the static ground wire is fastened under the left screw whentightened.1 2HooksStatic ground wireDate code sticker344 of 21
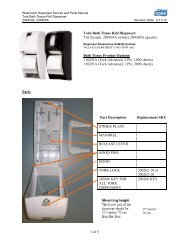
Washroom <strong>Dispenser</strong> Service and Parts Manual<strong>Tork</strong> <strong>Elevation</strong> <strong>Intuition</strong> <strong>Hand</strong> <strong>Towel</strong> <strong>Roll</strong> <strong>Dispenser</strong>5511201, 5511281 Revision Date: 7-30-12Replacing the H1 <strong>Elevation</strong> <strong>Intuition</strong> Hood: 2255220 (White); 2255230 (Black)1. Remove two Phillips head screws holding the cassette into the console and remove the cassette.(Ref. cassette replacement instructions above for instructions on removing cassette.)2. Remove the two screws that secure the cover to the dispenser console and remove the cover.3. Remove the two screws that attach the roll brake assembly and remove the assembly.4. Remove the lock in the top of the cover (ref. lock replacing instructions above).5. Install the lock into the new cover.6. Install the cover on the console using the correct screws.7. Install the roll brake assembly onto the new cover using the correct screws and making sure it isin the correct orientation. (The roll level indicating arm should be on the “right” side of the coverwhen installing on a cover that is attached to the console.)8. Replace the cassette as instructed above.(Ref. cassette replacement instructions above for instructions on removing cassette.)2 35 of 21
Washroom <strong>Dispenser</strong> Service and Parts Manual<strong>Tork</strong> <strong>Elevation</strong> <strong>Intuition</strong> <strong>Hand</strong> <strong>Towel</strong> <strong>Roll</strong> <strong>Dispenser</strong>5511201, 5511281 Revision Date: 7-30-12Replacing the H1 <strong>Elevation</strong> <strong>Intuition</strong> Cover: 2255220 (White); 2255230 (Black)(Cont’d.)Install with roll level indicatingarm on right side of dispenser.7___________________________________________________________________________Optional Direct Wire Kit for <strong>Tork</strong> Electronic <strong>Roll</strong> <strong>Towel</strong> <strong>Dispenser</strong>s - P/N 3096HWK:An optional direct wire kit is available that is compatible with this dispenser. The kit uses power from agrounded 110V standard wall outlet. The kit can be purchased by contacting SCA Customer Service.(Installation requires a hole to be drilled through the dispenser cabinet from the back, side or bottom tofeed the power cord through. Detailed instructions provided with each kit.)6 of 21
Washroom <strong>Dispenser</strong> Service and Parts Manual<strong>Tork</strong> <strong>Elevation</strong> <strong>Intuition</strong> <strong>Hand</strong> <strong>Towel</strong> <strong>Roll</strong> <strong>Dispenser</strong>5511201, 5511281 Revision Date: 7-30-12Installation Instructions:7 of 21
Washroom <strong>Dispenser</strong> Service and Parts Manual<strong>Tork</strong> <strong>Elevation</strong> <strong>Intuition</strong> <strong>Hand</strong> <strong>Towel</strong> <strong>Roll</strong> <strong>Dispenser</strong>5511201, 5511281 Revision Date: 7-30-12Be sure to check in the bottom of thebox for batteries & hardware8 of 21
Washroom <strong>Dispenser</strong> Service and Parts Manual<strong>Tork</strong> <strong>Elevation</strong> <strong>Intuition</strong> <strong>Hand</strong> <strong>Towel</strong> <strong>Roll</strong> <strong>Dispenser</strong>5511201, 5511281 Revision Date: 7-30-12Hanging the dispenser on the wallMount the dispenser, makingsure it is level.Insert the batteries9 of 21
Washroom <strong>Dispenser</strong> Service and Parts Manual<strong>Tork</strong> <strong>Elevation</strong> <strong>Intuition</strong> <strong>Hand</strong> <strong>Towel</strong> <strong>Roll</strong> <strong>Dispenser</strong>5511201, 5511281 Revision Date: 7-30-12Filling the <strong>Dispenser</strong>:10 of 21
Washroom <strong>Dispenser</strong> Service and Parts Manual<strong>Tork</strong> <strong>Elevation</strong> <strong>Intuition</strong> <strong>Hand</strong> <strong>Towel</strong> <strong>Roll</strong> <strong>Dispenser</strong>5511201, 5511281 Revision Date: 7-30-12Operation & Use<strong>Dispenser</strong> controls, settings & indicators1. <strong>Dispenser</strong> controls are located on the right side of the cassette mechanism.2. Use the manual feed button to check for proper battery installation and to and start the tail ofthe paper between the feed rollers.3. Locate the sheet length adjustment knob and turn to increase or decrease the length of thesheet dispensed. (Range is 8” min. to 24” max.)4. The low/empty roll indicator lights flashes yellow when the roll is low or emptyNote: If the low/empty roll light is flashing but there is still paper left on the roll, it can be movedto the stub roll position and a new roll can be loaded. (See “stub roll use” diagram on p.13).5. The low battery indicator light will flash red when the battery power is low. Replace thebatteries with a new set soon if this light is flashing6. The hand sensor on-off selector switch is used to set the dispenser operation mode to “sensoron” (requires a hand waved in front of the sensor to dispense a towel) or “sensor off” (dispensesa towel automatically after a sheet is taken).11 of 21
Washroom <strong>Dispenser</strong> Service and Parts Manual<strong>Tork</strong> <strong>Elevation</strong> <strong>Intuition</strong> <strong>Hand</strong> <strong>Towel</strong> <strong>Roll</strong> <strong>Dispenser</strong>5511201, 5511281 Revision Date: 7-30-12Opening the dispenser – setting the lock modeHorizontal dash position = key modeRound dot position = keyless mode12 of 21
Washroom <strong>Dispenser</strong> Service and Parts Manual<strong>Tork</strong> <strong>Elevation</strong> <strong>Intuition</strong> <strong>Hand</strong> <strong>Towel</strong> <strong>Roll</strong> <strong>Dispenser</strong>5511201, 5511281 Revision Date: 7-30-12Stub <strong>Roll</strong> UseLow roll light flashingThe <strong>Tork</strong> <strong>Elevation</strong> <strong>Intuition</strong> dispenser allows part of an unused roll to be placed in thebottom compartment of the dispenser and a new roll to be placed in the main roll holderarms. The stub roll feature requires that both tails of the roll are fed through thedispensing mechanism. Two sheets will be dispensed until the bottom stub roll iscompletely depleted. This allows 100% usage of each refill.13 of 21
Washroom <strong>Dispenser</strong> Service and Parts Manual<strong>Tork</strong> <strong>Elevation</strong> <strong>Intuition</strong> <strong>Hand</strong> <strong>Towel</strong> <strong>Roll</strong> <strong>Dispenser</strong>5511201, 5511281 Revision Date: 7-30-12Cleaning and MaintenanceThe <strong>Tork</strong> <strong>Elevation</strong> <strong>Intuition</strong> should be cleaned any time there is heavy paper dust build-up inside thedispenser. If paper dust is not a problem, approximately every year is a good frequency for cleanings.The following is the recommended procedure to cleaning:1. Open the dispenser and remove the roll of paper.2. Clean paper dust from the inside of the dispenser. This can be done is several ways, such as,vacuuming, blowing out with a can of compressed air (wear safety glasses), wiping out with adamp cloth, etc.3. Clean the cover with a gentle cloth and water. If necessary, use an all-purpose cleaner that issafe for plastics. It is not recommended that paper be used to clean the surface of the dispenser– it may scratch the high gloss surface. <strong>Tork</strong> Specialist Cleaning Cloth or Premium SpecialistCleaning Cloth will provide excellent results.Inspecting RefillsAlways inspect refills before use. Don’t use paper rolls that are not in specification. Rarely papertowels may be wider than standard. Paper rolls that are too wide will increase drag on the system,causing batteries to drain quickly. Refill rolls should not measure wider than 7.79”. (See imagebelow:)7.79” Here7.75” (7-3/4)Straighten any cores that are out of round when loading the dispenser. A round core on the papermeans smoother dispensing and longer battery life.Do not use a refill with a torn or “dog-eared” core.Ensure plug is inserted completely into core. Plugs that are partially inserted may also causeexcess drag and drain batteries quickly.14 of 21
Washroom <strong>Dispenser</strong> Service and Parts Manual<strong>Tork</strong> <strong>Elevation</strong> <strong>Intuition</strong> <strong>Hand</strong> <strong>Towel</strong> <strong>Roll</strong> <strong>Dispenser</strong>5511201, 5511281 Revision Date: 7-30-1215 of 21
Washroom <strong>Dispenser</strong> Service and Parts Manual<strong>Tork</strong> <strong>Elevation</strong> <strong>Intuition</strong> <strong>Hand</strong> <strong>Towel</strong> <strong>Roll</strong> <strong>Dispenser</strong>5511201, 5511281 Revision Date: 7-30-12TRAININGIt is highly recommended that training be provided to janitorial and maintenance staffon the use, care & maintenance of this dispenser. This should include the following:1. Loading paper. Using stub roll compartment.2. Indicator lights and meanings.3. Adjustments, buttons and switches.4. Installing and replacing batteries.5. Inspecting refills prior to loading.Contacting SCATo contact the SCA Tissue Quality Coordinator by phone, dial 1-866-722-6659 and press 6. If asked forthe date code on the dispenser, see instructions below.Email contact: http://www.torkusa.com/en-us/About-Us/Contact/Product Date Code Location: The product date code can be found on the bottom of the <strong>Tork</strong>Select labellocated on the inside, back of the dispenser.16 of 21
Washroom <strong>Dispenser</strong> Service and Parts Manual<strong>Tork</strong> <strong>Elevation</strong> <strong>Intuition</strong> <strong>Hand</strong> <strong>Towel</strong> <strong>Roll</strong> <strong>Dispenser</strong>5511201, 5511281 Revision Date: 7-30-12Mounting Template (included in Carton), not to scaleRecommended (standard) mounting height is approximately 48” to bottom of dispenser.Mount using (at least) 3 mounting holes. Ensure proper screws and anchors for walltype are used to fasten securely to wall.Recommended Mounting Height (standard access)17 of 21
Washroom <strong>Dispenser</strong> Service and Parts Manual<strong>Tork</strong> <strong>Elevation</strong> <strong>Intuition</strong> <strong>Hand</strong> <strong>Towel</strong> <strong>Roll</strong> <strong>Dispenser</strong>5511201, 5511281 Revision Date: 7-30-1218 of 21
Washroom <strong>Dispenser</strong> Service and Parts Manual<strong>Tork</strong> <strong>Elevation</strong> <strong>Intuition</strong> <strong>Hand</strong> <strong>Towel</strong> <strong>Roll</strong> <strong>Dispenser</strong>5511201, 5511281 Revision Date: 7-30-12<strong>Tork</strong> <strong>Elevation</strong> <strong>Intuition</strong> Backplate Dimensions19 of 21
Washroom <strong>Dispenser</strong> Service and Parts Manual<strong>Tork</strong> <strong>Elevation</strong> <strong>Intuition</strong> <strong>Hand</strong> <strong>Towel</strong> <strong>Roll</strong> <strong>Dispenser</strong>5511201, 5511281 Revision Date: 7-30-12Mounting location regulations - ADAAG Guidelines (2010)Advisory 606.1 General. If soap and towel dispensers are provided, they must be locatedwithin the reach ranges specified in 308. Locate soap and towel dispensers so that they areconveniently usable by a person at the accessible lavatory.308.2 Forward Reach.308.2.1 Unobstructed. Where a forward reach is unobstructed, the high forward reach shallbe 48 inches (1220 mm) maximum and the low forward reach shall be 15 inches (380 mm)minimum above the finish floor or ground.308.3 Side Reach.Figure 308.2.1 Unobstructed Forward Reach308.3.1 Unobstructed. Where a clear floor or ground space allows a parallel approach to anelement and the side reach is unobstructed, the high side reach shall be 48 inches (1220mm) maximum and the low side reach shall be 15 inches (380 mm) minimum above thefinish floor or ground.EXCEPTIONS: 1. An obstruction shall be permitted between the clear floor or ground spaceand the element where the depth of the obstruction is 10 inches (255 mm) maximum.Figure 308.3.1 Unobstructed Side Reach20 of 21
Washroom <strong>Dispenser</strong> Service and Parts Manual<strong>Tork</strong> <strong>Elevation</strong> <strong>Intuition</strong> <strong>Hand</strong> <strong>Towel</strong> <strong>Roll</strong> <strong>Dispenser</strong>5511201, 5511281 Revision Date: 7-30-12Optional Semi-Recessed Mounting – Filler Panel 3096040An optional filler panel is available for semi-recessed mounting. Please refer to3096040 <strong>Dispenser</strong> Manual for specifications and configurations that are applicable forthis filler panel.21 of 21