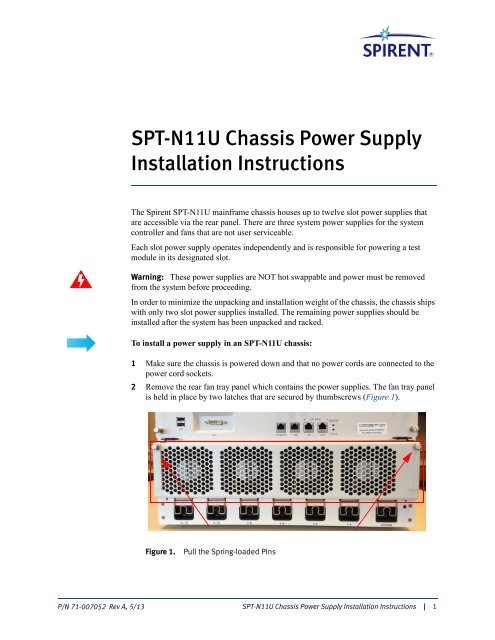
SPT-N11U Chassis Power Supply Installation Instructions
0613_007052A_SPT11U Pwr_supplyreplce.pdf - Spirent ...
0613_007052A_SPT11U Pwr_supplyreplce.pdf - Spirent ...
- No tags were found...

You also want an ePaper? Increase the reach of your titles
YUMPU automatically turns print PDFs into web optimized ePapers that Google loves.
<strong>SPT</strong>-<strong>N11U</strong> <strong>Chassis</strong> <strong>Power</strong> <strong>Supply</strong><br />
<strong>Installation</strong> <strong>Instructions</strong><br />
The Spirent <strong>SPT</strong>-<strong>N11U</strong> mainframe chassis houses up to twelve slot power supplies that<br />
are accessible via the rear panel. There are three system power supplies for the system<br />
controller and fans that are not user serviceable.<br />
Each slot power supply operates independently and is responsible for powering a test<br />
module in its designated slot.<br />
Warning: These power supplies are NOT hot swappable and power must be removed<br />
from the system before proceeding.<br />
In order to minimize the unpacking and installation weight of the chassis, the chassis ships<br />
with only two slot power supplies installed. The remaining power supplies should be<br />
installed after the system has been unpacked and racked.<br />
To install a power supply in an <strong>SPT</strong>-<strong>N11U</strong> chassis:<br />
1 Make sure the chassis is powered down and that no power cords are connected to the<br />
power cord sockets.<br />
2 Remove the rear fan tray panel which contains the power supplies. The fan tray panel<br />
is held in place by two latches that are secured by thumbscrews (Figure 1).<br />
Figure 1.<br />
Pull the Spring-loaded Pins<br />
P/N 71-007052 Rev A, 5/13<br />
<strong>SPT</strong>-<strong>N11U</strong> <strong>Chassis</strong> <strong>Power</strong> <strong>Supply</strong> <strong>Installation</strong> <strong>Instructions</strong> | 1
<strong>SPT</strong>-<strong>N11U</strong> <strong>Chassis</strong> <strong>Power</strong> <strong>Supply</strong> <strong>Installation</strong> <strong>Instructions</strong><br />
a<br />
Unscrew the thumbscrews (see arrows in Figure 1 on page 1) and gently pull<br />
down the latches to a 90-degree position (Figure 2).<br />
Figure 2.<br />
Pull Down the Latches<br />
b<br />
The fan tray panel is friction fit, so it must be pulled outward by gently rocking it<br />
top to bottom, with two hands, as you pull it toward you (Figure 3).<br />
Place the fan tray panel aside. The power supply cage is now exposed (Figure 4<br />
on page 3).<br />
Figure 3.<br />
Gently Rock Fan Tray Panel to Remove<br />
2 | <strong>SPT</strong>-<strong>N11U</strong> <strong>Chassis</strong> <strong>Power</strong> <strong>Supply</strong> <strong>Installation</strong> <strong>Instructions</strong> P/N 71-007052 Rev A, 5/13
<strong>SPT</strong>-<strong>N11U</strong> <strong>Chassis</strong> <strong>Power</strong> <strong>Supply</strong> <strong>Installation</strong> <strong>Instructions</strong><br />
Figure 4.<br />
<strong>Power</strong> <strong>Supply</strong> Cage<br />
Note: The power supply for slot 1 (on the right when viewing from the rear) is behind<br />
the fan tray connector (refer to Figure 4). The slot 1 power supply is normally preinstalled<br />
at the factory, but if you must access it for servicing, you must remove the<br />
phillips-head screw (arrow in Figure 4), and slide the connector out of the way, to<br />
access this power supply.<br />
3 Insert the power supplies with the heat sinks facing to the left (Figure 5). The power<br />
supply latch must be pulled out so the flat surface is facing towards you (see Figure 6<br />
on page 4).<br />
Figure 5.<br />
Heat Sink Facing Left<br />
P/N 71-007052 Rev A, 5/13<br />
<strong>SPT</strong>-<strong>N11U</strong> <strong>Chassis</strong> <strong>Power</strong> <strong>Supply</strong> <strong>Installation</strong> <strong>Instructions</strong> | 3
<strong>SPT</strong>-<strong>N11U</strong> <strong>Chassis</strong> <strong>Power</strong> <strong>Supply</strong> <strong>Installation</strong> <strong>Instructions</strong><br />
Figure 6.<br />
Flat Surface of <strong>Power</strong> <strong>Supply</strong> Latch<br />
4 Slide the power supply all the way forward until it stops. It should not require very<br />
much pressure.<br />
5 Start folding the latch back towards the power supply so that it catches the bracket and<br />
begins to lever the power supply forward (Figure 7).<br />
The latch should sit flush against the power supply.<br />
Figure 7.<br />
<strong>Power</strong> <strong>Supply</strong> on Left Ready for Latching to the Cage<br />
Figure 7 shows a power supply on left ready to be secured. The arrows on the right<br />
illustrate where a power supply latch levers into the cage.<br />
6 Use a slotted screwdriver to secure the bracket to the power supply housing (Figure 8<br />
on page 5).<br />
4 | <strong>SPT</strong>-<strong>N11U</strong> <strong>Chassis</strong> <strong>Power</strong> <strong>Supply</strong> <strong>Installation</strong> <strong>Instructions</strong> P/N 71-007052 Rev A, 5/13
<strong>SPT</strong>-<strong>N11U</strong> <strong>Chassis</strong> <strong>Power</strong> <strong>Supply</strong> <strong>Installation</strong> <strong>Instructions</strong><br />
Figure 8.<br />
Secure the Bracket with Slotted Screwdriver<br />
7 Re-fit the fan tray panel with the brackets in their unsecured 90-degree position<br />
(Figure 9).<br />
a<br />
b<br />
Rock the panel top to bottom, with both hands, while pushing it towards the<br />
chassis until it is seated.<br />
Fold up the two hinged brackets and tighten the thumbscrews (Figure 10 on<br />
page 6).<br />
Figure 9.<br />
Fan Tray in Place with Brackets in Unsecured Position<br />
P/N 71-007052 Rev A, 5/13<br />
<strong>SPT</strong>-<strong>N11U</strong> <strong>Chassis</strong> <strong>Power</strong> <strong>Supply</strong> <strong>Installation</strong> <strong>Instructions</strong> | 5
<strong>SPT</strong>-<strong>N11U</strong> <strong>Chassis</strong> <strong>Power</strong> <strong>Supply</strong> <strong>Installation</strong> <strong>Instructions</strong><br />
Figure 10.<br />
Fold up the Brackets and Tighten Thumbscrews<br />
This completes the installation.<br />
To remove the power supplies, reverse steps 2-6.<br />
6 | <strong>SPT</strong>-<strong>N11U</strong> <strong>Chassis</strong> <strong>Power</strong> <strong>Supply</strong> <strong>Installation</strong> <strong>Instructions</strong> P/N 71-007052 Rev A, 5/13
<strong>SPT</strong>-<strong>N11U</strong> <strong>Chassis</strong> <strong>Power</strong> <strong>Supply</strong> <strong>Installation</strong> <strong>Instructions</strong><br />
How to Contact Us<br />
How to Contact Us<br />
To obtain technical support for any Spirent Communications product, please contact our<br />
Support Services department using any of the following methods:<br />
Americas<br />
E-mail: support@spirent.com<br />
Web: http://support.spirent.com<br />
Toll Free: +1 800-SPIRENT (+1 800-774-7368) (North America)<br />
Phone: +1 818-676-2616<br />
Hours: Monday through Friday, 05:30 to 18:00, Pacific Time<br />
Europe, Middle East, Africa<br />
E-mail: support@spirent.com<br />
Web: http://support.spirent.com<br />
Phone: +33 (1) 6137 2270 (France)<br />
Phone: +44 1803 546333 (UK)<br />
Hours: Monday through Thursday, 09:00 to 18:00, Friday, 09:00 to 17:00, Paris Time<br />
Asia Pacific<br />
E-mail: support@spirent.com<br />
Web: http://support.spirent.com<br />
Phone: +86 (800) 810-9529 (toll-free mainland China only)<br />
Phone: +86 (10) 8233 0033 (China)<br />
Hours: Monday through Friday, 09:00 to 18:00, Beijing Time<br />
The latest versions of user manuals, application notes, and software and firmware updates<br />
are available on the Spirent Communications support website at<br />
http://support.spirent.com.<br />
Information about Spirent Communications and its products and services can be found on<br />
the main company website at http://www.spirent.com.<br />
Company Address<br />
Spirent Communications, Inc.<br />
26750 Agoura Road<br />
Calabasas, CA 91302<br />
USA<br />
© 2013 Spirent Communications, Inc. All Rights Reserved.<br />
P/N 71-007052 Rev A, 5/13<br />
<strong>SPT</strong>-<strong>N11U</strong> <strong>Chassis</strong> <strong>Power</strong> <strong>Supply</strong> <strong>Installation</strong> <strong>Instructions</strong> | 7