WARTON CRAG
Warton Crags Guide - LakesBloc.com
Warton Crags Guide - LakesBloc.com
- No tags were found...

Create successful ePaper yourself
Turn your PDF publications into a flip-book with our unique Google optimized e-Paper software.
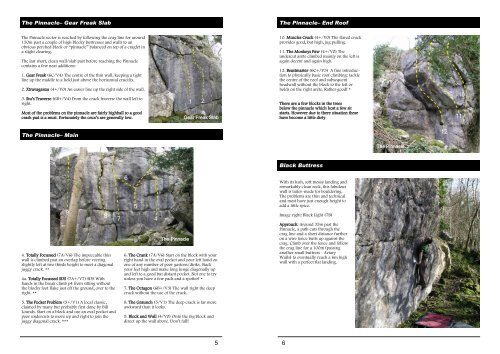
The Pinnacle– Gear Freak Slab<br />
The Pinnacle– End Roof<br />
The Pinnacle sector is reached by following the crag line for around<br />
150m past a couple of high blocky buttresses and walls to an<br />
obvious perched block or “pinnacle” balanced on top of a craglet in<br />
a slight clearing.<br />
The last short, clean wall/slab past before reaching the Pinnacle<br />
contains a few neat additions:<br />
1. Gear Freak (6C/V4) The centre of the thin wall, keeping a tight<br />
line up the middle to a hold just above the horizontal crucifix.<br />
2. Xtravaganza (4+/V0) An easier line up the right side of the wall.<br />
3. Stu’s Traverse (6B+/V4) From the crack traverse the wall left to<br />
right.<br />
Most of the problems on the pinnacle are fairly highball so a good<br />
crash pad is a must. Fortunately the crux’s are generally low.<br />
1 2<br />
Gear Freak Slab<br />
10. Muscles Crack (4+/V0) The flared crack<br />
provides good, but high, jug pulling.<br />
11. The Monkeys Paw (4+/V0) The<br />
undercut arête climbed mainly on the left is<br />
again decent and again high.<br />
12. Beastmaster (6C+/V5) A fine introduction<br />
to physically basic roof climbing: tackle<br />
the centre of the roof and subsequent<br />
headwall without the block to the left or<br />
holds on the right arête. Rather good! *<br />
There are a few blocks in the trees<br />
below the pinnacle which host a few sit<br />
starts. However due to there situation these<br />
have become a little dirty<br />
10<br />
11<br />
The Pinnacle– Main<br />
12<br />
The Pinnacle<br />
9<br />
4. Totally Focussed (7A/V6) The impeccable thin<br />
wall is climbed past an overlap before veering<br />
slightly left at two thirds height to meet a diagonal<br />
juggy crack. **<br />
4a. Totally Focussed SDS (7A+/V7) SDS With<br />
hands in the break climb p4 from sitting without<br />
the blocky foot flake just off the ground, over to the<br />
right. **<br />
5. The Pocket Problem (5+/V1) A local classic,<br />
claimed by many but probably first done by Bill<br />
Lounds. Start on a block and use an oval pocket and<br />
poor undercuts to move up and right to join the<br />
juggy diagonal crack. ***<br />
8<br />
7<br />
6<br />
5<br />
4<br />
The Pinnacle<br />
6. The Crank (7A/V6) Start on the block with your<br />
right hand in the oval pocket and your left hand on<br />
one of any number of poor gastons/dinks. Stack<br />
your feet high and make long lunge diagonally up<br />
and left to a good but distant pocket. Not one to try<br />
unless you have a few pads and a spotter! *<br />
7. The Octagon (6B+/V3) The wall right the deep<br />
crack without the use of the crack.<br />
8. The Graunch (5/V1) The deep crack is far more<br />
awkward than it looks.<br />
9. Block and Wall (4/V0) Onto the big block and<br />
direct up the wall above. Don’t fall!<br />
Black Buttress<br />
With its lush, soft mossy landing and<br />
remarkably clean rock, this fabulous<br />
wall is tailor-made for bouldering.<br />
The problems are thin and technical<br />
and most have just enough height to<br />
add a little spice.<br />
Image right: Black Light (7B)<br />
Approach: Around 35m past the<br />
Pinnacle, a path cuts through the<br />
crag line and a short distance further<br />
on a wire fence butts up against the<br />
crag. Climb over the fence and follow<br />
the crag line for a 100m (passing<br />
another small buttress - Aviary<br />
Walls) to eventually reach a 6m high<br />
wall with a perfect flat landing.<br />
5 6