Getting Started with InfoSphere Data Architect
You also want an ePaper? Increase the reach of your titles
YUMPU automatically turns print PDFs into web optimized ePapers that Google loves.
28 <strong>Getting</strong> started <strong>with</strong> <strong>InfoSphere</strong> <strong>Data</strong> <strong>Architect</strong><br />
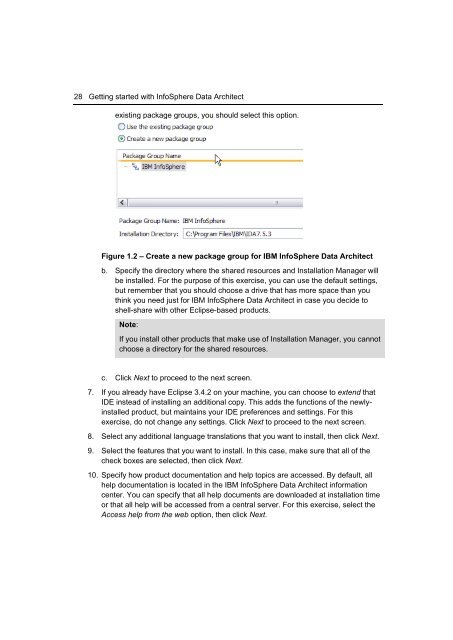
existing package groups, you should select this option.<br />
Figure 1.2 – Create a new package group for IBM <strong>InfoSphere</strong> <strong>Data</strong> <strong>Architect</strong><br />
b. Specify the directory where the shared resources and Installation Manager will<br />
be installed. For the purpose of this exercise, you can use the default settings,<br />
but remember that you should choose a drive that has more space than you<br />
think you need just for IBM <strong>InfoSphere</strong> <strong>Data</strong> <strong>Architect</strong> in case you decide to<br />
shell-share <strong>with</strong> other Eclipse-based products.<br />
Note:<br />
If you install other products that make use of Installation Manager, you cannot<br />
choose a directory for the shared resources.<br />
c. Click Next to proceed to the next screen.<br />
7. If you already have Eclipse 3.4.2 on your machine, you can choose to extend that<br />
IDE instead of installing an additional copy. This adds the functions of the newlyinstalled<br />
product, but maintains your IDE preferences and settings. For this<br />
exercise, do not change any settings. Click Next to proceed to the next screen.<br />
8. Select any additional language translations that you want to install, then click Next.<br />
9. Select the features that you want to install. In this case, make sure that all of the<br />
check boxes are selected, then click Next.<br />
10. Specify how product documentation and help topics are accessed. By default, all<br />
help documentation is located in the IBM <strong>InfoSphere</strong> <strong>Data</strong> <strong>Architect</strong> information<br />
center. You can specify that all help documents are downloaded at installation time<br />
or that all help will be accessed from a central server. For this exercise, select the<br />
Access help from the web option, then click Next.


