

Apple iMovie at a Glance (Manual) - iMovie at a Glance (Manual)
Apple iMovie at a Glance (Manual) - iMovie at a Glance (Manual)
Apple iMovie at a Glance (Manual) - iMovie at a Glance (Manual)

Create successful ePaper yourself
Turn your PDF publications into a flip-book with our unique Google optimized e-Paper software.
<strong>iMovie</strong> <strong>at</strong> a <strong>Glance</strong><br />
Tutorial<br />
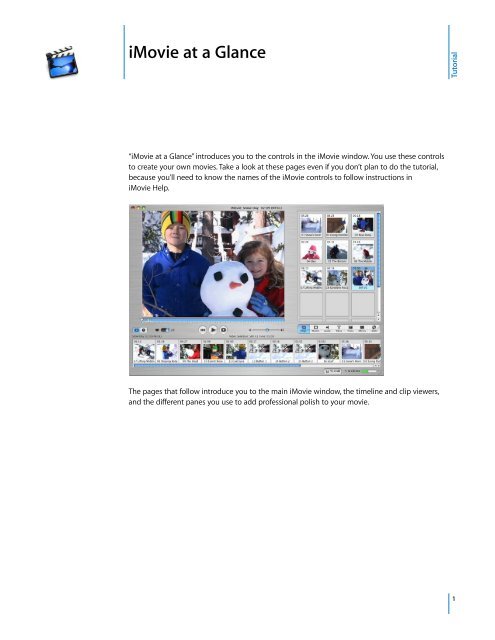
“<strong>iMovie</strong> <strong>at</strong> a <strong>Glance</strong>” introduces you to the controls in the <strong>iMovie</strong> window. You use these controls<br />
to cre<strong>at</strong>e your own movies. Take a look <strong>at</strong> these pages even if you don’t plan to do the tutorial,<br />
because you’ll need to know the names of the <strong>iMovie</strong> controls to follow instructions in<br />
<strong>iMovie</strong> Help.<br />
The pages th<strong>at</strong> follow introduce you to the main <strong>iMovie</strong> window, the timeline and clip viewers,<br />
and the different panes you use to add professional polish to your movie.<br />
1
<strong>iMovie</strong> Window<br />
A<br />
B<br />
C<br />
D E F<br />
G<br />
H<br />
A<br />
B<br />
C<br />
D<br />
E<br />
F<br />
G<br />
H<br />
<strong>iMovie</strong> monitor: W<strong>at</strong>ch your clips play in this window. You can play clips th<strong>at</strong> are in the Clips pane or the<br />
clip viewer.<br />
Scrubber bar: Drag the playhead along the scrubber bar to move through a clip frame by frame. The number<br />
near the playhead indic<strong>at</strong>es how far (minutes:seconds:frames) the selected frame is into the movie.<br />
Mode switch: Click to switch between camera mode and edit mode. Use camera mode to choose an input<br />
device and transfer your raw video into the computer. Use edit mode to work on your movie.<br />
Playback controls: Use these controls to skip to the beginning of a selected clip, play the clip in the <strong>iMovie</strong><br />
monitor, or play the clip full screen on your computer’s monitor.<br />
Volume slider: Slide this control to change the volume of the computer’s speaker while you work in <strong>iMovie</strong>.<br />
This won’t change the volume levels in your video or audio clips.<br />
Pane buttons: Click these buttons to see the different panes of the <strong>iMovie</strong> window. See a description of each<br />
pane l<strong>at</strong>er in this document.<br />
Trash: Drag unwanted clips to the Trash icon to delete them. You can restore cropped video and audio from<br />
the <strong>iMovie</strong> Trash if you haven’t emptied it.<br />
Disk space indic<strong>at</strong>or: Monitor your free disk space as you work. You should always have about 2 GB free disk<br />
space for optimal performance of <strong>iMovie</strong>. When this bar turns yellow, you are starting to run low on disk<br />
space. When it turns red, you must free up some space to continue working on your movie.<br />
2 <strong>iMovie</strong> <strong>at</strong> a <strong>Glance</strong>
Clip Viewer<br />
Use the clip viewer, shown below, to add clips to your movie and arrange them in the order you<br />
want them to appear in your movie. When you cre<strong>at</strong>e titles and transitions, or add photographs<br />
from your iPhoto library, drag them to the clip viewer.<br />
A<br />
B<br />
C<br />
A<br />
B<br />
C<br />
Clip viewer button: Click the clip viewer button to switch from the timeline viewer.<br />
Clip: Each section of video footage and any still images you import are called clips.<br />
Transition marker: Transition markers indic<strong>at</strong>e th<strong>at</strong> two clips are linked by a transition.<br />
Timeline Viewer<br />
Use the timeline viewer, shown below, to work with audio clips, synchronize your audio with<br />
video, and to adjust the timing of your movie.<br />
A<br />
B<br />
G<br />
C<br />
D<br />
E<br />
F<br />
H<br />
I<br />
A<br />
B<br />
C<br />
D<br />
E<br />
F<br />
G<br />
H<br />
I<br />
Timeline viewer button: Click the timeline viewer button to switch from the clip viewer.<br />
Video track: Select clips in this track to add motion effects.<br />
Audio tracks: Place and arrange audio clips in these tracks to synchronize audio and video clips. Deselecting<br />
the checkbox to the right of the track mutes all the audio clips in th<strong>at</strong> track.<br />
Zoom slider: Move the slider to make clips appear larger or smaller in the timeline.<br />
Clip speed slider: Select a video clip and drag this slider to make the clip play faster or slower.<br />
Edit Volume: Select this checkbox to see the volume level bar for all clips. Move the slider to raise or lower<br />
the volume of a selected clip or clip segment.<br />
Volume level bar: Click this bar to add markers, then drag the markers to adjust the volume for sections of<br />
audio clips. You can use this to make audio fade in or fade out.<br />
Audio waveforms: Represent<strong>at</strong>ions of audio intensity. Use audio waveforms to align video to audio events<br />
such as a certain drumbe<strong>at</strong> or the exact beginning or end of the audio.<br />
Audio checkboxes: Select a checkbox to hear the audio in its track. Deselect it to mute the track.<br />
<strong>iMovie</strong> <strong>at</strong> a <strong>Glance</strong> 3
Clips Pane<br />
Click the Clips button to open the Clips pane. The video footage and still images you import into<br />
<strong>iMovie</strong> are stored here.<br />
A<br />
B<br />
A<br />
B<br />
Clip name: Each clip is assigned a unique filename. Double-click the name to change it to something more<br />
meaningful to you. You can drag a clip from the Clips pane to the clip viewer to add it to your movie.<br />
Dur<strong>at</strong>ion: The length of a video or audio clip is read as minutes:seconds:frames. For example, 01:08:15 is<br />
1 minute, 8 seconds, and 15 frames into the movie.<br />
4 <strong>iMovie</strong> <strong>at</strong> a <strong>Glance</strong>
Photos Pane<br />
Click the Photos button to open the Photos pane. You can import an image directly from your<br />
iPhoto library, add pan and zoom effects to it, and choose how long you want the photo to show<br />
in your movie.<br />
A<br />
B<br />
G<br />
C<br />
D<br />
E<br />
F<br />
A<br />
B<br />
C<br />
D<br />
E<br />
F<br />
G<br />
Ken Burns Effect: Use these controls to set up pan and zoom effects for your photographs. Turn the effect off<br />
or on by selecting or deselecting the Ken Burns Effect checkbox. Click Start and Finish to set which part of<br />
the photo is showing <strong>at</strong> the beginning and end of the effect. Use the Zoom slider to set the zoom.<br />
Reverse: Click to reverse the direction of the pan and zoom effect.<br />
Preview: Click to see how the effect looks in the preview monitor.<br />
Apply: When you have the effect the way you want, click this button to apply the effect to the photograph.<br />
This cre<strong>at</strong>es a new clip in the Clips pane th<strong>at</strong> you can add to your movie.<br />
Dur<strong>at</strong>ion: Move the slider to set how many seconds the photograph remains in view.<br />
iPhoto pop-up menu: Choose your iPhoto library or an iPhoto album from this menu to view and select<br />
photographs. You can drag a photograph from the Photos pane to the clip viewer to add it to your movie.<br />
Preview monitor: Use this monitor to set up and preview effects for a selected photograph.<br />
<strong>iMovie</strong> <strong>at</strong> a <strong>Glance</strong> 5
Audio Pane<br />
Click the Audio button to open the Audio pane. You can add sound effects, record a voiceover, or<br />
import music from a CD or your iTunes music library.<br />
A<br />
B<br />
C<br />
D<br />
E<br />
F<br />
A<br />
B<br />
C<br />
D<br />
E<br />
F<br />
Audio pop-up menu: Choose the source from which you want to import music or audio. You can choose a<br />
track from your iTunes library or a music CD, or an <strong>iMovie</strong> sound effect. You can drag a sound effect or<br />
iTunes track from the list to the timeline viewer to add it to your movie.<br />
Eject button: Click the button to eject a CD from the optical drive.<br />
Play: Click the button to play or pause a selected track.<br />
Search field: Type some words from a title to search for a particular audio file in your iTunes library. You can<br />
search by title or artist.<br />
Place <strong>at</strong> Playhead: Click the button to import a selected track into your movie. The imported track appears in<br />
one of the audio tracks in the timeline viewer.<br />
Record/Stop: Click the button to record a voiceover or other sound through your computer’s built-in<br />
microphone or an external microphone. The input meter displays the sound level; sound quality is best if it<br />
stays within the yellow range.<br />
6 <strong>iMovie</strong> <strong>at</strong> a <strong>Glance</strong>
Titles Pane<br />
Click the Titles button to open the Titles pane. You can add opening titles, rolling commentary, or<br />
end credits. You can also choose a title style, font, and text color.<br />
A<br />
B<br />
D<br />
C<br />
E<br />
F<br />
G<br />
H<br />
I<br />
J<br />
A<br />
B<br />
C<br />
D<br />
E<br />
F<br />
G<br />
H<br />
I<br />
J<br />
Preview: Click to see how the title will look.<br />
Upd<strong>at</strong>e: Click to apply changes to a title you’ve already added to your movie.<br />
Arrow buttons: For some titles you can click the arrow button to set the direction you want the title to move.<br />
Preview monitor: Use this monitor to view title styles and preview your settings.<br />
Timing controls: Move the sliders to set how quickly you want the titles to appear and how long to pause<br />
before disappearing. Other options may be available, depending on the title style.<br />
Titles list: Select a title style for the text you want to add to your movie. Click the arrow next to a title to see<br />
more titles in th<strong>at</strong> c<strong>at</strong>egory. When you’re done setting options for the title, drag the title style from this list to<br />
the timeline viewer to place the title in your movie.<br />
Font controls: Choose a font, then move the slider left or right to adjust the font size. Choose a font color<br />
using the color box.<br />
Over Black: Select this option if you want the title to appear over a black video clip instead of one of your<br />
video clips.<br />
QT Margins: Select this option if you plan to export the movie to QuickTime. Deselect it if you want to show<br />
the movie on a television screen.<br />
Text fields: Type your text in these text fields. If the style you choose allows more lines of text, use the plus<br />
and minus buttons to add or remove lines of text.<br />
<strong>iMovie</strong> <strong>at</strong> a <strong>Glance</strong> 7
Transitions Pane<br />
Click the Transitions button to open the Transitions pane. You can add transitions to move<br />
smoothly between the scenes in your movie.<br />
A<br />
B<br />
C<br />
E<br />
G<br />
D<br />
F<br />
A<br />
B<br />
C<br />
D<br />
E<br />
F<br />
G<br />
Preview: Click to see how the transition will look in the <strong>iMovie</strong> monitor.<br />
Upd<strong>at</strong>e: Click to apply changes to a transition you’ve already added to your movie.<br />
Apply: Click to apply the transition to multiple selected clips in your movie.<br />
Arrow buttons: For some transitions, you can click an arrow button to set the direction you want the<br />
transition to move.<br />
Timing controls: Move the sliders to set the speed of the transition and make other adjustments, depending<br />
on the transition style.<br />
Preview monitor: View a selected video clip and transition here.<br />
Transitions list: Select a transition in this list. When you’re done setting options for the transition, drag the<br />
transition from this list to where you want it to appear in the clip viewer.<br />
8 <strong>iMovie</strong> <strong>at</strong> a <strong>Glance</strong>
Effects Pane<br />
Click the Effects button to open the Effects pane, where you can add special effects to change<br />
the look of your movie clips. For example, you can change color video to black and white, adjust<br />
the image brightness and contrast, or add playful effects like fairy dust or rain.<br />
A<br />
B<br />
D<br />
C<br />
E<br />
F<br />
A<br />
B<br />
C<br />
D<br />
E<br />
F<br />
Preview: Click to see how the effect will appear in the selected clip.<br />
Apply: Click to apply the effect to the selected clip in your movie.<br />
Effect In/Effect Out: Move these sliders to the points in the selected clip where you want<br />
the effect to appear and disappear.<br />
Preview monitor: Use this monitor to preview the effects you set up.<br />
Effects list: Select an effect in this list to change the appearance of clips in your movie.<br />
Appearance controls: Move these sliders to make adjustments to the selected effect.<br />
These options will vary, depending on the effect you choose.<br />
<strong>iMovie</strong> <strong>at</strong> a <strong>Glance</strong> 9
iDVD Pane<br />
Click the iDVD button to open the iDVD pane. You can add chapter markers to your movie and<br />
export it to iDVD.<br />
A<br />
B<br />
C<br />
A<br />
B<br />
C<br />
Chapter titles: A new chapter appears in the list each time you add a marker. Type a name for each chapter<br />
th<strong>at</strong> you want to use in your iDVD scene selection menu.<br />
Add Chapter/Remove Chapter: Click to add or remove a chapter marker in your movie. If you export your<br />
movie to iDVD to cre<strong>at</strong>e a DVD, the markers you add are used to cre<strong>at</strong>e scene selection menus in iDVD.<br />
Cre<strong>at</strong>e iDVD Project: Click to export your movie directly to iDVD. This opens iDVD version 3 or l<strong>at</strong>er and your<br />
movie appears as a project in the iDVD window. If you don’t have iDVD version 3 or l<strong>at</strong>er on your computer<br />
or you don’t have a supported DVD drive, this button is not available.<br />
© 2004 <strong>Apple</strong> Computer, Inc. All rights reserved.<br />
<strong>Apple</strong>, the <strong>Apple</strong> logo, <strong>iMovie</strong>, iTunes, and QuickTime are trademarks of <strong>Apple</strong> Computer, Inc., registered in the U.S. and other countries.<br />
iDVD and iPhoto are trademarks of <strong>Apple</strong> Computer, Inc. The owner or authorized user of a valid copy of the <strong>iMovie</strong> software may<br />
reproduce this public<strong>at</strong>ion for the purpose of learning or teaching to use the software, excluding commercial or paid-for purposes.


