

Canon imageCLASS D530 - imageCLASS D530 Basic Operation Guide
Canon imageCLASS D530 - imageCLASS D530 Basic Operation Guide
Canon imageCLASS D530 - imageCLASS D530 Basic Operation Guide

You also want an ePaper? Increase the reach of your titles
YUMPU automatically turns print PDFs into web optimized ePapers that Google loves.
Scan a Document with the Scanner Driver<br />
If you use the scanner driver window (ScanGear MF Window), you can use various features<br />
and scan only the necessary part with the preview function.<br />
1 Make sure that a computer and the machine are connected properly, and<br />
the MF Toolbox is installed on the computer (See the Starter <strong>Guide</strong>).<br />
2 Place your documents (→p.16).<br />
3 Switch to the Scan mode (→p.13).<br />
4 Press [▲] or [▼] to highlight , and then press [OK].<br />
5 From your computer, double-click the [<strong>Canon</strong> MF Toolbox 4.9] icon.<br />
6 When the MF Toolbox appears, click the desired scan mode button.<br />
• You may not use the ScanGear MF when using the [OCR] mode.<br />
7 When the scan setting window appears, select the [Display the Scanner<br />
Driver] check box, and then click [Start].<br />
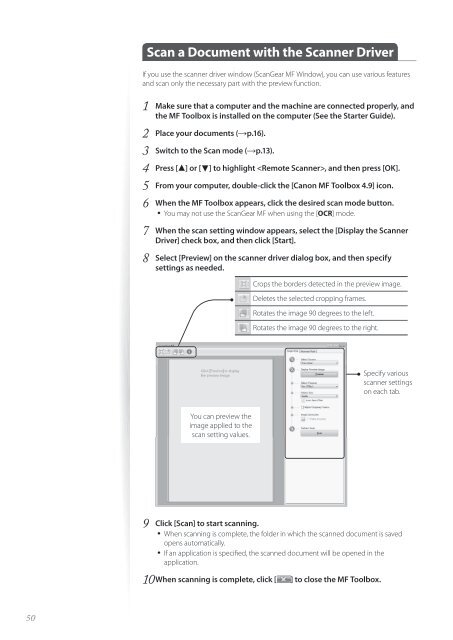
8 Select [Preview] on the scanner driver dialog box, and then specify<br />
settings as needed.<br />
Crops the borders detected in the preview image.<br />
Deletes the selected cropping frames.<br />
Rotates the image 90 degrees to the left.<br />
Rotates the image 90 degrees to the right.<br />
Specify various<br />
scanner settings<br />
on each tab.<br />
You can preview the<br />
image applied to the<br />
scan setting values.<br />
9 Click [Scan] to start scanning.<br />
• When scanning is complete, the folder in which the scanned document is saved<br />
opens automatically.<br />
• If an application is specified, the scanned document will be opened in the<br />
application.<br />
10 When scanning is complete, click [ ] to close the MF Toolbox.<br />
50


