

Garmin GPSMAP 531s - Quick Reference Guide
Garmin GPSMAP 531s - Quick Reference Guide
Garmin GPSMAP 531s - Quick Reference Guide

Create successful ePaper yourself
Turn your PDF publications into a flip-book with our unique Google optimized e-Paper software.
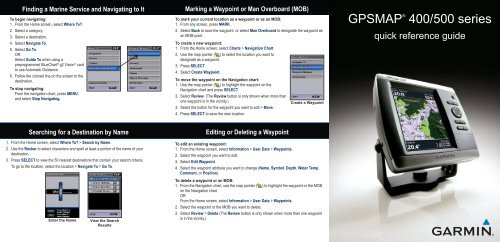
Finding a Marine Service and Navigating to It<br />
To begin navigating:<br />
1. From the Home screen, select Where To?.<br />
2. Select a category.<br />
3. Select a destination.<br />
4. Select Navigate To.<br />
5. Select Go To.<br />
OR<br />
Select <strong>Guide</strong> To when using a<br />
preprogrammed BlueChart ® g2 Vision ® card<br />
to use Automatic Guidance.<br />
6. Follow the colored line on the screen to the<br />
destination.<br />
To stop navigating:<br />
From the navigation chart, press MENU,<br />
and select Stop Navigating.<br />
Marking a Waypoint or Man Overboard (MOB)<br />
To mark your current location as a waypoint or as an MOB:<br />
1. From any screen, press MARK.<br />
2. Select Back to save the waypoint, or select Man Overboard to designate the waypoint as<br />
an MOB point.<br />
To create a new waypoint:<br />
1. From the Home screen, select Charts > Navigation Chart.<br />
2. Use the map pointer ( ) to select the location you want to<br />
designate as a waypoint.<br />
3. Press SELECT.<br />
4. Select Create Waypoint.<br />
To move the waypoint on the Navigation chart:<br />
1. Use the map pointer ( ) to highlight the waypoint on the<br />
Navigation chart and press SELECT.<br />
2. Select Review. (The Review button is only shown when more than<br />
one waypoint is in the vicinity.)<br />
3. Select the button for the waypoint you want to edit > Move.<br />
4. Press SELECT to save the new location.<br />
Create a Waypoint<br />
<strong>GPSMAP</strong> ®<br />
400/500 series<br />
quick reference guide<br />
Searching for a Destination by Name<br />
1. From the Home screen, select Where To? > Search by Name.<br />
2. Use the Rocker to select characters and spell at least a portion of the name of your<br />
destination.<br />
3. Press SELECT to view the 50 nearest destinations that contain your search criteria.<br />
To go to the location, select the location > Navigate To > Go To.<br />
Editing or Deleting a Waypoint<br />
To edit an existing waypoint:<br />
1. From the Home screen, select Information > User Data > Waypoints.<br />
2. Select the waypoint you want to edit.<br />
3. Select Edit Waypoint.<br />
4. Select the waypoint attribute you want to change (Name, Symbol, Depth, Water Temp,<br />
Comment, or Position).<br />
Enter the Name<br />
View the Search<br />
Results<br />
To delete a waypoint or an MOB:<br />
1. From the Navigation chart, use the map pointer ( ) to highlight the waypoint or the MOB<br />
on the Navigation chart.<br />
OR<br />
From the Home screen, select Information > User Data > Waypoints.<br />
2. Select the waypoint or the MOB you want to delete.<br />
3. Select Review > Delete (The Review button is only shown when more than one waypoint<br />
is in the vicinity.)
Turning the Unit On and Acquiring a Signal<br />
See the Important Safety and Product Information guide in the product box for product warnings and other<br />
important information.<br />
Turning the Unit On or Off<br />
To turn on the unit, press and release the Power key. When the Warning<br />
screen appears, select I Agree to view the Home screen. To turn off the<br />
unit, press and hold the Power key.<br />
Acquiring GPS Satellite Signals<br />
When you turn on the unit, the GPS receiver must collect satellite data and<br />
establish the current location. When the unit acquires satellite signals, the<br />
signal strength bars at the top of the Home screen are green . When the<br />
unit loses satellite signals, the green bars disappear and the position<br />
icon displays a flashing question mark.<br />
Please visit www.garmin.com for additional documentation and information.<br />
To adjust the backlight:<br />
1. Press and release the Power key.<br />
2. Select Backlight.<br />
Adjusting the Display Settings<br />
3. Press left or right on the Rocker to manually adjust the backlight.<br />
Note: Press the Power key repeatedly to cycle between<br />
maximum backlight, minimum backlight, and your manual setting.<br />
To switch between day mode and night<br />
mode:<br />
1. Press and release the Power key.<br />
2. Select Color Mode.<br />
3. Press left or right on the Rocker to switch<br />
between modes.<br />
Home Screen<br />
Using the Keypad<br />
POWER/BACKLIGHT—Press and hold to turn the unit<br />
on or off; press and release to adjust the backlight and the<br />
day and night modes.<br />
RANGE (-/+)—Press to adjust the range of the sonar, to<br />
zoom in or out on a chart, to page up or down on lists, or to<br />
adjust the backlight level.<br />
ROCKER—Press up, down, left, or right to move through<br />
menus, highlight fields, and enter data.<br />
MARK—Press to mark a waypoint.<br />
SELECT—Press to select highlighted items.<br />
HOME—Press to return to the Home screen.<br />
MENU—Press to access additional settings and configuration options; press to return to the<br />
previous screen when indicated.<br />
Panning and Zooming on the Navigation Chart<br />
Use the Rocker to move the map pointer ( ) away from your current location and to scroll<br />
to other areas on the Navigation chart. As you pan past the edge of the current map display,<br />
the screen scrolls forward to provide continuous map coverage.<br />
Map pointer<br />
POWER/<br />
BACKLIGHT<br />
RANGE<br />
ROCKER<br />
MARK<br />
SELECT<br />
MENU<br />
HOME<br />
As you move the map pointer, you can view the<br />
distance and bearing from your current location and<br />
the map pointer location coordinates in the lowerright<br />
corner of the map.<br />
To pan the map, press up, down, right, or left on the<br />
Rocker.<br />
Zooming In and Out on the Map<br />
The Range (-/+) keys control the zoom level, indicated by the scale at the bottom of the<br />
Navigation chart ( ). The bar under the number represents that distance on the map.<br />
Using Routes and Tracks<br />
To create a route from your present location:<br />
1. From the Navigation chart, use the map pointer ( ) to highlight your<br />
destination and press SELECT.<br />
2. Select Navigate To > Route To.<br />
3. Use the map pointer ( ) to select the location at which you want to<br />
make the last turn toward your destination.<br />
4. Press SELECT. Repeat this step to add additional turns.<br />
5. Press MENU to cancel, to undo the last turn, or to begin navigating the<br />
route.<br />
To create a route in another location:<br />
1. From the Home screen, select Information > User Data > Routes > New Route.<br />
2. Select Use Chart or Use Waypoint List.<br />
3. If you select Use Chart, use the map pointer ( ) to select the initial location at which you<br />
want to start the new route. If you select Use Waypoint List, select the first waypoint on the<br />
route and press SELECT.<br />
4. Choose the location of the first turn and press SELECT. Repeat until the route is complete.<br />
5. Select MENU to save the route.<br />
6. Select the route to edit the route, delete the route, or navigate to the route.<br />
To edit a route:<br />
1. From the Home screen, select Information > User Data > Routes.<br />
2. Select the route to edit.<br />
3. Select Edit Route. You can edit the route name or use the chart or turn list to edit the route<br />
turns.<br />
To turn on the track log:<br />
From any chart except the Fish Eye 3D, select MENU > Waypoints & Tracks > Tracks > On.<br />
A trailing line on the chart indicates your track.<br />
To clear the active track:<br />
From any chart except the Fish Eye 3D, select MENU > Waypoints & Tracks > Active Tracks<br />
> Clear Active Track. The track memory is cleared; the current track continues to be recorded.<br />
Day Mode<br />
Night Mode<br />
© 2009 <strong>Garmin</strong> Ltd. or its subsidiaries<br />
May 2009 190-01074-01 Rev. A Printed in Taiwan


