

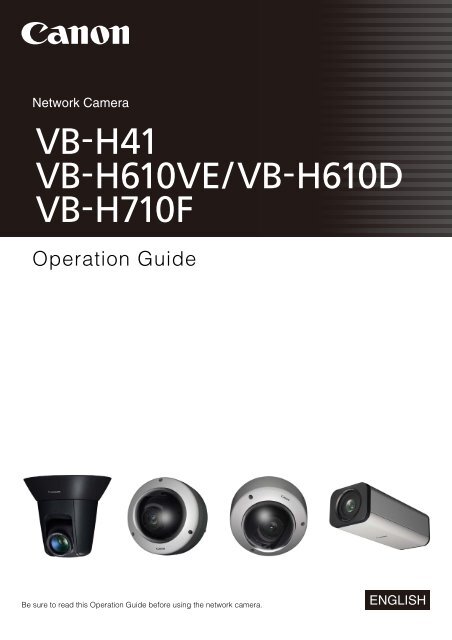
Canon VB-H41 - VB-H41 Operation Guide
Canon VB-H41 - VB-H41 Operation Guide
Canon VB-H41 - VB-H41 Operation Guide

Create successful ePaper yourself
Turn your PDF publications into a flip-book with our unique Google optimized e-Paper software.
Network Camera<br />
Network <strong>Operation</strong> Camera <strong>Guide</strong><br />
Be sure to read this <strong>Operation</strong> <strong>Guide</strong> before using the network camera.<br />
ENGLISH
Introduction<br />
Thank you for purchasing a <strong>Canon</strong> Network Camera <strong>VB</strong>-<strong>H41</strong>/<strong>VB</strong>-<strong>H41</strong>B/<strong>VB</strong>-H610VE/<strong>VB</strong>-H610D/<strong>VB</strong>-H710F (hereafter referred<br />
to as the camera).<br />
The only difference between the <strong>VB</strong>-<strong>H41</strong> and <strong>VB</strong>-<strong>H41</strong>B is the exterior color. The <strong>VB</strong>-<strong>H41</strong>, <strong>VB</strong>-<strong>H41</strong>B, <strong>VB</strong>-H610D and<br />
<strong>VB</strong>-H710F are for indoor use only. The <strong>VB</strong>-H610VE can be installed outdoors, such as underneath eaves.<br />
This <strong>Operation</strong> <strong>Guide</strong> explains the camera settings and operations. Read this guide carefully before using the camera to<br />
ensure correct use. Also, be sure to read the files in the LICENSE folder on the Setup CD-ROM.<br />
For the latest information on this product (firmware and included software, user manuals, operating environment, etc.),<br />
please refer to the <strong>Canon</strong> Web Site.<br />
Disclaimer<br />
To the full extent permitted by laws and regulations, neither<br />
<strong>Canon</strong> Inc. nor any of its subsidiaries or affiliates shall be<br />
responsible for any financial losses that may be incurred as<br />
a result of the loss of recorded information or images,<br />
regardless of the internal or external cause of the loss.<br />
EXCEPT AS SET FORTH IN THE LIMITED WARRANTY<br />
ACCOMPANYING THE CAMERA AND WITHOUT<br />
DETRACTING FROM ANY RIGHTS A CONSUMER MAY BE<br />
ENTITLED TO, AND TO THE FULL EXTENT PERMITTED BY<br />
LAWS AND REGULATIONS: (1) NEITHER CANON INC. NOR<br />
ANY OF ITS SUBSIDIARIES OR AFFILIATES MAKE ANY<br />
WARRANTY OF ANY KIND, EXPRESS OR IMPLIED, WITH<br />
REGARD TO THE MATERIAL IN THIS MANUAL OR WITH<br />
REGARD TO THE USE OF THE CAMERA INCLUDING,<br />
WITHOUT LIMITATION, IMPLIED WARRANTIES AS TO<br />
MARKETABILITY, MERCHANTABILITY, FITNESS FOR A<br />
PARTICULAR PURPOSE OR USE, OR NON-INFRINGEMENT<br />
AND (2) NEITHER CANON INC. NOR ANY OF ITS<br />
SUBSIDIARIES OR AFFILIATES SHALL BE LIABLE FOR ANY<br />
DIRECT, INCIDENTAL, OR CONSEQUENTIAL DAMAGES<br />
OF ANY NATURE RESULTING FROM THE USE OF THIS<br />
MATERIAL OR THE CAMERA.<br />
• Notes<br />
1 All rights reserved.<br />
2 The contents of this guide are subject to change<br />
without any prior notice.<br />
3 This document has been prepared with the utmost<br />
attention to accuracy. If you have any comments,<br />
however, please contact a <strong>Canon</strong> sales representative.<br />
4 <strong>Canon</strong> shall assume no liability for any outcome of<br />
using this product, regardless of Items 2 and 3 above.<br />
Notes on Network Security<br />
security breaches.<br />
To the full extent permitted by laws and regulations,<br />
neither <strong>Canon</strong> Inc. nor any of its subsidiaries or affiliates<br />
shall be liable for any losses, direct, incidental or<br />
consequential damages, or liabilities that may be incurred<br />
as a result of network security incidents such as<br />
unauthorized accesses.<br />
<br />
– Change the password of the camera periodically.<br />
– Change the HTTP or HTTPS port number of the<br />
camera.<br />
– Limit access to the camera by network devices.<br />
Copyright<br />
Videos, images or sounds recorded with your camera<br />
may not be utilized or published without consent of<br />
copyright holders, if any, except in such a way as<br />
permitted for personal use under the relevant copyright<br />
law.<br />
Notes on Privacy and Publicity Rights<br />
Regarding the Use of Video/Audio<br />
When using the camera (for video or audio recording), it is<br />
the full responsibility of the user to protect privacy and<br />
avoid any violation of publicity rights. For example, obtain<br />
consent to install the camera in advance if specific<br />
buildings or rooms are to be monitored. <strong>Canon</strong> shall have<br />
no liability whatsoever in this regard.<br />
Legal Notice<br />
In some cases, camera monitoring may be prohibited by<br />
law or regulation, the details of which differ by country.<br />
Before using the camera, check the laws or regulations of<br />
the country or region where the camera is used.<br />
The user is responsible for the network security of this<br />
product and its use.<br />
Take appropriate network security measures to avoid<br />
2
Introduction<br />
Trademark Notice<br />
• <strong>Canon</strong> and the <strong>Canon</strong> logo are registered trademarks<br />
of <strong>Canon</strong> Inc.<br />
• Microsoft, Windows, Windows Vista, Internet Explorer,<br />
Windows Server, Windows Media and ActiveX are<br />
trademarks or registered trademarks of Microsoft<br />
Corporation in the United States and other countries.<br />
• Windows is legally recognized as the Microsoft Windows<br />
Operating System.<br />
• This product comes with exFAT, a licensed file system<br />
technology from Microsoft.<br />
• QuickTime is a trademark of Apple Inc.<br />
• SD, SDHC and SDXC Logos are trademarks of SD-3C,<br />
LLC.<br />
• Other brands or product names in this guide are<br />
trademarks or registered trademarks of their respective<br />
companies.<br />
Warning<br />
To reduce a risk of fire or electric shock, do not expose<br />
this product to rain or moisture.<br />
(<strong>VB</strong>-<strong>H41</strong>, <strong>VB</strong>-H610D, <strong>VB</strong>-H710F)<br />
Notes on the Included Software RM-Lite<br />
(Disclaimer)<br />
Flaws or other problems with RM-Lite may result in recording<br />
failure or destruction or loss of recorded data. <strong>Canon</strong> shall<br />
have no liability whatsoever for any loss or damages<br />
incurred by the user as a result of such problems.<br />
Only for European Union and EEA (Norway,<br />
Iceland and Liechtenstein)<br />
These symbols indicate that this<br />
product is not to be disposed of with<br />
your household waste, according to<br />
the WEEE Directive (2012/19/EU),<br />
the Battery Directive (2006/66/EC)<br />
and/or national legislation<br />
implementing those Directives.<br />
If a chemical symbol is printed beneath the symbol shown<br />
above, in accordance with the Battery Directive, this indicates<br />
that a heavy metal (Hg = Mercury, Cd = Cadmium, Pb =<br />
Lead) is present in this battery or accumulator at a<br />
concentration above an applicable threshold specified in the<br />
Battery Directive.<br />
This product should be handed over to a designated<br />
collection point, e.g., on an authorized one-for-one basis when<br />
you buy a new similar product or to an authorized collection<br />
site for recycling waste electrical and electronic equipment<br />
(EEE) and batteries and accumulators. Improper handling of<br />
this type of waste could have a possible impact on the<br />
environment and human health due to potentially hazardous<br />
substances that are generally associated with EEE. Your<br />
cooperation in the correct disposal of this product will<br />
contribute to the effective usage of natural resources.<br />
For more information about the recycling of this product,<br />
please contact your local city office, waste authority,<br />
approved scheme or your household waste disposal<br />
service or visit www.canon-europe.com/weee, or<br />
www.canon-europe.com/battery.<br />
Notes on License Agreement for Included<br />
Software<br />
For information on the License Agreement for Included<br />
Software, refer to the next file in the BundledSoftware<br />
folder in the Included Setup CD-ROM LICENSE folder.<br />
Software Type<br />
<strong>VB</strong> Initial Setting Tool<br />
Memory Card Unmount Tool<br />
Backup Tool<br />
Restore Tool<br />
Camera Angle Setting Tool<br />
(Not used with the <strong>VB</strong>-<strong>H41</strong>.)<br />
RM-Lite Network Video Recording<br />
Software<br />
File Name<br />
<strong>VB</strong>Tools-E.txt<br />
RM-Lite-E.txt<br />
This product is licensed under AT&T patents for the MPEG-4<br />
standard and may be used for encoding MPEG-4 compliant<br />
video and/or decoding MPEG-4 compliant video that was<br />
encoded only (1) for a personal and non-commercial<br />
purpose or (2) by a video provider licensed under the AT&T<br />
patents to provide MPEG-4 compliant video. No license is<br />
granted or implied for any other use for MPEG-4 standard.<br />
3
Open Source Software<br />
The product (camera and included RM-Lite) contains Open<br />
Source Software modules. For details, see<br />
“ThirdPartySoftware-E.pdf” (Third-Party Software License) in<br />
the OpenSourceSoftware folder in the LICENSE folder on<br />
the Setup CD-ROM. Each module's license conditions are<br />
also available in the same folder.<br />
Software under GPL and LGPL<br />
If you would like to obtain the source code under GPL/<br />
LGPL, please contact the dealer or sales agent where you<br />
purchased the product.<br />
Security Export Control<br />
This product is subject to security export control.<br />
Therefore, to export or carry it overseas may require an<br />
authorization by governmental agencies.<br />
4
How to Read This <strong>Operation</strong> <strong>Guide</strong><br />
User Manuals<br />
This camera comes with an “Installation <strong>Guide</strong>” and<br />
“<strong>Operation</strong> <strong>Guide</strong>” (this manual) included in the Setup<br />
CD-ROM.<br />
Installation <strong>Guide</strong> (Included)<br />
This guide provides notes and procedures on camera<br />
installation as well as the main camera specifications.<br />
Sections you should reference in this guide will be<br />
marked “Installation <strong>Guide</strong>” along with the name of the<br />
reference items.<br />
<strong>Operation</strong> <strong>Guide</strong> (This Document)<br />
This document explains the initial camera settings,<br />
Camera Angle Setting Tool, Admin Tools settings, viewer<br />
operations and troubleshooting, etc. This document is<br />
included in the Setup CD-ROM.<br />
In the Setup CD-ROM, the recording software RM-Lite<br />
(“RM-Lite” in “Chapter1 Before Use”) is also included. The<br />
following user manuals are available.<br />
Icons Indicating Particular Camera<br />
Models<br />
In the descriptions of functions limited to particular<br />
models, the model names will appear or the following<br />
icons will be used to indicate those models.<br />
Icon<br />
Camera Model<br />
<strong>VB</strong>-<strong>H41</strong><br />
<strong>VB</strong>-H610VE and <strong>VB</strong>-H610D<br />
<strong>VB</strong>-H710F<br />
Symbols Indicating Safety Precautions<br />
This section explains symbols used in this <strong>Operation</strong><br />
<strong>Guide</strong>. This <strong>Operation</strong> <strong>Guide</strong> uses the following symbols<br />
to indicate important information the user should know in<br />
order to use the product safely. Be sure to observe these<br />
items.<br />
Network Video Recording Software RM-Lite<br />
Administrator Manual<br />
This document gives a detailed explanation of how to<br />
use RM-Lite.<br />
Network Video Recording Software RM-Lite<br />
Viewer <strong>Operation</strong> <strong>Guide</strong><br />
This is the operation guide for RM-Lite Viewer. For more<br />
details on operating procedures for the viewer, see the<br />
Administrator Manual.<br />
How to use this <strong>Operation</strong> <strong>Guide</strong><br />
The assumed reading format of this user manual is on a<br />
PC screen.<br />
Software Screenshots<br />
The software screenshots shown in these user manuals<br />
are illustrative samples only. The screenshots may differ<br />
from the actual screens displayed.<br />
Screenshots used with the explanations are generally<br />
from a Windows 7 PC connected to the <strong>VB</strong>-<strong>H41</strong>.<br />
Symbol<br />
Warning<br />
Caution<br />
Caution<br />
Important<br />
Note<br />
Meaning<br />
Failure to follow the instructions<br />
accompanied by this symbol may result<br />
in death or serious injury. Be sure to<br />
observe these warnings to ensure<br />
safety.<br />
Failure to follow the instructions<br />
accompanied by this symbol may result<br />
in injury. Be sure to observe these<br />
precautions to ensure safety.<br />
Failure to follow the instructions<br />
accompanied by this symbol may result<br />
in property damage. Be sure to observe<br />
these precautions.<br />
This symbol indicates other actions or<br />
information that should be noted.<br />
Important notes and restrictions are<br />
provided. Be sure to read this section.<br />
Contains operational reference<br />
information or additional explanations.<br />
5
Safety Precautions<br />
The following items must be observed when using the camera.<br />
If they are not observed, injury, death and/or property damage may occur. Read the following information carefully and<br />
observe the instructions without fail.<br />
Important Warnings<br />
Caution<br />
TO REDUCE THE RISK OF ELECTRIC SHOCK, DO<br />
NOT REMOVE COVER (OR BACK).<br />
NO USER-SERVICEABLE PARTS INSIDE. REFER<br />
SERVICING TO QUALIFIED SERVICE PERSONNEL.<br />
The AC adapter (sold separately) can be connected to<br />
the camera from a standard AC power outlet.<br />
Please check your instruction manual to make sure that<br />
your camera is compatible with this adapter.<br />
• The socket-outlet should be installed near the<br />
equipment and should be easily accessible.<br />
• Unplug the equipment from the wall outlet before<br />
cleaning or maintaining.<br />
FDA regulation<br />
This Network Camera has not been evaluated by the<br />
Food and Drug Administration (FDA) for use as a<br />
medical device. When incorporated into a system with<br />
medical applications, FDA regulations may apply.<br />
Therefore, please consult your legal advisor to<br />
determine whether FDA regulations apply.<br />
FCC NOTICE<br />
Network Camera, Model Name: <strong>VB</strong>-<strong>H41</strong>/<strong>VB</strong>-H610VE/<br />
<strong>VB</strong>-H610D/<strong>VB</strong>-H710F<br />
This device complies with Part 15 of the FCC Rules.<br />
<strong>Operation</strong> is subject to the following two conditions: (1)<br />
This device may not cause harmful interference, and (2)<br />
this device must accept any interference received,<br />
including interference that may cause undesired<br />
operation.<br />
Note: This equipment has been tested and found to<br />
comply with the limits for a Class B digital device,<br />
pursuant to Part 15 of the FCC Rules. These limits are<br />
designed to provide reasonable protection against<br />
harmful interference in a residential installation.<br />
This equipment generates, uses and can radiate radio<br />
frequency energy and, if not installed and used in<br />
accordance with the instructions, may cause harmful<br />
interference to radio communications.<br />
However, there is no guarantee that interference will not<br />
occur in a particular installation. If this equipment does<br />
cause harmful interference to radio or television<br />
reception, which can be determined by turning the<br />
equipment off and on, the user is encouraged to try to<br />
correct the interference by one or more of the following<br />
measures:<br />
• Reorient or relocate the receiving antenna.<br />
• Increase the separation between the equipment and<br />
receiver.<br />
• Connect the equipment to an outlet on a circuit<br />
different from that to which the receiver is connected.<br />
• Consult the dealer or an experienced radio/TV<br />
technician for help.<br />
Do not make any changes or modifications to the<br />
equipment unless otherwise specified in the manual. If<br />
such changes or modifications should be made, you<br />
could be required to stop operation of the equipment.<br />
<strong>Canon</strong> U.S.A., Inc.<br />
One <strong>Canon</strong> Park, Melville, New York 11747, U.S.A.<br />
Tel No. 1-800-OK-CANON (1-800-652-2666)<br />
Canadian Radio Interference Regulations<br />
This Class B digital apparatus complies with Canadian<br />
ICES-003.<br />
6
Safety Precautions<br />
Precautions for Use<br />
Warning<br />
• If you discover defective conditions such as smoke,<br />
strange sounds, heat or strange odors, immediately<br />
stop using the camera and contact your nearest<br />
dealer.<br />
Continued use of the product may cause fire or electric<br />
shock.<br />
• Do not disassemble or modify the camera.<br />
• Do not spill water or other liquid inside the camera,<br />
spray the camera with water, or otherwise make it wet.<br />
• Do not insert foreign objects into the camera.<br />
• Do not use flammable sprays near the camera.<br />
• Do not leave LAN cables, external power supplies or<br />
AC adapter (sold separately) power connectors<br />
connected when the camera is not in use for long<br />
periods.<br />
• Do not damage the connecting cable.<br />
This may cause fire or electric shock.<br />
• Do not use with medical devices or other life-support<br />
systems.<br />
Precautions for Use of Built-In Camera Functions and<br />
Included Software<br />
Caution<br />
• Do not use the built-in camera functions or included<br />
software listed below in cases requiring a high level of<br />
reliability:<br />
– Intelligent functions<br />
– Image Stabilizer<br />
– Network video recording software RM-Lite<br />
These features do not guarantee high-precision capture<br />
and cannot support applications beyond their intended<br />
range of use. <strong>Canon</strong> will assume no liability for any<br />
accident or damage resulting from the use of these<br />
functions.<br />
Notes on Cleaning<br />
Warning<br />
• Do not use alcohol, thinner, benzine or any other<br />
flammable solvent.<br />
This may cause fire or electric shock.<br />
Depending on the PC and network environment, highprecision<br />
video transmission cannot be guaranteed due<br />
to video delay or loss.<br />
<strong>Canon</strong> will assume no liability for any accident or<br />
damage resulting from use of the camera in the<br />
aforementioned devices or systems.<br />
Caution<br />
• Do not capture the sun, halogen lamps, and other very<br />
bright light sources or subjects.<br />
• Do not expose the camera to strong impact or<br />
vibration.<br />
• Do not carry the network camera by the<br />
camera head.<br />
• Do not forcibly turn the rotating parts of the<br />
camera by hand.<br />
This may cause malfunction.<br />
This installation should be made by a qualified service<br />
person and should conform to all local codes.<br />
Precautions for Use of the Camera Angle Setting Tool<br />
Caution<br />
• The Camera Angle Setting Tool is intended for use<br />
during camera installation. Do not use on a daily<br />
basis.<br />
This may cause malfunction.<br />
7
Maintenance<br />
Turn off the power before cleaning the camera.<br />
• Cleaning of Exterior<br />
1 Dampen a soft cloth with water or diluted neutral<br />
detergent and wipe away the grime gently.<br />
2 Wipe with a dry cloth.<br />
• Cleaning of Lens<br />
Use a commercial lens cleaner to remove grime on the<br />
lens surface.<br />
• Auto focus may not work properly if the lens<br />
surface is dusty or dirty.<br />
• Be aware that scratches on the lens surface may result<br />
in poor image capture.<br />
• Maintenance for Ceiling Mount Cover<br />
(dedicated accessory for <strong>VB</strong>-<strong>H41</strong>/<strong>VB</strong>-M40) or<br />
Recessed Mounting Kit (dedicated accessory<br />
for <strong>VB</strong>-H610VE/<strong>VB</strong>-H610D/<strong>VB</strong>-M600VE/<br />
<strong>VB</strong>-M600D)<br />
Periodically check the brackets and screws for rust and<br />
loosening to prevent injuries and equipment damage due<br />
to falling items.<br />
For inspections, please contact the dealer where you<br />
purchased the product.<br />
Disposing of the Camera<br />
Dispose of the camera in accordance with local laws and<br />
regulations.<br />
• Cleaning of Front Cover, Dome Case, or<br />
Dome Housing<br />
Grime on any of the parts listed below will reduce image<br />
quality, so periodic cleaning is required.<br />
Dome (when using the separately sold indoor<br />
dome housing)<br />
Dome case<br />
Front cover<br />
If the surface of the above part cannot be cleaned well,<br />
remove it following the steps below to clean it more<br />
thoroughly.<br />
1 Remove the front cover, dome case, or dome.<br />
See steps in “Installing the Camera” in the “Installation<br />
<strong>Guide</strong>” included with the indoor dome housing and<br />
remove the dome.<br />
See steps in “Installing the Camera” in the “Installation<br />
<strong>Guide</strong>” included with the camera to remove the dome<br />
case.<br />
See “Using Camera Housing” in the “Installation <strong>Guide</strong>”<br />
included with the camera to remove the front cover.<br />
2 Dampen a soft cloth with water or diluted neutral<br />
detergent and wipe away the grime gently.<br />
3 Wipe with a dry cloth.<br />
4 Reattach the front cover, dome case or dome to its<br />
original position.<br />
Periodically check the brackets and screws for rust and<br />
loosening to prevent injuries and equipment damage due<br />
to falling items.<br />
For inspections, please contact the dealer where you<br />
purchased the product.<br />
8
Table of Contents<br />
Introduction .................................................................................................................. 2<br />
Disclaimer ............................................................................................................................... 2<br />
Notes on Network Security...................................................................................................... 2<br />
Copyright................................................................................................................................. 2<br />
Notes on Privacy and Publicity Rights Regarding the Use of Video/Audio ............................ 2<br />
Trademark Notice.................................................................................................................... 3<br />
Notes on the Included Software RM-Lite (Disclaimer) ........................................................... 3<br />
Notes on License Agreement for Included Software .............................................................. 3<br />
Only for European Union and EEA (Norway, Iceland and Liechtenstein)............................... 3<br />
Open Source Software ............................................................................................................4<br />
Security Export Control ........................................................................................................... 4<br />
How to Read This <strong>Operation</strong> <strong>Guide</strong>............................................................................. 5<br />
User Manuals .......................................................................................................................... 5<br />
How to use this <strong>Operation</strong> <strong>Guide</strong> ............................................................................................ 5<br />
Icons Indicating Particular Camera Models............................................................................ 5<br />
Symbols Indicating Safety Precautions................................................................................... 5<br />
Safety Precautions....................................................................................................... 6<br />
Maintenance............................................................................................................................ 8<br />
Disposing of the Camera ........................................................................................................ 8<br />
Chapter 1<br />
Before Use<br />
Features..................................................................................................................... 14<br />
Common Features.................................................................................................................14<br />
<strong>VB</strong>-<strong>H41</strong> Features ................................................................................................................... 14<br />
<strong>VB</strong>-H610VE/<strong>VB</strong>-H610D/<strong>VB</strong>-H710F Features ......................................................................... 14<br />
Camera Software....................................................................................................... 16<br />
Installed Software.................................................................................................................. 16<br />
Included Software ................................................................................................................. 16<br />
Network Video Recording Software (Sold Separately) ......................................................... 16<br />
RM-Lite (See the “Administrator Manual”) ............................................................................ 18<br />
Operating Environment.............................................................................................. 19<br />
<strong>VB</strong> Initial Setting Tool, Camera Angle Setting Tool, <strong>VB</strong>-<strong>H41</strong>/610/710 Viewer,<br />
Admin Tools...................................................................................................................... 19<br />
RM-Lite .................................................................................................................................. 19<br />
Notes on Operating Environment .............................................................................. 20<br />
Notes on Use When the [Windows Firewall] Function is Enabled ........................................ 20<br />
Notes on Use with Internet Explorer 9 or Greater and Windows Server 2003/<br />
Windows Server 2008/Windows Server 2012................................................................... 20<br />
Notes on Use with Windows Server 2008/Windows Server 2012 ......................................... 21<br />
Notes on Use with Windows Vista/Windows 7/Windows 8/Windows Server 2008/<br />
Windows Server 2012....................................................................................................... 22<br />
Notes for Windows 8/Windows Server 2012 ......................................................................... 22<br />
9
Chapter 2<br />
Chapter 3<br />
Chapter 4<br />
Chapter 5<br />
Initial Settings<br />
Preparing the Camera for Use................................................................................... 24<br />
Installing the Necessary Software ............................................................................. 26<br />
Notes on Use with Internet Explorer 9 or Greater and Windows Server 2003/<br />
Windows Server 2008/Windows Server 2012................................................................... 27<br />
Performing Initial Settings for the Camera................................................................. 28<br />
Checking the Camera Image ..................................................................................... 29<br />
Camera Angle Setting Tool<br />
Setting the Camera Angle.......................................................................................... 32<br />
Launching the Camera Angle Setting Tool ........................................................................... 32<br />
Connecting to the Camera .................................................................................................... 32<br />
Connecting with a Camera List ............................................................................................. 33<br />
Disconnecting from the Camera, Shutting Down.................................................................. 35<br />
Display Screen of Camera Angle Setting Tool...................................................................... 36<br />
Setting the Camera Angle ..................................................................................................... 37<br />
Setting Focus and Exposure Compensation......................................................................... 38<br />
Creating a Camera Specification File ........................................................................ 39<br />
Top Page of the Camera<br />
Accessing the Top Page of the Camera .................................................................... 42<br />
Accessing the Top Page of the Camera ............................................................................... 42<br />
User Authentication............................................................................................................... 42<br />
Setting Page<br />
Setting Menu.............................................................................................................. 44<br />
Accessing the Setting Menu ...................................................................................... 45<br />
Setting Menu ......................................................................................................................... 45<br />
Items Common to All Setting Pages...................................................................................... 45<br />
[Network] Setting Administrator Password, LAN, IP Address, DNS, etc ................... 47<br />
[Date and Time] Setting Date and Time .................................................................... 50<br />
[Camera] Setting Initial Camera Settings and External Device Name....................... 51<br />
[Video] Setting Video Size, Quality and Frame Rate ................................................. 55<br />
[RTP] RTP Server, Audio Multicast and RTP Streaming........................................... 57<br />
[Upload] Setting HTTP/FTP Upload and E-mail Notification...................................... 59<br />
[Server] Setting the Video Server, Audio Server and HTTP Server .......................... 62<br />
[Event] Setting Video Record, Volume Detection, Audio Playback and Timer .......... 64<br />
[Access Control] Setting User Access Privileges....................................................... 68<br />
[IPsec] Setting IPsec.................................................................................................. 70<br />
[SSL/TLS] Setting HTTP Communication Encryption................................................ 73<br />
[Memory Card] SD Memory Card <strong>Operation</strong>s and Settings....................................... 75<br />
[Reboot Item] Setting Items Requiring Rebooting ..................................................... 78<br />
10
Table of Contents<br />
[Maintenance] Viewing Event Logs and Current Settings and Performing<br />
Maintenance......................................................................................................... 79<br />
Chapter 6<br />
Admin Tools<br />
Admin Tools Overview............................................................................................... 82<br />
Admin Tools ......................................................................................................................... 82<br />
Privacy Mask Setting Tool .................................................................................................... 82<br />
Panorama Creation Tool ....................................................................................................... 82<br />
View Restriction Setting Tool ................................................................................................ 82<br />
Preset Setting Tool ............................................................................................................... 83<br />
Intelligent Function Setting Tool ........................................................................................... 83<br />
Log Viewer ........................................................................................................................... 83<br />
Recorded Video Utility ......................................................................................................... 83<br />
Accessing the Admin Tools ....................................................................................... 84<br />
Launching the Admin Tools .................................................................................................. 84<br />
Privacy Mask Setting Tool ......................................................................................... 85<br />
Display Screen of Privacy Mask Setting Tool........................................................................ 85<br />
Setting the Privacy Mask Area .............................................................................................. 86<br />
Changing/Deleting a Privacy Mask Area .............................................................................. 88<br />
Panorama Creation Tool............................................................................................ 89<br />
Display Screens of Panorama Creation Tool ........................................................................ 90<br />
Capturing a Panorama Image............................................................................................... 90<br />
Saving/Deleting a Panorama Image on the Camera............................................................. 91<br />
Saving a Panorama Image as Image Files/Opening from Image Files................................. 91<br />
View Restriction Setting Tool..................................................................................... 92<br />
Display Screens of View Restriction Setting Tool.................................................................. 93<br />
Setting View Restrictions.......................................................................................................94<br />
Preset Setting Tool .................................................................................................... 96<br />
Display Screens of Preset Setting Tool ................................................................................. 97<br />
Setting the Preset .................................................................................................................. 98<br />
Preset Tour .......................................................................................................................... 101<br />
Intelligent Function Setting Tool .............................................................................. 103<br />
Display Screen of Intelligent Function Setting Tool............................................................. 106<br />
Flow of Intelligent Function Setting ..................................................................................... 107<br />
Setting Intelligent Function Detection Settings ................................................................... 109<br />
Log Viewer............................................................................................................... 115<br />
Display Screens of Log Viewer ........................................................................................... 115<br />
Downloading Log Files........................................................................................................ 116<br />
How to View Logs................................................................................................................116<br />
Recorded Video Utility ............................................................................................. 118<br />
Display Screens of Recorded Video Utility ......................................................................... 118<br />
Confirming Recorded Video................................................................................................ 119<br />
Narrowing Down the Number of Videos.............................................................................. 119<br />
Downloading Video ............................................................................................................. 120<br />
Exporting to Video Files That Can Be Played Back ............................................................ 120<br />
Playing Back Videos ........................................................................................................... 120<br />
11
Deleting Videos ................................................................................................................... 121<br />
Displaying SD Memory Card Information............................................................................ 121<br />
Control for Admin .................................................................................................... 122<br />
Using Control for Admin...................................................................................................... 122<br />
Chapter 7<br />
Chapter 8<br />
Admin Viewer/<strong>VB</strong> Viewer<br />
Overview of Viewer.................................................................................................. 124<br />
Major Differences Between the Admin Viewer and the <strong>VB</strong> Viewer ..................................... 124<br />
User Authorities and Camera Control Privileges................................................................. 124<br />
Launching the Viewer .............................................................................................. 127<br />
Launching the Viewer.......................................................................................................... 127<br />
Shutting Down the Viewer ................................................................................................... 127<br />
Connecting from Admin Tools............................................................................................. 127<br />
How to Operate the Viewer...................................................................................... 128<br />
Display Screens of Admin Viewer ....................................................................................... 128<br />
<strong>VB</strong> Viewer ............................................................................................................................ 129<br />
Obtaining Camera Control Privileges.................................................................................. 130<br />
Controlling the Camera ....................................................................................................... 131<br />
Cropping and Displaying Part of an Image (Digital PTZ) .................................................. 132<br />
Setting Video and Audio ..................................................................................................... 134<br />
Checking Information .......................................................................................................... 135<br />
Performing <strong>Operation</strong>s and Settings in the Admin Viewer....................................... 137<br />
Transmitting Audio ..............................................................................................................137<br />
Magnifying Part of the Image (Viewer PTZ) ........................................................................ 137<br />
Using Control for Admin...................................................................................................... 138<br />
Displaying Event Status ...................................................................................................... 143<br />
Recording to an SD Memory Card Manually ...................................................................... 144<br />
Appendix<br />
SD Memory Card Access ........................................................................................ 146<br />
Modifiers .................................................................................................................. 148<br />
Troubleshooting ....................................................................................................... 150<br />
List of Log Messages............................................................................................... 152<br />
Log Messages on the Camera............................................................................................ 152<br />
List of Viewer Messages.......................................................................................... 162<br />
Messages Displayed in the Information Field ..................................................................... 162<br />
Restore Default Settings.......................................................................................... 164<br />
Restoring the Initial Setting from the Maintenance Page in the Web Browser.................... 164<br />
Restoring Factory Default Settings with the Reset Switch on the Camera.......................... 164<br />
List of Factory Default Settings................................................................................ 166<br />
Index ........................................................................................................................ 173<br />
12
Chapter 1<br />
Before Use<br />
❏ Camera Features<br />
❏ Software Information<br />
❏ Operating Environment and Precautions
Features<br />
This camera integrates both camera and server functions into a compact network camera.<br />
Common Features<br />
Full HD (1920 x 1080) Support<br />
Transmission Performance<br />
Low Illumination Image Capture<br />
Equipped with a 2.1 megapixel CMOS sensor, the camera supports high-quality video<br />
monitoring.<br />
The camera supports two video compression formats (JPEG and H.264* 1 ) and is capable<br />
of transmitting 1920 x1080 resolution video in high quality at a high frame rate of up to 30<br />
frames per second* 2 . JPEG permits simultaneous transmission to a total of 30 clients while<br />
H.264 can transmit to up to 10 clients simultaneously.<br />
The camera can capture color images even with low subject illumination.<br />
SD/SDHC/SDXC Memory Card Support* 3 You can record video and logs when uploading fails, and record video as JPEG or H.264<br />
files to memory cards (manual, timer, and event recording are supported). Recorded Video<br />
Utility in Admin Tools allows you to search and play back recorded video.<br />
Intelligent Functions<br />
Small-Scale Video Monitoring via RM-Lite<br />
Software (Supplied)<br />
The camera boasts a variety of intelligent functions that offer the wide array of detection options.<br />
Moving object detection, abandoned object detection, removed object detection,<br />
tempering detection, passing detection, volume detection.<br />
By using the supplied network video recording software, RM-Lite, you can record and<br />
display live images from up to four cameras.<br />
*1 Viewing H.264 video requires the included RM-Lite Viewer. The viewers included in the camera (<strong>VB</strong> Viewer and Admin<br />
Viewer) do not have this capability.<br />
*2 The actual frame rate may drop depending on the performance of the PC running the Viewer, the number of clients<br />
connected at the same time, network load, and other factors.<br />
*3 In the “<strong>Operation</strong> <strong>Guide</strong>”, the memory card that can be used with the camera is referred to as “SD memory card”.<br />
<strong>VB</strong>-<strong>H41</strong> Features<br />
20x Optical Zoom Lens The camera is equipped with a 20x optical (12x digital) zoom lens with a maximum 60.4°<br />
angle of view and auto focus support.<br />
Pan/Tilt Functions<br />
You can operate camera angle controls remotely.<br />
<strong>VB</strong>-H610VE/<strong>VB</strong>-H610D/<strong>VB</strong>-H710F Features<br />
3x Optical Zoom Lens<br />
Camera Angle Setting Tool<br />
Shock Resistant Structure (<strong>VB</strong>-H610VE<br />
only)<br />
The camera is equipped with a 3x motorized optical zoom lens.<br />
You can make adjustments to the camera angle while viewing video on a PC for hassle-free<br />
angle adjustment during installation.<br />
Pan, tilt, rotation, zoom, and focus settings are possible.<br />
Zoom and focus settings are possible.<br />
The camera is built with a shock absorbing mechanism and an exterior casing made of 3.5<br />
mm-thick (0.14 inch-thick) polycarbonate resin and aluminum alloy. The camera's dome<br />
case also uses special screws that cannot be easily removed.<br />
* The features described above do not guarantee that the product will be undamaged if<br />
subjected to an impact, nor that the product is tamper-proof or tamper-resistant.<br />
14
Features<br />
1<br />
Dustproof and Waterproof Mechanisms<br />
(<strong>VB</strong>-H610VE only)<br />
The camera complies with the demanding IP66 dustproof/waterproof specifications and<br />
can be installed outdoors, such as underneath eaves, without any housing. The separately<br />
sold genuine heater lets you use the camera in low-temperature environments as cold as -<br />
30°C (-22°F).<br />
Before Use<br />
15
Camera Software<br />
Installed Software<br />
• <strong>VB</strong>-<strong>H41</strong>/610/710 Viewer<br />
(See Chapter 7 “Admin Viewer/<strong>VB</strong> Viewer”)<br />
There are two types of Viewer: the <strong>VB</strong> Viewer, which can<br />
be used by Guest Users, and the Admin Viewer for<br />
Administrators.<br />
The <strong>VB</strong> Viewer allows users to configure basic camera<br />
controls and display images.<br />
The Admin Viewer lets you monitor all camera controls<br />
and events.<br />
Only JPEG images are displayed. To display H.264 video,<br />
install the RM-Lite Viewer (p. 18).<br />
• Admin Tools (See Chapter 6 “Admin Tools”)<br />
The following tools for configuring camera settings and<br />
performing management functions are available:<br />
• Privacy Mask Setting Tool<br />
• Panorama Creation Tool<br />
• View Restriction Setting Tool<br />
• Preset Setting Tool<br />
• Intelligent Function Setting Tool<br />
• Log Viewer<br />
• Recorded Video Utility<br />
Included Software<br />
The included Setup CD-ROM contains the following<br />
software. Install the software on a PC to use it.<br />
• <strong>VB</strong> Initial Setting Tool<br />
(See Chapter 2 “Initial Settings”)<br />
This tool performs initial settings for the camera.<br />
• Admin Tools Certificate<br />
This electronic certificate is required to use the Admin<br />
Viewer and Admin Tools.<br />
• Camera Angle Setting Tool<br />
(See Chapter 3 “Camera Angle Setting Tool”)<br />
With this tool, you can operate the camera during<br />
installation while you view video over the network on a PC.<br />
• .NET Framework 3.5 SP1/.NET Framework<br />
4.5<br />
This execution environment is required to use the software<br />
included in the camera.<br />
• RM-Lite (p. 18)<br />
This software displays and records images from up to four<br />
cameras in real time.<br />
• Proxy Authentication Admin Viewer/Admin<br />
Tools<br />
This software lets you use Admin Viewer/Admin Tools via<br />
a proxy server with proxy authentication. It is saved in the<br />
ProxyAuthSupport folder on the Setup CD-ROM.<br />
• Backup and Restore Tools<br />
The Backup and Restore tools back up camera setting<br />
information to the PC. Information from multiple cameras<br />
can be saved at the same time.<br />
The tools can also restore information saved on the PC to<br />
the camera.<br />
• Memory Card Unmount Tool<br />
This software allows you to mount/unmount memory cards<br />
inserted in specified cameras, and acquire information<br />
from memory cards.<br />
Network Video Recording Software (Sold<br />
Separately)<br />
• RM-64/RM-25/RM-9<br />
This software allows network cameras to be used for<br />
multipoint surveillance, and for recording and playing<br />
back videos from the camera. The number of cameras<br />
16
that can be registered with RM-64/RM-25/RM-9 varies: 64,<br />
25, or 9 cameras can be registered.<br />
• RM-V<br />
This additional license lets you install RM-64/RM-25/RM-9<br />
Viewer on multiple computers. Purchase the license to be<br />
able to view images captured by the camera from multiple<br />
sites and for other similar purposes.<br />
Camera Software<br />
1<br />
Before Use<br />
• RM-Lite-V<br />
This additional license lets you install the RM-Lite Viewer<br />
on multiple computers. Purchase the license to be able to<br />
view images captured by the camera from multiple sites<br />
and for other similar purposes.<br />
17
RM-Lite (See the “Administrator Manual”)<br />
The installer (RMLiteInstall.exe) can be found in the Applications folder on the Setup CD-ROM.<br />
RM-Lite Software Configuration<br />
Type Overview License<br />
RM-Lite Storage Server Up to four cameras can be registered to record video. 1 license<br />
RM-Lite Viewer<br />
Plays recorded video saved in the storage server and displays live<br />
images (JPEG/H.264) captured by the camera.<br />
Up to four cameras can be registered for the viewer.<br />
1 license<br />
RM-Lite Viewer<br />
RM-Lite Storage Server<br />
Network<br />
Flow of Video from the Camera<br />
Flow of Recorded Video<br />
Supported cameras<br />
<strong>VB</strong>-S30D, <strong>VB</strong>-S31D, <strong>VB</strong>-S800D, <strong>VB</strong>-S900F, <strong>VB</strong>-<strong>H41</strong>, <strong>VB</strong>-H610VE, <strong>VB</strong>-H610D, <strong>VB</strong>-H710F, <strong>VB</strong>-<br />
M40, <strong>VB</strong>-M600VE, <strong>VB</strong>-M600D, <strong>VB</strong>-M700F, <strong>VB</strong>-C60, <strong>VB</strong>-C500VD/<strong>VB</strong>-C500D, <strong>VB</strong>-C300,<br />
<strong>VB</strong>-C50i/<strong>VB</strong>-C50iR, <strong>VB</strong>-C50FSi/<strong>VB</strong>-C50Fi<br />
Important<br />
• To add the RM-Lite Viewer, purchase RM-Lite-V (sold separately).<br />
• The <strong>VB</strong>-S30D/<strong>VB</strong>-S31D/<strong>VB</strong>-S800D/<strong>VB</strong>-S900F/<strong>VB</strong>-<strong>H41</strong>/<strong>VB</strong>-H610VE/<strong>VB</strong>-H610D/<strong>VB</strong>-H710F/<strong>VB</strong>-M40/<strong>VB</strong>-M600VE/<strong>VB</strong>-M600D/<strong>VB</strong>-M700F<br />
cannot be used with Network Video Recording Software older than RM-Lite. Users of VK-64/VK-16 must switch to RM-Lite.<br />
For details, visit our website.<br />
Note<br />
For details on the usage and functions of RM-Lite, see the “Administrator Manual”.<br />
18
1<br />
Operating Environment<br />
For the latest information on this product (firmware and included software, user manuals, operating environment, etc.),<br />
please refer to the <strong>Canon</strong> Web Site.<br />
Before Use<br />
<strong>VB</strong> Initial Setting Tool, Camera Angle Setting Tool, <strong>VB</strong>-<strong>H41</strong>/610/710 Viewer, Admin Tools<br />
CPU Intel Core i7-2600<br />
Windows XP Home/Professional SP3 32-bit<br />
Windows Server 2003 Standard SP2 32-bit<br />
Windows Server 2003 R2 Standard SP2 32-bit<br />
Windows Vista Ultimate/Business/Enterprise/Home Premium SP2 32/64-bit<br />
Operating Systems * 1<br />
Windows 7 Ultimate/Professional/Enterprise/Home Premium SP1 32/64-bit<br />
Windows 8/Windows 8 Pro/Windows 8 Enterprise 32/64-bit<br />
Windows Server 2008 Standard SP2 32/64-bit<br />
Windows Server 2008 R2 Standard SP1 64-bit<br />
Windows Server 2012 Standard 64-bit<br />
Web Browser Internet Explorer 7/8/9/10 32-bit * 2<br />
Memory<br />
Viewer Display<br />
2 GB or more<br />
1920 x 1080 or higher<br />
.NET Framework 3.5 SP1 (When using Internet Explorer 7/8/9)<br />
– Must be installed on Windows XP, Windows Vista, Windows Server 2003 and Windows<br />
Software * 3 Server 2008 systems<br />
Audio<br />
.NET Framework 4.5 (When using Internet Explorer 10)<br />
– Must be installed on Windows 7 and Windows Server 2008 R2 systems<br />
When using the camera's audio feature, the PC audio support feature is required.<br />
*1 Set the Control Panel’s font size (DPI) for Admin Tools and Admin Viewer to 100% or 125%.<br />
*2 The browser must support JavaScript, XAML browser applications, and I Frame.<br />
The <strong>VB</strong> Viewer requires cookies.<br />
*3 Installation is unnecessary if only <strong>VB</strong> Viewer will be used. .NET Framework 3.5 SP1 and 4.5 are provided on the included<br />
setup CD-ROM, and the appropriate version is selected automatically depending on the version of Internet Explorer.<br />
RM-Lite<br />
For operating environment details, refer to “Operating Environment” in the “Administrator Manual”.<br />
19
Notes on Operating Environment<br />
Notes on Use When the [Windows<br />
Firewall] Function is Enabled<br />
3<br />
Select [<strong>VB</strong> Initial Setting Tool], and then click [Add].<br />
When the <strong>VB</strong> Initial Setting Tool is started, the [Windows<br />
Security Alert] dialog box may appear.<br />
If the [Windows Security Alert] dialog box appears, click<br />
[Unblock].<br />
Once this button is clicked, the warning dialog box will no<br />
longer appear.<br />
If the [Windows Security Alert] dialog box does not appear,<br />
the Windows firewall warning function may be disabled.<br />
Follow the procedure below to add the [<strong>VB</strong> Initial Setting<br />
Tool] as a Windows Firewall exception.<br />
1<br />
Click [Windows Firewall] in [Control Panel] > [System<br />
and Security].<br />
Notes on Use with Internet Explorer 9 or<br />
Greater and Windows Server 2003/<br />
Windows Server 2008/Windows Server<br />
2012<br />
2<br />
Click [Allow a program or feature through Windows<br />
Firewall] > [Change settings] > [Allow another<br />
program].<br />
• Registering the Top Page of the Camera as a<br />
Trusted Site<br />
In Internet Explorer 9 or greater and Windows Server 2003/<br />
Windows Server 2008/Windows Server 2012, the security<br />
level for Internet sites and intranet sites on Internet Explorer<br />
is set to [High] by default.<br />
Thus, when accessing the <strong>VB</strong>-<strong>H41</strong>/610/710 Viewer, the<br />
camera's Setting Page or the Admin Tools, a content block<br />
dialog box appears and the page fails to display correctly.<br />
To correct this problem, follow the procedure below to<br />
register the top page as a trusted site.<br />
1<br />
Access the <strong>VB</strong>-<strong>H41</strong>/610/710 Viewer and the Setting Page<br />
from the top page of the camera with Internet Explorer.<br />
The following dialog box appears.<br />
2<br />
Click [Add].<br />
The [Trusted sites] dialog box appears.<br />
20
3<br />
If selected, clear the [Require server verification (https:) for<br />
all sites in this zone] checkbox.<br />
Notes on Operating Environment<br />
Notes on Use with Windows Server 2008/<br />
Windows Server 2012<br />
1<br />
Before Use<br />
• Registering “about:internet” and the<br />
Camera Host Name<br />
Admin Viewer and Admin Tools will not start when IE ESC<br />
(Internet Explorer Enhanced Security Configuration) is<br />
enabled in Windows Server 2008/Windows Server 2012.<br />
Before using the tools, register “about:internet” and the<br />
host name for the connected camera in the Internet<br />
Explorer “local intranet” and “trusted sites” lists.<br />
4<br />
Enter the IP address of the camera under [Add this<br />
Web site to the zone], and then click [Add].<br />
Note that even when the content block dialog box does<br />
not appear, JavaScript is sometimes disabled under the<br />
standard security settings, which may limit operations on<br />
the setting page and the <strong>VB</strong>-<strong>H41</strong>/610/710 Viewer.<br />
Register the page as a trusted site as this automatically<br />
enables JavaScript settings.<br />
If the content block dialog box does not appear, follow the<br />
procedure below to display the [Trusted Sites] dialog box.<br />
1<br />
Click [Tools] > [Internet Options] from the Internet<br />
Explorer menu to display the [Internet Options] dialog<br />
box.<br />
Important<br />
When “about:internet” is registered, the security level in<br />
Click the [Security] tab.<br />
Windows 7 is the same as when using Internet Explorer. After<br />
2 using the Admin Viewer/Admin Tools, it is recommended that<br />
you remove “about:internet” and the camera name as<br />
necessary and restore the original security level.<br />
3 Click and select [Trusted sites], and then click [Sites].<br />
The [Trusted sites] dialog box appears.<br />
This completes the trusted site registration process.<br />
• Web Browser Security Settings When Using<br />
SSL Connection<br />
When an SSL connection to the camera is made from a<br />
web browser (Internet Explorer 9/10) in Windows Server<br />
2008/Windows Server 2008 R2/Windows Server 2012, the<br />
following operations may display the content block dialog<br />
box and prevent further operation.<br />
• Startup of Admin Tools or Admin Viewer<br />
• Audio reception from <strong>VB</strong> Viewer<br />
This happens when Internet Explorer Enhanced Security<br />
Configuration (IE ESC) is enabled in Internet Explorer 9/<br />
10. Use the procedures below to change this setting.<br />
1<br />
Click [Internet Options] in the [Tools] menu in Internet<br />
Explorer 9/10 and click the [Advanced] tab.<br />
2<br />
Clear the [Do not save encrypted pages to disk]<br />
checkbox in [Security].<br />
21
Important<br />
Note that when IE Enhanced Security Configuration is turned<br />
back on, the [Do not save encrypted pages to disk] checkbox<br />
also becomes enabled.<br />
4<br />
The [Sound] dialog box appears.<br />
Click the [Playback] tab to confirm that an audio device<br />
has been installed. (If no audio device is installed, refer<br />
to your PC manual.)<br />
• Enabling the Sound Function to Use Audio<br />
In Windows Server 2008/Windows Server 2012, the sound<br />
function is disabled by default.<br />
To receive audio with the Viewer, follow the steps below to<br />
enable the sound function.<br />
Notes on Use with Windows Vista/<br />
Windows 7/Windows 8/Windows Server<br />
2008/Windows Server 2012<br />
The following restrictions apply.<br />
1<br />
Open [Control Panel] and click [Hardware].<br />
• RM-Lite<br />
For important information on the RM-Lite operating<br />
environment, see the “Administrator Manual”.<br />
Notes for Windows 8/Windows Server<br />
2012<br />
Each software application, including Admin Viewer and<br />
Admin Tools, can be started from the desktop screen only.<br />
They cannot be started from the Start screen.<br />
Note<br />
If [Control Panel] is in the classic view, double-click [Sound].<br />
2<br />
Click [Sound].<br />
3<br />
When the [Audio Service Not Running] message<br />
appears, click [Yes].<br />
22
Chapter 2<br />
Initial Settings<br />
❏ Preparing the Camera for Use<br />
❏ Initial Setting Tool Installation<br />
❏ Initial Settings
Preparing the Camera for Use<br />
Performing Initial Settings for the Camera<br />
Before installing the camera, read this chapter and use the <strong>VB</strong> Initial Setting Tool to<br />
configure the IP address.<br />
“Installing the Necessary Software” (p. 26)<br />
“Performing Initial Settings for the Camera” (p. 28)<br />
Checking Images<br />
When initial settings are complete, access the camera via a web browser and check the<br />
image using the <strong>VB</strong> Viewer.<br />
“Checking the Camera Image” (p. 29)<br />
▼<br />
▼<br />
Installing the Camera<br />
Install the camera to suit the operating environment it will be used in.<br />
“Installation <strong>Guide</strong>”<br />
Setting the Camera Angle<br />
Use the Camera Angle Setting Tool to set the camera angle via PC operation.<br />
“Installing the Necessary Software” (p. 26)<br />
“Chapter 3 Camera Angle Setting Tool”<br />
Configuring the Camera from the Setting Page<br />
The setting page lets you configure basic camera settings, network operations, user<br />
registration, and access restrictions.<br />
“Chapter 5 Setting Page”<br />
▼<br />
▼<br />
Using Admin Tools<br />
Admin Tools let you set viewing restrictions, make preset settings, and make settings for<br />
using intelligent functions. In addition, you can review logs to check on the camera's<br />
operation status.<br />
“Chapter 6 Admin Tools”<br />
▼<br />
▼<br />
24
Preparing the Camera for Use<br />
Using <strong>VB</strong>-<strong>H41</strong>/610/710 Viewer<br />
The camera's built-in <strong>VB</strong>-<strong>H41</strong>/610/710 Viewer features an Admin Viewer for administrators<br />
and a <strong>VB</strong> Viewer for guest users. Use the <strong>VB</strong> viewer to check distribution to guest users<br />
and Admin Viewer to check all operations.<br />
“Chapter 7 Admin Viewer/<strong>VB</strong> Viewer”<br />
Operating<br />
If an error message appears or the camera fails to operate correctly, see the error<br />
message and log message information in “Chapter 8 Appendix”.<br />
“Chapter 8 Appendix”<br />
▼<br />
2<br />
Initial Settings<br />
Important<br />
Before starting operations, make sure that the setting page and Admin Tools settings are functioning correctly.<br />
25
Installing the Necessary Software<br />
Install the following software to perform initial settings for the camera.<br />
• <strong>VB</strong> Initial Setting Tool: Software required for performing initial camera settings<br />
• Admin Tools Certificate: An electronic certificate that is required for using Admin Viewer and Admin Tools<br />
• Camera Angle Setting Tool: Software to use for camera angle adjustments when installing the camera<br />
• .NET Framework 3.5 SP1/.NET Framework 4.5: The execution environment required for network camera software (not<br />
required if already installed on the PC)<br />
You can perform either an Easy Installation or a Custom Installation of the software.<br />
Note<br />
• All computer users will be able to use Admin Viewer and Admin Tools if the Admin Tools certificate was installed by the installer.<br />
• Select [Custom Installation] and install only the “Admin Tools Certificate” if you intend to use the Admin Viewer and Admin Tools on a PC<br />
other than the one where the <strong>VB</strong> Initial Setting Tool is installed.<br />
• If you install the software with Easy Installation, the Camera Angle Setting Tool that is not used with <strong>VB</strong>-<strong>H41</strong> is also installed. If you do not<br />
want to install the Camera Angle Setting Tool because you are using only <strong>VB</strong>-<strong>H41</strong> cameras, perform a [Custom Installation] and clear the<br />
checkbox for the Camera Angle Setting Tool.<br />
1<br />
Insert the Setup CD-ROM included in the camera in<br />
the disc drive on the PC.<br />
[Custom Installation]: The user can select and install<br />
desired software.<br />
2<br />
3<br />
After confirming that all other applications have been<br />
closed, click the [Start] menu > [My Computer].<br />
Double-click the CD-ROM icon > [Applications] folder<br />
> [<strong>VB</strong>ToolsInstall.exe].<br />
5<br />
The installation screen appears.<br />
4 Select the installation method.<br />
[Easy Installation]: <strong>VB</strong> Initial Setting Tool, Admin Tools<br />
certificate and Camera Angle Setting Tool are<br />
installed.<br />
6<br />
After selecting [Easy Installation], click [Next] and after<br />
selecting [Custom Installation], select the checkboxes<br />
of the software you want to install and click [Next].<br />
The User License Agreement screen appears.<br />
Read through the user license agreement and click<br />
[Yes] if you accept it.<br />
Installation starts.<br />
26
Installing the Necessary Software<br />
When the installation complete screen appears, click<br />
If selected, clear the [Require server verification (https:) for<br />
7 3<br />
[Exit] or [Reboot].<br />
all sites in this zone] checkbox.<br />
The <strong>VB</strong> Initial Setting Tool and Camera Angle Setting<br />
Tool icons appear on the desktop.<br />
Enter the IP address of the camera under [Add this<br />
4<br />
website to the zone], and then click [Add].<br />
Note that even when the content block dialog box does<br />
Notes on Use with Internet Explorer 9 or<br />
not appear, JavaScript is sometimes disabled under the<br />
standard security settings, which may limit operations on<br />
Greater and Windows Server 2003/<br />
the setting page and the <strong>VB</strong>-<strong>H41</strong>/610/710 Viewer.<br />
Windows Server 2008/Windows Server<br />
Register the page as a trusted site as this automatically<br />
2012<br />
enables JavaScript settings.<br />
If the content block dialog box does not appear, follow the<br />
procedure below to display the [Trusted Sites] dialog box.<br />
• Registering the Top Page of the Camera as a<br />
Click [Tools] > [Internet Options] from the Internet<br />
Trusted Site<br />
1<br />
Explorer menu to display the [Internet Options] dialog<br />
box.<br />
In Internet Explorer 9 or greater and Windows Server 2003/<br />
Windows Server 2008/Windows Server 2012, the security<br />
Click the [Security] tab.<br />
level for Internet sites and intranet sites on Internet Explorer 2<br />
is set to [High] by default.<br />
Thus, when accessing the <strong>VB</strong>-<strong>H41</strong>/610/710 Viewer, the<br />
camera's Setting Page or the Admin Tools, a content block<br />
dialog box appears and the page fails to display correctly.<br />
To correct this problem, follow the procedure below to<br />
register the top page as a trusted site.<br />
Access the <strong>VB</strong>-<strong>H41</strong>/610/710 Viewer and the Setting Page<br />
1<br />
from the top page of the camera with Internet Explorer.<br />
The following dialog box appears.<br />
Click and select [Trusted sites], and then click [Sites].<br />
3<br />
The [Trusted sites] dialog box appears.<br />
This completes the trusted site registration process.<br />
2 Click [Add].<br />
The [Trusted sites] dialog box appears.<br />
2<br />
Initial Settings<br />
27
Performing Initial Settings for the Camera<br />
Use the <strong>VB</strong> Initial Setting Tool to configure the camera<br />
network.<br />
1<br />
2<br />
Connect the camera and PC to the network and turn<br />
on the camera (“Installation <strong>Guide</strong>” > “Connecting the<br />
Camera”).<br />
Launch the <strong>VB</strong> Initial Setting Tool.<br />
To launch the <strong>VB</strong> Initial Setting Tool, double-click the<br />
[<strong>VB</strong> Initial Setting Tool] icon on the desktop.<br />
4<br />
Enter the user name “root” and factory default setting<br />
password “camera”, and then the appropriate IP<br />
address and subnet mask.<br />
To use a setting other than the default gateway<br />
setting, clear the [Enter a default gateway address]<br />
checkbox.<br />
After settings are complete, click [OK].<br />
Setup progress is shown in the window.<br />
The Tool will automatically detect the camera<br />
connected to the network and display the camera's<br />
MAC address, IP address and model name.<br />
The factory setting IP address is set to 192.168.100.1.<br />
The MAC address can be found on the label on the<br />
camera (“Installation <strong>Guide</strong>” > “Part Names”).<br />
Important<br />
• Twenty minutes after the camera is turned on, it will stop<br />
issuing IP address assignments requests and <strong>VB</strong> Initial<br />
Setting Tool detection will be disabled. In such cases, turn<br />
the camera off and on again.<br />
• There may be cautionary information, depending on your<br />
operating environment. Read “Notes on Operating<br />
Environment” (p. 20) before performing initial settings.<br />
• The <strong>VB</strong> Initial Setting Tool cannot be used with cameras that<br />
are behind a router.<br />
3<br />
Select a MAC address, and then click [Initial Setting].<br />
Note<br />
• To ensure security, be sure to change the administrator<br />
password (p. 42).<br />
• Contact your System Administrator for the appropriate IP<br />
address, subnet mask and gateway address.<br />
5<br />
Click [OK].<br />
Important<br />
To obtain an IP address from a DHCP server or set IPv6, first<br />
use the <strong>VB</strong> Initial Setting Tool to temporarily configure an IPv4<br />
static address that can communicate with the PC. Then, in<br />
[Network] on the setting page, change [IPv4 Address Setting<br />
Method] to [Auto (DHCP)] in the [IPv4] area (p. 47).<br />
Alternatively, set [IPv6].<br />
Click to select<br />
28
Checking the Camera Image<br />
2<br />
Once initial settings are complete, check the image on the<br />
camera with the <strong>VB</strong> Viewer. When doing so, set the PC<br />
network settings to comply with the IP address and<br />
subnet mask settings on the camera.<br />
1<br />
Click to select the camera's MAC address which will be<br />
checked, and then click [Settings].<br />
Initial Settings<br />
Click to select<br />
2<br />
This will launch the web browser and display the top<br />
page of the camera. Click [<strong>VB</strong> Viewer].<br />
The viewer launches and displays the camera image.<br />
If the top page of the camera does not appear or the<br />
<strong>VB</strong> Viewer does not launch, see “Troubleshooting”<br />
(p. 150) in “Chapter 8 Appendix”.<br />
Important<br />
• The camera image cannot be checked until the network<br />
settings in the PC are configured for the IP address and<br />
subnet that are set in the camera.<br />
• Do not change the camera HTTP port from 80 if you want to<br />
open the setting page by clicking [Settings]. See “HTTP<br />
Server” (p. 63) for more information on HTTP port settings.<br />
29
30
Chapter 3<br />
Camera Angle Setting<br />
Tool<br />
❏ Camera Angle Setting Method<br />
❏ Creating a Camera Specification File to Manage Multiple Cameras
Setting the Camera Angle<br />
Use the Camera Angle Setting Tool to adjust the camera angle when installing the camera or to change the capture<br />
orientation according to the situation.<br />
You can set pan, tilt, rotation, zoom, focus and exposure compensation.<br />
You can set zoom, focus and exposure compensation.<br />
Important<br />
• The Camera Angle Setting Tool is included for angle adjustment during camera installation only and is not intended for daily use.<br />
Overuse may cause the camera to malfunction.<br />
• After changing settings in the Camera Angle Setting Tool, check the settings in the Setting page and Admin Tools operate as intended.<br />
• The Camera Angle Setting Tool cannot be used via a proxy server.<br />
• Upload functions cannot be used while the Camera Angle Setting Tool is connected.<br />
Launching the Camera Angle Setting Tool<br />
2<br />
Double-click the Camera Angle Setting Tool icon on<br />
1<br />
the desktop to launch the Camera Angle Setting Tool.<br />
Connecting to the Camera<br />
1 Click [Connect] from the [File] menu.<br />
The [Connection settings] dialog box will appear.<br />
Enter each item for the camera to connect to and click<br />
[OK].<br />
[Host Name]<br />
Enter the host name or IP address of the camera (p. 28).<br />
[Administrator User Name]<br />
Enter the administrator user name for the camera<br />
(p. 28).<br />
[Administrator Password]<br />
Enter the administrator password for the camera<br />
(p. 28).<br />
[Enable SSL Communications]<br />
Select this checkbox to connect to the camera using<br />
SSL communications. Normally SSL communications<br />
are not used (factory default setting) (p. 74).<br />
[Port]<br />
Set the HTTP port number to 80, 443 or in the range of<br />
1024 to 65535. Normally [80] (factory default setting)<br />
is used (p. 63).<br />
32
Setting the Camera Angle<br />
3<br />
Click [Yes] at the following message.<br />
Note<br />
When the Camera Angle Setting Tool connects to a camera, the<br />
viewer and recording software connected to the camera<br />
(excluding RTP connections) are disconnected.<br />
A live camera image from the connected camera will<br />
be displayed and the camera angle can be set.<br />
Connecting with a Camera List<br />
When using multiple cameras, the camera connection<br />
information already entered into the camera specification<br />
file can be read into the camera list used by the Camera<br />
Angle Setting Tool. This way you can easily connect to<br />
multiple cameras without having to enter the camera<br />
information for each one. See “Creating a Camera<br />
Specification File” (p. 39) for information on how to create<br />
a camera specification file.<br />
• Loading a Camera Specification File<br />
1<br />
Click [Select Camera] from the [File] menu.<br />
3<br />
Camera Angle Setting Tool<br />
Important<br />
• Access to one camera is restricted to 30 minutes. The<br />
Camera Angle Setting Tool will be disconnected<br />
automatically after 30 minutes. Reconnect if you do not<br />
complete camera angle settings within this time.<br />
• One camera cannot be accessed by the Camera Angle<br />
Setting Tool from multiple PCs at the same time.<br />
2<br />
The [Select Camera] dialog box will appear.<br />
Click [Load camera specification file].<br />
33
3<br />
Select the camera specification file and click [Open].<br />
• Connecting to the Camera<br />
From the camera list, select the camera to connect to and<br />
click [Connect].<br />
The camera specification file will be loaded and<br />
camera names listed will be displayed under [Camera<br />
List].<br />
Camera list<br />
• Connecting to the Next Camera on the List<br />
Click [Next] to disconnect the camera currently<br />
connected and connect to the next camera on the list.<br />
Camera to be<br />
connected next<br />
Note<br />
• The [Select Camera] dialog box will remain open unless the<br />
Camera Angle Setting Tool is shut down or the X at the top<br />
right of the dialog box is clicked.<br />
• The camera list is discarded when the Camera Angle Setting<br />
Tool is shut down. Load the camera specification file the next<br />
time you launch the Camera Angle Setting Tool.<br />
Note<br />
In [Detailed Information], information for the camera selected in<br />
the camera list is displayed.<br />
34
Setting the Camera Angle<br />
Disconnecting from the Camera, Shutting<br />
Down<br />
1<br />
Click [Disconnect] from the [File] menu to disconnect<br />
the currently connected camera.<br />
3<br />
Camera Angle Setting Tool<br />
2<br />
Click [Exit] from the [File] menu to shut down the<br />
Camera Angle Setting Tool.<br />
35
Display Screen of Camera Angle Setting Tool<br />
(6) (2)<br />
(11)<br />
(12)<br />
(13)<br />
(1)<br />
(3)<br />
(4)<br />
(5)<br />
(4)<br />
(5)<br />
(6)<br />
(10)<br />
(14)<br />
(15)<br />
(16)<br />
(17)<br />
(7) (8) (9) (10)<br />
(2)<br />
(1)<br />
(10)<br />
(14)<br />
(15)<br />
(16)<br />
(17)<br />
(8) (9) (10)<br />
(1) Image Display Area<br />
The image captured by the camera is shown.<br />
(2) [Switch Screen Size] button<br />
Switches the display screen size between “480 x 270”<br />
and “960 x 540”. The display screen size can also be<br />
selected from [Display Screen Size] from the [Display]<br />
menu.<br />
(3) Control Assist<br />
Displays dotted lines showing the range of pan<br />
operation and tilt operation. The camera angle cannot<br />
be changed to positions with no dotted lines.<br />
(4) [Pan] button<br />
Control the camera's pan operation.<br />
(5) [Tilt] button<br />
Control the camera's tilt operation.<br />
(6) [Rotation] button<br />
Control the camera's rotation operation.<br />
(7) [Rotation] slider<br />
You can click on the slider or drag the knob to control<br />
the camera's rotation operation.<br />
(8) Optical telephoto end icon<br />
This is displayed when [Enable] is selected for [Digital<br />
Zoom]. Dragging the slider upward above this icon<br />
switches to the digital zoom.<br />
36
Setting the Camera Angle<br />
(9) [Zoom] slider<br />
The slider to operate the zoom ratio.<br />
(10)[Zoom] button<br />
The button to operate the zoom ratio.<br />
(11)[Control Assist Display] selection box<br />
Select whether to [Enable] or [Disable] operation<br />
assist in the image display area.<br />
(12)[Control Button Display] selection box<br />
Select whether to [Enable] or [Disable] the [Pan]<br />
button and [Tilt] button in the image display area.<br />
(13)[Control Assist Correction]<br />
When the orientation of the camera is moved by hand,<br />
the operation assist display will not correspond with<br />
the actual camera angle. In this case, click [Control<br />
Assist Correction] to confirm the actual camera angle<br />
and automatically correct the display position of<br />
operation assist.<br />
<strong>Operation</strong> assist correction takes about 1 minute to<br />
complete.<br />
(14)[Digital Zoom]<br />
Set digital zoom to [Enable] or [Disable]. If you select<br />
[Enable], the digital zoom boundary is displayed for<br />
the zoom slider and the digital zoom operation<br />
becomes possible.<br />
The higher the digital zoom ratio, the lower the image<br />
quality becomes.<br />
(15)[Image Flip] selection box<br />
Select the orientation of the camera image.<br />
If [Enable] is selected, the image will be rotated 180<br />
degrees.<br />
(16)[Focus]<br />
You can control the focus.<br />
(17)[Exposure Compensation] slider<br />
You can control the exposure.<br />
Setting the Camera Angle<br />
You can operate pan, tilt, rotation and zoom<br />
operations to set a desired camera angle.<br />
You can operate zoom operation only.<br />
• Set Using the <strong>Operation</strong> Buttons and Sliders<br />
Click each of the [Pan], [Tilt], [Rotation] buttons to set the<br />
camera angle. Camera angle changes in orientation if the<br />
button is held down, and stops when the button is<br />
released.<br />
Pan (horizontal movement) operation<br />
Tilt (vertical movement) operation<br />
Rotation (angled movement) operation<br />
To set rotation using the [Rotation] slider, drag the slider<br />
and release the mouse button when the subject in the<br />
image is shown at a level angle.<br />
3<br />
Camera Angle Setting Tool<br />
Important<br />
You must set Intelligent Function detection areas, privacy<br />
masks and presets again after changing settings in the Camera<br />
Angle Setting Tool.<br />
<br />
37
• Click the Image to Set Camera Angle<br />
Click the desired position in the image and the camera<br />
angle will move to center that position on the screen.<br />
However, if the position clicked is beyond the range of the<br />
pan or tilt, the camera angle will move only in the pan or<br />
tilt direction that is within the valid range of movement.<br />
Note<br />
• One-shot AF may not focus properly on the following subjects.<br />
Subjects Difficult to Focus On<br />
Note<br />
If the camera moves in a different way from operation control or<br />
cannot be set to the range indicated by operation assist, then<br />
operation assist may not correspond to the actual camera angle.<br />
Click [Control Assist Correction], then try to set the camera angle<br />
again.<br />
• Changing the Camera Zoom Ratio<br />
A white wall or other<br />
subject lacking<br />
bright/dark contrast<br />
A subject consisting<br />
of only slant lines or<br />
horizontal stripes<br />
A slanting<br />
subject<br />
A subject having<br />
no form, such as<br />
flame or smoke<br />
A subject<br />
reflecting<br />
strong light<br />
A subject seen<br />
through glass<br />
The zoom ratio is set by using the [Zoom] buttons or<br />
[Zoom] slider.<br />
[Zoom] buttons<br />
Hold down to operate and release to stop.<br />
Zoom in.<br />
Zoom out.<br />
A fast moving<br />
subject<br />
A dark area or<br />
night view<br />
Subjects both<br />
near and far<br />
• After rebooting the camera, it is recommended that you check<br />
whether the camera is focusing correctly.<br />
• Focus ranges (rough guide) are shown in the table below.<br />
[Zoom] slider<br />
Drag the slider. The camera zoom ratio will change<br />
according to the position on the slider.<br />
Setting Focus and Exposure<br />
Compensation<br />
• Setting the Focus<br />
Use manual operations to focus on a desired position or<br />
fix at infinity. In manual operations, you can use the oneshot<br />
AF function to focus on the subject.<br />
[Manual]:<br />
You can adjust the focus manually by continuously<br />
pushing the (far) and (near) buttons.<br />
Clicking [One-shot AF] will use autofocus to focus on a<br />
subject and then return to manual focus.<br />
[Fixed at Infinity]:<br />
You can set the focus so that it is fixed near infinity.<br />
Focus Mode<br />
Manual<br />
Fixed at infinity<br />
Focused at infinity*<br />
* When using an infrared lamp, the camera may be out of focus.<br />
• Setting the Exposure<br />
You can set any of nine levels of image brightness (-4 to<br />
+4).<br />
To darken the image, drag the slider toward [Dark]. To<br />
brighten the image, drag the slider toward [Bright].<br />
Note<br />
Day Mode<br />
Day/Night Setting<br />
Night Mode<br />
0.3 m (12 in.) – infinity 1.0 m (3.3 ft.) – infinity<br />
• If the camera's Exposure Mode (p. 140) was set to [Manual], it<br />
will be changed to [Auto] after setting exposure compensation.<br />
• The exposure compensation value set with the Camera Angle<br />
Setting Tool will be reset when the camera is rebooted. The<br />
value will not be reflected in [Exposure Compensation] of<br />
[Initial Camera Settings] (p. 51) in [Camera] in the Setting<br />
Page.<br />
38
Creating a Camera Specification File<br />
You can load a camera list in the [Select Camera] dialog box (p. 33) if you create a camera specification file which lists<br />
connection information for cameras. The camera list allows for simple switching between camera connections for multiple<br />
cameras. Create a camera specification file beforehand using a text editor. The file must be saved in CSV file format.<br />
• Camera Specification File Content<br />
The 1st row in the camera specification file is the header row. Enter a title for each column.<br />
Camera information is listed for one camera per row starting from the 2nd row.<br />
Enter the following information for each column.<br />
Column<br />
Content<br />
Registered Name<br />
The camera name. Displayed in the camera list during connection.<br />
Host Name<br />
The camera's host name or IP address.<br />
Port Number The camera's HTTP port (factory default setting is 80).<br />
Administrator User Name<br />
The camera's administrator user name (factory default setting is “root”).<br />
Administrator Password<br />
The camera's administrator password (factory default setting is “camera”).<br />
SSL Communications SSL communications: 1 No SSL communications: 0 (factory default setting is 0).<br />
3<br />
Camera Angle Setting Tool<br />
1st row<br />
Header row<br />
From 2nd row<br />
Camera<br />
information for<br />
1 camera per<br />
line (up to 30<br />
cameras)<br />
Registered Name Host Name Port Number<br />
Administrator Administrator SSL<br />
User Name Password Communications<br />
↓ ↓ ↓ ↓ ↓ ↓<br />
→ RegisterName HostName PortNumber UserName Password ConnectType<br />
B1F <strong>VB</strong>-H710F 192.168.100.1 80 root camera1 0<br />
1Fa <strong>VB</strong>-H610VE 192.168.100.2 80 root camera2 0<br />
1Fb <strong>VB</strong>-H610D 192.168.100.3 80 root camera3 0<br />
.<br />
.<br />
.<br />
.<br />
.<br />
.<br />
Important<br />
Up to 30 cameras can be registered. If camera information for more than 30 cameras is listed, an error will occur when the file is loaded<br />
into the Camera Angle Setting Tool.<br />
39
• Entering in a Text Editor<br />
Separate each field with a comma. When you save the file, use the .csv file extension.<br />
RegisterName,HostName,PortNumber,UserName,Password,ConnectType<br />
B1F <strong>VB</strong>-H710F,192.168.100.1,80,root,camera1,0<br />
1Fa <strong>VB</strong>-H610VE,192.168.100.2,80,root,camera2,0<br />
1Fb <strong>VB</strong>-H610D,192.168.100.3,80,root,camera3,0<br />
2Fa <strong>VB</strong>-H610D,192.168.100.4,80,root,camera4,0<br />
2Fb <strong>VB</strong>-H610D,192.168.100.5,80,root,camera5,0<br />
3Fa <strong>VB</strong>-H710F,192.168.100.6,80,root,camera6,0<br />
R <strong>VB</strong>-H610VE,192.168.100.7,443,root,camera7,0<br />
Important<br />
• Enter the actual administrator passwords in the camera specification file. Handle the camera specification file with sufficient care.<br />
• If the camera specification file includes delimiters other than commas, such as semicolons or blank rows, the process of loading the<br />
camera specification cannot be performed.<br />
40
Chapter 4<br />
Top Page of the Camera<br />
❏ Accessing the Setting Page, Admin Tools and Viewer
Accessing the Top Page of the Camera<br />
Accessing the Top Page of the Camera<br />
From the top page of the camera, you can navigate to the<br />
Setting Menu to configure various camera settings, launch<br />
Admin Tools, and display the viewer to view images.<br />
1<br />
2<br />
Launch the web browser.<br />
Enter the IP address you specified in the Initial Setting<br />
Tool.<br />
Important<br />
This “<strong>Operation</strong> <strong>Guide</strong>” explains relevant operations using the<br />
IP address 192.168.100.1 (factory default setting). You need to<br />
enter the actual IP address set for the camera when following<br />
instructions.<br />
The top page of the camera appears.<br />
User Authentication<br />
User authentication is required to access [Setting Page],<br />
[Admin Tools] and [Admin Viewer].<br />
Setting Page authentication<br />
window<br />
Admin Tools/Admin<br />
Viewer authentication<br />
window<br />
The factory default setting user name and password are:<br />
User name: root Password: camera<br />
(The user name “root” is the administrator account for the<br />
camera. Connection to [Setting Page] and [Admin Tools]<br />
is limited to the user name “root”.)<br />
(1)<br />
(2)<br />
(3)<br />
(4)<br />
(5)<br />
Important<br />
• To ensure system security, be sure to change the<br />
administrator password. Do not forget the new password.<br />
• If the Administrator and an authorized user share the <strong>VB</strong><br />
Viewer on the same PC, it is strongly recommended that the<br />
[Remember my credentials] checkbox be cleared.<br />
• If the wrong user name or password is entered, you cannot<br />
connect to the camera. Connect to the camera by entering<br />
the correct user name and password.<br />
(1) Language Button<br />
Click to switch the display language.<br />
The top page language switches to the selected<br />
language.<br />
(2) Setting Page (Setting Menu) Link<br />
Click to make detailed settings. See “Chapter 5<br />
Setting Page”.<br />
(3) Admin Tools Link<br />
Click to use the Admin Tools. See “Chapter 6 Admin<br />
Tools”.<br />
(4) Admin Viewer Link<br />
Click to access the Admin Viewer. See “Chapter 7<br />
Admin Viewer/<strong>VB</strong> Viewer”.<br />
(5) <strong>VB</strong> Viewer Link<br />
Click to access the <strong>VB</strong> Viewer. See “Chapter 7 Admin<br />
Viewer/<strong>VB</strong> Viewer”.<br />
• Press the reset switch to restore factory default settings if you<br />
have forgotten the administrator password (p. 164). Note,<br />
however, that this will reset all camera settings to factory<br />
default settings except for time and date.<br />
• The Admin Tools and the Admin Viewer cannot be used if an<br />
IPv6 address is specified. Only host names are supported for<br />
IPv6 connections.<br />
42
Chapter 5<br />
Setting Page<br />
❏ Administrator Password and Network Detailed Settings<br />
❏ Camera Date and Time Settings<br />
❏ Camera Name and Initial Camera Settings Related Settings<br />
❏ Video Size and Quality Settings<br />
❏ RTP Streaming Settings<br />
❏ Upload and E-mail Notification Settings<br />
❏ Video Server, Audio Server and HTTP Server Settings<br />
❏ Settings Related to Events<br />
❏ User Registration/Authorities and Access Restriction Settings<br />
❏ IPsec Settings<br />
❏ HTTP Communication Encryption (SSL/TLS) Settings<br />
❏ SD Memory Card <strong>Operation</strong>s and Displaying Information<br />
❏ Settings for Items Requiring Rebooting<br />
❏ Maintenance (Displaying Log and Setting Information/Rebooting/Factory<br />
Default Settings)
Setting Menu<br />
From the Setting Menu, you can navigate to each setting page to set various items regarding the camera.<br />
Information describing what can be set from each setting page is listed as follows. See each setting page for details.<br />
Setting Menu<br />
• Network<br />
Administrator password, LAN, IPv4, IPv6, DNS and<br />
SNMP Settings (p. 47)<br />
• Date and Time<br />
Camera date and time, time zone and daylight saving<br />
time settings (p. 50)<br />
• Camera<br />
Camera name, initial camera settings, camera control,<br />
day/night, camera position control, external input<br />
device name and external output device name settings<br />
(p. 51)<br />
Installation Conditions (p. 51)<br />
• Video<br />
Video quality, video size, and frame rate settings for<br />
JPEG and H.264, as well as on-screen display settings<br />
(p. 55)<br />
• RTP<br />
RTP Server, Audio Multicast and RTP Streaming<br />
settings (p. 57)<br />
• Upload<br />
General upload and HTTP and FTP upload settings<br />
and e-mail notification settings (p. 59)<br />
• Server<br />
Video server, audio server and HTTP server settings<br />
(p. 62)<br />
• Event<br />
Video record settings, volume detection, external<br />
device output, external device input, timer, and sound<br />
clip upload (p. 64)<br />
• Access Control<br />
Authorized user account, user authorities, host access<br />
restriction settings (p. 68)<br />
• IPsec<br />
IPsec settings (p. 70)<br />
• SSL/TLS<br />
Certificate creation, administrative settings and<br />
encrypted communication settings (p. 73)<br />
• Memory Card<br />
SD memory card operations and information display<br />
(p. 75)<br />
• Reboot Item<br />
Setting items that require the camera to be rebooted<br />
(Reboot Item) (p. 78)<br />
• Maintenance<br />
Display and execution (displaying logs, current<br />
settings, rebooting and restoring initial settings) (p. 79)<br />
• User Page<br />
Link to web page customized by the user (For details,<br />
contact your nearest <strong>Canon</strong> Customer Service Center.)<br />
Important<br />
Notes on Use with Internet Explorer 7/8/9/10<br />
If the pop-up is blocked and an information bar appears when<br />
attempting to access [View Logs] or [View Current Settings] on<br />
the maintenance page, enable Pop-up by following the<br />
procedure explained in the information bar.<br />
44
Accessing the Setting Menu<br />
The various settings of the camera are configured by accessing the camera in the web browser. First, access the top page<br />
of the camera (p. 42).<br />
For details on entering the user name and password, see p. 42.<br />
Setting Menu<br />
(1) (2)<br />
Items Common to All Setting Pages<br />
• Applying New Settings<br />
When a setting is changed on any setting page, [Apply]<br />
shown on the top right and bottom right of the setting<br />
page turns from grayed-out to blue.<br />
5<br />
Setting Page<br />
(3)<br />
Click [Apply] to make the new setting effective.<br />
Click [Clear] to restore the previous setting.<br />
(1) [Admin Viewer]<br />
Clicking this button opens Admin Viewer.<br />
(2) [Back to top]<br />
Clicking this button navigates to the top page.<br />
(3) Setting Menu<br />
Clicking this button navigates to each setting page.<br />
Important<br />
To ensure security, exit the web browser after completing<br />
settings on the Setting page and after using Admin Viewer/<br />
Admin Tools.<br />
• Setting Changes Requiring Rebooting<br />
Items that require the camera to be rebooted in order to<br />
change settings are flagged with an orange mark.<br />
When any item accompanied by an orange mark is<br />
changed, the [Apply] shown at the top right and bottom<br />
right of each setting page changes to [Apply and reboot].<br />
Click [Apply and reboot] to confirm the new setting. The<br />
new setting will be reflected and the camera will be<br />
rebooted.<br />
Click [Clear] to restore the previous setting.<br />
Important<br />
Setting changes will be lost if you navigate to another setting<br />
page without clicking [Apply] or [Apply and reboot]. Be sure to<br />
click [Apply] or [Apply and reboot] to make the new settings<br />
effective.<br />
45
• Returning to the Setting Menu<br />
Click [Settings menu] at the top right of each setting page<br />
to return to the Setting Menu.<br />
Important<br />
• Do not open multiple setting pages at one time and try to<br />
change the settings of a single camera.<br />
• Do not use the [Back] or [Forward] buttons in the web<br />
browser to navigate between setting pages. The changed<br />
settings may return to the original settings or unwanted<br />
setting changes may be applied.<br />
Note<br />
Click on [Help] at the beginning of any item to display a<br />
detailed explanation of that setting item.<br />
46
[Network]<br />
Setting Administrator Password, LAN, IP Address, DNS, etc<br />
The following can be set here.<br />
LAN<br />
• Administrator Password<br />
Set the administrator password.<br />
• LAN<br />
Set the IP address and other items needed to<br />
establish a LAN connection.<br />
• IPv4<br />
Set IPv4 address.<br />
• IPv6<br />
Set IPv6 address.<br />
• DNS<br />
Set the name server address, host name and<br />
DDNS registration.<br />
• SNMP<br />
Configure the necessary settings to use SNMP.<br />
(1) [LAN Interface]<br />
Select [Auto], [Full Duplex] or [Half Duplex]. Normally<br />
[Auto] is used.<br />
(2) [Maximum Packet Size]<br />
Enter the maximum transmission unit. Normally there<br />
is no need to change the default setting of 1500.<br />
Important<br />
• The camera may become inaccessible from the active web<br />
browser if [LAN Interface] or [Maximum Packet Size] settings<br />
are changed. Check beforehand the precautions in<br />
“Important” in “[Reboot Item] Setting Items Requiring<br />
Rebooting” (p. 78).<br />
5<br />
Setting Page<br />
Administrator Password<br />
(1) [Password]<br />
Set the administrator password. Up to eight (singlebyte)<br />
ASCII characters (space or printable<br />
characters) can be used. The factory default setting is<br />
“camera”. If the Admin Viewer, Admin Tools, etc., are<br />
connected, terminate the connection before changing<br />
the password.<br />
(2) [Confirm Password]<br />
Enter the same password as above for confirmation.<br />
Important<br />
• To ensure system security, be sure to change the<br />
administrator password. Do not forget the new password.<br />
• Press the reset switch to restore factory default settings if you<br />
have forgotten the administrator password (p. 164). Note,<br />
however, that this will reset all camera settings to factory<br />
default settings except for date and time.<br />
• Set [Maximum Packet Size] to 1280 or greater if using IPv6.<br />
Note<br />
When using optical fiber or ADSL, setting the maximum packet<br />
size to a slightly lower value may increase sending efficiency.<br />
IPv4<br />
(1) [IPv4 Address Setting Method]<br />
Select [Manual] or [Auto (DHCP)] in the address<br />
setting method. If [Manual] is selected, directly enter<br />
the values according to the environment in which the<br />
camera is used. If [Auto (DHCP)] is selected, the value<br />
automatically acquired from the DHCP server will be<br />
entered in [IPv4 Address], [Subnet Mask] and [IPv4<br />
Default Gateway Address].<br />
(2) [IPv4 Address]<br />
If [Manual] is specified in (1), enter a fixed IP address.<br />
(3) [Subnet Mask]<br />
If [Manual] is specified in (1), enter the designated<br />
subnet mask values for each network.<br />
(4) [IPv4 Default Gateway Address]<br />
Enter an appropriate value if [Manual] is specified in<br />
(1). Be sure to set when connecting the camera to a<br />
different subnet from that of the viewer.<br />
47
(5) [AutoIP]<br />
Set AutoIP to [Disable] or [Enable].<br />
(6) [IPv4 Address (AutoIP)]<br />
When [Enable] is selected in (5), an automatically set<br />
IP address is displayed.<br />
Important<br />
• Contact your System Administrator for the [IPv4 Address],<br />
[Subnet Mask] and [IPv4 Default Gateway Address].<br />
• The camera's IP address cannot be set to an IP address that<br />
starts with 127., such as 127.0.0.1.<br />
• If any of the [IPv4 Address], [Subnet Mask] or [IPv4 Default<br />
Gateway Address] settings is wrong, network access may be<br />
disabled. In this case, see “Performing Initial Settings for the<br />
Camera” (p. 28) and use <strong>VB</strong> Initial Setting Tool to set the<br />
address again.<br />
• The camera may become inaccessible from the active web<br />
browser if settings are changed in [IPv4 Address], [Subnet<br />
Mask] or [IPv4 Default Gateway Address]. Check beforehand<br />
the precautions in “Important” in “[Reboot Item] Setting Items<br />
Requiring Rebooting” (p. 78).<br />
• If [Auto (DHCP)] is selected as the IPv4 address setting<br />
mode, the IPv4 address may not be assigned correctly in<br />
certain environments, such as when a router is present<br />
between the DHCP server and the camera. In this case,<br />
assign a fixed IPv4 address from the [Manual] settings.<br />
(6) [IPv6 Default Gateway Address]<br />
Enter a default gateway address if [Disable] is<br />
specified in (2). Be sure to set when connecting the<br />
camera to a different subnet from that of the viewer.<br />
(7) [IPv6 Address (Auto)]<br />
If [Enable] is specified in (1) and [Enable] is specified<br />
in (2) and (3), then the automatically acquired address<br />
will be shown.<br />
Note<br />
In an environment where IPv6 cannot be used, if IPv6 is set to<br />
[Enable] and auto is set to [Enable], then the [IPv6 Address<br />
(Auto)] field will display the link-local address only.<br />
DNS<br />
Important<br />
• Contact your System Administrator for the [IPv6 Address<br />
(Manual)], [Prefix Length] and [IPv6 Default Gateway<br />
Address].<br />
• The camera may become inaccessible from the active web<br />
browser if settings are changed in [IPv6], [IPv6 Address<br />
(Manual)], [Prefix Length] or [IPv6 Default Gateway Address].<br />
Check beforehand the precautions in “Important” in “[Reboot<br />
Item] Setting Items Requiring Rebooting” (p. 78).<br />
IPv6<br />
(1) [IPv6]<br />
Set IPv6 use to [Disable] or [Enable].<br />
(2) [Auto (RA)]<br />
Select [Enable] to set an address automatically using<br />
RA (Router Advertisement, network information<br />
automatically transmitted from a router), or select<br />
[Disable] not to set an address automatically.<br />
(3) [Auto (DHCPv6)]<br />
Select [Enable] to use DHCPv6 to set an address<br />
automatically or [Disable] not to set an address<br />
automatically.<br />
(4) [IPv6 Address (Manual)]<br />
Enter a fixed IPv6 address.<br />
(5) [Prefix Length]<br />
Enter a prefix length from 16 to 128 if [Disable] is<br />
specified in (2).<br />
(1) [Name Server Address 1], [Name Server Address 2]<br />
Enter the name server address you want to register.<br />
To register only one address, keep the [Name Server<br />
Address 2] field blank.<br />
(2) [Auto-Setting of Name Server Address]<br />
Select [Enable] to use DHCP to automatically set an<br />
address using a name server automatically obtained<br />
from DHCP, otherwise select [Disable].<br />
To select [Enable], specify [Auto (DHCP)] in [IPv4<br />
Address Setting Method].<br />
(3) [Host Name]<br />
You can register the host name of the camera in the<br />
name server.<br />
Characters A to Z, a to z, 0 to 9, “-” (hyphen), “_”<br />
(underscore) and “.” (period) may be used up to 63<br />
(single-byte) characters in length.<br />
(4) [Host Name Registration with DDNS]<br />
Select [Enable] to register the entered name server<br />
address and host name of the camera.<br />
48
[Network] Setting Administrator Password, LAN, IP Address, DNS, etc<br />
(5) [Search Domain]<br />
To specify the server used for uploading and mail<br />
notification by host name, enter the domain name<br />
added after the host name and then click [Add].<br />
(6) [Search Domain List]<br />
A list of domain names added using [Search Domain]<br />
appears. The function queries DNS server for each<br />
domain name starting from the top of the list.<br />
Use the ▲▼ buttons on the right to change the order<br />
of the domain names.<br />
To delete a domain name, select one from the list and<br />
then click [Delete].<br />
Important<br />
Do not use “_” (underscore) in [Host Name] and [Search<br />
Domain] in Internet Explorer 8/9/10.<br />
(5) [Installation Location]<br />
Set information regarding the installation location of<br />
this camera. Setting information can be referenced by<br />
the SNMP manager.<br />
Note<br />
• The information set in the camera is read-only from the SNMP<br />
manager.<br />
• Use the SNMP Manager that supports SNMP MIB2 (supporting<br />
RFC1213).<br />
• Supports SNMP protocol versions v1 and v2c (v3<br />
unsupported).<br />
5<br />
Setting Page<br />
Note<br />
• Use [Host Name Registration with DDNS] if the camera IP<br />
Address Setting Method is [Auto (DHCP)] (p. 47). DNS server<br />
registration settings must be set in advance. Contact your<br />
System Administrator for the DNS server settings.<br />
• If the name server address 1 is unavailable, the name server<br />
address 2 will be accessed. However, the name server<br />
address 2 must be set in advance.<br />
SNMP<br />
(1) [SNMP]<br />
Set SNMP use to [Disable] or [Enable]. Camera<br />
information can be referenced by the SNMP Manager<br />
if [Enable] is specified.<br />
(2) [Community Name]<br />
Set a community name for SNMP. It is recommended<br />
that you change the community name to ensure<br />
system security.<br />
(3) [Administrator Contact Information]<br />
Set contact information (e-mail address, etc.) for the<br />
Administrator of the camera. Setting information can<br />
be referenced by the SNMP manager.<br />
(4) [Administration Function Name]<br />
Set the camera name used for administration. Setting<br />
information can be referenced by the SNMP manager.<br />
If left blank, the following will be used by default:<br />
<strong>VB</strong>-<strong>H41</strong><br />
<strong>VB</strong>-H610<br />
<strong>VB</strong>-H710<br />
49
[Date and Time] Setting Date and Time<br />
The following can be set here.<br />
• Current Date and Time<br />
The date and time set in the camera is shown.<br />
• Setting<br />
Select the date and time setting method, time<br />
zone and daylight saving time for the camera.<br />
[Enable]<br />
The camera time is synchronized with the time of the<br />
NTP server at the address acquired from the DHCP<br />
server. To make the setting, you must change<br />
[Network] > [IPv4 Address Setting Method] to [Auto<br />
(DHCP)] (p. 47).<br />
Current Date and Time<br />
[Date], [Time]<br />
The date and time currently set in the camera are<br />
shown.<br />
[Synchronize with NTP broadcast]<br />
The camera will synchronize with the NTP server<br />
time. The camera will synchronize time with NTP<br />
broadcasts received from the NTP server.<br />
Setting<br />
(1) [Setting Method]<br />
Select from [Set manually], [Synchronize with NTP<br />
server], [Synchronize with NTP broadcast],<br />
[Synchronize with computer time].<br />
(2) [Date], [Time]<br />
Set the following according to the selection made in<br />
[Setting Method].<br />
[Set manually]<br />
Set the desired date and time. The date is set by , and the time in 24-hour format in the<br />
order (two digits for month,<br />
day and time).<br />
Example: To specify 1:23:04 pm, 23 August 2012,<br />
enter “2012/08/23” and “13:23:04”.<br />
[Synchronize with NTP server]<br />
The camera will synchronize with the NTP server<br />
time.<br />
[Synchronize with computer time]<br />
The camera will synchronize with the date and time<br />
of the computer currently accessing the camera.<br />
The [Time Zone] is not selected automatically, and<br />
must be set separately as required.<br />
(4) [Time Zone]<br />
Select from the list the appropriate time difference<br />
from the Greenwich Mean Time.<br />
(5) [Daylight Saving Time]<br />
Select [Enable] to automatically adjust the daylight<br />
saving time according to the time zone or [Disable]<br />
not to automatically adjust the daylight saving time.<br />
Note<br />
• If [Synchronize with computer time] is selected, after clicking<br />
[Apply], [Setting Method] will change to [Set manually].<br />
• If [Synchronize with NTP server] is selected and the IP address<br />
of the NTP server is incorrect or a connection with the NTP<br />
server cannot otherwise be established, the date and time will<br />
not be changed.<br />
• The NTP server query interval is 300 seconds.<br />
• The camera's NTP broadcast mode does not support IPv6.<br />
• If the [Time Zone] setting is changed, the date and time<br />
display will update automatically according to the specified<br />
time zone.<br />
(3) [Auto-Setting of NTP Server]<br />
[Disable]<br />
Select when specifying an arbitrary NTP server.<br />
Enter the IP address or host name of the NTP server<br />
used in [NTP Server].<br />
50
[Camera] Setting Initial Camera Settings and External Device Name<br />
The following can be set here.<br />
• Camera Name<br />
Enter the name of the camera. The camera name<br />
is required for use with RM-Lite.<br />
• Initial Camera Settings<br />
Sets shooting settings at camera start up.<br />
• Camera Control<br />
Set the digital zoom, image stabilizer and AGC<br />
limit.<br />
• Day/Night<br />
Set the day/night switching mode.<br />
• Installation Conditions<br />
Sets installation conditions, such as LED settings.<br />
• Camera Position Control<br />
Set whether or not to limit the pan, tilt and zoom<br />
operations to the preset positions. Also, set the<br />
camera position when nobody has control<br />
privileges.<br />
• External Device Name<br />
Set the external input device name and external<br />
output device name.<br />
(1) [AE Mode], [Slow Shutter], [Shutter Speed]<br />
Set the exposure control and shutter speed for the<br />
camera startup.<br />
[AE Mode]<br />
[Auto]<br />
The exposure is controlled automatically.<br />
[Auto (Flickerless)]<br />
In this mode, image flickers caused by fluorescent<br />
lights, etc., can be reduced. The shutter speed is<br />
automatically adjusted according to the brightness<br />
of the environment in which the camera is used.<br />
[Auto (Shutter-priority AE)]<br />
In this mode, a desired shutter speed can be<br />
specified.<br />
[Slow Shutter]<br />
Slow shutter can be used only if [Auto] is selected in<br />
[AE Mode].<br />
Set the maximum slow shutter time to be used when<br />
in auto exposure mode when capturing video in a<br />
dark place. Select [Disable], [1/15], [1/8], [1/4] or<br />
[1/2]. As slower shutter speed generates residual<br />
images when capturing a moving subject, select an<br />
appropriate time according to the capture conditions.<br />
5<br />
Setting Page<br />
Camera Name<br />
[Camera Name]<br />
Be sure to enter [Camera Name (alphanumeric<br />
characters)].<br />
Up to 15 ASCII characters (spaces and printable<br />
characters) may be used for [Camera Name<br />
(alphanumeric characters)].<br />
Note<br />
• The camera name set here will be shown when the camera is<br />
registered for use with included RM-Lite.<br />
Initial Camera Settings<br />
[Shutter Speed]<br />
Shutter speed can be used only if [Auto (Shutter-priority<br />
AE)] is selected in [AE Mode].<br />
Select a desired shutter speed from the 16 levels from<br />
[1/2] to [1/16000]. When capturing a moving subject,<br />
selecting a higher shutter speed can reduce blurry image<br />
capture.<br />
(2) [Exposure Compensation]<br />
The exposure compensation when the camera starts<br />
can be set in the range of [-4 (Dark)] to [4 (Bright)]. To<br />
brighten the image, set a positive value. To darken the<br />
image, set a negative value.<br />
(3) [Metering Mode]<br />
Set the metering mode when the camera starts.<br />
[Center-Weighted]<br />
The entire screen is metered by focusing on the<br />
center of the screen.<br />
Even when slightly darker/brighter areas are present<br />
on the periphery of the screen, an appropriate<br />
exposure can be achieved for the subject near the<br />
center.<br />
Use this mode if the subject is positioned near the<br />
center of the screen.<br />
51
[Average]<br />
The entire screen is metered by averaging.<br />
A stable exposure can be achieved even in a<br />
capture environment where there are notable<br />
brightness differences within the screen.<br />
Use this mode to stabilize the exposure in locations<br />
where vehicles or people are moving.<br />
[Spot]<br />
The center of the screen is metered.<br />
An appropriate exposure can be achieved for the<br />
subject at the center of the screen regardless of the<br />
brightness/darkness on the periphery of the screen.<br />
Use this mode if you want to adjust the exposure to<br />
the center of the screen because the subject is<br />
receiving a spotlight or backlight, etc.<br />
(4) [Focus Mode]<br />
Set the focus mode when camera starts.<br />
[Auto]<br />
Automatically brings the subject into focus. Normally<br />
[Auto] is selected.<br />
[Fixed at infinity]<br />
The focus can be fixed to near infinity.<br />
(5) [Smart Shade Control]<br />
Select [Disable] or one of the 7 levels from [1 (Mild)] to<br />
[7 (Strong)] for smart shade control at the camera<br />
startup.<br />
(6) [White Balance]<br />
Select the white balance according to the light source<br />
to achieve natural color in the image.<br />
[Auto]<br />
The white balance is adjusted automatically.<br />
[Manual]<br />
Set the values of red and blue gain according to the<br />
light source. Enter a value from 0 to 1023 for both<br />
the [R Gain] and [B Gain].<br />
Select this option to capture video under halogen<br />
lamps or incandescent bulbs.<br />
Important<br />
• The initial camera settings (1) to (6) define the defaults that<br />
apply when the camera is started. Setting changes will be<br />
reflected only after the camera is reconnected or rebooted.<br />
Specify the settings used in the actual operating environment<br />
from the Admin Viewer (p. 137).<br />
• If the subject is a traffic signal or electronic scoreboard, etc.,<br />
the captured image may flicker.<br />
In this case, try changing the [AE Mode] setting to [Auto<br />
(Shutter-priority AE)] and selecting a shutter speed lower<br />
than 1/100 to see if the problem improves.<br />
• Setting a slow shutter speed may make it impossible for<br />
intelligent functions to work correctly. Select a shutter speed<br />
that suits the capture conditions and purpose.<br />
• In conditions where an outdoor scene is captured<br />
from an indoor location through a glass window, the camera<br />
may focus on the glass surface if there is dust or water there.<br />
Install the camera at the shortest possible distance from the<br />
glass surface.<br />
Note<br />
• See “Subjects Difficult to Focus On” (p. 38).<br />
• Focus ranges (rough guide) are shown in the following table<br />
according to the settings of [Day/Night] (p. 53), etc.<br />
Focus<br />
Mode<br />
Auto<br />
Dome<br />
Setting<br />
Do not use<br />
Use<br />
Day Mode<br />
Day/Night Setting<br />
Night Mode<br />
Wide end Tele end Wide end Tele end<br />
0.3 m (12 in)<br />
– infinity<br />
1.0 m (3.3 ft)<br />
– infinity<br />
2.0 m (6.6 ft) – infinity<br />
1.0 m (3.3 ft)<br />
– infinity<br />
1.0 m (3.3 ft)<br />
– infinity<br />
1.5 m (4.9 ft)<br />
– infinity<br />
2.2 m (7.2 ft)<br />
– infinity<br />
Fixed at<br />
infinity<br />
Do not use/<br />
Use<br />
Focused at infinity *<br />
[Daylight Fluorescent]<br />
Select this option to capture video under daylight<br />
fluorescent lighting.<br />
[White Fluorescent]<br />
Select this option to capture video under daylight<br />
fluorescent or white fluorescent lighting.<br />
[Warm Fluorescent]<br />
Select this option to capture video under warm<br />
fluorescent lighting.<br />
[Mercury Lamp]<br />
Select this option to capture video under mercury<br />
lamps.<br />
[Sodium Lamp]<br />
Select this option to capture video under orange<br />
sodium lamps.<br />
[Halogen Lamp]<br />
* When using an infrared lamp, the camera may be out of focus.<br />
52
[Camera] Setting Initial Camera Settings and External Device Name<br />
Camera Control<br />
Day/Night<br />
(1) [Digital Zoom]<br />
Set digital zoom to [Disable] or [Enable].<br />
The higher the digital zoom ratio, the lower the image<br />
quality becomes.<br />
(2) [Image Stabilizer]<br />
Select [Disable], [On1] or [On2] for image stabilizer.<br />
Image stabilizer has the effect of correcting blurry<br />
images. Try [On2] if the image is still blurry after<br />
selecting [On1].<br />
If you have selected [On1] or [On2] as the image<br />
stabilizer setting, the viewing angle will be smaller and<br />
the image more coarse than when [Disable] is<br />
selected. This is not a malfunction.<br />
Degree of<br />
blurriness<br />
corrected<br />
Viewing angle<br />
ratio<br />
Disable — 100%<br />
On1 Small 83%<br />
On2 Large 50%<br />
Effective<br />
pixels<br />
Approx. 2.07<br />
megapixels<br />
Approx. 1.44<br />
megapixels<br />
Approx. 0.52<br />
megapixels<br />
(3) [AGC Limit]<br />
Select one of 5 levels from 1 to 5 to automatically set<br />
the upper gain limit. The greater the value, the higher<br />
the sensitivity becomes. If you do not want to use the<br />
automatic gain adjustment, select [OFF]. Setting the<br />
[AGC Limit] allows you to record with reduced noise<br />
when recording in low light conditions.<br />
(1) [Mode]<br />
Set Day/Night mode to [Manual] or [Auto].<br />
It is also possible to switch between [Day Mode] and<br />
[Night Mode] using Admin Viewer Night Mode<br />
function (p. 141).<br />
If you have selected [Auto], set [Switching Brightness]<br />
and [Response (sec.)] according to the environment<br />
in which the camera is installed as well as the desired<br />
switching conditions.<br />
(2) [Switching Brightness]<br />
Set the brightness at which Day Mode and Night<br />
Mode will be switched when [Auto] is selected in<br />
[Mode]. Select [Darker], [Slightly Darker], [Standard],<br />
[Slightly Brighter] or [Brighter]. Select [Darker] if you<br />
want to capture video in color as much as possible.<br />
Select [Brighter] to reduce noise. Note that this mode<br />
switches to black & white sooner.<br />
(3) [Response (sec.)]<br />
Set the time in seconds needed for judgment on<br />
switching between Day Mode and Night Mode when<br />
[Auto] is selected in [Mode]. Select [60], [30], [20],<br />
[10] or [5].<br />
The mode will switch between Day Mode and Night<br />
Mode if brightness remains above or below the level<br />
set in (2) for the number of seconds specified.<br />
Select [30] or [60] if brightness changes frequently,<br />
such as when a light source passes in front of the<br />
camera. Select [5] or [10] if change in brightness is<br />
minimal.<br />
5<br />
Setting Page<br />
Important<br />
• If [On2] is selected, it is best to select a video size smaller<br />
than “960 x 540”.<br />
• The image stabilizer is not effective when the subject is<br />
shaking.<br />
• The image stabilizer is not effective beyond a certain level of<br />
vibration or against momentary vibration.<br />
• See “Important” on p. 94, p. 100 for precautionary notes<br />
regarding Admin Tools configuration when image stabilizer is<br />
set.<br />
• See “Important” on p. 136 for precautionary notes regarding<br />
the Viewer when image stabilizer is set.<br />
• [AGC Limit] is disabled when [Exposure] is set to [Manual] or<br />
[Auto (Flickerless)] in the Admin Viewer.<br />
• Minimum subject illumination may change when [AGC Limit]<br />
is set.<br />
Important<br />
• If [Auto] is selected for [Day/Night], conduct a thorough<br />
operation test to check the effectiveness of the setting<br />
beforehand.<br />
• If [Auto] is selected for [Day/Night], set [Exposure] of the<br />
Admin Viewer to [Auto], [Auto (Flickerless)] or [Auto (Shutterpriority<br />
AE)] (p. 140).<br />
• To use with infrared illumination, set [Day/Night] to [Manual].<br />
• When Day/Night Mode is set to [Manual], in additional to the<br />
Day/Night function of the Admin Viewer (p. 141), it is also<br />
possible to switch Day/Night Mode via settings in [Setting<br />
Page] > [Event] > [External Device Input] (p. 65) or [Event] ><br />
[Timer] (p. 66).<br />
• When [Day Mode] and [Night Mode] are switched, the image<br />
may not focus correctly depending on the brightness.<br />
• If [Day/Night] is set to [Auto], the infrared cutoff filter may<br />
move several times while the mode is switching between<br />
[Day Mode] and [Night Mode]. Pan, tilt, zoom and manual<br />
focus will not work during this period.<br />
53
Installation Conditions<br />
External Input Device 1, 2 / External Output Device 1, 2<br />
(1) [Dome]<br />
Select whether or not a dome is used. To use the<br />
camera with a dome housing unit, select [Use].<br />
(2) [LED Setting]<br />
Select [Turn Off] or [Turn On] for the LED operation<br />
status on the camera. Set to [Turn Off] if you do not<br />
want to turn on the LED.<br />
Set to [Turn Off] if the separately sold indoor dome<br />
housing (DR41-C-<strong>VB</strong>/DR41-S-<strong>VB</strong>) will be used, if<br />
reflected LED light enters the capture area or<br />
otherwise interferes with image capture, or if you do<br />
not want to show that the camera is operating.<br />
(3) [Image Flip]<br />
Select the orientation of the camera image. The<br />
factory default setting is [Disable] (ceiling mounted).<br />
Select [Enable] when installing in upright positions.<br />
[Device Name] for external input device/external output<br />
device<br />
Be sure to enter each device name in order to identify<br />
the corresponding external device being connected.<br />
Enter [Device Name (alphanumeric characters)] using<br />
up to 15 characters (ASCII characters (space or<br />
printable characters) excluding the double quotation<br />
mark (“)).<br />
Note<br />
The external device name set here will be shown when the Admin<br />
Viewer or included RM-Lite is used.<br />
Note<br />
• For the focus ranges when the dome is set to [Use],<br />
see the note on p. 52.<br />
• The LED will light for several seconds when booting even if the<br />
[LED Setting] is set to [Turn Off].<br />
Camera Position Control<br />
(1) [Restricted to Presets]<br />
Set the camera control preset to [No Restriction] or<br />
[Preset Only]. The administrator can limit camera<br />
control by non-administrators to preset angles by<br />
selecting [Preset Only].<br />
(2) [Camera Position without Control]<br />
Select either [Do not return to Home Position] or<br />
[Return to Home Position] as the action when no<br />
control privileges are requested by users and the<br />
home position has already been set.<br />
When [Return to Home Position] is selected and no<br />
users have control privileges, the camera moves<br />
automatically to the home position. This function<br />
requires the home position of the camera be set in<br />
advance. Set the home position using Preset Setting<br />
Tool (p. 96).<br />
54
[Video] Setting Video Size, Quality and Frame Rate<br />
The following can be set here.<br />
H.264<br />
JPEG<br />
• JPEG<br />
Set the video quality, size, maximum frame rate<br />
and upload size in JPEG.<br />
• H.264<br />
Set the bit rate, video size and capture frame rate<br />
in H.264.<br />
• On-screen display<br />
Set time, character string, etc. displayed over<br />
images.<br />
(1) [Video Quality]<br />
Select a desired video quality from 1 to 5 (5 levels) for<br />
videos transmitted at each video size in JPEG.<br />
Greater values have higher quality.<br />
(2) [Video Quality: Digital PTZ]<br />
Select a desired video quality from 1 to 5 (5 levels) for<br />
Digital PTZ.<br />
Greater values have higher quality.<br />
(3) [Video Size: video Transmission]<br />
Select [320x240], [480x270], [960x540] or<br />
[1920x1080] for the size of images transmitted. This<br />
becomes the start-up video size used by each viewer<br />
if no video size has been set.<br />
(4) [Maximum Frame Rate: Video Transmission]<br />
Limit the maximum transmission frame rate per<br />
second to reduce the viewer load. The maximum is 30<br />
frames/sec. Enter a value of between 0.1 and 30.0.<br />
(5) [Video Size: Upload / SD card]<br />
Select [320x240], [480x270], [960x540] or<br />
[1920x1080] for the size of images when using the<br />
upload function (p. 59) or when recording to an SD<br />
card (p. 75). Use [Video Record Action] (p. 64) in the<br />
[Event] menu to specify the destination of a video<br />
recording (upload or SD card recording).<br />
(1) [Bit Rate Control]<br />
Select [Do not use bit rate control] or [Use bit rate<br />
control].<br />
Select [Use bit rate control] when [Video Format]<br />
under [Upload] is set to [H.264] or when [Video<br />
Format] under [Memory Card] is set to [H.264].<br />
(2) [Target Bit Rate (kbps)]<br />
If [Use bit rate control] is selected in (1), select a<br />
desired target bit rate from the 17 levels from [64] to<br />
[16384].<br />
(3) [Video Quality]<br />
If [Do not use bit rate control] is selected in (1), select<br />
a desired quality from 1 to 5 (total 5 levels) for H.264<br />
video transmission.<br />
Greater values have higher quality.<br />
(4) [Video Size]<br />
Select [480x270], [960x540] or [1920x1080] for the<br />
size of video transmitted.<br />
(5) [Frame Rate (fps)]<br />
Select [30], [15], [10], [6], [5], [3], [2] or [1] (fps) for<br />
the frame rate of video transmitted.<br />
(6) [I Frame Interval (sec)]<br />
Select [0.5], [1], [1.5], [2], [3], [4] or [5] for the I frame<br />
interval (sec) for H.264 video.<br />
Important<br />
• When the SD card recording and upload settings are<br />
configured, the following restrictions apply.<br />
- Only [Use bit rate control] can be selected for [Bit Rate<br />
Control].<br />
- Only [3072] or less can be selected for [Target Bit Rate<br />
(kbps)].<br />
- Only one of [0.5], [1], and [1.5] can be selected for [I<br />
Frame Interval (sec)].<br />
• Network load will increase if a larger video size is set or<br />
higher video quality and target bit rate are set, as this<br />
increases data size per frame. As a result, the following could<br />
occur:<br />
5<br />
Setting Page<br />
JPEG: The frame rate may drop<br />
H.264: Video may be temporarily disrupted<br />
55
• Block noise may become noticeable if a large video size and<br />
low target bit rate are set.<br />
• The data size may increase depending on the type or<br />
movement of the subject. If the frame rate remains low or<br />
other undesirable conditions continue for a prolonged<br />
period, lower the video size or quality setting.<br />
• Note that if you are using included RM-Lite, the hard disk<br />
usage will also be affected during recording.<br />
On-screen display<br />
(8) [Text string display]<br />
If [Display designated string] is selected in (6) [Text<br />
display], you can enter a text string of up to 15 ASCII<br />
characters (spaces and printable characters) for<br />
superimposed display on the video.<br />
(9) [Color of text]<br />
Select [Black], [Blue], [Cyan], [Green], [Yellow],<br />
[Red], [Magenta] or [White] for the color of text to be<br />
displayed over the image.<br />
(10)[Color of text outline]<br />
Select [Black], [Blue], [Cyan], [Green], [Yellow],<br />
[Red], [Magenta] or [White] for the color of text<br />
outline.<br />
(11)[Color depth of text and outline]<br />
Select [Fill text and outline], [Make text only<br />
transparent], [Make text only translucent] or [Make<br />
text and outline translucent] for the color depth of text<br />
and outline to be displayed over the image.<br />
(1) [Date display]<br />
Select whether to enable date display over images. If<br />
[Enable] is selected, date information will be<br />
displayed over images.<br />
(2) [Position of date display]<br />
Select [Upper left], [Upper right], [Lower left] or<br />
[Lower right] for the position of date display<br />
information.<br />
(3) [Format of date display]<br />
Select [YYYY/MM/DD], [DD/MM/YYYY] or [MM/DD/<br />
YYYY] for the format of the date display.<br />
(4) [Time display]<br />
Select whether to enable time display over images. If<br />
[Enable] is selected, display time information will be<br />
displayed over images.<br />
(5) [Position of time display]<br />
Select [Upper left], [Upper right], [Lower left] or<br />
[Lower right] for the position of time display<br />
information.<br />
(6) [Text display]<br />
Select [Display nothing], [Display designated string]<br />
or [Display camera name] for the text string to display<br />
over images.<br />
If [Display designated string] is selected, the [Text<br />
string display] set in (8) will be displayed.<br />
If [Display camera name] is selected, the text string<br />
set in [Camera Name (alphanumeric characters)]<br />
under [Camera] will be shown (p. 51).<br />
(7) [Position of text display]<br />
Select the position of text display from [Upper left],<br />
[Upper right], [Lower left] or [Lower right].<br />
Important<br />
The on-screen time display is not suitable for usage where high<br />
reliability is required. Use as reference information only where<br />
utmost and constant reliability is required for surveillance.<br />
Note<br />
• The on-screen time display may not correspond with camera<br />
time by several seconds (p. 50).<br />
• Depending on video quality settings, on-screen display may<br />
become difficult to decipher. Set after confirming appearance<br />
on actual images.<br />
56
[RTP]<br />
RTP Server, Audio Multicast and RTP Streaming<br />
The following can be set here.<br />
• RTP Server<br />
Enable RTP, and set the RTSP authentication<br />
method and port number.<br />
• Audio Multicast<br />
Make settings for multicast audio transmission.<br />
• RTP Streaming 1 to 5<br />
Make settings for RTP streaming of video,<br />
multicasting, and audio transmission.<br />
value reaches 0, the signal can no longer be<br />
distributed. For example, if TTL is set to [1], multicast<br />
distribution is confined to the local segment only and<br />
cannot be distributed by the router.<br />
RTP Streaming 1 to 5<br />
You can make settings for each stream, RTP Streaming 1<br />
to RTP Streaming 5, in a 5-session RTP stream<br />
distribution.<br />
5<br />
Setting Page<br />
RTP Server<br />
(1) [RTP]<br />
Set RTP to [Disable] or [Enable].<br />
(2) [RTSP Authentication Method]<br />
Set the RTSP authentication method to [Basic<br />
Authentication], [Digest Authentication], or [No<br />
Authentication].<br />
(3) [RTSP Port]<br />
Set the RTSP port number to 554 or in the range of<br />
1024 to 65535.<br />
Normally [554] (factory default setting) is used.<br />
Audio Multicast<br />
(1) [Multicast Address]<br />
Set the multicast address for audio transmission in the<br />
range 224.0.0.0 to 239.255.255.255 (IPv4) or an<br />
address beginning with ff00::/8 (IPv6).<br />
To disable Multicast, set to [0.0.0.0] (IPv4) or [::0(::)]<br />
(IPv6).<br />
(2) [Multicast Port]<br />
Set the multicast port number for audio transmission<br />
to an even number in the range 1024 to 65534.<br />
To disable Multicast, set to [0].<br />
(3) [Multicast TTL]<br />
Set the effective scope of multicast distribution<br />
between 0 and 255.<br />
To disable Multicast, set to [0].<br />
The TTL (Time To Live), representing the effective<br />
scope of multicast distribution, is decremented each<br />
time the signal passes through a router. When the<br />
(1) [Video Size]<br />
Select [320x240 JPEG], [480x270 JPEG], [960x540<br />
JPEG], [1920x1080 JPEG], or [H.264] for the format<br />
and size of video for RTP streaming.<br />
[H.264] cannot be set for multiple RTP streams.<br />
(2) [Frame Rate]<br />
Set the frame rate if the RTP stream is JPEG video.<br />
Cannot be configured for H.264.<br />
(3) [Multicast Address]<br />
Set the multicast address for RTP streaming in the<br />
range 224.0.0.0 to 239.255.255.255 (IPv4) or an<br />
address beginning with ff00::/8 (IPv6).<br />
To disable Multicast, set to [0.0.0.0] (IPv4) or [::0(::)]<br />
(IPv6).<br />
(4) [Multicast Port]<br />
Set the multicast port number for RTP streaming to an<br />
even number in the range 1024 to 65534.<br />
To disable Multicast, set to [0].<br />
(5) [Multicast TTL]<br />
Set the effective scope of multicast distribution for<br />
RTP streaming between 0 and 255.<br />
To disable Multicast, set to [0].<br />
The TTL (Time To Live), representing the effective<br />
scope of multicast distribution, is decremented each<br />
time the signal passes through a router. When the<br />
value reaches 0, the signal can no longer be<br />
distributed. For example, if TTL is set to [1], multicast<br />
distribution is confined to the local segment only and<br />
cannot be distributed by the router.<br />
(6) [Audio Transmission]<br />
Set RTP streaming audio transmission to [Disable] or<br />
[Enable].<br />
57
Note<br />
• RTP stream URL<br />
rtsp://IP_address:port_number/rtpstream/config1(~5)=r|u|m<br />
[=r|u|m] is optional and can be omitted. If specified, specify<br />
only one option.<br />
r: Requests RTP over TCP<br />
u: Requests RTP over UDP<br />
m: Requests multicast<br />
Example: RTP streaming 1 request using RTP over TCP<br />
rtsp://192.168.100.1:554/rtpstream/config1=r<br />
Note that the actual operation is dependent on the RTP client<br />
application, so the URL does not necessarily specify the<br />
method used for transmission.<br />
• The video quality and, when H.264 is selected, bit rate control,<br />
video size, and frame rate, are determined by the [Video]<br />
settings.<br />
• Regardless of the [Server] > [Audio Server] > [Audio<br />
Transmission from the Camera] setting, RTP streaming audio<br />
will be used.<br />
However, to use audio settings, select [Enable] for [Audio<br />
Transmission from the Camera] and make the settings.<br />
• The [Access Control] > [User Authority] > [Video Distribution]<br />
and [Audio Distribution] settings are not used for RTP.<br />
• RTP streaming video may not be viewable on systems using a<br />
proxy server or firewall. If the video cannot be viewed, contact<br />
the system administrator.<br />
• If host access restrictions are applied to a client while it is<br />
streaming using RTP over UDP, it may take from a few to<br />
several seconds until streaming ceases.<br />
58
[Upload]<br />
Setting HTTP/FTP Upload and E-mail Notification<br />
The following can be set here.<br />
• General Upload<br />
Set the upload operation to be performed and the<br />
image buffer.<br />
• HTTP Upload<br />
Set HTTP connection uploads.<br />
• FTP Upload<br />
Set FTP connection uploads.<br />
• E-mail Notification<br />
Set event information and image e-mail<br />
notifications.<br />
Important<br />
• If the upload function is used, either the [Event] menu must<br />
be set (p. 64) or the [Event] tab in the Intelligent Function<br />
Setting Tool (p. 110) must be set.<br />
• If you are using both e-mail notification by text and image<br />
and image upload by HTTP/FTP, set [Video Size: Upload / SD<br />
card] (p. 55) to a small size.<br />
• HTTP upload does not support SSL/TLS.<br />
• If the camera is set to perform upload or e-mail notification<br />
continuously, not all images or e-mails may be sent<br />
depending on the video size and the network condition to the<br />
server. In this case, an event log message is displayed<br />
(p. 79).<br />
5<br />
Setting Page<br />
General Upload<br />
(1) [Upload]<br />
Select [Upload Disabled], [HTTP Upload] or [FTP<br />
Upload] for the upload method.<br />
(2) [Video Format]<br />
Select the [JPEG] or [H.264] format for video you want<br />
to upload.<br />
If [H.264] is selected, select [Use bit rate control]<br />
under [Bit Rate Control] in [Video].<br />
(3) [Frame Rate]<br />
Enter the maximum frame rate of image to be<br />
uploaded. This setting can only be made when<br />
[JPEG] is selected for [Video Format].<br />
(4) [Pre-event Buffer (number of frames)] / [Pre-event<br />
Buffer (sec)]<br />
Enter the number of frames or seconds of video to be<br />
buffered before the event. The maximum amount is<br />
number of frames for a [JPEG] selection and number<br />
of seconds for an [H.264] selection in [Video Format].<br />
(5) [Post-event Buffer (number of frames)] / [Post-event<br />
Buffer (sec)]<br />
Enter the number of frames or seconds of video to be<br />
buffered after the event. The maximum amount is<br />
number of frames for a [JPEG] selection and number<br />
of seconds for an [H.264] selection in [Video Format].<br />
• If the destination for HTTP/FTP upload or e-mail notification is<br />
set for a Windows operating system, IPsec communication<br />
cannot be applied.<br />
• When an H.264 video is uploaded, the following restrictions<br />
apply to [H.264] of [Video].<br />
- Only [Use bit rate control] can be selected for [Bit Rate<br />
Control].<br />
- Only [3072] or less can be selected for [Target Bit Rate<br />
(kbps)].<br />
- Only one of [0.5], [1], and [1.5] can be selected for [I<br />
Frame Interval (sec)].<br />
• The maximum image buffer size capacity is approx. 5 MB.<br />
If a large video size is set, the Frame Rate, Pre-event Buffer<br />
and Post-event Buffer may not be achieved as specified.<br />
• If buffering cannot be achieved as specified, a message is<br />
written to the event log (p. 79).<br />
Before using a large video size, confirm that no messages<br />
appear in the event log.<br />
• Regardless of the image buffer frame rate setting, only a<br />
single image will be uploaded when a timer event occurs<br />
(p. 66).<br />
Note<br />
The server or network load may increase and the frame rate may<br />
drop, depending on the settings. If this occurs, try the following<br />
measures. Also check the settings including the network to the<br />
server.<br />
• Reduce the image file size:<br />
– Set a lower value under [Video Quality] for JPEG/H.264<br />
(p. 55).<br />
– Set a lower value for [Video Size: Upload / SD card] for<br />
JPEG (p. 55).<br />
– Set a lower value for [Video Size] for H.264 (p. 55).<br />
– Set a lower value under [Target Bit Rate (kbps)] for H.264<br />
(p. 55).<br />
• Reduce the uploading frequency:<br />
– Reduce the value in [Pre-event Buffer] or [Post-event Buffer]<br />
(p. 59).<br />
59
– If [Volume Detection Event] is enabled, disable [ON Event<br />
<strong>Operation</strong>] or [OFF Event <strong>Operation</strong>] (p. 64).<br />
– From the Intelligent Function Setting Tool [Event] tab ><br />
disable [ON Event <strong>Operation</strong>], [OFF Event <strong>Operation</strong>] or<br />
[Detected mode <strong>Operation</strong>] (p. 110).<br />
– If [External Device Input Event] is enabled, disable [Active<br />
Event <strong>Operation</strong>] or [Inactive Event <strong>Operation</strong>] (p. 65).<br />
– If [Timer Event] is enabled, increase the value in [Repeat<br />
Interval] (p. 66).<br />
Important<br />
• Enter [Proxy Server], [Proxy Port], [Proxy User Name] and<br />
[Proxy Password] if connecting via a proxy.<br />
• For information about the HTTP upload function and settings,<br />
contact your nearest <strong>Canon</strong> Customer Service Center.<br />
HTTP Upload<br />
The HTTP upload function sends notifications via HTTP or<br />
via HTTP with attached video, depending on the network<br />
camera event.<br />
FTP Upload<br />
(1) [Notification]<br />
The content of notification is set to [Video data upload<br />
with FTP].<br />
(1) [Notification]<br />
Select [Notification Only with HTTP] or [Video<br />
attached Notification with HTTP] as the content of<br />
notification.<br />
(2) [URI]<br />
Enter the URI to be uploaded to (using up to 255<br />
characters).<br />
(3) [User Name], [Password]<br />
Enter the user name and password required for<br />
authentication.<br />
Digest authentication is not supported.<br />
(4) [Proxy Server]<br />
Enter the host name or IP address of the proxy server<br />
(using up to 63 characters).<br />
(5) [Proxy Port]<br />
Enter the port number of the proxy server (factory<br />
default setting is [80]).<br />
(6) [Proxy User Name], [Proxy Password]<br />
Enter the user name and password of the proxy<br />
server.<br />
Digest authentication is not supported.<br />
(7) [Parameter (query string)]<br />
Enter the parameter (using up to 127 characters).<br />
Parameters can be specified using the “%” character<br />
(p. 148).<br />
(8) [HTTP Upload Test]<br />
Clicking [Exec] initiates an upload test based on the<br />
settings currently entered. Only one JPEG image is<br />
uploaded. It is not necessary to click [Apply].<br />
After entering a password, first click [Exec], then<br />
[Apply] the password.<br />
(2) [FTP Server]<br />
Enter the host name or IP address of the FTP server<br />
(using up to 63 characters).<br />
(3) [User Name], [Password]<br />
Enter the user name and password required for<br />
authentication.<br />
(4) [PASV Mode]<br />
Select [Disable] or [Enable] for the PASV mode when<br />
uploading via FTP.<br />
(5) [File Upload Path]<br />
Enter the path to the folder where the image file is to<br />
be uploaded to (using up to 255 characters).<br />
(6) [File Naming]<br />
Set a desired file naming rule.<br />
[YYYYMMDDHHMMSSms]<br />
Images are uploaded according to the file name<br />
format of<br />
“{year}{month}{day}{hour}{minute}{second}{ms}.jpg”.<br />
(Example: 20130123112122000.jpg)<br />
[YYYYMMDD Directory/HHMMSSms]<br />
A subdirectory named “{year}{month}{day}” is<br />
created first, and then the image is uploaded using<br />
the file name “{hour}{minute}{second}{ms}.jpg”.<br />
(Example: 20130123/112122000.jpg)<br />
[Loop]<br />
Images are loaded with a file name numbered up to<br />
the value set in [Maximum Number of Loops].<br />
(Example: 0000.jpg, 0001.jpg)<br />
[Maximum Number of Loops]<br />
If [Loop] is set under [File Naming], enter the<br />
maximum number of loops in the range of 0 to 9999.<br />
60
[Upload] Setting HTTP/FTP Upload and E-mail Notification<br />
[User Setting]<br />
Images are uploaded according to the file naming<br />
method specified in [Subdirectory Name to Create]<br />
and [File Name to Create].<br />
[Subdirectory Name to Create], [File Name to<br />
Create]<br />
If file naming is set to [User Setting], enter the<br />
subdirectory name to be created as well as the<br />
name of the created file (using up to 127<br />
characters). Parameters can be specified in the<br />
entry with the “%” character (p. 148).<br />
(7) [FTP Upload Test]<br />
Clicking [Exec] initiates an upload test based on the<br />
settings currently entered. Only one JPEG image is<br />
uploaded. It is not necessary to click [Apply].<br />
After entering a password, first click [Exec], then<br />
[Apply] the password.<br />
E-mail Notification<br />
[User Name], [Password], [POP Server]<br />
If [POP before SMTP] is selected as the e-mail<br />
authentication mode, enter the user name and<br />
password as well as the host name or IP address of<br />
the POP server required for authentication.<br />
[User Name], [Password]<br />
If [SMTP-AUTH] is selected as the e-mail<br />
authentication method, enter the user name and<br />
password required for authentication.<br />
(7) [Subject]<br />
Enter the subject of the e-mail to be sent using up to<br />
31 ASCII characters.<br />
(8) [Message Body]<br />
Enter the message (text) of the e-mail to be sent using<br />
up to 255 ASCII characters. Parameters can be<br />
specified with the “%” character (p. 148).<br />
(9) [E-mail Notification Test]<br />
Clicking [Exec] initiates an e-mail notification test<br />
based on the settings currently entered. It is not<br />
necessary to click [Apply].<br />
After entering a password, first click [Exec], then<br />
[Apply] the password.<br />
5<br />
Setting Page<br />
(1) [Notification]<br />
Select [Text Only] or [Text with Image] as the content<br />
of notification. If [Upload] is set to [Upload Disabled],<br />
[Text with Image] will not be available.<br />
(2) [Mail Server Name]<br />
Enter the host name or IP address of the SMTP server<br />
(using up to 63 characters).<br />
(3) [Mail Server Port]<br />
Enter the port number of the SMTP server (factory<br />
default setting is [25]).<br />
(4) [Sender (From)]<br />
Set the e-mail address of the sender (using up to 63<br />
characters).<br />
(5) [Recipient (To)]<br />
Set the e-mail address of the recipient (using up to 63<br />
characters).<br />
(6) [Authentication]<br />
Select [None], [POP before SMTP] or [SMTP-AUTH]<br />
for the e-mail authentication method.<br />
Set an appropriate method according to the<br />
authentication method used by the SMTP server to<br />
send to.<br />
61
[Server]<br />
Setting the Video Server, Audio Server and HTTP Server<br />
The following can be set here.<br />
Audio Server<br />
• Video Server<br />
Set the video transmission from the camera.<br />
• Audio Server<br />
Set the audio transmission/reception.<br />
• HTTP Server<br />
Set the authentication method, and HTTP port<br />
number.<br />
Video Server<br />
(1) [Maximum Number of Clients]<br />
Set the maximum number of clients that can be<br />
connected to the camera at the same time. Up to 30<br />
clients can be set.<br />
If 0 is set, connection is prohibited except for the<br />
Administrator.<br />
(2) [Camera Control Queue Length]<br />
Set the maximum queue length for clients requesting<br />
camera control privilege from the viewer. The<br />
maximum number is 30. Enter an integer from 0 to 30.<br />
If 0 is set, camera control is prohibited except for the<br />
Administrator.<br />
(3) [Maximum Connection Time (sec.)]<br />
Set the time in seconds during which an individual<br />
client can connect to the camera. The maximum<br />
number is 65535. Enter an integer from 0 to 65535. If 0<br />
is set, the connection time becomes unlimited.<br />
(4) [Camera Control Time (sec.)]<br />
Set the maximum time during which the viewer can<br />
control the camera. The maximum number is 3600.<br />
Enter an integer from 1 to 3600.<br />
(1) [Audio Transmission from the Camera]<br />
When [Enable] is selected, the audio input through the<br />
microphone attached to the camera can be<br />
transmitted to the Viewer.<br />
(2) [Input Volume]<br />
Set the volume of input for the microphone connected<br />
to the camera in the range of 1 to 100. The greater the<br />
value, the larger the input volume becomes.<br />
(3) [Voice Activity Detection]<br />
If [Enable] is selected, the audio transmission is<br />
stopped temporarily when no audio is output. This<br />
way, the load of the applicable network can be<br />
reduced.<br />
(4) [Audio Reception from Viewer]<br />
If [Enable] is selected, the audio received from the<br />
Admin Viewer and RM Viewer can be output from the<br />
speaker with amplifier connected to the camera.<br />
(5) [Output Volume]<br />
Set the volume of output for the speaker connected to<br />
the camera in the range of 1 to 100. The greater the<br />
value, the larger the output volume becomes.<br />
(6) [Echo Canceller]<br />
If [Enable] is selected, echo between the microphone<br />
and speaker is suppressed.<br />
(7) [Audio Input]<br />
Set the microphone input. Select [Line In],<br />
[Microphone In (dynamic microphone)] or<br />
[Microphone In (condenser microphone)].<br />
• Audio Transmission<br />
• Input Volume<br />
• Voice Activity Detection<br />
• Echo Canceller<br />
62
[Server] Setting the Video Server, Audio Server and HTTP Server<br />
• Audio Reception<br />
• Output Volume<br />
Important<br />
If the setting of [HTTP Port] or [HTTPS Port] is changed, the<br />
camera may become inaccessible from the active web<br />
browser. Check beforehand the precautions in “Important” in<br />
“[Reboot Item] Setting Items Requiring Rebooting” (p. 78).<br />
Caution<br />
Switch line in and microphone in on each setting page<br />
according to the specification of the microphone (p. 62).<br />
Using the wrong input may damage the camera and/or<br />
microphone. Be sure to configure settings correctly.<br />
Important<br />
• When multiple viewers are connected to the camera over an<br />
SSL connection and audio is received from the camera, the<br />
video frame rate may slow down and the sound may drop<br />
out.<br />
5<br />
Setting Page<br />
• The volume, sound quality, etc., may change depending on<br />
the characteristics of the microphone used.<br />
• If [Input Volume] or [Echo Canceller] settings are changed after<br />
setting volume detection, check the detection setting again.<br />
• Connect a speaker with amplifier to the camera (“Installation<br />
<strong>Guide</strong>” > “Audio Input/Output Terminals”).<br />
• If [Enable] is selected under [Echo Canceller], the sound<br />
quality or volume may be affected. Utilize this function as<br />
necessary according to the installation environment and how<br />
the camera is used.<br />
• When sending audio, carefully read the information in<br />
“Important” under “Audio Input/Output Terminals” in the<br />
“Installation <strong>Guide</strong>”.<br />
HTTP Server<br />
(1) [Authentication Method]<br />
Set the authentication method used with the HTTP<br />
server to [Basic Authentication] or [Digest<br />
Authentication].<br />
(2) [HTTP Port]<br />
Set the HTTP port number to 80 or in the range of<br />
1024 to 65535.<br />
Normally [80] (factory default setting) is used.<br />
(3) [HTTPS Port]<br />
Set the HTTPS port number to 443 or in the range of<br />
1024 to 65535.<br />
Normally [443] (factory default setting) is used.<br />
63
[Event]<br />
Setting Video Record, Volume Detection, Audio Playback and Timer<br />
The following can be set here.<br />
Volume Detection<br />
• Video Record Setting<br />
Set where video is recorded when an event<br />
occurs.<br />
• Volume Detection<br />
Set the operation to be performed at the time of<br />
volume detection.<br />
• External Device Output<br />
Set external device output.<br />
• External Device Input<br />
Set the operation to be performed when an event<br />
is triggered by input from an external device.<br />
• Timer<br />
Set timer events.<br />
• Sound Clip Upload<br />
Set the audio file registered as playback.<br />
Video Record Setting<br />
(1) [Video Record Action]<br />
Select the destination of a video recorded when an<br />
event occurs. To record to a server selected on the<br />
[Upload] in the setting page, select [Upload] and to<br />
record to an SD card inserted in the camera, select<br />
[Record to SD Card].<br />
Note<br />
The size and format of video recorded according to the [Video<br />
Record Action] settings are as follows:<br />
[Video Record<br />
Action] settings<br />
[Upload]<br />
[Record to SD<br />
Card]<br />
Applied video format<br />
[Upload] > [Video<br />
Format] settings<br />
[Memory Card] ><br />
[Video Format]<br />
settings<br />
Applied video size<br />
When the video format is<br />
[JPEG], [Video] > [JPEG] ><br />
[Video Size: Upload / SD<br />
card]<br />
When the video format is<br />
[H.264], [Video] > [H.264] ><br />
[Video Size]<br />
Settings must be made in the above setting page to make<br />
an actual video recording.<br />
(1) [Volume Detection Event]<br />
Set volume detection to [Disable] or [Enable].<br />
(2) [Detection Criteria]<br />
Set the criteria for generating volume detection events<br />
to [The reference volume level or above] or [The<br />
reference volume level or below].<br />
(3) [Reference Volume Level]<br />
Set the reference volume level for detection in the<br />
range of 0 to 100.<br />
Perform an actual test at the volume level before<br />
setting the value.<br />
(4) [Detect Criteria Duration (sec)]<br />
Set the duration of the detect criteria in the range of 0<br />
to 10 (sec.). When the status meeting the detect<br />
criteria has continued for the duration or longer, an<br />
ON event is generated.<br />
(5) [ON Event <strong>Operation</strong>]<br />
Select the operation to be performed upon an ON<br />
event. If [Enable] is selected, (8) [Preset], (9) [Video<br />
Record] and (10) [E-mail Notification] will be executed<br />
according to their settings upon an ON event.<br />
(6) [OFF Event <strong>Operation</strong>]<br />
Select the operation to be performed upon an OFF<br />
event. If [Enable] is selected, (8) [Preset], (9) [Video<br />
Record] and (10) [E-mail Notification] will be executed<br />
according to their settings upon an OFF event.<br />
(7) [Ongoing ON Event <strong>Operation</strong>]<br />
Select the operation to be performed while a volume<br />
detection event is ongoing.<br />
Select [Enable] to perform operations according to<br />
the (9) [Video Record] and (10) [E-mail Notification]<br />
settings during an ongoing volume detection event.<br />
(8) [Preset]<br />
If a preset is specified, the camera will orient<br />
automatically to the specified preset position when a<br />
volume detection event occurs. To use presets, it is<br />
necessary to set the presets with the Preset Setting<br />
64
[Event] Setting Video Record, Volume Detection, Audio Playback and Timer<br />
Tool under Admin Tools (p. 96). If there is no need for<br />
additional camera operation, select [None].<br />
(9) [Video Record]<br />
Specify the video record action. If [Enable] is<br />
selected, video will be transmitted to the destination<br />
selected in [Video Record Action] (p. 64) when a<br />
volume detection event occurs.<br />
(10)[E-mail Notification]<br />
Select the e-mail notification operation to be<br />
performed. If [Enable] is selected, e-mail notification<br />
is performed when a volume detection event occurs.<br />
To use this function, the [E-mail Notification] submenu<br />
must also be set from the [Upload] menu<br />
(p. 61).<br />
(11)[External Device Output for ON Event]<br />
Select whether external device output (1 or 2) is active<br />
or inactive upon an ON event. Select [Disable] to<br />
disable external device output.<br />
(3) [Pulse Output Time (sec)]<br />
Enter the pulse output time in the range of 1 to 120<br />
(sec.). This setting is available when [Active Output<br />
Format] is [Pulse].<br />
Important<br />
When [Active Output Format] is set to [Pulse] and a timer is<br />
used, a single contact output is controlled when the timer starts.<br />
Note<br />
[Normally Open] means that the contacts are normally in the<br />
open state (that the circuit is non-conductive), and [Normally<br />
Close] means that the contacts are normally in the closed state<br />
(that the circuit is conductive).<br />
Normally Open<br />
Active Event<br />
Inactive Event<br />
1 (Terminals close)<br />
0 (Terminals open)<br />
5<br />
Setting Page<br />
(12)[External Device Output for OFF Event]<br />
Select whether external device output (1 or 2) is active<br />
or inactive upon an OFF event. Select [Disable] to<br />
disable external device output.<br />
Normally Close<br />
Inactive Event<br />
Active Event<br />
1 (Terminals close)<br />
0 (Terminals open)<br />
Important<br />
• The volume detection function is temporarily disabled during<br />
audio file playback and audio transmission from the viewer.<br />
• For notes on use of volume detection, see “Safety<br />
Precautions” in “Precautions for Use of Built-In Camera<br />
Functions and Included Software” (p. 7).<br />
• When <strong>VB</strong>-<strong>H41</strong>/610/710 Viewer has camera control<br />
privileges, those camera control privileges are released if the<br />
camera is moved to a preset position, specified in the<br />
[Preset] settings, by a volume detection event operation.<br />
External Device Input<br />
External Device Output<br />
(1) [<strong>Operation</strong> Mode]<br />
Select the normal (inactive) circuit condition.<br />
When [Normally Open] is selected, the output<br />
terminals remain in the open state during normal<br />
operation, and the terminals close upon an active<br />
event and open upon an inactive event.<br />
When [Normally Close] is selected, the output<br />
terminals remain in the closed state during normal<br />
operation, and the terminals open upon an active<br />
event and close upon an inactive event.<br />
(2) [Active Output Format]<br />
Select [Pulse] or [Continuous] for the external device<br />
output format.<br />
(1) [External Device Input Event]<br />
Set external device input events to [Disable] or<br />
[Enable].<br />
(2) [<strong>Operation</strong> Mode]<br />
Select the circuit condition of the connected external<br />
device.<br />
When [Normally Open] is selected, an active event<br />
occurs when the terminals of the external device<br />
close, and an inactive event occurs when the<br />
terminals open.<br />
When [Normally Close] is selected, an active event<br />
occurs when the terminals of the external device<br />
open, and an inactive event occurs when the<br />
terminals close.<br />
65
(3) [Active Event <strong>Operation</strong>]<br />
Select the operation to be performed upon an active<br />
event. If [Enable] is selected, (6) [Preset], (7) [Video<br />
Record] and (8) [E-mail Notification] will be executed<br />
according to their settings upon an active event.<br />
(4) [Inactive Event <strong>Operation</strong>]<br />
Select the operation to be performed upon an inactive<br />
event. If [Enable] is selected, (6) [Preset], (7) [Video<br />
Record] and (8) [E-mail Notification] will be executed<br />
according to their settings upon an inactive event.<br />
(5) [Ongoing Active Event <strong>Operation</strong>]<br />
Select the operation to be performed while an active<br />
event is ongoing.<br />
Select [Enable] to perform operations according to<br />
the (7) [Video Record] and (8) [E-mail Notification]<br />
settings during an ongoing active event.<br />
(6) [Preset]<br />
If a preset is specified, the camera will automatically<br />
orient to the specified preset position when an<br />
external device input event occurs. To use presets, it<br />
is necessary to set presets with the Preset Setting Tool<br />
under Admin Tools (p. 96). If there is no need for<br />
additional camera operation, select [None].<br />
(7) [Video Record]<br />
Specify the video record action. If [Enable] is<br />
selected, video will be transmitted to the destination<br />
selected in [Video Record Action] (p. 64) when an<br />
external device input event occurs.<br />
(8) [E-mail Notification]<br />
Select the e-mail notification operation to be<br />
performed. If [Enable] is selected, e-mail<br />
notification will be performed when an external<br />
device input event occurs. To use this function, the<br />
[E-mail Notification] sub-menu must also be set from<br />
the [Upload] menu (p. 61).<br />
(9) [External Device Output for Active Event]<br />
Select whether external device output (1 or 2) is active<br />
or inactive upon an active event. Select [Disable] to<br />
disable external device output.<br />
(10)[External Device Output for Inactive Event]<br />
Select whether external device output (1 or 2) is active<br />
or inactive upon an inactive event. Select [Disable] to<br />
disable external device output.<br />
(11)[Audio Playback at Active Event]<br />
Select the audio playback operation to be performed<br />
upon an active event. If [Enable] is selected, the audio<br />
designated in [Sound Clip] will playback when the<br />
external device input becomes active.<br />
(12)[Audio Playback at Inactive Event]<br />
Select the audio playback operation to be performed<br />
upon an inactive event. If [Enable] is selected, the<br />
audio designated in [Sound Clip] will playback when<br />
the external device input becomes inactive.<br />
(13)[Sound Clip]<br />
Select the sound clip to be played. For registration of<br />
sound clips, see p. 67.<br />
(14)[Volume]<br />
Select the volume of sound clips using an integer of 1<br />
to 100. The greater the value, the louder the volume<br />
becomes.<br />
(15)[Day/Night Mode Switching]<br />
Select the Day/Night Mode switching behavior when<br />
an external device input event is triggered.<br />
When [Switch to Day Mode] is selected, switches to<br />
Day Mode when an active event is triggered, and<br />
switches to Night Mode when an inactive event is<br />
triggered.<br />
When [Switch to Night Mode] is selected, switches to<br />
Night Mode when an active event is triggered, and<br />
switches to Day Mode when an inactive event is<br />
triggered.<br />
Select [Disable] to disable Day/Night Mode switching.<br />
Timer<br />
Important<br />
• When [Day/Night] in the Admin Viewer is set to [Auto], Day/<br />
Night Mode switching will not happen when an external<br />
device input event is triggered (p. 141).<br />
• If the [Day/Night Mode Switching] settings switch Day/Night<br />
Mode while the <strong>VB</strong>-<strong>H41</strong>/610/710 Viewer is assigned camera<br />
control, control will be released.<br />
• When <strong>VB</strong>-<strong>H41</strong>/610/710 Viewer has camera control<br />
privileges, those camera control privileges are released if the<br />
camera is moved to a preset position, specified in the<br />
[Preset] settings, by an external device input event operation.<br />
(1) [Timer Event]<br />
Select [Disable] or [Enable] for timer event.<br />
(2) [Start Time]<br />
Set the start time of the timer event in 24-hour format.<br />
(3) [End Time]<br />
Set the end time of the timer event in the 24-hour<br />
format.<br />
(4) [Repeat Interval]<br />
Select [1 sec.] [5 sec.] [10 sec.] [30 sec.] [1 min.] [5<br />
min.] [10 min.] [15 min. ] [20 min.] [30 min.] [1 hour] [3<br />
hours] [6 hours] or [12 hours] for the timer event<br />
repeat intervals. Select [None] if an operation need<br />
not be repeated.<br />
66
[Event] Setting Video Record, Volume Detection, Audio Playback and Timer<br />
(5) [Video Record]<br />
Specify the video record action. When [Enable] is<br />
selected, video will be transmitted to the destination<br />
selected in [Video Record Action] (p. 64) when a timer<br />
event occurs.<br />
(6) [E-mail Notification]<br />
Select the e-mail notification operation to be<br />
performed. If [Enable] is selected, e-mail notification<br />
is performed when a timer event occurs. To use this<br />
function, the [E-mail Notification] sub-menu must also<br />
be set from the [Upload] menu (p. 61).<br />
blank field is applied, the sound clip will be deleted.<br />
To delete a registered audio file, click [Delete] next to<br />
the sound clip name you want to delete.<br />
Note<br />
Audio files must be 20 seconds or shorter and must be “.wav”<br />
files (µ-law PCM 8 bits sampling frequency 8000 Hz, monaural).<br />
Audio file samples are provided in the SOUND folder on the<br />
Setup CD-ROM.<br />
5<br />
(7) [External Device Output]<br />
Select whether external device output (1 or 2) is active<br />
or inactive when a timer event occurs. Select [Disable]<br />
to disable output to an external device.<br />
Setting Page<br />
(8) [Day/Night Mode Switching]<br />
Select the Day/Night Mode switching behavior when a<br />
timer event is triggered.<br />
Select [Switch to Day Mode] to switch to Day Mode at<br />
the start time, and Night Mode at the end time.<br />
Select [Switch to Night Mode] to switch to Night Mode<br />
at the start time, and Day Mode at the end time.<br />
Select [Disable] to disable Day/Night Mode switching.<br />
Important<br />
• [Day/Night Mode Switching] can only be set in [Timer 1].<br />
• [External Device Output] and [Day/Night Mode Switching] do<br />
not support [Repeat Interval].<br />
• When [Day/Night] in the Admin Viewer is set to [Auto], Day/<br />
Night Mode switching will not happen when a timer event is<br />
triggered (p. 141).<br />
• If the [Day/Night Mode Switching] settings switch Day/Night<br />
Mode while the <strong>VB</strong>-<strong>H41</strong>/610/710 Viewer is assigned camera<br />
control, control will be released.<br />
Note<br />
When using timers that run continuously for 24 hours with a<br />
[Repeat Interval] of 30 seconds or less, set the timer start and<br />
end times so the timers can run continuously.<br />
Example:<br />
Timer [Start Time] [End Time] [Repeat Interval]<br />
[Timer 1] 0:00 12:00 10 sec<br />
[Timer 2] 12:00 0:00 10 sec<br />
Sound Clip Upload<br />
(1) [Browse File]<br />
Specify the audio file you want to register as the<br />
sound clip, and then click [Add].<br />
(2) [Sound Clip Name]<br />
Set a name for the audio file to be registered as sound<br />
playback (up to 15 alphanumeric characters). If a<br />
67
[Access Control] Setting User Access Privileges<br />
The following can be set here.<br />
• Authorized User Account<br />
Register who can access this camera.<br />
• User Authority<br />
Set the authorities for authorized users and guest<br />
users.<br />
• IPv4 Host Access Restrictions<br />
Specify the hosts from which IPv4 access is<br />
permitted and restricted.<br />
• IPv6 Host Access Restrictions<br />
Specify the hosts from which IPv6 access is<br />
permitted and restricted.<br />
Note<br />
Authorized users have higher authorities than guest users.<br />
For details, see “User Authorities and Camera Control Privileges”<br />
(p. 124).<br />
IPv4 Host Access Restrictions<br />
Authorized User Account<br />
(1) [Apply Host Access Restrictions]<br />
Set IPv4 host access restrictions to [Disable] or<br />
[Enable].<br />
(1) [User Name], [Password]<br />
Enter the user name and password and then click<br />
[Add]. The authorized user will be added to the user<br />
list.<br />
The user name can consist of up to 15 (single-byte)<br />
characters using A to Z, a to z, 0 to 9, “-” (hyphen) and<br />
“_” (underscore).<br />
The password can consist of 6 to15 (single-byte)<br />
ASCII characters (space or printable characters).<br />
(2) [User List]<br />
A list of authorized users is shown. User authorities<br />
can be set for these users. Up to 50 users can be<br />
registered in addition to the Administrator (root).<br />
Also, the user list can be sorted using the <br />
buttons on the right.<br />
To delete a user, select the applicable user from the<br />
user list and then click [Delete].<br />
User Authority<br />
(2) [Default Policy]<br />
If IPv4 host access restrictions are applied, select<br />
[Authorize Access] or [Prohibit Access] for the default<br />
policy.<br />
(3) [Network Address / Subnet]<br />
Create a list of permitted hosts and restricted hosts<br />
and set IPv4 address access for each host to [Yes] or<br />
[No].<br />
You can specify the subnet and set access<br />
restrictions by network or host.<br />
If access is prohibited, access to all ports is<br />
restricted.<br />
Important<br />
• To prohibit access via a proxy server in HTTP connection, a<br />
proxy server address must be set.<br />
• If host access restriction is set mistakenly, access to the<br />
setting pages themselves may be prohibited, in which case<br />
restoring the factory default settings will become the only<br />
means for recovery.<br />
[Privileged Camera Control], [Camera Control], [Video<br />
Distribution], [Audio Distribution]<br />
Set the user authorities of authorized users and guest<br />
users. Select the checkboxes corresponding to the<br />
items you want to permit for each user.<br />
Note<br />
If the same address is duplicated, the policy for the address that<br />
appears highest on the list will be applied.<br />
68
[Access Control] Setting User Access Privileges<br />
IPv6 Host Access Restrictions<br />
5<br />
(1) [Apply Host Access Restrictions]<br />
Set IPv6 host access restrictions to [Disable] or<br />
[Enable].<br />
Setting Page<br />
(2) [Default Policy]<br />
If IPv6 host access restrictions are applied, select<br />
[Authorize Access] or [Prohibit Access] for the default<br />
policy.<br />
(3) [Prefix / Prefix Length]<br />
Create a list of permitted hosts and restricted hosts<br />
and set IPv6 address access for each host to [Yes] or<br />
[No].<br />
You can specify the prefix length and set access<br />
restriction by network or host.<br />
If access is prohibited, access to all ports is<br />
restricted.<br />
69
[IPsec] Setting IPsec<br />
IPsec<br />
The following can be set here.<br />
• IPsec<br />
Set the IPsec setting method.<br />
• Auto Key Exchange Settings<br />
Set auto key exchange.<br />
• IPsec Set<br />
IP security can be specified through auto key<br />
exchange or manual setting with up to five<br />
communicating devices.<br />
(6) [DH Group]<br />
Select [Group 2] or [Group 2->Group 1] for the key<br />
generation information that will be used in the DH<br />
algorithm for key exchange via auto key exchange<br />
protocol IKE.<br />
(7) [ISAKMP SA Validity Period (min)]<br />
Set the duration of validity for ISAKMP SA (factory<br />
default setting is [480]).<br />
IPsec Set (Auto Key Exchange)<br />
IPsec Sets 1 to 5 are available, and you can specify IPsec<br />
settings for one communication device for each IPsec Set.<br />
(1) [IPsec]<br />
Key settings for use with IPsec can be selected as<br />
[Auto Key Exchange] or [Manual].<br />
Auto Key Exchange Settings<br />
(1) [IPsec SA Encryption Algorithm]<br />
Set the IPsec SA encryption algorithm to [AES-<br />
>3DES], [AES->3DES->DES] or [AES->3DES->DES -<br />
>NULL].<br />
The specified algorithm will be checked for an<br />
applicable encryption algorithm starting from the left.<br />
(2) [IPsec SA Authentication Algorithm]<br />
Set the IPsec SA authentication algorithm to<br />
[HMAC_SHA1_96] or [HMAC_SHA1_96-><br />
HMAC_MD5_96].<br />
The specified algorithm will be checked for an<br />
applicable authentication algorithm starting from the<br />
left.<br />
(3) [IPsec SA Validity Period (min)]<br />
Set the duration of validity for IPsec SA (factory default<br />
setting is [480]).<br />
(4) [ISAKMP SA Encryption Algorithm]<br />
Set the SA encryption algorithm for use with auto key<br />
exchange protocol IKE to [AES->3DES] or [AES-><br />
3DES->DES].<br />
(5) [ISAKMP SA Authentication Algorithm]<br />
Set the SA authentication algorithm for use with auto<br />
key exchange protocol IKE to [SHA1] or [SHA1-<br />
>MD5].<br />
(1) [IPsec Set]<br />
Set IPsec Set to [Disable], [Enable in IPv4] or [Enable<br />
in IPv6].<br />
(2) [IPsec Mode]<br />
Set IPsec mode to [Tunnel Mode] or [Transport<br />
Mode].<br />
(3) [Destination IPv4 Address], [Destination IPv6 Address]<br />
Enter the IP address of the connection destination.<br />
(4) [Source IPv4 Address], [Source IPv6 Address]<br />
Enter the IP address of the source.<br />
(5) [Security Protocol]<br />
Set the IPsec protocol to [ESP], [AH] or [ESP and AH].<br />
If [ESP] is selected, enter only the setting items<br />
relating to ESP.<br />
If [AH] is selected, enter only the setting items relating<br />
to AH.<br />
If [ESP and AH] is selected, enter all setting items.<br />
(6) [Security Gateway IPv4 Address], [Security Gateway<br />
IPv6 Address]<br />
If IPsec mode is set to [Tunnel Mode] in (2), set the IP<br />
address of the security gateway.<br />
(7) [Destination Subnet Mask Length] (IPv4), [Destination<br />
Prefix Length] (IPv6)<br />
This setting is required only if IPsec mode is set to<br />
[Tunnel Mode] in (2).<br />
If IPv6 is used, enter a desired prefix length for the<br />
connection destination in the range of 16 to 128.<br />
If IPv4 is used, enter a desired length in the range of 1<br />
to 32.<br />
70
[IPsec] Setting IPsec<br />
(8) [IKE Pre-Shared Key]<br />
Enter the pre-shared key for IKE (auto key exchange)<br />
(up to 127 characters).<br />
Important<br />
If the camera is rebooted during auto key exchange<br />
communication, a connection error may result after rebooting.<br />
In this case, connect again.<br />
Note<br />
If auto key exchange is used, it will take approximately 5 to 10<br />
seconds before communication with the camera starts.<br />
IPsec Set (Manual)<br />
IPsec Sets 1 to 5 are available, and you can specify IPsec<br />
settings for one communication device for each IPsec Set.<br />
(1) [IPsec Set]<br />
Set IPsec Set to [Disable], [Enable in IPv4] or [Enable<br />
in IPv6].<br />
(2) [IPsec Mode]<br />
Set IPsec mode to [Tunnel Mode] or [Transport<br />
Mode].<br />
(3) [Destination IPv4 Address], [Destination IPv6 Address]<br />
Enter the IP address of the connection destination.<br />
(4) [Source IPv4 Address], [Source IPv6 Address]<br />
Enter the IP address of the source.<br />
(5) [Security Protocol]<br />
Set the IPsec protocol to [ESP], [AH] or [ESP and AH].<br />
If [ESP] is selected, enter only the setting items<br />
relating to ESP.<br />
If [AH] is selected, enter only the setting items relating<br />
to AH.<br />
If [ESP and AH] is selected, enter all setting items.<br />
(6) [Security Gateway IPv4 Address], [Security Gateway<br />
IPv6 Address]<br />
If [IPsec Mode] is set to [Tunnel Mode] in (2), set the<br />
IP address of the security gateway.<br />
(7) [Destination Subnet Mask Length] (IPv4), [Destination<br />
Prefix Length] (IPv6)<br />
This setting is required only if [IPsec Mode] is set to<br />
[Tunnel Mode] in (2).<br />
If IPv6 is used, enter a desired prefix length for the<br />
connection destination in the range of 16 to 128.<br />
If IPv4 is used, enter a desired length in the range of 1<br />
to 32.<br />
• If [Security Protocol] is set to [ESP] or [ESP and AH] in<br />
(5), (8) [SA ESP Encryption Algorithm] to (15) [SA ESP<br />
SPI (inbound)] must be set.<br />
(8) [SA ESP Encryption Algorithm]<br />
Set the ESP encryption algorithm to [AES], [3DES],<br />
[DES] or [NULL] according to the encryption<br />
algorithm supported by the device to connect to.<br />
Normally [AES] or [3DES] is recommended.<br />
(9) [SA ESP Authentication Algorithm]<br />
Set the ESP authentication algorithm to<br />
[HMAC_SHA1_96], [HMAC_MD5_96] or [No<br />
Authentication] according to the authentication<br />
algorithm supported by the device to connect to.<br />
If [ESP] is used alone, [No Authentication] cannot be<br />
selected.<br />
(10)[SA ESP Encryption Key (outbound)]<br />
Set the SA encryption key for outbound. If [AES],<br />
[3DES] or [DES] was selected in (8), set a 128-bit,<br />
192-bit or 64-bit hexadecimal, respectively. This item<br />
need not be set if [NULL] was selected.<br />
(11)[SA ESP Authentication Key (outbound)]<br />
Set the SA authentication key for outbound. If<br />
[HMAC_SHA1_96] or [HMAC_MD5_96] was selected<br />
in (9), set a 160-bit or 128-bit hexadecimal,<br />
respectively. This item need not be set if [No<br />
Authentication] was selected.<br />
(12)[SA ESP SPI (outbound)]<br />
Set the SA SPI value for outbound.<br />
Set a desired value in the range of 256 to<br />
4294967295.<br />
(13)[SA ESP Encryption Key (inbound)]<br />
Set the SA encryption key for inbound.<br />
If [AES], [3DES] or [DES] was selected in (8), set a<br />
128-bit, 192-bit or 64-bit hexadecimal, respectively.<br />
This item need not be set if [NULL] was selected.<br />
(14)[SA ESP Authentication Key (inbound)]<br />
Set the SA authentication key for inbound.<br />
If [HMAC_SHA1_96] or [HMAC_MD5_96] was<br />
selected in (9), set a 160-bit or 128-bit hexadecimal,<br />
respectively. This item need not be set if [No<br />
Authentication] was selected.<br />
(15)[SA ESP SPI (inbound)]<br />
Set the SA SPI value for inbound.<br />
Set a desired value in the range of 256 to<br />
4294967295. Since this setting is used as an ID for<br />
5<br />
Setting Page<br />
71
identifying the SA, be careful not to specify an<br />
inbound SPI whose value is already used in the SPI for<br />
other ESP.<br />
• If [Security Protocol] was set to [AH] or [ESP and AH] in<br />
(5), (16) [SA AH Authentication Algorithm] to (20) [SA<br />
AH SPI (inbound)] must be set.<br />
(16)[SA AH Authentication Algorithm]<br />
Set the AH authentication algorithm to<br />
[HMAC_SHA1_96] or [HMAC_MD5_96] according to<br />
the authentication algorithm supported by the device<br />
to connect to.<br />
(17)[SA AH Authentication Key (outbound)]<br />
Set the SA authentication key for outbound. If<br />
[HMAC_SHA1_96] or [HMAC_MD5_96] was selected<br />
in (16), set a 160-bit or 128-bit hexadecimal,<br />
respectively.<br />
(18)[SA AH SPI (outbound)]<br />
Set the SA SPI value for outbound.<br />
Set a desired value in the range of 256 to<br />
4294967295.<br />
(19)[SA AH Authentication Key (inbound)]<br />
Set the SA authentication key for inbound. If<br />
[HMAC_SHA1_96] or [HMAC_MD5_96] was selected<br />
in (16), set a 160-bit or 128-bit hexadecimal,<br />
respectively.<br />
(20)[SA AH SPI (inbound)]<br />
Set the SA SPI value for inbound.<br />
Set a desired value in the range of 256 to<br />
4294967295. Since this setting is used as an ID for<br />
identifying the SA, be careful not to specify an<br />
inbound SPI whose value is already used in the SPI for<br />
another AH.<br />
Important<br />
• To run this camera with IPsec, the communicating devices<br />
and network must be set beforehand. Contact your System<br />
Administrator for these settings.<br />
• When connecting with IPsec, set the camera IP address<br />
manually.<br />
For IPv4 addresses, use addresses set with [Network] ><br />
[IPv4 Address Setting Method] > [Manual].<br />
For IPv6 addresses, use addresses set with [Network] ><br />
[IPv6 Address (Manual)].<br />
• If any setting is changed from the [IPsec] menu, the camera<br />
may become inaccessible from the active web browser.<br />
Check beforehand the precautions in “Important” in “[Reboot<br />
Item] Setting Items Requiring Rebooting” (p. 78).<br />
Note<br />
If IPsec is used, video transmission performance drops.<br />
72
[SSL/TLS] Setting HTTP Communication Encryption<br />
The following can be set here.<br />
Certificate Management<br />
• Certificates<br />
Create an SSL/TLS certificate.<br />
• Certificate Management<br />
Manage the SSL/TLS certificate.<br />
• Encrypted Communications<br />
Set the encrypted communication.<br />
Certificates<br />
(1) [Generate Certificate Signing Request]<br />
Click [Exec] to create server private key and generate<br />
a certificate signing request. Once processed, the<br />
certificate signing request will appear in a separate<br />
window.<br />
5<br />
Setting Page<br />
(1) [Create Self-Signed Certificate]<br />
After entering each of the following settings, click<br />
[Exec] to create a self-signed certificate. Follow the<br />
instructions in the message and reboot. The certificate<br />
created will take effect after rebooting.<br />
Note<br />
Creating a certificate takes time, so it is recommended that you<br />
stop video transmission and upload processes.<br />
(2) [Certificate Status]<br />
If no certificate is installed, [Not Installed] will appear.<br />
If a certificate is installed, [Installed] will appear.<br />
(3) [Country (C)]<br />
Enter the country code.<br />
(4) [State/Province (ST)], [Locality (L)], [Organization (O)],<br />
[Organizational Unit (OU)], [Common Name (CN)]<br />
Enter state/province name, locality, organization<br />
name, organizational unit and common name in ASCII<br />
characters (spaces or printable characters). Enter a<br />
FQDN format host name, etc. to set the common<br />
name (required).<br />
(5) [Validity Period Start Date], [Validity Period End Date]<br />
Set the validity period of the certificate to be created in<br />
the range of 2001/01/01 to 2031/12/31 (required when<br />
creating a self-signed certificate).<br />
Important<br />
With regard to security, it is recommended that you use a selfsigned<br />
certificate where complete security does not need to be<br />
ensured through operation tests, etc. For system operation,<br />
acquire and install a certificate issued by a CA.<br />
Note<br />
Generating a certificate signing request takes time, so it is<br />
recommended that you stop video transmission and upload<br />
processes.<br />
(2) [Display Certificate Signing Request Details]<br />
Click [Exec] to view the details of the certificate<br />
signing request.<br />
(3) [Install Server Certificate]<br />
Perform this operation to install a server certificate.<br />
Click [Browse] to select the certificate file for<br />
installation, then click [Exec]. The certificate installed<br />
will take effect after rebooting.<br />
(4) [Install Intermediate Certificate]<br />
Perform this operation to install an intermediate<br />
certificate. Select the certificate file to be installed<br />
using the [Browse] button and click [Exec]. The<br />
installed certificate will take effect after rebooting.<br />
Note<br />
To install an intermediate certificate and a primary intermediate<br />
certificate, use a text editor or similar software to place them in<br />
the same file and install them as an intermediate certificate.<br />
(5) [Delete Certificate]<br />
Click [Exec] to delete the certificate. However, if SSL<br />
communications are enabled, the certificate cannot<br />
be deleted. Set [SSL Communications] to [Disable]<br />
before deleting a certificate. The deletion will take<br />
effect after rebooting.<br />
(6) [Display Server Certificate Details]<br />
Click [Exec] to view the details of the certificate.<br />
(7) [Self CA Certificate]<br />
Used for the purpose of testing SSL communications,<br />
but otherwise not normally used.<br />
73
(8) [Backup]<br />
Click [Exec] to perform a backup of the certificates<br />
and private key. This operation can only be performed<br />
via SSL communications.<br />
(9) [Restore]<br />
Installs the certificates and private key from<br />
backup. Click [Browse] to select the backup file,<br />
then click [Exec]. This operation can only be<br />
performed via SSL communications, and will take<br />
effect after rebooting.<br />
Encrypted Communications<br />
(1) [SSL Communications]<br />
Set SSL communications to [Disable] or [Enable]. The<br />
setting will take effect after rebooting.<br />
However, if no certificate is installed, SSL<br />
communications cannot be changed to [Enable].<br />
Note<br />
• It may take a few minutes to generate an SSL key.<br />
• If SSL communications are used, video transmission<br />
performance drops.<br />
• Depending on the type of the certificate being installed on the<br />
camera, a dialog box may appear indicating that the web<br />
browser has accepted the certificate and a connection can be<br />
made.<br />
If the dialog box does not appear, register the CA certificate in<br />
the web browser.<br />
74
[Memory Card] SD Memory Card <strong>Operation</strong>s and Settings<br />
The following can be set here.<br />
• SD Card <strong>Operation</strong>s<br />
Perform SD memory card operations.<br />
• SD Card Information<br />
Display information about the SD memory card.<br />
Note<br />
• When [JPEG] is selected in [Video Format] and an upload error<br />
occurs, the frame rate of video recorded in JPEG format is<br />
always 1 fps.<br />
• When a network error occurs during recording-mode stream,<br />
video is saved in the JPEG format regardless of the [Video<br />
Format] setting (the frame rate is fixed at 1 fps).<br />
5<br />
SD Card <strong>Operation</strong>s (unmount status)<br />
(1) [Mount/Unmount]<br />
In unmount status, [Mount] will appear. Click [Mount]<br />
to mount the SD memory card.<br />
Note<br />
SD, SDHC and SDXC memory cards can be used with the<br />
camera.<br />
When an SD memory card is inserted in the card slot, it is<br />
mounted automatically. It is also mounted automatically if<br />
inserted in the camera at the time of booting.<br />
For inserting and removing the SD memory card, see “Installation<br />
<strong>Guide</strong>” > “Using an SD Memory Card”.<br />
(2) [<strong>Operation</strong> Settings]<br />
Set write operations to the SD memory card to [Save<br />
Log] or [Save Logs and Videos].<br />
Note<br />
• The following settings and operations will record video on an<br />
SD memory card.<br />
- When a network error occurs during recording-mode stream<br />
- When uploading fails<br />
- When [Video Record Action] in the [Event] menu (p. 64) is<br />
set to [Record to SD Card], and an event (volume detection,<br />
external device input or timer) setting is enabled and<br />
[Enable] is selected for [Video Record]<br />
- When manually recorded to SD memory card from the<br />
Admin Viewer (p. 144)<br />
• New files cannot be saved to the SD memory card if there is no<br />
free space.<br />
(3) [Video Format]<br />
Select the [JPEG] or [H.264] video format to make<br />
recordings to an SD memory card. If [H.264] is<br />
selected, select [Use bit rate control] under [Bit Rate<br />
Control] in [Video]. Video is recorded in this format<br />
when [Record to SD Card] is selected in [Video<br />
Record Action] (p. 64) of the [Event] menu.<br />
• Video size and quality of the recorded video are made<br />
according to the settings in the [Video] menu.<br />
(4) [Pre-event Buffer (number of frames)] / [Pre-event<br />
Buffer (sec)]<br />
Enter the number of frames or seconds of video to be<br />
buffered before the event. The maximum amount is<br />
number of frames for a [JPEG] selection and number<br />
of seconds for an [H.264] selection in [Video Format].<br />
(5) [Post-event Buffer (number of frames)] / [Post-event<br />
Buffer (sec)]<br />
Enter the number of frames or seconds of video to be<br />
buffered after the event. The maximum amount is<br />
number of frames for a [JPEG] selection and number<br />
of seconds for an [H.264] selection in [Video Format].<br />
(6) [Overwrite videos]<br />
Select [Enable] or [Disable] for the overwrite setting of<br />
video that is recorded to an SD memory card when an<br />
event occurs. If you select [Enable], videos recorded<br />
using an event and timer will be overwritten.<br />
Overwriting is performed when the number of<br />
recordings that can be stored (100,000 files) for each<br />
of events and timers is exceeded. Overwriting is not<br />
performed when there is insufficient space on the SD<br />
memory card.<br />
Important<br />
• When an H.264 video is saved to an SD memory card, the<br />
following restrictions apply to [H.264] of [Video] (p. 55).<br />
- Only [Use bit rate control] can be selected for [Bit Rate<br />
Control].<br />
- Only [3072] or less can be selected for [Target Bit Rate<br />
(kbps)].<br />
- Only one of [0.5], [1], and [1.5] can be selected for [I<br />
Frame Interval (sec)].<br />
• Since the [Pre-event Buffer] and [Post-event Buffer] set the<br />
maximum value, it may not be possible to record the<br />
specified number of frames or seconds of video depending<br />
on conditions.<br />
(7) [Format]<br />
Click [Exec] to format the SD memory card.<br />
Formatting erases all video and logs on the memory<br />
card.<br />
Setting Page<br />
75
SD Card <strong>Operation</strong>s (mount status)<br />
SD Card Information<br />
(1) [Mount/Unmount]<br />
In mount status, [Unmount] will appear. Click<br />
[Unmount] to unmount the SD memory card.<br />
Important<br />
Be sure to perform the unmount process when turning off the<br />
power to the camera or removing the SD memory card. Failing<br />
to unmount first may result in management file problems or the<br />
SD memory card becoming inaccessible.<br />
You can use the Memory Card Unmount Tool (p. 16) to mount/<br />
unmount memory cards from multiple cameras at the same<br />
time.<br />
(2) [<strong>Operation</strong> Settings], [Video Format], [Pre-event<br />
Buffer], [Post-event Buffer], [Overwrite videos]<br />
These settings are the same as in “SD Card<br />
<strong>Operation</strong>s (unmount status)”.<br />
(3) [Delete Videos]<br />
Click [Exec] to delete videos from the SD memory<br />
card. During deletion, an indicator will appear to the<br />
right of [Exec].<br />
Note<br />
• It may take 40 minutes or more to delete videos from the SD<br />
memory card.<br />
• Deleting videos takes time, so it is recommended that you stop<br />
video transmission and upload processes.<br />
(4) [Recreate Video Management Information]<br />
Click [Exec] to recreate the video management<br />
information.<br />
During re-creation, an indicator will appear to the right<br />
of [Exec]. The SD memory card is inaccessible during<br />
this time.<br />
Note<br />
• It may take 90 minutes or more to recreate video management<br />
information.<br />
• Recreating video management information takes time, so it is<br />
recommended that you stop video transmission and upload<br />
processes.<br />
(1) [SD Card Recognition]<br />
Displays the status of the SD memory card. The three<br />
status messages are [SD Card Not Inserted], [Not<br />
Mounted] and [Mounted].<br />
(2) [SD Card <strong>Operation</strong> Status]<br />
Displays the operation status of the SD memory card.<br />
The three status messages are as follows.<br />
• [Operable]: This status indicates that any operation<br />
may be performed.<br />
• [Recreating video management information]: This<br />
status indicates that video management information<br />
is being recreated. Other operations cannot be<br />
performed.<br />
• [Deleting videos]: This status indicates that videos<br />
are being deleted. Other operations cannot be<br />
performed.<br />
(3) [Video Management Information Status]<br />
Displays the status of the video management<br />
information. The two status messages are as follows.<br />
• [Normal]: This status indicates that video<br />
management information is normal.<br />
• [Video Management Information Recreation<br />
Required]: This status indicates that management<br />
files are corrupted or not consistent with saved<br />
video files. It is necessary to click [Exec] in<br />
[Recreate Video Management Information] to<br />
recreate video management information.<br />
(4) [Video Saving]<br />
Displays whether or not videos can be saved to the<br />
SD memory card.<br />
• [Can Save]: Indicates that videos can be saved to<br />
the SD memory card.<br />
• [Cannot Save]: Indicates that videos cannot be<br />
saved to the SD memory card. This status may be<br />
caused when the SD memory card is not mounted,<br />
the video file count upper limit has been reached,<br />
the video management file is corrupted or the card<br />
is write-protected.<br />
(5) [SD Card Capacity (KB)]<br />
Displays the SD memory card storage capacity.<br />
(6) [Used Capacity (KB)]<br />
Displays information about storage used on the SD<br />
memory card.<br />
76
[Memory Card] SD Memory Card <strong>Operation</strong>s and Settings<br />
Important<br />
Information recorded to the SD memory card may be regarded<br />
as “personal information”. Take sufficient precautions for<br />
handling this information when releasing to third parties for<br />
disposal, transfer or repair.<br />
Note<br />
For accessing files saved to the SD memory card, see “SD<br />
Memory Card Access” (p. 146).<br />
5<br />
Setting Page<br />
77
[Reboot Item] Setting Items Requiring Rebooting<br />
The following settings that require rebooting before<br />
changes take effect can be found on a single page.<br />
• LAN, IPv4, IPv6, Installation Conditions (<strong>VB</strong>-<strong>H41</strong><br />
only), HTTP Server<br />
Important<br />
These settings relate to network connectivity. If any setting is<br />
changed to a value that may disable camera connection from<br />
the active web browser, a dialog box appears and alerts the<br />
user.<br />
Click [OK] to apply the new setting.<br />
Depending on the new setting, it may not be possible to<br />
connect to the camera again after rebooting. If this happens, a<br />
candidate URI for reconnecting the camera will appear if<br />
available.<br />
Try the URI displayed to reconnect the camera.<br />
If you cannot connect to the camera through the displayed URI,<br />
contact your System Administrator.<br />
* Settings related to network connectivity in the [Reboot Item] menu<br />
are [LAN Interface], [Maximum Packet Size], [IPv4 Address<br />
Setting Method], [IPv4 Address], [Subnet Mask], [IPv4 Default<br />
Gateway Address], [AutoIP], [IPv6], [Auto (RA)], [Auto<br />
(DHCPv6)], [IPv6 Address (Manual)], [Prefix Length], [IPv6<br />
Default Gateway Address], [HTTP Port] and [HTTPS Port].<br />
(1) [LAN]<br />
LAN interface, maximum packet size settings (p. 47)<br />
(2) [IPv4]<br />
IP address, IPv4 settings, etc. (p. 47)<br />
(3) [IPv6]<br />
Settings regarding IPv6 (p. 48)<br />
(4) [Installation Conditions]<br />
Dome setting (p. 54)<br />
(5) [HTTP Server]<br />
Authentication method, HTTP, and HTTPS port<br />
settings (p. 63)<br />
78
[Maintenance]<br />
Viewing Event Logs and Current Settings and Performing Maintenance<br />
Tool<br />
The following items can be used here.<br />
• Tool<br />
Display or Initialize Camera Settings, and Back<br />
Up/Restore Settings.<br />
Caution<br />
• You must not turn off the camera while it is<br />
performing the [Restore Default Settings]<br />
operation. Turning off the camera at this stage<br />
may result in making it unable to boot correctly.<br />
• Never touch the camera head during<br />
initialization. Initialization failure or malfunction<br />
may result.<br />
5<br />
Setting Page<br />
(1) [View Logs]<br />
Display a history of camera operations and<br />
connections to each viewer, etc.<br />
(2) [View Current Settings]<br />
Display a list of current settings.<br />
(3) [Reboot]<br />
The camera is rebooted.<br />
(4) [Restore Default Settings]<br />
Discard user-defined settings and restore all setting<br />
items to factory default settings except camera<br />
administrator password, network setting, date, time,<br />
time zone, SSL certificate, encrypted communications<br />
and host access restrictions. Executing this operation<br />
will reboot the camera automatically.<br />
(5) [Back Up Settings]<br />
Back up all settings, other than the date and time, to a<br />
memory card.<br />
The IP address, SSL certificates, and private key files<br />
are also backed up.<br />
(6) [Restore Settings]<br />
Restore all settings, other than the date and time, from<br />
a backup file on a memory card.<br />
The IP address, SSL certificates, and private key files<br />
are also restored.<br />
The camera reboots after settings are restored.<br />
Note<br />
• It is recommended that you write down all current setting<br />
values before restoring factory default settings in [Restore<br />
Default Settings] (p. 166).<br />
• The camera can be restored to factory default settings using<br />
the reset switch as well. Note, however, that this will reset all<br />
camera settings to factory default settings except for date and<br />
time (p. 165).<br />
Important<br />
If the restored settings were backed up from a different camera,<br />
note that an address conflict on the network may occur.<br />
79
80
Chapter 6<br />
Admin Tools<br />
❏ Privacy Mask Setting<br />
❏ Panorama Image Registration<br />
❏ View Restriction Setting<br />
❏ Camera Preset Setting<br />
❏ Intelligent Function Setting<br />
❏ Viewing Logs<br />
❏ Managing SD Memory Card Video
Admin Tools Overview<br />
Admin Tools consists of applications for remotely making camera settings, checking operating conditions, and acquiring logs.<br />
Admin Tools<br />
(p. 84)<br />
This is the top page of Admin Tools. All tools can be<br />
launched from this page.<br />
Panorama Creation Tool<br />
(p. 89)<br />
A panorama image creation tool that shows the entire<br />
area that can be captured by this camera. Once a<br />
panorama image is captured and registered, it is shown in<br />
the panorama display panel of the viewer. As the<br />
panorama image is also shown when view restrictions and<br />
presets are set, you can see at a glance which part of the<br />
entire area the set area is occupying.<br />
Privacy Mask Setting Tool<br />
(p. 85)<br />
A tool that lets you hide areas you do not want to be seen<br />
by setting privacy masks. Up to eight areas can be<br />
masked, allowing thorough protection of privacy.<br />
View Restriction Setting Tool<br />
(p. 92)<br />
The View Restriction Tool restricts the viewable capture<br />
range in the <strong>VB</strong> Viewer. You can set the desired range<br />
with the mouse by referring to the preview in panorama<br />
mode.<br />
82
Admin Tools Overview<br />
Preset Setting Tool<br />
(p. 96)<br />
A tool that lets you set presets and the home position<br />
visually. You can make the desired settings with the<br />
mouse by referring to the preview in panorama or full<br />
image mode. You can also set [Preset Tour] whereby the<br />
camera tours and monitors multiple presets.<br />
Log Viewer<br />
(p. 115)<br />
This viewer shows the logs of operating conditions of the<br />
camera.<br />
6<br />
Intelligent Function Setting Tool<br />
(p. 103)<br />
This tool is used to set intelligent functions that perform<br />
uploads, notify the viewer, record a log, etc., if a change<br />
has occurred in the captured image due to movement of a<br />
subject. By setting the conditions, you can let the camera<br />
detect events such as “moving object”, “abandoned<br />
object”, “removed object”, “camera tampering”,<br />
“passing”. You can view the image on the camera while<br />
setting the position and size of the detection area and line,<br />
detection conditions, etc.<br />
Note<br />
On the control panel of Windows, the decimal point in a value is<br />
always indicated by “.” regardless of the settings of [Region and<br />
Language]. Also, the date is shown in the “yyyy/mm/dd” or “mm/<br />
dd” format, while the time is shown in the “hh:mm:ss” format. (y,<br />
m, d, h, m, and s indicate year, month, day, hour, minute, and<br />
second, respectively)<br />
Recorded Video Utility<br />
(p. 118)<br />
This is a utility for browsing and managing video recorded<br />
on SD memory cards inserted in the camera. You can<br />
display a list of recorded video, play it back, delete it and<br />
download it.<br />
Admin Tools<br />
83
Accessing the Admin Tools<br />
Launching the Admin Tools<br />
The Admin Tools can be launched from the top page of<br />
the camera.<br />
1<br />
Start the top page of the camera (p. 42).<br />
• In environments without a proxy server, select [Internet<br />
options] > [Connections] tab > [LAN settings] and clear the<br />
[Automatically detect settings] checkbox in Internet Explorer.<br />
2<br />
3<br />
Click [Admin Tools].<br />
A user authentication window appears.<br />
Enter a user name and password and click [OK]<br />
(p. 42).<br />
The Admin Tools top page will appear.<br />
(1) (2) (3)<br />
(4)<br />
(1) [Admin Viewer]<br />
Click to launch Admin Viewer.<br />
(2) [Setting Page]<br />
Click to launch Setting Menu.<br />
(3) [Back to top]<br />
Click this button to navigate to the top page.<br />
(4) [Admin Tools]<br />
Click the buttons of any tool to launch Admin Tools.<br />
Important<br />
The Admin Tools Certificate must be installed on any PCs using<br />
[Admin Tools]. (p. 26)<br />
Note<br />
• The first time you launch any of the Admin Tools, wait about 5<br />
to 10 seconds until the software is downloaded to your PC.<br />
From then on, launching will be quicker. Also, when accessing<br />
via SSL encrypted communication, download time will take<br />
longer (about 20 to 30 seconds).<br />
• None of the following tools can be launched concurrently:<br />
Privacy Mask Setting Tool, Panorama Creation Tool, View<br />
Restriction Setting Tool, Preset Setting Tool and Intelligent<br />
Function Setting Tool.<br />
84
Privacy Mask Setting Tool<br />
A tool that lets you cover certain areas on the camera image with privacy masks.<br />
When the camera is panned, tilted, or zoomed, the privacy mask area responds to the camera image.<br />
You can set privacy masks<br />
for up to eight areas while<br />
checking the image on the<br />
camera.<br />
6<br />
Display Screen of Privacy Mask Setting Tool<br />
Admin Tools<br />
(1)<br />
(2) (3)<br />
(7)<br />
(8)<br />
(9)<br />
(10)<br />
(11)<br />
(12)<br />
(13)<br />
(14)<br />
(15)<br />
(15)-1<br />
(15)-2<br />
(15)-3<br />
(15)-4<br />
(15)-5<br />
(6) (5)(4)<br />
(16) (17)<br />
(1) Image Display Area<br />
The image currently captured by the camera is<br />
shown. Privacy masks can be resized/moved in the<br />
image display area.<br />
Pan, tilt, and zoom operations are the same as in the<br />
<strong>VB</strong>-<strong>H41</strong>/610/710 Viewer. For details, see “How to<br />
Operate the Viewer” (p. 128).<br />
(2) [Switch Mouse <strong>Operation</strong>] button<br />
Each time this button is clicked, the button switches<br />
between and , and the mouse operation in the<br />
image display area changes.<br />
When the button is set to , privacy masks can be<br />
resized/moved. While in this mode, the camera<br />
orientation will not change.<br />
When the button is set to , pan/tilt operations can<br />
be performed.<br />
(3) [Switch Screen Size] button<br />
Each time this button is clicked, the screen size of the<br />
image display area switches between “480 x 270” and<br />
“960 x 540”.<br />
(4) [BLC] (Back Light Compensation) button<br />
This button turns on/off backlight compensation. This<br />
control is effective when the image is dark due to<br />
backlight.<br />
(5) [Obtain/Release Camera Control] button<br />
This button is used to obtain/release the camera<br />
control privileges. For details, see “Obtaining Camera<br />
Control Privileges” (p. 130). If camera control<br />
privileges have not yet been obtained elsewhere,<br />
such as in the Admin Viewer, the control privileges will<br />
85
e obtained the moment the Privacy Mask Setting<br />
Tool is launched.<br />
(6) [Control for Admin] button<br />
Displays the Control for Admin Panel (p. 122).<br />
(7) Registered Privacy Mask Display Area (Capture area)<br />
You can check the settings for the area where the<br />
camera can physically capture privacy masks.<br />
Even if a panorama image is saved in the camera, it<br />
will not be displayed here.<br />
(8) [Registered Privacy Masks]<br />
Show the number of registered privacy masks. You<br />
can set up to eight privacy masks.<br />
(9) [Next]<br />
When multiple privacy masks are set, clicking this<br />
button switches to the privacy mask selected.<br />
(10)[Color]<br />
Choose the color for the privacy mask area. All<br />
privacy mask areas are set to the selected color.<br />
(11)[Quick adding]<br />
Add a privacy mask area and save it in the camera.<br />
(12)[Quick change]<br />
Change a privacy mask area and save it in the<br />
camera.<br />
(13)[Delete]<br />
Delete the privacy mask area selected from the<br />
camera.<br />
(14)[Image Stabilizer]<br />
Show the usage condition of the image stabilizer. Set<br />
the image stabilizer under [Camera] in the Setting<br />
page (p. 53).<br />
(15)[Detailed Settings]<br />
Show the detailed settings.<br />
(15)-1 [Enable privacy mask] checkbox<br />
Select the checkbox if you want to enable the<br />
selected privacy mask area settings.<br />
(15)-2 [Pan], [Tilt], [Zoom]<br />
You can specify values for each camera angle.<br />
(15)-3 [Get camera info]<br />
Load the current camera angle. Load the pan, tilt,<br />
and zoom settings of the camera and show them in<br />
(15)-2.<br />
(15)-4 [Privacy Mask Position and Size]<br />
Set left and upper edge, width, and height of the<br />
privacy mask.<br />
(15)-5 [Preview settings]<br />
The settings will be reflected in the image display<br />
area and in the registered privacy mask display<br />
area (capture area).<br />
(16)[Restore settings]<br />
Clear the settings you have specified on the screen of<br />
the tool and restore the settings saved in the camera.<br />
(17)[Save settings]<br />
Save the privacy mask settings specified under<br />
[Detailed Settings] in the camera.<br />
Setting the Privacy Mask Area<br />
Set the privacy mask area while checking the image on<br />
the camera.<br />
1<br />
2<br />
3<br />
4<br />
If you have not yet obtained the camera control<br />
privileges, click the [Obtain/Release Camera Control]<br />
button and obtain the control privileges.<br />
Set the position and size of the privacy mask area.<br />
A preview frame showing the privacy mask area is<br />
shown in the image display area.<br />
If you want to change the size, drag the square<br />
markers (■) positioned at the four sides of the preview<br />
frame. Drag from inside the frame to move the privacy<br />
mask area.<br />
If you want to cancel the changes and restore the<br />
settings saved in the camera, click [Restore settings].<br />
Click [Quick adding] to save the privacy mask area.<br />
The set privacy mask area is saved in the camera.<br />
You can set up to eight privacy masks. Repeat the<br />
setting operations to set multiple privacy mask areas.<br />
Confirm privacy mask areas.<br />
Saved privacy mask areas are shown in the image<br />
display area and registered privacy mask display<br />
area (capture area).<br />
86
Privacy Mask Setting Tool<br />
<strong>VB</strong>-<strong>H41</strong><br />
(1) (2) (3) (4)<br />
Important<br />
• The privacy mask areas are also part of the intelligent<br />
function detection area. Subject movement may be seen.<br />
<strong>VB</strong>-H610VE/<strong>VB</strong>-H610D/<strong>VB</strong>-H710F<br />
(1) (3)<br />
• Privacy masks are applied to all images transmitted from the<br />
camera (live video, uploaded images, recorded video, video<br />
recorded to an SD memory card).<br />
• The privacy mask function is not available in the following<br />
situations:<br />
– While the camera is starting up after being turned on<br />
– Camera video in the Camera Angle Setting Tool<br />
– While a panorama image is being created<br />
6<br />
(1) Privacy Mask Area<br />
Enabled privacy mask areas are shown filled with<br />
color. Disabled privacy mask areas are just shown<br />
in a frame.<br />
(2) View Restriction Area<br />
This is the area set with the View Restriction Setting<br />
Tool.<br />
(3) Privacy Mask Area<br />
Privacy masks for which the [Enable privacy mask]<br />
checkbox is selected are shown filled with color.<br />
Privacy masks that are not selected are shown in a<br />
hatched frame.<br />
(4) Maximum Wide-angle Area<br />
This is the visible area when the camera is at<br />
maximum wide angle. This area is only shown<br />
when a privacy mask area (3) is being dragged.<br />
• Privacy mask areas cannot be set in digital zoom areas.<br />
• Privacy masks may deviate slightly from the specified<br />
position depending on the zoom position.<br />
• Set the privacy mask area to a somewhat larger size than the<br />
area you want to hide. Also, be sure to confirm that after<br />
setting a privacy mask, the area you want to hide does not<br />
become visible when the camera direction is altered by pan,<br />
tilt, or zoom operations.<br />
• If the privacy mask settings were changed after a panorama<br />
image was saved using the Panorama Creation Tool, the<br />
panorama image must be recreated using the Panorama<br />
Creation Tool.<br />
• Reconfigure all privacy mask positions and sizes when<br />
reconfiguring privacy mask settings after the image stabilizer<br />
setting was changed.<br />
Admin Tools<br />
87
Changing/Deleting a Privacy Mask Area<br />
How to Change<br />
1<br />
Select the privacy mask area you want to change.<br />
Click the privacy mask area you want to change in the<br />
registered privacy mask display area (capture area)<br />
or select a privacy mask area by clicking [Next].<br />
2<br />
Change the position and size of the privacy mask area.<br />
Privacy mask areas can be changed using the mouse<br />
or by entering values.<br />
Entering values<br />
Click [Detailed Settings].<br />
Enter a value for the [Privacy Mask Position and Size]<br />
and click [Preview settings] to check the position and<br />
size of the preview frame.<br />
Note<br />
Select a disabled privacy mask and click [Quick change] to<br />
enable it.<br />
How to Delete<br />
Select the privacy mask area you want to delete and click<br />
[Delete].<br />
The privacy mask area that was saved in the camera is<br />
deleted.<br />
Click [Get camera info] to load the current pan, tilt,<br />
and zoom settings.<br />
3<br />
If you want to cancel the changes and restore the<br />
settings saved in the camera, click [Restore settings].<br />
Click [Quick change] to save the privacy mask area.<br />
The changed privacy mask area is saved in the<br />
camera.<br />
88
Panorama Creation Tool<br />
A panorama image capture/creation tool that shows the entire area that can be captured by this camera. When performing<br />
pan, tilt, or zoom operations, setting presets using the viewer, etc., you can see at a glance which part of the entire area the<br />
set area is occupying.<br />
6<br />
Admin Tools<br />
Create/capture a panorama image with the Panorama Creation Tool and save<br />
it in the camera.<br />
Admin Viewer<br />
Preset Setting Tool<br />
You can see at a glance which<br />
part of the entire area the<br />
displayed area is occupying.<br />
Important<br />
If the privacy mask settings were changed using the Privacy Mask Setting Tool, it is<br />
recommended that you recreate the panorama image to reflect the new privacy mask<br />
settings in the panorama image.<br />
89
Display Screens of Panorama Creation Tool<br />
(1)<br />
(2) (3) (4)<br />
(5)<br />
(6)<br />
(12)<br />
(7)<br />
(13)<br />
(8)<br />
(11)<br />
(14)<br />
(9) (10)<br />
(1) [Load from camera]<br />
Show the panorama image saved in the camera.<br />
(2) [Save to camera]<br />
Save the currently shown panorama image in the<br />
camera.<br />
(3) [Load from file]<br />
Show JPEG files as a panorama image.<br />
(4) [Save to file]<br />
Save the currently shown panorama image as a JPEG<br />
file.<br />
(5) Creation date and time<br />
Show the date and time a panorama image was<br />
captured or loaded from a JPEG file.<br />
(6) [Clear]<br />
Delete the currently shown panorama image.<br />
(7) Panorama Image Display Area<br />
Show the panorama image.<br />
(8) [Cancel]<br />
Stop the capture of a panorama image.<br />
(9) [Start Panorama Creation]<br />
Start capturing a panorama image.<br />
(10)[Finish Panorama Creation]<br />
Confirm the captured panorama image.<br />
(11)Status Display<br />
Show the panorama image capturing status, such as<br />
[Capturing images...], etc.<br />
(12)[Exposure Lock]<br />
Select [Center] or [Current Position] for the auto<br />
exposure lock position.<br />
(13)[White Balance Lock]<br />
Set the white balance to [Do not lock], [Center], or<br />
[Current Position].<br />
(14)[Focus Lock]<br />
Set the focus to [Do not lock], [Center], or [Current<br />
Position].<br />
Capturing a Panorama Image<br />
1<br />
Click [Start Panorama Creation].<br />
The capture is started.<br />
Change the settings beforehand for [Exposure Lock],<br />
[White Balance Lock], and [Focus Lock] as<br />
necessary.<br />
To stop the capture when underway, click [Cancel].<br />
When you position the mouse pointer over the<br />
panorama image, a white grid is shown. If you want to<br />
recapture part of the panorama, position the pointer<br />
inside the grid, right-click and select [Recapture].<br />
To recapture an entire panorama image, click [Start<br />
Panorama Creation] again.<br />
90
Panorama Creation Tool<br />
Note<br />
• While a panorama image is being captured, the image<br />
stabilizer function is temporarily disabled.<br />
• While a panorama image is being created, all connections<br />
other than Administrators and RTP connections are cut off.<br />
• When a small value is entered for [Maximum Frame Rate:<br />
Video Transmission] under [Video] > [JPEG] in the Setting<br />
page, panorama capture is slowed down.<br />
2<br />
When the capture is complete, click [Finish Panorama<br />
Creation] if the image is satisfactory.<br />
Saving/Deleting a Panorama Image on the<br />
Camera<br />
How to Save<br />
Click [Save to camera], and then click [OK] in the<br />
displayed dialog box.<br />
The panorama image is saved to the camera.<br />
Saving a Panorama Image as Image Files/<br />
Opening from Image Files<br />
You can save a recorded panorama image as an image<br />
file or open image files as a panorama image. Only JPEG<br />
image files created using Panorama Creation Tool can be<br />
handled.<br />
How to Save<br />
Click [Save to file] and then select the folder you want to<br />
save the image file in and enter the file name in the<br />
displayed dialog box.<br />
How to Open from Image Files<br />
Click [Load from file] and then select the image files you<br />
want to use in the displayed dialog box.<br />
6<br />
Admin Tools<br />
How to Delete<br />
1<br />
To delete the panorama image saved to the camera,<br />
click [Clear].<br />
2<br />
The image in the panorama image display area will be<br />
cleared.<br />
Click [Save to camera], and then click [OK] in the<br />
displayed dialog box.<br />
The panorama image saved in the camera is deleted.<br />
91
View Restriction Setting Tool<br />
View Restriction Setting Tool is a tool that limits the range that can be captured by the camera. If view restrictions have been<br />
set, you can limit the displayable capture range using the viewer.<br />
To limit zoom or a certain field of view when publishing live video, use<br />
the View Restriction Setting Tool to set the view restrictions easily.<br />
[Apply View Restriction Setting]<br />
Restrictions set by the View Restriction Setting Tool are applied in the following cases.<br />
• When the Admin Viewer is accessed with authorized user authorities<br />
• When the <strong>VB</strong> Viewer is accessed<br />
• When accessed via the Intelligent Function Setting Tool<br />
• When accessed via RM-Lite<br />
92
View Restriction Setting Tool<br />
Display Screens of View Restriction Setting Tool<br />
(1)<br />
(2)<br />
(3)<br />
(6)<br />
(6)-1<br />
(6)-2<br />
(6)-3<br />
(7)<br />
(8)<br />
(9)<br />
(10)<br />
6<br />
(11)<br />
Admin Tools<br />
(5) (4) (12) (13)<br />
(1) Image Display Area<br />
The image currently captured by the camera is shown.<br />
Pan, tilt, and zoom operations are the same as in the<br />
<strong>VB</strong>-<strong>H41</strong>/610/710 Viewer. For details, see “How to<br />
Operate the Viewer” (p. 128).<br />
(2) [Switch Mouse <strong>Operation</strong>] button<br />
Click the button to switch to . In this mode, move<br />
the mouse pointer to the image display area and click<br />
to operate the pan and tilt. Click the button again to<br />
return to .<br />
(3) [Switch Screen Size] button<br />
Each time this button is clicked, the screen size of the<br />
image display area switches between “480 x 270” and<br />
“960 x 540”.<br />
(4) [Obtain/Release Camera Control] button<br />
This button is used to obtain/release the camera<br />
control privileges. For details, see “Obtaining Camera<br />
Control Privileges” (p. 130).<br />
(5) [Control for Admin] button<br />
Displays the Control for Admin Panel (p. 122).<br />
(6) [Panorama Screen]<br />
The panorama image registered in the camera is<br />
shown. View restriction preview frames, representing<br />
the view restriction setting values, are also shown. You<br />
can drag the frames to change their shapes, with the<br />
new settings being reflected in View Restriction<br />
Settings.<br />
• View restriction preview frame<br />
(6)-1 Pan/tilt preview frame (red frame)<br />
Range of field of view defined by<br />
top/ bottom/left/right edges<br />
(6)-2 Wide-angle preview frame (green frame)<br />
Wide-angle restriction setting (restriction of<br />
capture frame)<br />
(6)-3 Telephoto preview frame (yellow frame)<br />
Telephoto restriction setting (restriction of<br />
maximum zoom ratio)<br />
(7) [Digital Zoom]<br />
The current digital zoom usage status of the camera is<br />
shown in real time.<br />
(8) [Image Stabilizer]<br />
The current image stabilizer usage status of the<br />
camera is shown in real time.<br />
(9) [Apply the view restriction]<br />
To use view restrictions, select this checkbox.<br />
(10)View restriction setting entry boxes and [Get value]<br />
You can enter a value in each view restriction setting<br />
entry box to change the applicable setting. You can<br />
load the values for the current camera angle to the<br />
view restriction settings by clicking [Get value].<br />
• View restriction settings<br />
[Upper Limit]: Top limit of the view restriction. Click<br />
[Get value] to load the top edge<br />
value of the current camera angle.<br />
[Lower Limit]: Bottom limit of the view restriction.<br />
Click [Get value] to load the bottom<br />
edge value of the current camera<br />
angle.<br />
[Left Limit]: Left limit of the view restriction. Click<br />
[Get value] to load the left edge value<br />
of the current camera angle.<br />
[Right Limit]: Right limit of the view restriction.<br />
Click [Get value] to load the right<br />
edge value of the current camera<br />
angle.<br />
[Telephoto]: Telephoto limit of the view restriction.<br />
Click [Get value] to load the zoom<br />
ratio of the current camera angle.<br />
93
[Wide-angle]: Wide-angle limit of the view restriction.<br />
Click [Get value] to load the zoom<br />
ratio of the current camera angle.<br />
(11)[Display in panorama screen]<br />
1<br />
Apply the current view restriction settings to the<br />
panorama screen. At this point, the settings are not<br />
yet saved in the camera. Be sure to click [Save<br />
2<br />
settings].<br />
(12)[Restore settings]<br />
Clear the settings you have specified on the screen of 3<br />
the tool and restore the settings saved in the camera.<br />
(13)[Save settings]<br />
Save the set view restriction in the camera.<br />
After the view restriction has been set, be sure to save<br />
the settings in the camera by clicking [Save settings].<br />
Setting View Restrictions<br />
You can set view restrictions by entering values in the<br />
view restriction setting entry boxes, or by changing the<br />
current settings in the view restriction preview frame of the<br />
panorama screen or from the camera angle in the image<br />
display area. Select appropriate settings according to the<br />
environment in which the camera is operated or the 4<br />
purpose for which it is used.<br />
• Use the preview frame on the panorama<br />
image to set view restrictions.<br />
Select the [Apply the view restriction] checkbox.<br />
1<br />
Drag to change the [Pan/tilt preview frame (red<br />
2<br />
frame)], [Telephoto preview frame (yellow frame)], or<br />
[Wide-angle preview frame (green frame)] shown on<br />
the panorama screen to set view restrictions.<br />
When the telephoto/wide-angle preview frames are<br />
enlarged/shrunk, the aspect ratio remains the same.<br />
At this time, you can also enter view restrictions by<br />
entering values in the view restriction setting entry<br />
boxes. If you have adjusted the view restriction<br />
settings, click [Display in panorama screen]. The<br />
settings are reflected in the preview frame of the<br />
panorama screen.<br />
3 Click [Save settings].<br />
Confirm that the settings have been applied correctly,<br />
and then click [Save settings] to save the settings in<br />
the camera.<br />
• Setting by Loading Position Information from<br />
Image in Image Display Area<br />
Select the [Apply the view restriction] checkbox.<br />
Click the [Obtain/Release Camera Control] button to<br />
obtain the control privileges of the camera.<br />
Operate the camera to adjust the top edge, bottom<br />
edge, left edge, right edge, telephoto, or wide angle to<br />
desired positions, and click [Get value] each time.<br />
The loaded view restriction can be checked in the<br />
view restriction setting entry box or view restriction<br />
preview frame.<br />
Click [Save settings].<br />
The settings are saved in the camera.<br />
Important<br />
• If you have changed the camera mounting method,<br />
recapture the panorama image and register it again.<br />
• The panorama screen may be slightly different from the<br />
actual image. After view restrictions have been set, be sure<br />
to confirm with the <strong>VB</strong> Viewer that the view restrictions have<br />
been reflected correctly.<br />
• Confirm the settings using the <strong>VB</strong> Viewer. (View restrictions<br />
are not applied to the image display area of this tool, nor to<br />
the Admin Viewer.)<br />
• If the image stabilizer or digital zoom setting has been<br />
changed, check the view restriction settings again.<br />
Note<br />
• Even when view restrictions are set, an area outside the view<br />
restriction may still appear momentarily when the camera is<br />
controlled near the boundary of the view restriction.<br />
• To cancel the view restrictions, clear the [Apply the view<br />
restriction] checkbox and then click [Save settings].<br />
• If the setting fields are cleared while the [Apply the view<br />
restriction] checkbox is selected, the maximum view restriction<br />
will be set.<br />
• The controllable range and range that can be captured are as<br />
follows.<br />
94
View Restriction Setting Tool<br />
Maximum vertical capture area<br />
Tilt controllable area<br />
Pan controllable area<br />
Maximum wide-angle viewing angle<br />
Maximum horizontal captured area<br />
• The pan and tilt ranges vary depending on the zoom ratio<br />
(view angle).<br />
Setting view restrictions<br />
automatically restricts<br />
the camera operating<br />
angle.<br />
When wide-angle is selected,<br />
the capture of the camera<br />
operating angle would exceed<br />
the view restrictions if it<br />
remained the same. Therefore, it<br />
is narrowed automatically.<br />
View restrictions<br />
6<br />
Admin Tools<br />
Camera operating angle<br />
Camera<br />
Captured image range<br />
• If the view restriction will be exceeded as a result of controlling<br />
the zoom toward the wide-angle side, the camera will first pan<br />
and tilt to a position where the maximum wide-angle zoom will<br />
be within the viewing restriction area. Wide-angle zoom control<br />
will then be enabled within the view restriction area.<br />
Captured image<br />
First, the center of the<br />
maximum wide-angle<br />
zoom is panned and<br />
tilted.<br />
After panning and<br />
tilting, wide-angle zoom<br />
control is enabled within<br />
the view restriction.<br />
Restricted view angle<br />
Zoom<br />
out<br />
Zoom<br />
out<br />
• Reducing the view restriction may also reduce the zoom range.<br />
95
Preset Setting Tool<br />
A tool that lets you set presets and the home position. You can make the desired settings with the mouse by referring to the<br />
preview in the panorama or full image mode. You can also set Preset Tour whereby the camera tours and monitors multiple<br />
presets.<br />
Preset Setting Tool<br />
Set preset tour after the<br />
presets have been set.<br />
Reflecting in the viewer<br />
Executing preset tour<br />
Important<br />
• If you want to use intelligent functions, it is strongly recommended that you<br />
use the Preset Setting Tool to register a preset that corresponds to the camera<br />
position of the area where you want to use intelligent functions.<br />
• Presets that were set with the Preset Setting Tool cannot be used for<br />
the settings of intelligent functions.<br />
96
Preset Setting Tool<br />
Display Screens of Preset Setting Tool<br />
Preset Setting Tool has two display screens, the [Preset] tab and the [Preset Tour] tab.<br />
With the [Preset] tab, up to 20 presets and the home position are set while referring to the panorama screen or full image.<br />
With the [Preset Tour] tab, Preset Tour is set whereby the camera tours and monitors multiple presets.<br />
The following explains the [Preset] tab display screen.<br />
For the [Preset Tour] tab, see “Preset Tour” (p. 101).<br />
• [Preset] Tab Display Screen<br />
(1)<br />
(2) (3)<br />
(6) (13)<br />
6<br />
(7)<br />
(8)<br />
(9)<br />
(10)<br />
(11)<br />
(11)-1<br />
(11)-2<br />
(14)<br />
(15)<br />
(16)<br />
(17)<br />
Admin Tools<br />
(12)<br />
(18)<br />
(19)<br />
(5) (4) (20) (21)<br />
(1) Image Display Area<br />
The image currently captured by the camera is<br />
shown.<br />
Pan, tilt, and zoom operations are the same as in the<br />
<strong>VB</strong>-<strong>H41</strong>/610/710 Viewer. For details, see “How to<br />
Operate the Viewer” (p. 128).<br />
(2) [Switch Mouse <strong>Operation</strong>] button<br />
Click the button to switch to . In this mode, move<br />
the mouse pointer to the image display area and click<br />
to operate the pan and tilt. Click the button again to<br />
return to .<br />
(3) [Switch Screen Size] button<br />
Each time this button is clicked, the screen size of the<br />
image display area switches between “480 x 270” and<br />
“960 x 540”.<br />
(4) [Obtain/Release Camera Control] button<br />
This button is used to obtain/release the camera<br />
control privileges. For details, see “Obtaining Camera<br />
Control Privileges” (p. 130).<br />
(5) [Control for Admin] button<br />
Displays the Control for Admin Panel (p. 122).<br />
(6) [Panorama Screen]<br />
The panorama image registered in the camera is<br />
shown. A preset preview frame (yellow) reflecting the<br />
preset settings is shown, where you can drag to resize<br />
or move the frame and reflect the new frame in the<br />
preset settings. Also, if view restrictions are set, those<br />
areas are shown in a blue frame.<br />
(7) [Preset] tab, [Preset Tour] tab<br />
Switch between the preset setting tab and preset tour<br />
setting tab.<br />
(8) [Preset/Home Position] selection box<br />
Select the preset (from 1 to 20) or [home position] you<br />
want to set.<br />
(9) [Quick Registration]<br />
Load the current camera position, and register them<br />
as preset settings.<br />
(10)[Preset Name]<br />
You can enter a preset name of up to 64 characters.<br />
You can set a name in alphanumeric characters. Be<br />
sure to enter a single-byte alphanumeric preset name.<br />
When the [Home Position] is selected in (8), the preset<br />
name function is grayed out.<br />
In a [Preset Name], ASCII characters (spaces or<br />
printable characters) can be used.<br />
97
(11)[Detailed Settings]<br />
Show the detailed settings.<br />
(11)-1 [Show in viewers] checkbox<br />
Select this checkbox to use presets in the<br />
viewer. When the [Home Position] is selected in<br />
(8), this function is grayed out.<br />
(11)-2 Camera Parameter<br />
Enter the center angle of the desired angle in<br />
[Pan] and [Tilt]. In [Zoom], enter the view angle.<br />
• Camera Angle<br />
[Pan] ..... Set the pan position of the camera.<br />
[Tilt] ....... Set the tilt position of the camera.<br />
[Zoom] .. Set the viewing angle of the camera.<br />
• [BLC] (Back Light Compensation)<br />
Select [OFF] or [ON] for the BLC setting of the<br />
camera.<br />
• [Focus Mode]<br />
Select [Auto], [Manual], or [Fixed at infinity] for<br />
the focus mode of the camera. (p. 139)<br />
•[Smart Shade Control]<br />
Select [OFF] or a level from [1] (Mild) to [7]<br />
(Strong) for the smart shade control setting of<br />
the camera.<br />
• [White Balance]<br />
Set the white balance of the camera to [Auto]<br />
or according to the light source of the<br />
condition in which it is used. For details on<br />
light sources, see p. 52.<br />
• [R Gain], [B Gain]<br />
If white balance is set to [Manual], set the<br />
respective gains to a value between 0 and<br />
1023.<br />
(12)[Get camera info]<br />
Load the current camera angle of the image display<br />
area, or the [Focus] and [Smart Shade Control]<br />
settings of Control for Admin (p. 122), and reflect them<br />
in the panorama screen or camera parameter<br />
settings.<br />
(13)[Full Image]<br />
Displays the full image obtained from the camera. A<br />
preset preview frame (yellow) reflecting the preset<br />
settings is shown. If you drag to resize or move the<br />
frame, the new frame is reflected in the preset<br />
settings.<br />
(14)[Update Image]<br />
Load the full video from the current camera to update<br />
the video.<br />
(15)[Show in viewers] checkbox<br />
Select this checkbox to use presets in the viewer.<br />
When home position is selected in (8), this function is<br />
grayed out.<br />
(16)Camera Parameters<br />
Displays the values for the pan and tilt positions and<br />
zoom viewing angle in accordance with the size and<br />
position of the preset preview frame on [Full Image].<br />
(17)[Get Digital PTZ Info]<br />
Load the current crop position of the video display<br />
area to reflect it in the preset preview frame in [Full<br />
Image] and the camera parameters.<br />
(18)[Preview settings]<br />
Preview the image with the camera parameter values<br />
that are being edited in the video display area.<br />
(19)[Clear settings]<br />
Delete the settings for the preset selected.<br />
(20)[Restore settings]<br />
Clear the settings you have specified on the screen of<br />
the tool and restore the settings saved in the camera.<br />
(21)[Save settings]<br />
Save the edited preset settings in the camera.<br />
If presets have been set, be sure to save the settings<br />
by clicking [Save settings].<br />
Setting the Preset<br />
Select presets or home position as needed for the<br />
operating environment or desired objectives. A preset can<br />
be set in the following ways.<br />
• Setting from Camera Angle in the Image<br />
Display Area<br />
1<br />
2<br />
Select the preset you want to set from the [Preset/Home<br />
Position] selection box, and then fill the [Preset Name]<br />
field.<br />
Click the [Obtain/Release Camera Control] button to<br />
obtain the control privileges of the camera.<br />
98
Preset Setting Tool<br />
3<br />
Operate the camera from the image display area, set it<br />
to the desired position and click [Quick Registration].<br />
• Use the preview frame of the panorama<br />
screen to set presets<br />
• Using the Digital PTZ Function to Set Presets<br />
Use the Digital PTZ function to set part of the area that can<br />
be captured by the camera as a preset.<br />
Select the preset you want to set from the [Preset/<br />
Home Position] selection box, and then fill in the<br />
[Preset Name] field.<br />
1<br />
Use the preview frame of the panorama screen to set<br />
presets.<br />
Be sure to enter the preset name.<br />
Select the preset you want to set from the [Preset/Home<br />
1<br />
Position] selection box, and then fill the [Preset Name]<br />
field.<br />
Be sure to enter the preset name.<br />
Select the [Show in viewers] checkbox.<br />
2<br />
Click [Detailed Settings] and select the [Show in<br />
2<br />
viewers] checkbox.<br />
3<br />
Drag to move or resize the preset preview frame<br />
3<br />
(yellow) shown on the panorama screen to set the<br />
preset.<br />
If you click on the panorama screen, the preview<br />
frame will move to center on the clicked point.<br />
Click [Preview settings].<br />
Click [Preview settings].<br />
4 4<br />
The settings are reflected in the image display area.<br />
If you previewed incorrect settings, etc., and want to<br />
restore the settings registered in the camera, click<br />
[Restore settings].<br />
5 Click [Save settings]. Click [Save settings].<br />
5<br />
Change the position or size of the preset preview<br />
frame (yellow) displayed on [Full Image] to set the<br />
preset position.<br />
If you click on the full video, the preview frame will<br />
move to center on the clicked position.<br />
The settings are reflected in the video display area.<br />
If you previewed incorrect settings, etc., and want to<br />
restore the settings registered in the camera, click<br />
[Restore settings].<br />
6<br />
Admin Tools<br />
99
Note<br />
Important<br />
Digital PTZ is a function for transmitting only the specified part of<br />
• To use presets in the viewer, select the [Show in viewers]<br />
a 1920 x 1080 image. This function reduces the load on the<br />
checkbox.<br />
network because only part of the image is cropped and<br />
transmitted.<br />
• Set presets again if the camera mounting conditions have<br />
been changed.<br />
• If [Manual] is selected in [Focus Mode], manually adjust the<br />
• Specifying Detailed Settings<br />
focus while checking the actual image in the image display<br />
area. After the focus has been adjusted, set the focus using<br />
If you want to fine-tune the camera angle or to adjust the<br />
[Get camera info]. Click [Save settings] to save the focus<br />
image, etc., click [Detailed Settings] and specify the<br />
settings.<br />
detailed settings before saving the preset settings in the<br />
• If the image stabilizer setting is changed after a preset has<br />
camera.<br />
been set, the viewing angle during operation will no longer<br />
agree with the viewing angle at the time the preset was set<br />
Select the [Show in viewers] checkbox.<br />
1<br />
(p. 53). Check the preset settings again if the image<br />
stabilizer setting is changed.<br />
• If a dome housing is used, be sure to set presets with the<br />
dome installed.<br />
Note<br />
• Up to 20 presets can be set.<br />
• Changes to preset settings are not reflected in already<br />
connected viewers.<br />
• You can disable presets in the viewer by clearing the [Show in<br />
viewers] checkbox under [Detailed settings].<br />
• Preset positions cannot be set in the digital zoom area.<br />
Click [Get camera info].<br />
2<br />
The camera parameters in the image display area are<br />
loaded to [Detailed Settings].<br />
Fine-tune the camera angle and adjust the image<br />
3<br />
quality with focus or smart shade control while<br />
checking the image.<br />
Click [Preview settings].<br />
4<br />
The settings are reflected in the preview frame on the<br />
panorama screen and the image display area.<br />
If you previewed incorrect settings, etc., and want to<br />
restore the settings registered in the camera, click<br />
[Restore settings].<br />
5 Click [Save settings].<br />
100
Preset Setting Tool<br />
Preset Tour<br />
Set a preset tour whereby the camera tours and monitors<br />
the multiple presets currently set.<br />
• [Preset Tour] Tab Display Screen<br />
(9) [Pause (sec)]<br />
Set the time at which the camera stops at the preset<br />
position.<br />
You can set between 0 and 120 seconds in 5-second<br />
increments.<br />
(1)<br />
(2)<br />
(3)<br />
(5)<br />
(7)<br />
(8)<br />
(9)<br />
(10)<br />
(11)<br />
(4)<br />
(6)<br />
You can set between 1 and 120 seconds in 1-second<br />
increments.<br />
(10)[Add]<br />
Add the preset to the tour schedule list.<br />
(11)[Change]<br />
Change the speed or pause time between presets<br />
selected from the tour schedule list.<br />
Note<br />
• Preset tour is not performed while the camera is being<br />
controlled with viewers, Admin Tools, etc.<br />
6<br />
Admin Tools<br />
(1) [Preset Tour] selection box.<br />
Select when you want to perform a preset tour from<br />
the following options.<br />
[Not used]<br />
Preset tour is not performed.<br />
[For Viewers]<br />
Preset tour is performed when a camera is<br />
connected via the <strong>VB</strong> Viewer, etc.<br />
[Always]<br />
Preset tour is always performed.<br />
(2) Tour schedule list<br />
A list of presets set for preset tour.<br />
(3) [Up] / [Down]<br />
Select preset in the list and click [Up] or [Down] to<br />
change sequence of the tour schedule list. Presets<br />
tours are performed in order from the top of the list.<br />
(4) [Delete]<br />
Delete the preset selected from the tour schedule list.<br />
(5) [Preset] selection box<br />
Select the preset you want to add to the tour schedule<br />
list.<br />
(6) [Preview]<br />
The camera angle switches to the selected preset,<br />
and the new angle can be checked in the image<br />
display area.<br />
(7) [Speed (PT)]<br />
Select [Slow], [Normal], or [Fast] for the moving speed<br />
of the camera during panning/tilting.<br />
(8) [Speed (Z)]<br />
Select [Slow] or [Fast] for the camera speed during<br />
zoom.<br />
• Preset tour is not performed when control privileges are<br />
obtained by RM-Lite.<br />
• Setting the Preset Tour<br />
1<br />
2<br />
Select the touring method from the [Preset Tour]<br />
selection box.<br />
Select [For Viewers] or [Always].<br />
Select the preset number you want to add to the tour<br />
schedule from the [Preset] selection box, and then<br />
click [Add].<br />
The preset is registered in the tour schedule list. Up to<br />
20 presets can be registered.<br />
101
3<br />
Select a preset in the tour schedule list, and set the<br />
preset operation.<br />
In [Speed (PT)] and [Speed (Z)], you can set the pan,<br />
tilt, and zoom speeds of the preset.<br />
4<br />
5<br />
In [Pause (sec)], you can enter the number of<br />
seconds for the camera to remain stationary at the<br />
preset position.<br />
When [Preview] is clicked, the camera angle switches<br />
to this preset, and the new angle can be checked in<br />
the image display area.<br />
Click [Change].<br />
When you want to delete changes made to the tour<br />
schedule list and restore the settings registered in the<br />
camera, click [Restore settings].<br />
Click [Save settings].<br />
When you complete setting the tour schedule list, click<br />
[Save settings]. The settings are saved in the camera.<br />
Important<br />
If preset tour is used, do not use the intelligent function.<br />
Note<br />
The home position cannot be added to the tour schedule list.<br />
102
Intelligent Function Setting Tool<br />
This tool is used to set intelligent functions that perform uploads, notify the viewer, audio playback, etc., if a change has<br />
occurred in the captured image due to movement of a subject.<br />
Camera Tampering Detection<br />
Moving Object Detection<br />
Volume Detection<br />
Camera<br />
E-mail notification<br />
6<br />
Network<br />
Admin Viewer<br />
RM Viewer<br />
Admin Tools<br />
Passing Detection<br />
Abandoned Object Detection<br />
Removed Object Detection<br />
Video recording on<br />
storage server<br />
Upload to FTP<br />
server/HTTP<br />
server<br />
The intelligent functions can perform the following 6 types of detection. Use detection types that best serve your needs.<br />
Moving Object Detection<br />
Detect moving objects. This function can be used to detect visitors or suspicious individuals.<br />
Moving object detection is triggered when moving objects are inside the detection area.<br />
Moving object enters/<br />
leaves area.<br />
Alert<br />
Detection begins when a<br />
moving object enters the<br />
designated area.<br />
Background Image<br />
Generated<br />
Change in Designated Area Analysis Moving Object Detected<br />
103
Abandoned Object Detection<br />
Detect objects that are carried in and abandoned for a certain amount of time. This function<br />
can be used to detect objects that have been left.<br />
Abandoned object detection is triggered when an object is left in the detection area for a<br />
specified duration.<br />
Object abandoned.<br />
Alert<br />
The object is abandoned<br />
and detection begins<br />
after set time.<br />
Background Image<br />
Generated<br />
Change in Designated Area Analysis Abandoned Object Detected<br />
Removed Object Detection<br />
Detect objects that are being removed. This function can be used to detect actions such as<br />
taking away valuables.<br />
Removed object detection is triggered when an object is removed from the detection area<br />
for a specified duration.<br />
Picture has disappeared.<br />
Alert<br />
The picture (object) is<br />
removed and detection<br />
begins after set time.<br />
Background Image<br />
Generated<br />
Change in Designated Area Analysis Object Removal Detected<br />
Camera Tampering Detection<br />
Detect when the capture is being obstructed. This function can be used to detect when the<br />
camera orientation is changed or the image display is obstructed with spray, etc.<br />
Camera tampering detection is triggered when an area exceeding the set ratio of change is<br />
continuously altered by an object, etc.<br />
Tampering detected.<br />
Alert<br />
Detection begins when the<br />
ratio of change in a video<br />
exceeds a set amount.<br />
Background Image<br />
Generated<br />
Video Area Changes Analysis Camera Tampering Detected<br />
104
Intelligent Function Setting Tool<br />
Passing Detection<br />
Detect when a person or moving object crosses a specified line.<br />
It determines that an object is passing when the decision point of the object detection frame<br />
crosses a detection line.<br />
Passing detected.<br />
Detection begins when<br />
decision point of object<br />
crosses detection line.<br />
Alert<br />
6<br />
Background Image<br />
Generated<br />
Video Area Changes<br />
Passing Detected<br />
Analysis<br />
Volume Detection<br />
Detect specified volume levels. For setting details, see “Chapter 5 Setting Page” [Event] ><br />
[Volume Detection] (p. 64).<br />
Admin Tools<br />
Caution<br />
Notes on Use of This Camera<br />
The intelligent functions are not suitable for applications where high reliability is required. If constant and maximum<br />
reliability is required for surveillance it is not recommended that you use this function. <strong>Canon</strong> shall assume no<br />
liability for any accident, loss or other undesirable outcomes resulting from intelligent function operations.<br />
105
Display Screen of Intelligent Function Setting Tool<br />
(1)<br />
(2) (3)<br />
(11)<br />
(12)<br />
(13)<br />
(7)<br />
(8)<br />
(14)<br />
(15)<br />
(16)<br />
(17)<br />
(18)<br />
(9)<br />
(10)<br />
(6) (5)<br />
(4)<br />
(19) (20)<br />
(1) Image Display Area<br />
The image currently captured by the camera is<br />
shown. Detection areas are shown in translucently<br />
colored frames (rectangular or polygonal) and the<br />
detection line is shown as a translucently colored<br />
polygonal line or line segment. Also, subjects for<br />
which movement has been detected are shown in a<br />
detection block and detection frame.<br />
Pan, tilt, and zoom operations are the same as in the<br />
<strong>VB</strong>-<strong>H41</strong>/610/710 Viewer. For details, see “How to<br />
Operate the Viewer” (p. 128).<br />
However, when the (11) [Lock camera position]<br />
checkbox is selected, the camera is fixed at a preset<br />
position and cannot perform pan, tilt, and zoom<br />
operations.<br />
(2) [Switch Mouse <strong>Operation</strong>] button<br />
Each time this button is clicked, the button switches<br />
between and , and the mouse operation in the<br />
image display area changes.<br />
When the button is set to , detection areas can be<br />
created/resized/moved. While in this mode, the<br />
camera orientation will not change.<br />
When the button is set to and the (11) [Lock<br />
camera position] checkbox is not selected, pan, tilt,<br />
and zoom operations can be performed.<br />
(3) [Switch Screen Size] button<br />
Each time this button is clicked, the screen size of the<br />
image display area switches between “480 x 270” and<br />
“960 x 540”.<br />
(4) [BLC] button<br />
This button turns on/off backlight compensation. This<br />
control is effective when the image is dark due to<br />
backlight.<br />
(5) [Obtain/Release Camera Control] button<br />
This button is used to obtain/release the camera<br />
control privileges. For details, see “Obtaining Camera<br />
Control Privileges” (p. 130). If camera control<br />
privileges have not yet been obtained elsewhere,<br />
such as in the Admin Viewer, the control privileges will<br />
be obtained the moment the Intelligent Function<br />
Setting Tool is launched.<br />
(6) [Control for Admin] button<br />
Show the Control for Admin Panel (p. 122).<br />
(7) [Event Display]<br />
Show the event display panel (p. 114).<br />
(8) [Display Options]<br />
Select the [Detection Area/Line] or [Detection Results]<br />
you want to show in the image display area from the<br />
following items.<br />
•[Selected Detection Settings Only]<br />
Show the detection areas/lines or detection results<br />
only for those detection settings selected in the<br />
[Detection Setting List].<br />
• [All Detection Settings]<br />
Show the detection areas/lines or detection results<br />
for all detection settings in the [Detection Setting<br />
List].<br />
• [Detection Settings of the Same Type]<br />
Show the detection areas/lines or detection results<br />
for the same type of detection settings as those<br />
selected in the [Detection Setting List].<br />
• [Do not display]<br />
No detection areas/lines or detection results are<br />
shown.<br />
(9) [Restart intelligent function]<br />
If the background image has changed while you were<br />
specifying settings or detection results are not as set,<br />
etc., click this button to restart the intelligent function.<br />
106
Intelligent Function Setting Tool<br />
If camera control privileges are not obtained, this<br />
function is grayed out.<br />
Important<br />
It takes tens of seconds for the intelligent function to restart. No<br />
detection is performed while restarting.<br />
the tool and restore the settings saved in the camera.<br />
(20)[Save settings]<br />
Save the edited detection settings in the camera.<br />
After the detection settings have been specified, be<br />
sure to save the settings in the camera by clicking<br />
[Save settings].<br />
(10)[Detection Settings]<br />
Show the [Detection Settings] dialog box (p. 113).<br />
This dialog box allows you to reduce the effects of<br />
lighting changes.<br />
(11)[Lock camera position] checkbox<br />
Select this checkbox to move the camera position to a<br />
preset position selected from the preset selection box<br />
and lock it there. Lock the camera position when<br />
specifying detection settings to obtain a correct<br />
detection result.<br />
If camera control privileges are not obtained or a<br />
preset position has not been set, this function is<br />
grayed out.<br />
(12)Camera position selection box<br />
Select the camera position from the view restriction<br />
presets or the home position. Use the Preset Setting<br />
Tool to set presets or the home position (p. 96).<br />
If camera control privileges are not obtained, the<br />
[Lock camera position] checkbox is not selected, or a<br />
preset position within the view restriction has not been<br />
set, this function is grayed out.<br />
(13)[Detection Setting List]<br />
A list with the specified detection settings is shown.<br />
(14)[Add]<br />
The [New Detection Settings] dialog box is shown and<br />
detection settings can be added.<br />
(15)[Delete]<br />
Delete detection settings selected from the [Detection<br />
Setting List].<br />
(16)[Detection Setting Number], [Detection Type]<br />
The detection setting numbers and detection types<br />
selected from the [Detection Setting List] are shown.<br />
(17)[Enable these detection settings] checkbox<br />
Select this checkbox to enable the detection settings<br />
that are selected in the [Detection Setting List].<br />
(18)[Detection Criteria] tab, [Event] tab<br />
Switch between the Detection Criteria and Event tabs.<br />
• [Detection Criteria]<br />
Specify detection settings name, detection area/line,<br />
and detection criteria (p. 109).<br />
•[Event]<br />
Specify operations to be performed when events<br />
occur (p. 110).<br />
(19)[Restore settings]<br />
Clear the settings you have specified on the screen of<br />
Flow of Intelligent Function Setting<br />
The intelligent functions are set according to the<br />
procedure below. For details on the setting method, see<br />
each setting page.<br />
Important<br />
Presets that were set with the Preset Setting<br />
Tool cannot be used for the settings of intelligent functions.<br />
• Camera Position Settings<br />
1<br />
Register the camera angle as a preset using the<br />
Preset Setting Tool.<br />
For details on the preset setting method, see “Preset<br />
Setting Tool” (p. 96).<br />
Important<br />
It is strongly recommended that you preset the camera angle in<br />
advance and lock the camera at a preset position with the<br />
Intelligent Function Setting Tool. An angle of view that captures<br />
the target object up close is also recommended.<br />
2<br />
3<br />
4<br />
Launch the Intelligent Function Setting Tool.<br />
Click [Yes].<br />
This selects [Lock camera position] in the Intelligent<br />
Function Setting Tool.<br />
If [No] is clicked, select [Lock camera position].<br />
Select a preset.<br />
6<br />
Admin Tools<br />
107
• Intelligent Function Settings<br />
1<br />
Add detection settings.<br />
When you click [Add] in the [Detection Setting List],<br />
the [New Detection Settings] dialog box is displayed.<br />
Set the [Detection Setting Number] and [Detection<br />
Type] of the detection setting you want to add, and<br />
then click [OK].<br />
Up to 15 different detection settings can be<br />
registered.<br />
(1)<br />
(2)<br />
(1) [Detection Setting Number]<br />
Specify a detection setting number from 1 to 15 for the<br />
detection area you want to set.<br />
(2) [Detection Type]<br />
Select detection types that suit your purpose from<br />
[Moving Object Detection], [Abandoned Object<br />
Detection], [Removed Object Detection], [Camera<br />
Tampering Detection], or [Passing Detection]. For<br />
details on detection types, see p. 103.<br />
Enable Detection Settings.<br />
2<br />
To enable detection settings, select [Enable these<br />
detection settings].<br />
Clear this checkbox to disable a setting.<br />
Set detection criteria ([Detection Criteria] tab p. 109).<br />
3<br />
Set detection criteria while operating the camera and<br />
checking the image in the image display area.<br />
Set operations to be performed when a change in a<br />
4<br />
subject is detected ([Event] tab p. 110).<br />
Set e-mail notification, video record, and audio<br />
playback to be performed upon detection.<br />
Save the detection settings in the camera.<br />
5<br />
Click [Save settings] to save the settings in the<br />
camera.<br />
6 Check the detection result. You can check the detection status of the specified<br />
detection settings in the event display panel (p. 143).<br />
Important<br />
Notes on intelligent function settings and operation<br />
• When setting intelligent function, do an actual detection test<br />
to confirm that detection will be performed correctly.<br />
• When the entire screen are exposed to sudden changes in<br />
brightness, detection may not be performed as intended for<br />
up to 5 minutes.<br />
• If [Auto] is used in [Day/Night] settings or automatic<br />
switching between [Day Mode] and [Night Mode] is<br />
performed when a timer is used, [Restarting intelligent<br />
function. Please wait.] is shown and intelligent function will<br />
restart. Detection will not be performed while intelligent<br />
function is restarting.<br />
• If the camera is operated during intelligent function setting or<br />
operation, [Restarting intelligent function. Please wait.] is<br />
shown and intelligent function will restart. Detection will not<br />
be performed while intelligent function is restarting.<br />
• Set intelligent function again if the angle of view is changed<br />
through camera operation, or the camera position of a preset<br />
or home position is changed using Preset Setting Tool.<br />
• If [Status] in [Detection Setting List] is [Enabled] when the<br />
camera position is fixed, control privileges cannot be<br />
obtained by <strong>VB</strong> Viewer or RM. Also, the preset tour will no<br />
longer run.<br />
Difficult-to-detect Subjects<br />
• Objects or portions where there is little contrast in color or<br />
brightness with the background may not be detected.<br />
• Small objects and changes on the screen may not be<br />
detected.<br />
• Partial or entire changes in light on the screen may trigger<br />
detection.<br />
• If multiple objects overlap, the detection status may change.<br />
In particular, passing may not be detected or may be<br />
detected at the wrong timing.<br />
108
Intelligent Function Setting Tool<br />
Setting Intelligent Function Detection<br />
Settings<br />
• Setting Detection Criteria ([Detection<br />
Criteria] tab)<br />
Set detection criteria while operating the camera and<br />
checking the image in the image display area.<br />
[Detection Criteria] tab (Except passing detection)<br />
(1)<br />
(2)<br />
(3)<br />
(4)<br />
[Detection Criteria] tab (Passing detection)<br />
(1)<br />
(5)<br />
(3)<br />
(6)<br />
For details on detection area setting operations, see<br />
“Setting Detection Areas” (p. 110).<br />
[Clear]<br />
If the [Area Shape] is [Polygonal], the detection area<br />
set in the image display area is deleted.<br />
(3) [Display Color]<br />
Choose the color of the detection setting. The color<br />
selected here becomes the display color of the<br />
detection area/line in the image display area.<br />
(4) [Object Size (%)] [Change Ratio (%)] [Duration (Sec)]<br />
Set the lower limit for the size, change ratio, and<br />
judgment time for the set detection area to trigger<br />
detection. If the value set here is exceeded, “Detected”<br />
mode is triggered.<br />
Click the text box to enter a value directly, or specify a<br />
value using the slider.<br />
For details on the setting method, see “Setting<br />
Detection Criteria per Detection Type” (p. 111).<br />
(5) [Clear detection line]<br />
Clears the detection line set in the image display area.<br />
(6) [Passing Direction]<br />
Select the passing direction of a moving object<br />
relative to the detection line.<br />
(7) [Decision point]<br />
Select the point of a moving object that will be used as<br />
criteria for passing detection when a moving object<br />
crosses a detection line.<br />
6<br />
Admin Tools<br />
Image Display Area<br />
(7)<br />
(4)<br />
Important<br />
It is recommended that the detection criteria are set in a<br />
condition as close as possible to the condition in which the<br />
camera is actually used. Perform a detection test in advance to<br />
make sure that the detection frame continues to be displayed<br />
for a subject targeted for passing detection.<br />
Detection Area<br />
(1) [Detection Settings Name]<br />
You can use up to 64 characters in a detection setting<br />
name. Be sure to enter a single-byte alphanumeric<br />
detection setting name.<br />
In a [Detection Settings Name], ASCII characters<br />
(spaces or printable characters) can be used.<br />
(2) [Area Shape]<br />
Select [Rectangular] or [Polygonal] for the shape of<br />
detection areas you want to set in the image display<br />
area.<br />
109
• Setting Event <strong>Operation</strong>s ([Event] tab)<br />
Set operations to be performed upon detection of<br />
changes in a subject.<br />
[Event] tab<br />
(1) Specify the operation timing. (Multiple checkboxes can<br />
be selected.)<br />
[ON Event <strong>Operation</strong>] checkbox<br />
When selected, the operations set in (2) [E-mail<br />
Notification] and [Video Record] are performed the<br />
moment detected mode is triggered to ON.<br />
[OFF Event <strong>Operation</strong>] checkbox<br />
When selected, the operations set in (2) [E-mail<br />
Notification] and [Video Record] are performed the<br />
moment detected mode is triggered to OFF.<br />
[Detected mode <strong>Operation</strong>] checkbox<br />
When selected, the operations set in (2) [E-mail<br />
Notification] and [Video Record] are performed for as<br />
long as detected mode is active.<br />
(2) Specify the event operation. (Multiple checkboxes can<br />
be selected.)<br />
[E-mail Notification] checkbox<br />
When selected, e-mail notification is performed at the<br />
timing set in (1). [E-mail Notification] must be set in<br />
advance under [Upload] in the Setting page (p. 61).<br />
[Video Record] checkbox<br />
When selected, video record is performed at the<br />
timing set in (1). [Video Record Action] must be set in<br />
advance under [Event] in the Setting page (p. 64).<br />
(3) Specify the audio playback timing.<br />
[Audio Playback at ON Event] checkbox<br />
When selected, the sound set in (4) [Sound Clip<br />
Name] is played at the moment the detected mode is<br />
triggered to ON.<br />
[Audio Playback at OFF Event] checkbox<br />
When selected, the sound set in (4) [Sound Clip<br />
Name] is played at the moment the detected mode is<br />
turned OFF.<br />
(1)<br />
(2)<br />
(3)<br />
(4)<br />
(5)<br />
(4) Set the playback sound.<br />
[Sound Clip Name]<br />
Select the sound that is to be played. The sound clip<br />
name set for [Sound Clip Upload] under [Event] in the<br />
Setting page is shown in the pull-down list (p. 67).<br />
[Volume]<br />
Set the audio playback volume in the range of 1 to<br />
100.<br />
(5) <strong>Operation</strong> of External Device Output<br />
[External Device Output for ON Event] checkbox<br />
Select this checkbox for enabling external device<br />
output at an ON event and select output destination<br />
(output 1 or 2) and operation (active or inactive).<br />
[External Device Output for OFF Event] checkbox<br />
Select this checkbox for enabling external device<br />
output at an OFF event and select output destination<br />
(output 1 or 2) and operation (active or inactive).<br />
• Setting Detection Areas<br />
Set detection areas in the image display area.<br />
Setting a [Rectangular] detection area<br />
By default, a rectangle is shown in the image display area.<br />
Move or resize that rectangle to set a detection area.<br />
Setting a [Polygonal] detection area<br />
Specify polygonal areas with a maximum of 32 angles.<br />
Click in the image display area to form the polygon point<br />
by point. Click on a previously set point to complete the<br />
polygon and set the enclosed area as the detection area.<br />
The set area can also be moved by dragging it.<br />
Note<br />
• Drag the square marks (■) at each angle to change the shape<br />
of the polygon.<br />
110
Intelligent Function Setting Tool<br />
• Click [Clear] to delete the polygonal detection area.<br />
• The camera tampering detection area cannot be changed.<br />
Changing a [Rectangular] detection area into a [Polygonal]<br />
shape or changing a [Polygonal] detection area into a<br />
[Rectangular] shape<br />
Changing the shape of the detection areas already set<br />
deletes that area and switches to a new drawing setting.<br />
When [Object Size (%)] is changed, an indicator frame<br />
showing the size of the object is displayed for 1 second in<br />
the center of the image display area, allowing<br />
specification of the settings while checking the size ratio.<br />
Detection area<br />
Object size indicator<br />
• Setting the Detection Line<br />
Use the image display area to set the detection line.<br />
Specify a detection line consisting of a polygonal line with<br />
a maximum of 32 angles.<br />
In the image display area, click the start point of the<br />
detection line and then click the end point. To create a<br />
detection line consisting of polygonal line, click each<br />
angle in the polygonal line in order.<br />
To confirm a detection line, click any of the already set<br />
angles.<br />
The angles in a confirmed detection line can be dragged<br />
to change the shape of a detection line and lines between<br />
angles can be dragged to change the position of the<br />
detection line.<br />
Any moving objects detected are shown with contour lines.<br />
If a moving object is smaller than [Object Size (%)], its<br />
contour lines are white. If the moving object is larger than<br />
[Object Size (%)], its contour lines take on the same color<br />
as the detection area, indicating that “detection” mode has<br />
been triggered to ON.<br />
Contour lines of a<br />
detected moving<br />
object<br />
6<br />
Admin Tools<br />
Detect criteria for [Abandoned Object Detection]<br />
Set areas where you want to detect abandoned objects as<br />
detection areas.<br />
Note<br />
• Drag the square marks (■) at each angle to change the shape<br />
of the detection line.<br />
• Click [Clear detection line] to delete a detection line.<br />
• Setting Detection Criteria per Detection Type<br />
Specify different detection criteria for each detection type.<br />
Detect criteria for [Moving Object Detection]<br />
Set detection areas where you want to detect moving<br />
objects.<br />
[Object Size (%)]<br />
Enter a value or move the slider to set the ratio of the size<br />
of an object that was left behind in the detection area to<br />
the size of the detection area.<br />
When [Object Size (%)] is changed, an indicator frame<br />
representing the area of the object is displayed for 1<br />
second in the center of the image display area. This<br />
allows you to check the size ratio of the abandoned object<br />
detection area while specifying the [Object Size (%)]<br />
setting.<br />
[Duration (Sec)]<br />
Set the time that must elapse after an object has been left.<br />
If both the values for [Object Size (%)] and [Duration<br />
(Sec)] are exceeded, detection mode is triggered to ON.<br />
For [Object Size (%)], enter a value or move the slider to<br />
set the ratio of the size of an object moving in the<br />
detection area to the size of the detection area.<br />
When the ratio of an area where the camera has detected<br />
a moving object exceeds the value set for [Object Size<br />
(%)], detected mode is triggered to ON.<br />
Object size indicator<br />
Detection area<br />
111
Any moving objects detected are shown with contour lines.<br />
If [Object Size (%)] and [Duration (Sec)] are not exceeded,<br />
contour lines are white. When all detection criteria are met,<br />
contour lines take on the same color as the detection area<br />
and “detected” mode is triggered to ON.<br />
Detect criteria for [Camera Tampering Detection]<br />
For [Camera Tampering Detection], the entire image<br />
display area becomes the detection area. “Detected”<br />
mode will be triggered to ON when the image is<br />
obstructed over an area exceeding the ratio set in<br />
[Change Ratio (%)].<br />
Contour of abandoned<br />
object<br />
Detect criteria for [Removed Object Detection]<br />
Set detection areas for objects whose removal you want to<br />
detect.<br />
When [Change Ratio (%)] is changed, an indicator frame<br />
representing the area that can be obstructed is displayed<br />
for 1 second in the center of the image display area. This<br />
allows you to check the change ratio of the camera<br />
tampering detection area, which occupies the entire<br />
image display area, while specifying the [Change Ratio<br />
(%)] setting.<br />
For [Duration (Sec)], set the time that must elapse after<br />
the object has been taken away. Detected mode will be<br />
triggered to ON when an object is taken away from the<br />
detection area for a period longer than the set [Duration<br />
(Sec)].<br />
Removed object<br />
detected<br />
Obstructed area<br />
indicator<br />
Any moving objects detected are shown with contour<br />
lines. If it is smaller than [Change Ratio (%)], contour lines<br />
are white. If the image is changed for an area larger than<br />
[Change Ratio (%)], contour lines take on the same color<br />
as the detection area, indicating that “detected” mode<br />
has been triggered to ON.<br />
Any moving objects detected are shown with contour<br />
lines. As long as [Duration (Sec)] has not elapsed,<br />
contour lines are white. When [Duration (Sec)] has<br />
elapsed, contour lines take on the same color as the<br />
detection area, indicating that “detected” mode has been<br />
triggered to ON.<br />
Contour of removed<br />
object<br />
Note<br />
Contour of camera<br />
tampering object<br />
Detection will not be possible for three seconds after the change<br />
ratio is modified when camera tampering detection is selected, or<br />
when switching into camera tampering detection from another<br />
detection mode.<br />
Important<br />
Set detection areas for removed object detection so that they<br />
precisely match the contours of the object in question.<br />
Influence from the target object’s shadow or adjacent objects<br />
may result in the target object being recognized as larger than<br />
actual and will not trigger Removed Object Detection. In such<br />
cases, reconfigure the detection area to outline the recognized<br />
target object.<br />
112
Intelligent Function Setting Tool<br />
Detect criteria for [Passing Detection]<br />
Set the passing direction and decision point of the moving<br />
object for the detection line that the moving object will<br />
cross.<br />
Important<br />
Perform a detection test in advance to make sure that the<br />
detection frame continues to be displayed for a subject<br />
targeted for passing detection.<br />
Note<br />
• A ratio of up to 30% can be set for [Object Size (%)] in passing<br />
detection.<br />
• A passing detection event is notified only when the decision<br />
line is crossed. Take care in setting the operation to be<br />
performed when an event occurs.<br />
6<br />
[Passing Direction]<br />
Select the direction for moving objects to pass the<br />
detection line. When an object that moves in the selected<br />
direction passes the detection line, “line crossed” is<br />
detected.<br />
A preview display shows the selected passing direction<br />
on the detection line in the image display area.<br />
[Decision Point]<br />
Select the decision point of a moving object in<br />
accordance with a detection line. When a decision point<br />
selected here crosses the detection line, “line crossed” is<br />
detected. In the image display area, a cross mark is<br />
displayed to indicate the decision point in the detection<br />
frame.<br />
Detection line<br />
Detection frame<br />
Decision point<br />
[Object Size (%)]<br />
Enter or use the slider to set the size ratio of moving<br />
objects for the entire screen.<br />
When a moving object exceeds the value set for [Object<br />
Size (%)], it becomes a passing detection target.<br />
When [Object Size (%)] is changed, an indicator frame<br />
showing the size of the object is displayed for 1 second in<br />
the center of the image display area, allowing<br />
specification of the settings while checking the size ratio.<br />
• Setting by Right-Click Menu<br />
Right-click on the Intelligent Function Setting Tool display<br />
screen to display the menu. There, the following functions<br />
can be used.<br />
[Copy detection area/line]<br />
Copy the detection area/line of the detection setting<br />
selected.<br />
[Paste detection area/line]<br />
Paste the copied detection area/line to the detection<br />
setting selected. It cannot be copied to camera tampering<br />
detection. Pasting a detection line is possible only when<br />
the source and the target both set passing detection.<br />
[Clear detection area/line]<br />
Clear the detection area/line of the detection setting<br />
selected. It cannot be cleared in camera tampering<br />
detection.<br />
[Copy detection criteria settings]<br />
Copy the detection criteria of the detection setting<br />
selected.<br />
[Paste detection criteria settings]<br />
Paste the copied detection criteria to the detection setting<br />
selected. Pasting is possible only if the source and the<br />
target are the same detection type.<br />
[Copy event settings]<br />
Copy the event operations of the detection setting<br />
selected.<br />
[Paste event settings]<br />
Paste the copied event operations to the detection setting<br />
selected.<br />
Admin Tools<br />
Object size indicator<br />
• Reducing effects of lighting change<br />
Intelligent functions may not work when the entire screen<br />
is exposed to sudden changes in brightness, for example,<br />
when indoor lights are turned on or off. Changing the<br />
detection settings may reduce this effect.<br />
1<br />
Click [Detection Settings].<br />
113
2<br />
Select [Reduce effects of lighting change].<br />
3<br />
Click [Save settings].<br />
Important<br />
A [Reduce effects of lighting change] setting may not work<br />
depending on the operating environment. Sudden changes in<br />
brightness that persist may also have the same effect. Perform<br />
a detection test to check what will work.<br />
Note<br />
Since changing [Detection Settings] restarts the intelligent<br />
functions, detection will not be performed during the tens of<br />
seconds that it takes to complete a restart.<br />
• Displaying Event Status<br />
Click the [Event Display] button to open the event display<br />
panel and confirm the detection status icon of the<br />
intelligent functions.<br />
This panel displays the same information as [Intelligent<br />
Function (Image Detection)] in the event display panel of<br />
the Admin Viewer. For details, see “Displaying Event<br />
Status” (p. 143).<br />
Note<br />
If the detection setting is not stored in the camera, only the<br />
detection status for the currently selected detection setting is<br />
displayed.<br />
114
Log Viewer<br />
This tool lets you view the operating condition log of the camera.<br />
Display Screens of Log Viewer<br />
(7)<br />
(8)<br />
(9)<br />
(1)<br />
(2) (3) (4) (5) (6)<br />
(10)<br />
6<br />
(12)<br />
Admin Tools<br />
(11)<br />
(13)<br />
(14)<br />
(15)<br />
(16)<br />
(17) (18)<br />
(1) [Download]<br />
Download log files from this camera or SD memory<br />
cards.<br />
(2) [Reload]<br />
Reload the displayed log file and show the latest logs.<br />
(3) [Previous File]<br />
If there are multiple log files in the camera's internal<br />
memory or SD memory card, load and display the file<br />
before the currently shown log list.<br />
(4) [Next File]<br />
If there are multiple log files in the internal memory or<br />
SD memory card, load and display the file after the<br />
currently shown log list.<br />
(5) [Open local file]<br />
Load log files that are saved on a PC to the log display<br />
area.<br />
(6) [Save to local file]<br />
Save the displayed log data as a text file to a PC.<br />
(7) [Source]<br />
The name of the source from where log files are<br />
loaded is shown.<br />
From the camera's internal memory:<br />
Camera (Internal memory)<br />
From an SD memory card: Camera (SD card)<br />
From files saved to a PC: File name<br />
(8) [Copy]<br />
Copy to the clipboard logs that you have selected on<br />
the log display area.<br />
(9) [Select all]<br />
Select all the logs that are shown in the log display<br />
area.<br />
(10)[Show all logs] checkbox<br />
When selected, all logs, including those without a log<br />
code, are shown.<br />
(11)Log display area<br />
The content of log files downloaded from the camera,<br />
SD memory card, or PC is shown.<br />
(12)[Log Type]<br />
Select log types you want to show using the filter<br />
function.<br />
[Not specified]:<br />
Select to show all log types.<br />
[Specify type]:<br />
To specify the log type, select the level ([Error],<br />
[Warning], [Information]) and output module<br />
([Application], [HTTP Server], [System]) of the log.<br />
Multiple checkboxes can be selected.<br />
[Specify code]:<br />
Logs matching the entered log code are shown.<br />
115
(13)[Date & Time]<br />
Set the date and time of the log you want to show<br />
using the filter function.<br />
Select the [Specify start date & time] or [Specify end<br />
date & time] checkbox to set the date and time.<br />
(14)[Apply filter]<br />
Show the filtered logs in the log display area.<br />
(15)[Search for]<br />
Enter the character string for which you want to<br />
search.<br />
(16)[Match case] checkbox<br />
Specify whether or not to enable case sensitivity in<br />
search commands. When selected, character strings<br />
perfectly matching the case in the [Search for] field<br />
are searched.<br />
(17)[Previous]/[Next]<br />
Click [Next] to move down and [Previous] to move up<br />
in the search results for (18) [Search].<br />
(18)[Search]<br />
Search logs containing the character string searched<br />
in the displayed log list and display them.<br />
Note<br />
Logs cannot be deleted in the Log viewer.<br />
Downloading Log Files<br />
When Log Viewer is launched, the latest log files will be<br />
downloaded and displayed automatically.<br />
To download a new log file list, click [Download]. A<br />
[Download] dialog box is shown where you can select<br />
[Internal memory] or [SD Card] as a download source.<br />
When the list has been downloaded, a dialog box<br />
showing the log file list opens. Select the log file you want<br />
to view and click [Download], and the selected log file will<br />
be downloaded.<br />
How to View Logs<br />
The log contains the following information.<br />
• Code<br />
For the log code, see “List of Log Messages” (p. 152).<br />
The log code is shown together with one of three icons<br />
corresponding to the applicable level.<br />
If the log has no log code, no icon is shown.<br />
Error Level<br />
Warning Level<br />
Information Level<br />
• Date & Time<br />
The date and time at which the log was generated.<br />
• Message<br />
A message regarding the log.<br />
116
Log Viewer<br />
• Saving a Log to a File/Opening a Saved Log<br />
Set the following conditions and click [Apply filter] to show<br />
only the logs matching the specified conditions.<br />
How to Save<br />
Click [Save to local file] and save using the [Save As]<br />
dialog box.<br />
How to View<br />
Click [Open local file] and select a log file using the<br />
[Open] dialog box.<br />
• Copying/Searching Logs<br />
6<br />
How to Copy<br />
Click to select the log you want to copy, and then click<br />
[Copy].<br />
How to Search<br />
Enter the character string for which you want to search in<br />
[Search for] and click [Search].<br />
If the searched log is found, it is shown as selected.<br />
Click [Previous] or [Next] to search the log above or<br />
below. Lines of logs found are shown as selected.<br />
• Showing All Logs<br />
Select the [Show all logs] checkbox.<br />
When selected, even logs without a log code are shown if<br />
[Not specified] is selected for the log type [Filter].<br />
• Showing Filtered Logs<br />
You can filter logs by type, code and date & time to show<br />
only the necessary information.<br />
[Log Type]<br />
Select the [Specify type] or [Specify code] checkbox to<br />
filter logs by type. If you do not want to filter logs by type,<br />
select [Not specified].<br />
• Specify type<br />
Specify the log level<br />
Select [Error], [Warning] or [Information] for the level of<br />
logs to be shown.<br />
Specify log output module<br />
Select [Application], [HTTP Server] or [System] for the<br />
output source module whose logs will be displayed.<br />
• Specify code<br />
Specify the log code. Only logs whose code contains<br />
the entered characters are shown. If “A0” is entered,<br />
for example, logs starting with “A0” are displayed.<br />
[Date & Time]<br />
• [Specify start date & time] checkbox<br />
When this checkbox is selected and a date and time<br />
are entered, logs generated on or after the specified<br />
date and time are shown.<br />
• [Specify end date & time] checkbox<br />
When this checkbox is selected and a date and time<br />
are entered, logs generated on or before the specified<br />
date and time are shown.<br />
Admin Tools<br />
Important<br />
Logs saved in the camera's internal memory are cleared when<br />
you perform [Maintenance] > [Restore Default Settings] and<br />
[Reboot], or press the reset switch on the camera.<br />
Note<br />
[Application], [HTTP Server], and [System] support the List of<br />
Log Messages (p. 152).<br />
117
Recorded Video Utility<br />
This utility manages video recorded on an SD memory card. It allows you to play back recorded video and download it to a<br />
PC, display a video list or perform filtering.<br />
Display Screens of Recorded Video Utility<br />
(1)<br />
(2) (3)<br />
(4)<br />
(5)<br />
(6)<br />
(7)<br />
(8)<br />
(9)<br />
(10)<br />
(12)<br />
(11)<br />
(1) [Refresh Video List]<br />
Update the video list to the current state.<br />
(2) [Refresh Download Status]<br />
Update video download status to the current state.<br />
(3) [SD Card Details]<br />
Displays the dialog box for details about the SD<br />
memory card.<br />
(11)[Filter]<br />
Click [Filter] to open or close the filter area. Sets<br />
criteria to narrow down the number of items displayed<br />
in the video list (p. 119).<br />
(12)[Playback Videos] Area<br />
Plays videos selected in the video list (p. 120).<br />
(4) [Number of Videos]<br />
Displays the number of videos in the video list.<br />
(5) [Select All]<br />
Select all video in the video list.<br />
(6) [Export to mov format]<br />
Export the [Downloaded] video selected in the video<br />
list to a mov format video file.<br />
(7) Video List<br />
Displays a list of videos recorded on an SD memory<br />
card and downloaded to a PC.<br />
(8) [Delete from Camera]<br />
Delete videos selected in the video list from the SD<br />
memory card.<br />
(9) [Download]<br />
Download videos selected in the video list to a PC.<br />
(10)[Download to]<br />
Specify the folder that videos are downloaded to.<br />
118
Recorded Video Utility<br />
Confirming Recorded Video<br />
The video list displays the following information:<br />
[Date & Time]<br />
Displays the date and time of a video recording.<br />
[Format]<br />
Displays the format of a recorded video ([JPEG] or<br />
[H.264]).<br />
[Recording Type]<br />
Displays the type of recorded video ([Upload],<br />
[Recording-Mode Stream], [Manual], [Timer], [Event]).<br />
[Upload] indicates video that failed to upload from the<br />
camera, and [Recording-Mode Stream] indicates video<br />
where video transmission failed when using RM<br />
recording-mode stream.<br />
[Video in Camera]<br />
Displays whether or not any video remains on an SD<br />
memory card. When video has been deleted from an SD<br />
memory card after downloading it, this indicator displays<br />
[No].<br />
[Download Status]<br />
Displays download status of video ([Downloaded], [Not<br />
Downloaded], [Partially Downloaded]).<br />
Note<br />
Clicking a header in each column sorts the video list.<br />
• Refreshing Video List<br />
Click [Refresh Video List] to update the video list to the<br />
current state.<br />
Click [Refresh Download Status] to update download<br />
status of the video list to the current state.<br />
Selecting Videos<br />
Click a video to select it. Use the Ctrl key or the Shift key<br />
while clicking to select multiple videos.<br />
Click [Select All] to select all videos on the list.<br />
Narrowing Down the Number of Videos<br />
Use [Filter] to narrow down the number of videos that<br />
appear in the video list to the ones you need.<br />
Set the following conditions and click [Apply filter] to show<br />
only the videos matching the specified conditions.<br />
[Date & Time]<br />
• [Specify start date & time] checkbox<br />
When this checkbox is selected and a date and time<br />
are entered, videos recorded on or after the specified<br />
date and time are shown.<br />
• [Specify end date & time] checkbox<br />
When this checkbox is selected and a date and time<br />
are entered, videos recorded on or before the<br />
specified date and time are shown.<br />
[Video Format]<br />
Select [Specified] and select the checkboxes for the<br />
video format ([JPEG] or [H.264]) (multiple selections<br />
possible).<br />
[Recording Type]<br />
Select [Specified] and select the checkboxes for the type<br />
of video recording ([Upload], [Recording-Mode Stream],<br />
[Manual], [Timer], [Event]) (multiple selections possible).<br />
[Video in Camera]<br />
Select [Not specified], [Yes] or [No].<br />
[Download Status]<br />
Select [Specified] and select the checkboxes for the<br />
status of video download ([Downloaded], [Not<br />
Downloaded], [Partially Downloaded]) (multiple selections<br />
possible).<br />
6<br />
Admin Tools<br />
119
Downloading Video<br />
2<br />
Download video recorded on an SD memory card to a PC.<br />
Specify the folder to download video to in [Download<br />
1 3<br />
to].<br />
Click [Browse] to specify a folder.<br />
Select a video to download in the video list.<br />
2<br />
Click [Download].<br />
3<br />
The video is downloaded to the specified folder.<br />
Important<br />
Since the Recorded Video Utility processes both files<br />
downloaded to a PC and its original videos recorded on the SD<br />
memory card, the video list will not display correctly if files<br />
downloaded to a PC are manually deleted. In this case, click<br />
[Refresh Download Status] to refresh status of data<br />
downloaded to a PC.<br />
Note<br />
When the download folder is changed, the download status of the<br />
files in the download folder prior to the change becomes [Not<br />
Downloaded]. Manually copy the files in the download folder<br />
prior to the change to the new download folder to change their<br />
status to [Downloaded].<br />
Downloaded videos are stored in a folder that is automatically<br />
created within the specified destination folder and named using<br />
the camera IP address (for example, [192.168.100.1]). Quit the<br />
Recorded Video Utility before using explorer to browse the<br />
folders before and after the change and copy the contents of the<br />
folder with the same name as the camera IP address.<br />
After copying, start up the Recorded Video Utility, click [Refresh<br />
Download Status] and the manually copied files will appear in the<br />
video list.<br />
For details on the folder configuration and file naming rules for<br />
the download location, see “Directory Structure for Data<br />
Downloaded with Recorded Video Utility” (p. 146) in “Chapter 8<br />
Appendix”.<br />
Exporting to Video Files That Can Be<br />
Played Back<br />
Videos downloaded from an SD memory card to a PC can<br />
be exported to video files that can be played back on a<br />
PC.<br />
For H.264 video, subdivided files are merged into a single<br />
file.<br />
1 Select a video to export in the video list. Videos whose [Download Status] is labeled<br />
[Downloaded] in the video list can be exported.<br />
Click [Export to mov format].<br />
The [Browse For Folder] dialog box appears.<br />
Select a folder to export to and click [OK].<br />
The video is exported.<br />
Note<br />
• The exported video files can be played back using QuickTime<br />
7.7 and Windows Media Player 11/12. For Windows Vista and<br />
earlier, use QuickTime. However, playback when using this<br />
software is not guaranteed.<br />
• A recorded JPEG video whose size is changed during<br />
recording and exported to a mov file cannot be played back by<br />
Windows Media Player. Use QuickTime to play it back.<br />
Playing Back Videos<br />
Videos selected in the video list can be played back in the<br />
[Playback Videos] area.<br />
The appearance and operations of the [Playback Videos]<br />
area differ depending on the selected video format.<br />
• For JPEG<br />
[Recording Date & Time]<br />
Displays the date and time of video frames that are being<br />
displayed.<br />
[Playback Frame No.]<br />
Displays frame numbers and total number of video frames<br />
that are being displayed.<br />
[Playback Interval]<br />
• [Real Time]<br />
JPEG video is played back in real time interval<br />
according to the recording time. The preceding JPEG<br />
video appears in an empty frame.<br />
• [Equal Interval]<br />
JPEG video is played back at a 1-second interval.<br />
120
Recorded Video Utility<br />
Note<br />
• [Real Time] can be selected only for playback of downloaded<br />
videos.<br />
• [Not Downloaded] or [Partially Downloaded] JPEG videos may<br />
not be played back in the order they were recorded.<br />
Slider/Playback Control<br />
Drag the slider to change playback position.<br />
The following buttons can also be used for playback.<br />
Button<br />
Description<br />
Move to first frame<br />
Move to previous frame<br />
Fast rewind<br />
Playback<br />
Pause<br />
Fast forward<br />
Move to next frame<br />
Move to last frame<br />
[Save Playback Frame As]<br />
Video frames that are being played back can be saved as<br />
a separate file.<br />
Note<br />
• When the file size for mov type files is 1 MB or greater, they are<br />
split into several files.<br />
• If mov files are split into several files, only the initial few<br />
seconds of the first file can be played back.<br />
• The exported video files can be played back using QuickTime<br />
7.7 and Windows Media Player 11/12. For Windows Vista and<br />
earlier, use QuickTime. However, playback when using this<br />
software is not guaranteed.<br />
Deleting Videos<br />
You can delete videos from an SD memory card.<br />
1<br />
2<br />
Select a video to delete in the video list.<br />
Click [Delete from Camera].<br />
The video is deleted from the camera.<br />
Note<br />
If the selected videos contain [Not Downloaded] videos, a<br />
message prompting you to confirm deletion appears. Click [OK]<br />
to delete the video.<br />
Displaying SD Memory Card Information<br />
Click [SD Card Details] to display information on the SD<br />
memory card inserted in the camera.<br />
6<br />
Admin Tools<br />
• For H.264<br />
Video in the H.264 format that has been downloaded to a<br />
PC can be played back on an external player.<br />
[Number of downloaded video files]<br />
The number of downloaded files the video consist of is<br />
displayed.<br />
[Playback with External Player]<br />
Start up the external player (Windows Media Player, etc.)<br />
and the selected video is played back.<br />
[Open Video folder]<br />
Open the folder storing the selected video. Double click<br />
the video file in the folder to play it back.<br />
121
Control for Admin<br />
This panel is used to adjust video from the camera that is<br />
displayed by each Admin Tool. The panel is available to<br />
the Privacy Mask Setting Tool, View Restriction Setting<br />
Tool, Preset Setting Tool and Intelligent Function Setting<br />
Tool.<br />
• Operating the Control Items<br />
The panel operates in the same way as Control for Admin<br />
of the Admin Viewer.<br />
Using Control for Admin<br />
Click the [Control for Admin] button to display the Control<br />
for Admin Panel.<br />
• Opening/Closing Control Items<br />
Clicking the title of a control item will open or close the<br />
setting items.<br />
⇔<br />
You can display the Control for Admin Panel and open the<br />
various control items even without obtaining the camera<br />
control privileges, but the items will be grayed out.<br />
[Smart Shade Control]<br />
You can set Smart Shade Control. For details, see “Setting<br />
the Smart Shade Control” (p. 139).<br />
[Focus]<br />
You can adjust focus. For details, see “Setting the Focus”<br />
(p. 139).<br />
[Exposure]<br />
You can adjust exposure. For details, see “Setting the<br />
Exposure” (p. 140).<br />
Note<br />
The items for the Intelligent Function Setting Tool's Control for<br />
Admin will be grayed out if the [Lock camera position] checkbox<br />
is selected (p. 107) in the Intelligent Function Setting Tool.<br />
122
Chapter 7<br />
Admin Viewer/<strong>VB</strong> Viewer<br />
❏ Differences between the Admin Viewer and the <strong>VB</strong> Viewer<br />
❏ User Authorities and Camera Control Privileges<br />
❏ Viewer Startup and <strong>Operation</strong><br />
❏ Camera Control and Obtaining Camera Control Privileges<br />
❏ Admin Viewer <strong>Operation</strong> and Settings
Overview of Viewer<br />
Accessing this viewer via a web browser allows you to display images and operate the camera.<br />
Two types of viewer are available, the Admin Viewer and the <strong>VB</strong> Viewer.<br />
<strong>VB</strong>-<strong>H41</strong>/610/710 Viewer<br />
Admin Viewer<br />
<strong>VB</strong> Viewer<br />
Important<br />
Use the RM-Lite Viewer to display H.264 video from the<br />
camera.<br />
Only JPEG images can be displayed using the <strong>VB</strong>-<strong>H41</strong>/610/710<br />
viewer.<br />
control assigned by the Administrator beforehand<br />
(p. 68).<br />
<strong>VB</strong> Viewer:<br />
Users with camera control authority can use this<br />
viewer. You can set the applicable options to<br />
enable/disable authentication, etc.<br />
Major Differences Between the Admin<br />
Viewer and the <strong>VB</strong> Viewer<br />
• The operable ranges differ between the viewers.<br />
Admin Viewer:<br />
Users can use the administrative control functions,<br />
such as shooting adjustment settings or event<br />
detection display.<br />
<strong>VB</strong> Viewer:<br />
This viewer is limited to basic image operations for<br />
viewing images.<br />
• Accessible controls are different.<br />
Admin Viewer:<br />
Users with privileged camera control can use this<br />
viewer.<br />
Password authentication is required.<br />
Authorized users must have privileged camera<br />
User Authorities and Camera Control<br />
Privileges<br />
User authorities and their relative camera control<br />
privileges are specified as follows.<br />
User<br />
Authority<br />
Camera Control Privileges<br />
Privileged<br />
Camera<br />
Control<br />
Camera<br />
Control<br />
Video<br />
Distribution<br />
Audio<br />
Distribution<br />
Administrator ◦ ◦ ◦ ◦<br />
Authorized<br />
user<br />
◦<br />
(Can be<br />
changed)<br />
Guest user ×<br />
◦<br />
(Can be<br />
changed)<br />
◦<br />
(Can be<br />
changed)<br />
◦ ◦<br />
(Can be<br />
changed)<br />
(Can be<br />
changed)<br />
◦ ◦<br />
(Can be<br />
changed)<br />
(Can be<br />
changed)<br />
* Can be changed: The Administrator can change the<br />
privileges of Authorized Users and Guest Users (p. 68).<br />
124
Overview of Viewer<br />
The four authorities that can be set for users are privileged<br />
camera control, camera control, video distribution and<br />
audio distribution.<br />
Users must have privileged camera control to use the<br />
Admin Viewer.<br />
Users must have the video distribution authority to display<br />
images using the <strong>VB</strong> Viewer. To operate the camera using<br />
the <strong>VB</strong> Viewer, users must also have camera control<br />
authority.<br />
Audio distribution authority is required to receive audio<br />
using the Admin Viewer and the <strong>VB</strong> Viewer.<br />
[Administrator]<br />
This user is given all authorities. The user name is fixed<br />
to “root”.<br />
The Administrator can launch the Admin Viewer from<br />
the [Admin Viewer] link on the top page.<br />
[Authorized User]<br />
Authorized users can launch the Admin Viewer from<br />
the [Admin Viewer] link on the top page if they have<br />
privileged camera control. Authorized users can no<br />
longer launch the Admin Viewer upon losing privileged<br />
camera control. However, they can still launch the <strong>VB</strong><br />
Viewer. Launching the <strong>VB</strong> Viewer can be prohibited by<br />
disabling all authorities of a given authorized user<br />
(p. 68).<br />
[Guest User]<br />
This user can only use the following functions:<br />
Backlight compensation, snapshots, image display,<br />
audio distribution<br />
Pan/tilt/zoom camera control<br />
Digital PTZ<br />
Guest users can launch the <strong>VB</strong> Viewer from the [<strong>VB</strong><br />
Viewer] link on the top page. The Administrator can<br />
List of Authorized User Authorities<br />
completely prohibit all camera access from guest users<br />
by disabling all their authorities.<br />
Important<br />
• Only the [Administrator] can transmit audio from the viewer.<br />
• At any time, the [Administrator] can launch the Admin Viewer<br />
to override the camera control privileges of another instance<br />
of the Admin Viewer launched by an [Authorized User]. The<br />
Administrator can retain the camera control privileges, but<br />
doing so prevents authorized users from obtaining camera<br />
control privileges. After viewing the necessary information,<br />
the Administrator should always close the viewer or click<br />
[Obtain/Release Camera Control] to release the control<br />
privileges.<br />
• The Admin Viewer launched by the [Administrator] can access<br />
only one camera at a time. While administrator authorities are<br />
used to access the camera from a given PC, access with<br />
administrator authorities from other PCs will be not be granted.<br />
In contrast, the camera can be accessed simultaneously by<br />
multiple instances of the Admin Viewer launched by<br />
[Authorized Users] from different PCs. Take note, however,<br />
that when controlling the camera, the control privileges are<br />
given to the user who accessed the camera most recently.<br />
Note<br />
• The factory default setting gives privileged camera control to<br />
[Authorized User] as well.<br />
• If all guest user authorities are disabled, the user<br />
authentication dialog box will appear when the <strong>VB</strong> Viewer is<br />
launched. When an authorized user or administrator name and<br />
password are entered, the <strong>VB</strong> Viewer can be used with<br />
authorized user or administrator authorities, respectively.<br />
• The authorities of authorized users are assigned as follows.<br />
7<br />
Admin Viewer/<strong>VB</strong> Viewer<br />
Provided controls Viewer <strong>Operation</strong>s<br />
Privileged Camera<br />
Control<br />
Camera Control<br />
Video Distribution<br />
Audio Distribution<br />
Camera Control<br />
Video Distribution<br />
Audio Distribution<br />
Admin<br />
Viewer<br />
<strong>VB</strong> Viewer<br />
<strong>VB</strong> Viewer<br />
All operations possible in the Admin Viewer.<br />
[Details]<br />
Video size, video display size, full screen mode, reconnect, audio reception, back<br />
light compensation, get a snapshot, SD memory card insert status, event display,<br />
viewer PTZ* 1 , Control for Admin (smart shade control, focus, exposure, white balance,<br />
day/night, external device output, frame rate), preset selection, home position<br />
Slider for pan/tilt/zoom, panorama display, Control for Admin (camera PTZ* 1<br />
operation and speed setting)<br />
Digital PTZ<br />
All operations possible in the <strong>VB</strong> Viewer.<br />
[Details]<br />
Video size, video display size, full screen mode, reconnect, audio reception, back<br />
light compensation, get a snapshot, preset selection, home position<br />
Slider for pan/tilt/zoom, panorama display<br />
Digital PTZ<br />
125
Video Distribution<br />
Audio Distribution<br />
<strong>VB</strong> Viewer<br />
Video size, video display size, full screen mode, reconnect, audio reception, get a<br />
snapshot<br />
Panorama display<br />
Digital PTZ<br />
Video Distribution* 2 <strong>VB</strong> Viewer Video size, video display size, full screen mode, reconnect, get a snapshot<br />
Panorama display<br />
Digital PTZ<br />
*1 PTZ: Pan, tilt, zoom<br />
*2 If video distribution authority is disabled, users can no longer use <strong>VB</strong> Viewer.<br />
126
Launching the Viewer<br />
Launching the Viewer<br />
The viewer is launched.<br />
Important<br />
• The Admin Tools Certificate must be installed on a PC that is<br />
using the Admin Viewer. (p. 26)<br />
• This <strong>Operation</strong> <strong>Guide</strong> explains relevant operations based on<br />
the IP address “192.168.100.1” (factory default setting). You<br />
must enter the actual IP address set for the camera when<br />
following instructions.<br />
1<br />
2<br />
Access “http://192.168.100.1/” via the web browser.<br />
Click [Admin Viewer] or [<strong>VB</strong> Viewer] according to the<br />
user.<br />
Shutting Down the Viewer<br />
Close the web browser in the viewer to shut down.<br />
Connecting from Admin Tools<br />
7<br />
Admin Viewer/<strong>VB</strong> Viewer<br />
3<br />
For [Admin Viewer], enter the user name and<br />
password.<br />
Only the administrator can connect to this viewer.<br />
1<br />
2<br />
Launch Admin Tools.<br />
(Refer to “Launching the Admin Tools” (p. 84) for<br />
information on launching the Admin Tools.)<br />
Click [Admin Viewer].<br />
Refer to “User Authentication” (p. 42) in “Chapter<br />
4 Top Page of the Camera” for information on the user<br />
name and password.<br />
Note<br />
In environments without a proxy server, select [Internet options] ><br />
[Connections] tab > [LAN settings] and clear the [Automatically<br />
detect settings] checkbox in Internet Explorer.<br />
127
How to Operate the Viewer<br />
Display Screens of Admin Viewer<br />
The following gives an overview of the functions of buttons, boxes and other screen elements displayed in the Admin<br />
Viewer.<br />
The following screen shows the Admin Viewer with all panels opened. In practice, you only open panels that are necessary,<br />
and can put them anywhere desired in the web browser.<br />
(2) (3) (10) (8) (4) (5) (6) (7)(11)(12)<br />
(30)<br />
(31)<br />
(1)<br />
(32)<br />
(14) (16) (18) (20)<br />
(15) (17) (19) (21)<br />
(9)<br />
(13)<br />
(23)<br />
(24)<br />
(25)<br />
(33)<br />
(18) (19)<br />
(22) (21)<br />
(34)<br />
(28)<br />
(26)<br />
(27)<br />
(29)<br />
(1) Image Display Area<br />
Displays images received from the camera.<br />
(2) Video Size<br />
Set the size of video received from the camera.<br />
(3) Video Display Size<br />
Set the display size of the image shown on the screen.<br />
(4) [Full Screen Mode] button<br />
Live images are shown in full screen mode.<br />
(5) [Reconnect] button<br />
The camera is reconnected.<br />
(6) [Audio Transmission] button<br />
Transmit audio to the camera.<br />
(7) [Audio Reception] button<br />
Audio from the camera is received and output.<br />
(8) Slider for tilt<br />
This slider is used to control the tilt (vertical<br />
movement) of the camera.<br />
(9) Slider for pan<br />
This slider is used to control the pan (horizontal<br />
movement) of the camera.<br />
(10)Slider for zoom<br />
This slider is used to control the zoom ratio.<br />
You can zoom in (telephoto) by moving the knob<br />
upwards or zoom out (wide-angle) by moving the<br />
knob downwards.<br />
(11)[BLC] (Back Light Compensation) button<br />
This button turns on/off backlight compensation. This<br />
control is effective when the image is dark due to<br />
backlight.<br />
128
How to Operate the Viewer<br />
(12)[Obtain/Release Camera Control] button<br />
This button is used to obtain/release the camera<br />
control privileges.<br />
(13)Information Field<br />
Information messages, warning messages and error<br />
messages are shown to the user.<br />
(14)[Get a Snapshot] button<br />
A still image from the moment of clicking is displayed<br />
in a new window.<br />
(15)SD Memory Card Insert Status Icon<br />
Displays whether or not the SD memory card is<br />
mounted.<br />
SD memory card is mounted.<br />
SD memory card is not mounted.<br />
(16)[Start/Stop SD Card Recording] button<br />
Recording to the SD memory card starts if you have<br />
camera control privileges. Click again to stop<br />
recording.<br />
(17)[Recorded Video Utility] button<br />
The Recorded Video Utility (p. 118) of the Admin Tools<br />
starts up.<br />
(18)[Event Display] button<br />
The event display panel is displayed.<br />
(19)[Viewer PTZ] button<br />
The viewer PTZ panel is displayed.<br />
(20)[Panorama Display] button<br />
The panorama display panel is displayed.<br />
(21)[Control for Admin] button<br />
Displays the Control for Admin Panel.<br />
(22)[Digital PTZ] button<br />
The Digital PTZ panel is displayed.<br />
(23)Preset selection box<br />
You can control the camera with presets registered in<br />
the camera beforehand.<br />
(24)[Home Position] button<br />
Move the camera angle to the home position.<br />
(25)Event Display Panel<br />
This panel is displayed upon clicking the [Event<br />
Display] button.<br />
The panel shows the input status of external devices<br />
and the status of image and volume detection by<br />
intelligent functions.<br />
(26)Panorama Display Panel<br />
This panel is displayed upon clicking the [Panorama<br />
Display] button.<br />
(27)Panorama Display Area<br />
Displays panorama images registered in the camera.<br />
You can operate the camera by controlling the frame<br />
lines within the panorama display area.<br />
(28)Digital PTZ Panel<br />
This panel is displayed upon clicking the [Digital PTZ]<br />
button.<br />
(29)Digital PTZ Area Designator<br />
Specify the area in the image display area to crop with<br />
Digital PTZ.<br />
(30)[Setting Page]<br />
The screen switches to the Settings Menu page.<br />
(31)[Back to top]<br />
The screen switches to the top page of the camera.<br />
(32)Control for Admin Panel<br />
You can operate the camera with the administrator<br />
authorities. For details, see “Using Control for Admin”<br />
(p. 138).<br />
(33)Viewer PTZ Panel<br />
This panel is displayed upon clicking the [Viewer PTZ]<br />
button.<br />
(34)Viewer PTZ Area Designator<br />
Set the cropped area in the image display area.<br />
<strong>VB</strong> Viewer<br />
(15)<br />
(16)<br />
(1)<br />
(12)<br />
(7)<br />
(10)<br />
(13)<br />
(14)<br />
(17)<br />
(18)<br />
(19)<br />
(20)<br />
(21)<br />
(22)<br />
(2)<br />
(3) (11) (9) (4)(5)(6) (8)<br />
(1) Image Display Area<br />
Displays images received from the camera.<br />
(2) Video Size<br />
Set the size of video received from the camera.<br />
(3) Video Display Size<br />
Set the display size of the image shown on the screen.<br />
(4) [Full Screen Mode] button<br />
Live images are shown in full screen mode.<br />
7<br />
Admin Viewer/<strong>VB</strong> Viewer<br />
129
(5) [Reconnect] button<br />
The camera is reconnected.<br />
(6) [Audio Reception] button<br />
Audio from the camera is received and output.<br />
(7) Control Privilege Status Indicator<br />
Whether or not the current client has camera control<br />
privileges is shown in this area.<br />
(8) [Obtain/Release Camera Control] button<br />
This button is used to obtain and release the camera<br />
control privileges.<br />
(9) Slider for tilt<br />
This slider is used to control the tilt (vertical<br />
movement) of the camera.<br />
(10)Slider for pan<br />
This slider is used to control the pan (horizontal<br />
movement) of the camera.<br />
(11)Slider for zoom<br />
This slider is used to control the zoom ratio.<br />
You can zoom in (telephoto) by moving the knob<br />
upwards or zoom out (wide-angle) by moving the<br />
knob downwards.<br />
(12)[BLC] (Back Light Compensation) button<br />
This button turns on/off backlight compensation. This<br />
control is effective when the image is dark due to<br />
backlight.<br />
(13)Information Field<br />
Information messages, warning messages and error<br />
messages are shown to the user.<br />
(14)[Get a Snapshot] button<br />
A still image from the moment of clicking is displayed<br />
in a new window.<br />
(15)[Panorama Display] button<br />
The panorama display panel is displayed.<br />
(16)[Digital PTZ] button<br />
The Digital PTZ panel is displayed.<br />
(17)Preset selection box<br />
You can control the camera with presets registered in<br />
the camera beforehand.<br />
(18)[Home Position] button<br />
Move the camera angle to the home position.<br />
(19)Panorama Display Panel<br />
This panel is displayed upon clicking the [Panorama<br />
Display] button.<br />
(20)Panorama Display Area<br />
Displays panorama images registered in the camera.<br />
You can operate the camera by controlling the frame<br />
lines within the panorama display area.<br />
(21)Digital PTZ Panel<br />
This panel is displayed upon clicking the [Digital PTZ]<br />
button.<br />
(22)Digital PTZ Area Designator<br />
Specify the area in the image display area to crop with<br />
Digital PTZ.<br />
Obtaining Camera Control Privileges<br />
The camera cannot be controlled by multiple users<br />
simultaneously. Only the user with the control privileges<br />
can control the camera. To perform backlight<br />
compensation camera control, you must obtain control<br />
privileges first.<br />
How to Operate<br />
Click the [Obtain/Release Camera Control] button to<br />
obtain the control privileges.<br />
Admin Viewer<br />
Camera Control<br />
Privilege Display<br />
Displays camera<br />
control privilege<br />
status.<br />
<strong>VB</strong> Viewer<br />
[Obtain/Release Camera Control]<br />
button<br />
This button is used to obtain/release the<br />
camera control privileges.<br />
• Camera Control Privilege Status Indicator<br />
Display of the camera control buttons and camera control<br />
status indicator changes according to the status of control<br />
privileges shown as follows.<br />
Control privileges not assigned<br />
With the <strong>VB</strong> Viewer, the control privilege status<br />
indicator appears in gray and an animated<br />
[Obtain/Release Camera Control] button is<br />
displayed.<br />
The Admin Viewer does not display a control<br />
privilege status indicator. The [Obtain/Release<br />
Camera Control] button is grayed out.<br />
Waiting for control privileges<br />
When waiting for control privileges in the <strong>VB</strong><br />
Viewer, the remaining standby time is shown<br />
on the control privilege status indicator.<br />
130
How to Operate the Viewer<br />
Control privileges assigned<br />
(restricted time counting down)<br />
If another user is waiting for control privileges<br />
while you are assigned control privileges,<br />
your remaining time is shown on the control<br />
privilege status indicator.<br />
Control privileges assigned<br />
The control privilege status indicator is shown<br />
in blue.<br />
The [Obtain/Release Camera Control] button<br />
in the <strong>VB</strong> Viewer is blue in the center.<br />
• Change the Camera Angle in the Panorama<br />
Display Area<br />
1<br />
2<br />
Click the [Panorama Display] button.<br />
Change the camera angle in the panorama display<br />
area.<br />
The [Obtain/Release Camera Control] button<br />
in the Admin Viewer is yellow green in the<br />
center.<br />
Controlling the Camera<br />
Obtain camera control privileges before carrying out the<br />
following operations. These operations can be carried out<br />
in both the Admin Viewer and the <strong>VB</strong> Viewer.<br />
• Changing the Camera Angle<br />
You can change the angle by doing one of the following:<br />
Use the pan and tilt sliders<br />
The camera angle will change according to the knob<br />
position on the sliders. The knob can also be moved by<br />
clicking on an empty part of the slider.<br />
Click on the image<br />
You can center on a point in<br />
the image by clicking on it.<br />
This slider is used to control<br />
the tilt (vertical movement)<br />
of the camera.<br />
This slider is used to control<br />
the pan (horizontal<br />
movement) of the camera.<br />
The frame lines within the display area show the<br />
image currently being captured by the camera.<br />
Blue frame lines mean that you do not have camera<br />
control privileges.<br />
Yellow frame lines mean that you have camera<br />
control privileges.<br />
Move by clicking<br />
Clicking a point in the panorama window moves the pan<br />
and tilt to center on that point.<br />
Move by dragging<br />
Dragging the yellow frame lines in the panorama window<br />
moves the pan and tilt to capture that area.<br />
Note<br />
• <strong>Operation</strong>s carried out by clicking on the image will not be<br />
precise.<br />
• Users operating the camera in the Admin Viewer with the<br />
administrator authorities can control the camera outside the<br />
view restrictions.<br />
Users operating the camera in the Admin Viewer with the<br />
authorized user authorities can control the camera only within<br />
the view restrictions.<br />
• Users operating the camera in the <strong>VB</strong> Viewer can control the<br />
camera within the view restrictions.<br />
7<br />
Admin Viewer/<strong>VB</strong> Viewer<br />
Note<br />
In the Admin Viewer, you can also control the pan and tilt with the<br />
camera control button (p. 139).<br />
131
• Changing the Camera Zoom Ratio<br />
Move the knob on the slider up or down to zoom in or out<br />
The camera zoom ratio will change according to the knob<br />
position on the slider. The knob can also be moved by<br />
clicking on an empty part of the slider.<br />
Maximum telephoto digital<br />
zoom<br />
(only when digital<br />
zoom is on)<br />
Optical telephoto end<br />
• Using the Preset/Home Position<br />
You can control the camera using presets and home<br />
position registered in the camera beforehand (p. 96).<br />
Click the preset selection box and select a preset from the<br />
displayed list to go to the selected preset camera angle.<br />
Click the [Home Position] button to move the camera<br />
angle to the home position.<br />
Slider for zoom<br />
Move the knob upwards to<br />
zoom in (telephoto)<br />
Move the knob downwards<br />
to zoom out (wide-angle)<br />
Note<br />
• If [Digital Zoom] is set to [Enable] in [Camera] on the Setting<br />
page, the icon for the digital zoom telephoto end is displayed.<br />
(p. 53).<br />
• In the Admin Viewer, you can also control the zoom with the<br />
Camera Control button (p. 139).<br />
• Change the Zoom Ratio in the Panorama<br />
Display Area<br />
1<br />
2<br />
Wide end<br />
Click the [Panorama Display] button.<br />
Change the zoom ratio in the panorama display area<br />
displayed.<br />
Preset selection box<br />
Note<br />
Register presets and home position beforehand using the Preset<br />
Setting Tool (p. 98). Registered presets will appear in the preset<br />
selection box.<br />
• Compensating Backlight<br />
[Home Position] button<br />
This control is effective when the image is dark due to<br />
backlight.<br />
Clicking [BLC] brightens images that are dark due to<br />
backlight.<br />
Clicking the button again cancels backlight<br />
compensation.<br />
You can change the zoom ratio by dragging the yellow<br />
frame lines in the panorama window and changing the<br />
size of the frame. The zoom ratio will adjust to capture<br />
the area in the changed frame.<br />
Note<br />
Clicking outside the yellow frame lines and dragging will create<br />
blue frame lines. When you release the mouse button, the blue<br />
lines will turn yellow and the camera will change the pan, tilt and<br />
zoom in order to capture that area.<br />
Cropping and Displaying Part of an Image<br />
(Digital PTZ)<br />
You can use the Digital PTZ panel to crop and display<br />
part of a camera image in the image display area. It is<br />
also possible to use a preset or home position registered<br />
to the camera.<br />
• Digital PTZ<br />
Digital PTZ is a function that facilitates simple panning,<br />
tilting, and zooming without changing the camera lens<br />
132
How to Operate the Viewer<br />
position that was adjusted at the time of installation by<br />
transmitting just part of the camera effective pixel area<br />
(1920 x 1080) from the camera to the viewer.<br />
Note<br />
For details on how this function differs from Viewer PTZ, see<br />
p. 138.<br />
• Opening the Digital PTZ Panel<br />
Click the [Digital PTZ] button to display the Digital PTZ<br />
panel.<br />
7<br />
Note<br />
• The size of the preview frame can be changed to any of the<br />
five sizes 640 x 360, 512 x 288, 384 x 216, 256 x 144, and 128<br />
x 72, and the new size is displayed in [Image Size] on the<br />
Digital PTZ panel. The aspect ratio is always 16:9.<br />
• If the size of the preview frame becomes larger than the<br />
display size specified in the display size setting of the viewer,<br />
the quality of the image in the image display area deteriorates.<br />
Admin Viewer/<strong>VB</strong> Viewer<br />
The appearance of the [Digital PTZ] button differs as<br />
follows depending on the state of the Digital PTZ function.<br />
Digital PTZ is disabled (displays the scene as seen by<br />
the camera).<br />
Digital PTZ is enabled (displays trimmed video).<br />
• Specifying a Cropping Range<br />
Change the position and size of the preview frame on the<br />
Digital PTZ panel to specify the range to display in the<br />
image display area.<br />
The preview frame is blue when you have not obtained<br />
camera control privileges. When you obtain camera<br />
control privileges, the preview frame turns yellow and you<br />
can use the following procedures to resize and move it.<br />
• Changing the Size<br />
You can resize the preview frame by dragging it. The<br />
preview frame turns blue during dragging. The image<br />
inside the frame is displayed in the image display area in<br />
accordance with the size of the frame.<br />
• Changing the Position<br />
You can move the preview frame by dragging the inside<br />
of the frame.<br />
If you click any position in the Digital PTZ display area, the<br />
preview frame moves to the clicked position.<br />
Note<br />
The preview frame moves in stages. You cannot finely adjust the<br />
position.<br />
• Specifying a Range with the Sliders<br />
You can use the pan, tilt, and zoom sliders for the image<br />
display area to specify the cropping range in the image<br />
display area. The preview frame on the Digital PTZ panel<br />
also moves in accordance with the operation of the pan,<br />
tilt, and zoom sliders.<br />
• Using a Preset or the Home Position<br />
You can use a registered preset or home position to<br />
specify the range for Digital PTZ.<br />
Click the preset selection box and select a preset from the<br />
displayed list to move the preview frame on the Digital<br />
PTZ panel to the preset position and display the image<br />
inside the frame in the image display area.<br />
Click the [Home Position] button to move the preview<br />
frame on the Digital PTZ panel to the home position and<br />
133
display the image inside the frame in the image display<br />
area.<br />
Note<br />
Register the preset or home position beforehand using the Preset<br />
Setting Tool (p. 98). Registered presets will appear in the preset<br />
selection box.<br />
• Exiting Digital PTZ<br />
Click the [Digital PTZ] button again. The Digital PTZ panel<br />
closes and Digital PTZ ends.<br />
Although clicking the close button of the Digital PTZ panel<br />
closes the Digital PTZ panel, Digital PTZ will stay on.<br />
Setting Video and Audio<br />
Note<br />
• When the <strong>VB</strong> Viewer is launched, the video size set for the<br />
camera is applied.<br />
When the Admin Viewer is launched for the first time, the camera<br />
settings are applied, but from then on settings from the previous<br />
time are used.<br />
• When the viewer is launched, the display screen size opens at<br />
[Actual Pixels].<br />
• Black bars will appear above and below the image if [Actual<br />
Pixels] is selected for the display screen size while the video<br />
size is set to [320x240].<br />
• Displaying in Full Screen Mode<br />
You can show images over the entire display. Clicking this<br />
button will switch the viewer to full screen mode.<br />
Admin Viewer<br />
<strong>VB</strong> Viewer<br />
To close the full screen window, select [Exit Full Screen<br />
Mode] in the following menu.<br />
You can display the necessary panels for controlling the<br />
camera in the full screen mode. Right-click on the screen<br />
and select the necessary panel from the menu that<br />
appears.<br />
• Changing the Video Size<br />
You can set a desired video size for video received from<br />
the camera. Select from [320x240], [480x270], [960x540]<br />
or [1920x1080].<br />
Admin Viewer<br />
<strong>VB</strong> Viewer<br />
• Changing the Display Screen Size<br />
You can change the display screen size. Select from [Actual<br />
Pixels], [480x270], [960x540], [1920x1080] or [Fit to<br />
Window].<br />
[Actual Pixels] displays the video at the size at which it is<br />
being captured.<br />
[Fit to Window] displays the video at the maximum size<br />
possible in the web browser window.<br />
[Obtain/Release Camera Control]<br />
Obtain and release the camera<br />
control privileges.<br />
[Preset]<br />
Select a preset.<br />
[Home Position] Move the camera angle to the<br />
home position.<br />
[Panorama]<br />
Displays the panorama display<br />
panel.<br />
[Start/Exit Viewer PTZ] The viewer PTZ panel is<br />
displayed. (Admin Viewer only)<br />
[Start/Exit Digital PTZ]<br />
The Digital PTZ panel is<br />
displayed.<br />
[Control]<br />
Displays the camera control<br />
panel.<br />
[Pan/Tilt Slider] Displays the pan/tilt slider.<br />
134
How to Operate the Viewer<br />
[Control for Admin] Displays the Control for Admin<br />
Panel (Admin Viewer only).<br />
[Video Capture Size] Switch video capture size.<br />
[Snapshot]<br />
Get a snapshot.<br />
[Audio Reception] Receive audio.<br />
[Audio Transmission] Transmit audio (Admin Viewer<br />
only).<br />
[Event Display] Displays the event display panel<br />
(Admin Viewer only).<br />
[Start/Stop SD Card Recording]<br />
Start and stop video recording to<br />
an SD memory card (Admin<br />
Viewer only).<br />
[Exit Full Screen Mode] Exit full screen mode.<br />
You can move any panel by clicking the title bar and<br />
dragging it to the desired position.<br />
• Getting a Snapshot<br />
Captures a still image from live images and displays it in a<br />
new window.<br />
You can also save still images.<br />
Click [Get a Snapshot] button at the moment you want to<br />
capture a still image.<br />
• Reconnect<br />
Admin Viewer<br />
To reconnect the camera, click this button.<br />
Note<br />
If you reconnect, audio reception will stop and camera control<br />
privileges will be lost.<br />
• Receiving Audio<br />
You can receive audio through the microphone attached<br />
to the camera.<br />
Admin Viewer<br />
<strong>VB</strong> Viewer<br />
<strong>VB</strong> Viewer<br />
Click this button to receive audio.<br />
Select the [Receive audio] checkbox in the Receive Audio<br />
panel that appears and use the slider to set an<br />
appropriate volume.<br />
7<br />
Admin Viewer/<strong>VB</strong> Viewer<br />
A snapshot panel will open showing a still image from the<br />
moment you clicked it. When the snapshot panel is open,<br />
click the [Get a Snapshot] button to update the image<br />
displayed in the snapshot panel.<br />
To save a still image, right-click on it and select [Save<br />
Picture As] from the menu that appears.<br />
Enter the file name desired and save the image.<br />
Note<br />
• To receive audio, go to [Audio Server] in [Server] beforehand<br />
and set [Audio Transmission from the Camera] to [Enable]<br />
(p. 62).<br />
• The first time the Receive Audio panel is launched, a message to<br />
install the add-on “<strong>Canon</strong> Network Camera Audio Receiver” will be<br />
displayed in the information bar of the web browser. Install the addon.<br />
• Regardless whether or not the Receive Audio panel is open, audio<br />
will always be received if the [Receive audio] checkbox is selected<br />
in the Receive Audio panel.<br />
Checking Information<br />
135
The following icons will appear depending on the content<br />
of the information displayed.<br />
Icon (color) Meaning Description<br />
(Blue)<br />
(Yellow)<br />
(Orange)<br />
Information<br />
Warning<br />
Error<br />
Appears when a camera<br />
operation has been successful.<br />
The following information<br />
appears.<br />
• Help messages, such for each<br />
button and pull down menu<br />
• Frame rate information<br />
• Pan, tilt, zoom camera<br />
information, image<br />
stabilization information<br />
• Pan, tilt, and<br />
zoom information for Digital<br />
PTZ<br />
A message will appear notifying<br />
the user when camera control<br />
privileges cannot be obtained,<br />
audio reception stops, etc.<br />
Appears when a system error<br />
occurs.<br />
Important<br />
If the image stabilizer function is turned on in the setting page<br />
(p. 53), the actual viewing angle of the image will be smaller<br />
than the viewing angle displayed in the information field (For<br />
On1: approx. 83%; for On2: approx. 50%).<br />
Also, the viewing angle of image display becomes smaller than<br />
the angle (frame) displayed in the panorama display area.<br />
Note<br />
For details on the messages, see “List of Viewer Messages”<br />
(p. 162).<br />
136
Performing <strong>Operation</strong>s and Settings in the Admin Viewer<br />
The operations and settings that can be performed only in the Admin Viewer are explained.<br />
Transmitting Audio<br />
In the Admin Viewer, you can transmit audio via an<br />
external device connected to the camera.<br />
Click this button to transmit audio.<br />
Use the slider to set an appropriate volume on the Send<br />
Audio panel that appears.<br />
In the [Audio sending time limit], select [No Limit], [1<br />
min(s)], [5 min(s)] or [10 min(s)].<br />
• The cropped position in the image display area will be<br />
reflected in full screen mode as well.<br />
• Opening the Viewer PTZ Panel<br />
Click the [Viewer PTZ] button to display the viewer PTZ<br />
panel.<br />
7<br />
Admin Viewer/<strong>VB</strong> Viewer<br />
Note<br />
The first time the Send Audio panel is launched, a message to<br />
install the add-on “<strong>Canon</strong> Network Camera Audio Receiver” will<br />
be displayed in the information bar of the web browser. Install the<br />
add-on.<br />
Preview Frame<br />
(Magnified display area)<br />
Center of preview<br />
frame<br />
Magnifying Part of the Image (Viewer<br />
PTZ)<br />
You can use the Viewer PTZ panel to magnify part of the<br />
camera’s image in the image display area.<br />
The initial status of the Viewer PTZ panel shows the<br />
preview frame (yellow) occupying the entire image.<br />
• Viewer PTZ<br />
Viewer PTZ uses the digital zoom function to enlarge part<br />
of a video without using the camera pan, tilt or zoom<br />
functions.<br />
This function allows you to enlarge part of a video when<br />
using the camera in a locked position, for example, during<br />
use of an intelligent function.<br />
Important<br />
When the Viewer PTZ function is used, you cannot operate the<br />
camera by clicking the image display area.<br />
Note<br />
• Video cropped with Viewer PTZ will not be videos recorded<br />
manually, or by event or timer.<br />
137
• Adjusting the Preview Frame Size<br />
Drag the preview frame line to make the frame smaller,<br />
and a magnified view of the image in the frame will be<br />
shown in the image display area.<br />
• Exiting Viewer PTZ<br />
Click the [Viewer PTZ] button again. The Viewer PTZ<br />
panel closes and Viewer PTZ is exited.<br />
Although clicking the close button of the Viewer PTZ panel<br />
closes the PTZ panel, the Viewer PTZ will stay on.<br />
• Differences Between Viewer PTZ and Digital<br />
PTZ<br />
Viewer PTZ and Digital PTZ are both simple pan, tilt, and<br />
zoom functions that use the digital zoom function, but they<br />
have the following differences because they employ<br />
different operating principles.<br />
The preview frame turns blue when you drag it.<br />
Note<br />
• The aspect ratio of the preview frame is always 16:9.<br />
• The Viewer PTZ uses digital zoom, so the higher the digital<br />
zoom ratio, the lower the quality of the image becomes.<br />
• Moving the Preview Frame<br />
You can move the preview frame to the desired position.<br />
Viewer PTZ<br />
Enlarges the specified part of<br />
the image transmitted from<br />
the camera and then displays<br />
it in the viewer.<br />
The size of the received data<br />
is large.<br />
Can be used only in Admin<br />
Viewer.<br />
Not necessary to obtain the<br />
camera control privileges.<br />
PTZ operation can be<br />
performed independently for<br />
each viewer.<br />
Digital PTZ<br />
Transmits only the trimmed<br />
part of the entire area that can<br />
be captured by the camera.<br />
The size of the received data<br />
is small.<br />
Can be used in both Admin<br />
Viewer and <strong>VB</strong> Viewer.<br />
Necessary to obtain the<br />
camera control privileges.<br />
Independent operation cannot<br />
be performed for each viewer<br />
(if multiple viewers are<br />
connected and Digital PTZ is<br />
used for one of them, the<br />
same Digital PTZ display is<br />
also applied in the other<br />
viewers).<br />
Move by dragging<br />
Click within the preview frame and drag it over the subject<br />
that you want to see magnified.<br />
The preview frame turns blue when you drag it.<br />
Move by clicking<br />
Click a position outside of the preview frame and the<br />
preview frame will move to that position. Click the subject<br />
that you want to see magnified.<br />
Using Control for Admin<br />
When you have obtained control privileges, click the<br />
[Control for Admin] button to display the Control for Admin<br />
Panel and perform camera operation and video settings.<br />
Move using sliders<br />
When you have obtained control privileges, you can pan,<br />
tilt and zoom the displayed video using sliders.<br />
Note<br />
After changing the preview frame, the image display area will<br />
continue to display the cropped video corresponding to the<br />
preview frame even after the Viewer PTZ panel is closed.<br />
However, when you reconnect to Admin Viewer, the initial status<br />
will be restored.<br />
138
Performing <strong>Operation</strong>s and Settings in the Admin Viewer<br />
• Opening/Closing Control Items<br />
Clicking the title of a control item will open or close it.<br />
⇔<br />
• Setting the Smart Shade Control<br />
The smart shade control function differs from backlight<br />
compensation in that only dark areas are brightened while<br />
bright areas are kept intact.<br />
(1)<br />
(2)<br />
You can open the various control items even without<br />
obtaining the camera control privileges, but all items other<br />
than [Frame Rate] will be grayed out.<br />
• Performing <strong>Operation</strong>s and Settings<br />
Click the camera control buttons to set the pan, tilt and<br />
zoom operations as well as the speed.<br />
(1) [Smart Shade Control]<br />
Set to [Off] or [On].<br />
(2) Adjusting the Smart Shade Control<br />
When smart shade control is [On], set one of the 7<br />
levels from [1] (Mild) to [7] (Strong).<br />
Example: If the background is bright and the subject<br />
is hard to see, this function brightens dark areas to<br />
make the subject clearer.<br />
In comparison to backlight compensation, smart<br />
shade control can reduce overexposure of bright<br />
areas.<br />
7<br />
Admin Viewer/<strong>VB</strong> Viewer<br />
(1)<br />
(3)<br />
(2)<br />
(1) [Pan/Tilt] button<br />
Move pan and tilt in the direction of the arrows.<br />
<strong>Operation</strong> will continue as long as you are holding<br />
down the button and will stop when you release it.<br />
Clicking the center button will make the camera face<br />
straight forwards.<br />
(2) [Zoom] button<br />
Zooms in or out. <strong>Operation</strong> will continue as long as<br />
you are holding down the button and will stop when<br />
you release it.<br />
(3) [Pan/Tilt] Speed<br />
Select a speed from [Fast], [Normal] and [Slow].<br />
(4) [Zoom] Speed<br />
Set the speed to [Fast] or [Slow].<br />
Note<br />
Changing the [Pan/Tilt] speed or [Zoom] speed will not change<br />
the speed of the slider, or of the pan, tilt or zoom in panorama.<br />
(4)<br />
Note<br />
• When [On] is selected for smart shade control, the image file<br />
size increases.<br />
• When [On] is selected for smart shade control, screen noise<br />
may increase. If noise is noticeable, lower the control level.<br />
• Setting the Focus<br />
[Auto]<br />
OFF<br />
[Manual]<br />
Smart Shade<br />
Control<br />
BLC (Back Light<br />
Compensation)<br />
: Automatically focuses on the<br />
subject.<br />
: You can adjust the focus manually<br />
by pushing the (far) and<br />
(near) buttons.<br />
Clicking [One-shot AF] will use<br />
autofocus to focus on a subject and<br />
then stop in manual focus.<br />
139
[Fixed at Infinity] : You can set the focus so that it is<br />
fixed near infinity.<br />
Important<br />
• If it is set in the Admin Viewer, the same focus mode will<br />
occur in the viewers of other users also.<br />
• Depending on the lighting used, focus may not be<br />
maintained when switching between [Day Mode] and [Night<br />
Mode]. Focus when switching Day/Night Mode can be set in<br />
the [Day/Night Mode Focus Settings] panel in the Admin<br />
Viewer (p. 141).<br />
• Setting the shutter speed at [1/1 sec] in manual exposure<br />
(p. 140) will disable the [Auto] and [One-shot AF] focus<br />
modes in Control for Admin. Switch the focus to [Manual] and<br />
adjust it to your subject.<br />
• Refer to the following for focus ranges.<br />
Notes on p. 52<br />
Notes on p. 38<br />
• Changes to focus mode in the Admin Viewer will not be<br />
reflected in the settings on the setting page.<br />
• Note that if you set the focus manually it will remain fixed.<br />
• Setting the Exposure<br />
(1)<br />
(2)<br />
[Auto (Flickerless)]<br />
In this mode, video flickering caused by fluorescent<br />
lights, etc., can be reduced. The shutter speed is<br />
automatically adjusted according to the brightness<br />
of the environment in which the camera is used.<br />
[Auto (Shutter-priority AE)]<br />
In this mode, the desired shutter speed can be<br />
specified.<br />
(2) [Exposure Compensation]<br />
When [Auto], [Auto (Flickerless)] or [Auto (Shutterpriority<br />
AE)] is selected for [Exposure], the exposure<br />
compensation value desired can be selected from<br />
nine levels (-4 to +4) using the slider.<br />
To darken the image, select a negative value. To<br />
brighten the image, select a positive value.<br />
(3) [Metering Mode]<br />
When [Auto], [Auto (Flickerless)] or [Auto (Shutterpriority<br />
AE)] is selected for [Exposure], the metering<br />
mode can be selected from [Center-Weighted],<br />
[Average] or [Spot].<br />
For an explanation on each item set in [Metering<br />
Mode], see [Metering Mode] in the Setting page<br />
(p. 51).<br />
(4) [Shutter Speed]<br />
When [Manual] or [Auto (Shutter-priority AE)] is<br />
selected for [Exposure], select the shutter speed<br />
desired. If [Manual] is selected, set the shutter speed<br />
in the range of [1/1 sec] to [1/16000 sec] from a pulldown<br />
menu. If [Auto (Shutter-priority AE)] is selected,<br />
set the shutter speed in the range of [1/2 sec] to<br />
[1/16000 sec] from a pull-down menu.<br />
When capturing a moving subject, selecting a higher<br />
shutter speed can reduce blurry video capture.<br />
(3)<br />
(1) Exposure Mode<br />
Select from [Auto], [Manual], [Auto (Flickerless)] or<br />
[Auto (Shutter-priority AE)].<br />
If [Auto] is selected for [Day/Night] under [Camera] in<br />
the Setting page (p. 53), select [Auto], [Auto<br />
(Flickerless)] or [Auto (Shutter-priority AE)].<br />
[Auto]<br />
The exposure is controlled automatically.<br />
(4)<br />
[Manual]<br />
The exposure is set by adjusting the shutter speed,<br />
aperture and gain values manually.<br />
(5) [Aperture]<br />
If [Manual] is selected for [Exposure], set a desired<br />
aperture value.<br />
Moving the slider to the left closes the aperture and<br />
darkens the image. Moving the slider to the right<br />
opens the aperture and brightens the image.<br />
(6) [Gain]<br />
If [Manual] is selected for [Exposure], set a desired<br />
gain value.<br />
Moving the slider to the left decreases the gain<br />
(sensitivity to brightness) and darkens the image.<br />
Moving the slider to the right increases the gain and<br />
brightens the image.<br />
140
Performing <strong>Operation</strong>s and Settings in the Admin Viewer<br />
Important<br />
• If the subject is a traffic signal or electronic scoreboard, etc.,<br />
the captured image may flicker.<br />
In this case, try changing [Exposure] to [Auto (Shutter-priority<br />
AE)] and then select a shutter speed lower than 1/100, to see<br />
if the situation improves.<br />
• The [BLC] button is not available if [Exposure] is set to<br />
[Manual].<br />
Important<br />
• Since the light source selection options are based on<br />
representative characteristics, proper colors may not be<br />
achieved depending on the applicable light source. In this<br />
case, use the [One-shot WB] function.<br />
• If the subject looks greenish under mercury lamps in the<br />
[Auto] mode, select the [Mercury Lamp] mode under light<br />
source. If the image is still not shown in appropriate colors<br />
under mercury lamps when the [Mercury Lamp] mode is<br />
selected under light source, use [One-shot WB].<br />
• Setting White Balance<br />
(3)<br />
(1) [Auto]<br />
The white balance is adjusted automatically.<br />
(1)<br />
(2)<br />
• When the subject has only one color, under low light<br />
conditions, or when sodium lamps, mercury lamps or certain<br />
other fluorescent lighting is used, colors may not be adjusted<br />
automatically.<br />
• When [Day/Night] is set to [Night Mode] (including when it is<br />
set to [Auto] and night mode is judged to be applicable), the<br />
white balance function cannot be used.<br />
• Notes on capturing video continuously day and night<br />
If a subject that seldom changes is captured in a location<br />
where the light source changes gradually, such as when<br />
capturing a subject continuously day and night, appropriate<br />
colors may not be achieved.<br />
In the above case, applying changes to the image to capture<br />
will achieve the appropriate colors.<br />
7<br />
Admin Viewer/<strong>VB</strong> Viewer<br />
(2) [Light Source]<br />
Select the light source from the pull-down menu below<br />
according to the condition in which the camera is<br />
used.<br />
For an explanation on each item set in [Light Source],<br />
see [White Balance] in the Setting page (p. 52).<br />
• Setting the Day/Night Mode<br />
(1)<br />
(2)<br />
(3)<br />
(4)<br />
(3)<br />
(1) [Auto]<br />
The camera automatically switches to day mode or<br />
night mode depending on ambient brightness.<br />
(2) [Day Mode]<br />
Color image can be viewed in the normal mode.<br />
(3) [Lock]<br />
The white balance is fixed to that of the video currently<br />
received.<br />
To forcibly fix the white balance according to the light<br />
source, use [One-shot WB].<br />
Example of Setting Method:<br />
Irradiate a white subject (white paper, etc.) using the<br />
light source and capture the subject over the entire<br />
screen. In this condition, select [One-shot WB].<br />
(3) [Night Mode]<br />
Images are shown in black and white, due to the<br />
disabling of the infrared cut filter.<br />
(4) [Day/Night Mode Focus Settings]<br />
Click to display the [Day/Night Mode Focus Settings]<br />
panel for making focus settings when switching Day/<br />
Night Mode. Can only be set when [Focus] is set to<br />
[Manual] (p. 139).<br />
141
(5)<br />
(8) [None]<br />
When switching Day/Night Mode, the camera<br />
automatically focuses on each of the fluorescent<br />
lighting focus positions set for Day Mode and Night<br />
Mode.<br />
(6)<br />
(7)<br />
Registering the Focus Positions<br />
The focus positions that are used when switching Day/<br />
Night Mode are registered as follows:<br />
1<br />
Select (2) [Day Mode] or (3) [Night Mode] in [Day/<br />
Night] (p. 141).<br />
(5)<br />
(6)<br />
(8)<br />
2<br />
3<br />
4<br />
Under the lighting conditions selected in step 1, adjust<br />
the focus position as required while watching the<br />
video.<br />
Click [Register focus position].<br />
[Registered] will appear next to the mode, [Day Mode]<br />
or [Night Mode], picked in step 1.<br />
Select the remaining mode in step 1, and repeat steps<br />
2-3.<br />
Focusing positions will vary under different light<br />
sources, such as fluorescent or infrared, since the<br />
wavelengths of these light sources vary. One of the<br />
following methods can be used to adjust the focusing<br />
position to allow for these differences when switching<br />
Day/Night Mode.<br />
(5) [Use One-shot AF]<br />
This is the factory default setting. Select this option to<br />
use One-shot AF when switching Day/Night Mode.<br />
(6) [Move to registered focus position]<br />
When switching Day/Night Mode, the focus positions<br />
preregistered for Day Mode and Night Mode in<br />
[Register focus position] will be used. For details, see<br />
“Registering the Focus Positions” (p. 142).<br />
(7) [Compensate for light source]<br />
Select this option to adjust the focus position to suit<br />
the lighting being used when switching to Night Mode.<br />
[Fluorescent]<br />
Select this option to capture video under<br />
fluorescent, LED, sodium or mercury lighting.<br />
[Halogen Lamp]<br />
Select this option to capture video under halogen or<br />
incandescent lighting.<br />
[Infrared (740nm)]<br />
Select this option to capture video under infrared<br />
(740 nm wavelength) lighting.<br />
[Infrared (850nm)]<br />
Select this option to capture video under infrared<br />
(850 nm wavelength) lighting.<br />
[Infrared (940nm)]<br />
Select this option to capture video under infrared<br />
(940 nm wavelength) lighting.<br />
[Clear the registered focus position?] will appear when<br />
selecting (5) or (8), even if only one focus position has<br />
been registered for either [Day Mode] or [Night Mode].<br />
When switching to (5) or (8), and then back to [Move to<br />
registered focus position] mode, selecting [No] will<br />
preserve the registered focus position. Selecting [Yes] will<br />
clear the registered focus position.<br />
Important<br />
• If the viewer is exited in [Day Mode] or [Night Mode], auto<br />
day/night stays disabled even if [Auto] is set in the setting<br />
page. To set auto day/night to enable, be sure to exit the<br />
viewer after setting [Auto].<br />
• While making settings with the [Day/Night Mode Focus<br />
Settings] panel, it is not possible to make settings using<br />
Admin Tools on another computer.<br />
• If [Use One-shot AF] is activated due to switching between<br />
Day/Night Mode, the camera may not be able to focus on a<br />
target subject using One-shot AF if another subject passes in<br />
front of the target at that time.<br />
• If Night Mode will be used under infrared lighting, turn on the<br />
lighting before switching to Night Mode.<br />
• Even if you use [Day/Night Mode Focus Settings], focus may<br />
not be maintained in Night Mode if the light source changes<br />
(ex. infrared lighting to sunlight).<br />
Note<br />
Refer to the following for focus ranges when Day/Night is<br />
enabled.<br />
Notes on p. 52<br />
Notes on p. 38<br />
142
Performing <strong>Operation</strong>s and Settings in the Admin Viewer<br />
• Selecting the External Device Output<br />
You can control external device output and display the<br />
current output status using an icon. Output can be<br />
activated and deactivated by clicking this icon.<br />
Example:<br />
Output 1: inactive<br />
Output 2: active<br />
• Setting a Frame Rate<br />
[Maximum Frame Rate]<br />
You can select the maximum frame rate for displayed<br />
video from one of twelve levels between [30fps] to<br />
[0.2fps].<br />
Displaying Event Status<br />
(2) [Intelligent Function (Image Detection)]<br />
The status of intelligent function (image detection) will<br />
be displayed. When the detection settings<br />
configured in intelligent functions (Moving Object<br />
Detection, Abandoned Object Detection, Removed<br />
Object Detection, Camera Tampering Detection or<br />
Passing Detection) enter Detected mode, the<br />
corresponding icon will turn green (p. 109).<br />
If names are entered in [Detection Setting Name] in<br />
Intelligent Function Setting Tools (p. 109), [Setting 1]<br />
to [Setting 15] will be displayed with the<br />
corresponding name.<br />
Example:<br />
Setting 1: Image Detection status ON<br />
Other settings: Image Detection status OFF<br />
Note<br />
The icon signifying Detection mode will be displayed for a<br />
maximum of five minutes (except for Moving Object Detection).<br />
(3) [Intelligent Function (Volume detection)]<br />
The volume detection status is displayed. When<br />
sound that meets the criteria selected under [Event] ><br />
[Volume Detection] in the Setting Page is detected,<br />
the icon turns green.<br />
7<br />
Admin Viewer/<strong>VB</strong> Viewer<br />
Clicking the [Event Display] button will show the event<br />
display panel, which shows the input status of external<br />
devices, as well as the status of image and volume<br />
detection by the intelligent function.<br />
Example:<br />
Volume Detection status ON<br />
(1)<br />
(2)<br />
(3)<br />
(1) [External Device Input]<br />
When a contact input signal is received from an<br />
external device, input will be activated and an icon will<br />
be displayed.<br />
Example:<br />
Input 1: inactive<br />
Input 2: active<br />
143
Recording to an SD Memory Card<br />
Manually<br />
Video displayed in the Admin Viewer can be manually<br />
recorded to an SD memory card.<br />
• Confirming Manually Recorded Video<br />
Use the Recorded Video Utility (p. 118) to confirm video<br />
manually recorded to an SD memory card.<br />
Click the [Recorded Video Utility] button to start the<br />
Recorded Video Utility from the Admin Viewer.<br />
Note<br />
• To record on an SD memory card, an SD memory card must be<br />
inserted in the camera (p. 129) and [Save Logs and Videos]<br />
must be selected in the setting page > [Memory Card] ><br />
[<strong>Operation</strong> Settings].<br />
• The format and size of the video recorded on an SD memory<br />
card depends on the settings made on the Setting page.<br />
Video format: [Memory Card] > [Video Format]<br />
Video size: JPEG [Video] > [JPEG] > [Video Size: Upload /<br />
SD card]<br />
H.264 [Video] > [H.264] > [Video Size]<br />
• Recording Videos Manually<br />
1<br />
If you have not yet obtained the camera control<br />
privileges, click the [Obtain/Release Camera Control]<br />
button and obtain the control privileges.<br />
2<br />
Click the [Start/Stop SD Card Recording] button.<br />
The [Start/Stop SD Card Recording] button<br />
appearance changes as shown below depending on<br />
recording status.<br />
Not recording<br />
Recording<br />
3<br />
To stop video recording, click the [Start/Stop SD Card<br />
Recording] button again.<br />
Important<br />
Recording to the SD memory card will be terminated when the<br />
length of manually recorded video exceeds 300 seconds from<br />
the time recording started.<br />
144
Chapter 8<br />
Appendix<br />
❏ SD Memory Card Access<br />
❏ Modifiers<br />
❏ Troubleshooting<br />
❏ List of Log Messages<br />
❏ List of Viewer Messages<br />
❏ Restore Default Settings<br />
❏ List of Factory Default Settings<br />
❏ Index
SD Memory Card Access<br />
You can set the camera so that the following data is saved automatically to the camera’s SD memory card. (“Chapter 5<br />
Setting Page”, “[Memory Card] SD Memory Card <strong>Operation</strong>s and Settings” (p. 75)).<br />
When either the storage capacity of the SD memory card or the number of files that can be saved is reached, you cannot<br />
save further video to the SD memory card. If this happens, delete any unneeded video files with the Recorded Video Utility.<br />
• Image files when recording-mode stream transmission failed to be sent due to network errors (JPEG only)<br />
• Video files when HTTP or FTP upload failed (JPEG/H.264)<br />
• Video files manually recorded by the user from the Admin Viewer (JPEG/H.264)<br />
• Video files recorded by [External Device Input], [Volume Detection], and the intelligent functions when an event occurs<br />
(JPEG/H.264)<br />
• Video files recorded using a timer (JPEG/H.264)<br />
• Log<br />
• Access to the SD Memory Card<br />
Use the Recorded Video Utility (p. 118) of the Admin Tools or FTP software (not included) to access the camera using the<br />
camera’s IP address.<br />
FTP Software Settings<br />
Address: Camera IP address (factory default setting: 192.168.100.1)<br />
User ID: Administrator user ID (factory default setting: root)<br />
Password: Administrator password (factory default setting: camera)<br />
Important<br />
• When deleting a video using a method other than the Recorded Video Utility, you must perform [Recreate Video Management<br />
Information] under [Memory Card] in the setting page (p. 76).<br />
• <strong>Canon</strong> will assume no liability for any accident or damage resulting from use of FTP software.<br />
• Directory Structure for Data Downloaded with Recorded Video Utility<br />
When video on an SD memory card is downloaded to a computer with the Recorded Video Utility, folders are created<br />
automatically in accordance with conditions such as the camera and the date and time.<br />
The following shows the folder structure.<br />
Example: H.264 video, manually recorded using a camera with an IP address of 192.168.100.1, on Sept. 10, 2012, from<br />
16:00:00 to 16:59:59 (Camera Time Zone: GMT+09:00).<br />
D:\work \ 192.168.100.1 \ 20120910 \ 070000_075959 _ +9 _ M _ H264<br />
(1) (2) (3) (4) (5) (6) (7)<br />
(1) Folder specified with [Download to]<br />
(2) IP address of the camera<br />
(3) Video recording date<br />
(4) Recording start and end times (UTC)<br />
(5) Time difference from UTC<br />
(6) Recording type<br />
E: Event<br />
M: Manual recording<br />
R: Recording-mode stream<br />
T: Timer<br />
U: Upload<br />
(7) Video format (JPEG or H.264)<br />
146
SD Memory Card Access<br />
Note<br />
• A folder is created once per hour.<br />
• If the time difference is added to the starting and ending times, it will equal the local time.<br />
• File Name Format for Data Downloaded with Recorded Video Utility<br />
Example: Video, manually recorded on Sept. 10, 2012, starting from 16:06:19 (Camera Time Zone: GMT+09:00).<br />
20120910 070618-070619- M 00 _ 507.mov<br />
(1) (2) (3) (4)<br />
(1) Video recording date<br />
(2) File creation time (UTC)<br />
(3) Recording start time (UTC)<br />
(4) Recording type<br />
E: Event<br />
M: Manual recording<br />
R: Recording-mode stream<br />
T: Timer<br />
U: Upload<br />
Note<br />
• The file creation time will be earlier than the actual start of recording time.<br />
8<br />
Appendix<br />
• If multiple video files were created because recording continued for several seconds or more, a new file name with different values for<br />
(2) and the sequential number ending will be used. In the above example, if recording starts at 16:09:19, and the next file is switched to<br />
4 seconds later, the file name will be as follows.<br />
20120910070623-070619-M00_508.mov<br />
Since this is a continuation of the recording that started at 16:09:19, the recording start time (3) will remain as “070619”. The sequential<br />
number at the end of the file name will be increased by one increment.<br />
147
Modifiers<br />
According to the setting item, you can specify parameters using modifier “% characters”.<br />
Modifiers Meaning Description of character string entered<br />
%n Reason for capture (number) 0 (test) | 1 (External device input 1) | 2 (External device input 2) |<br />
33 (Timer 1) | 34 (Timer 2) | 35 (Timer 3) | 36 (Timer 4) | 145 (Volume detection) |<br />
161 (Intelligent Function Detection Setting 1) | 162 (Intelligent Function Detection Setting 2) |<br />
163 (Intelligent Function Detection Setting 3) | 164 (Intelligent Function Detection Setting 4) |<br />
165 (Intelligent Function Detection Setting 5) | 166 (Intelligent Function Detection Setting 6) |<br />
167 (Intelligent Function Detection Setting 7) | 168 (Intelligent Function Detection Setting 8) |<br />
169 (Intelligent Function Detection Setting 9) | 170 (Intelligent Function Detection Setting 10) |<br />
171 (Intelligent Function Detection Setting 11) | 172 (Intelligent Function Detection Setting 12) |<br />
173 (Intelligent Function Detection Setting 13) | 174 (Intelligent Function Detection Setting 14) |<br />
175 (Intelligent Function Detection Setting 15)<br />
%N Reason for capture<br />
(character string)<br />
| | NULL (external input device name (alphanumeric characters) not yet set/volume<br />
detection/timer event or test)<br />
%X Width of image Number of pixels in horizontal direction<br />
%Y Height of image Number of pixels in vertical direction<br />
%C Camera number 1<br />
%D Camera name Setting for [Camera Name (alphanumeric characters)]<br />
%P Pan position -179.99 – 180.00 0<br />
%T Tilt position -179.99 – 180.00 0<br />
%Z Zoom position 0.01 – 300.00 0<br />
%V Camera server <strong>VB</strong>-<strong>H41</strong>/<strong>VB</strong>-H610VE/<strong>VB</strong>-H610D/<strong>VB</strong>-H710F<br />
%y Year of capture time 2001 – 2031<br />
%m Month of capture time 01 – 12<br />
%d Day of capture time 01 – 31<br />
%w Day of week of capture time 0 – 6 (Sunday to Saturday)<br />
%H Hours of capture time 00 – 23<br />
%M Minutes of capture time 00 – 59<br />
%S Seconds of capture time 00 – 59<br />
%s Milliseconds of capture time 000 – 999<br />
%z Time zone of capture time -1200 – +1300<br />
%a Weekday name of capture<br />
time<br />
Sun | Mon | Tue | Wed | Thu | Fri | Sat<br />
%b Month name of capture time Jan | Feb | Mar | Apr | May | Jun | Jul | Aug | Sep | Oct | Nov | Dec<br />
%h Host Name<br />
Note<br />
• A runtime error will occur if the specified name does not match.<br />
• If this modifier is not defined, “%” will be deleted.<br />
148
Modifiers<br />
• Available Modifiers<br />
The modifiers that can be used for each setting item are specified below.<br />
[HTTP Upload] (p. 60)<br />
[Parameter (query string)]<br />
All modifiers can be used.<br />
[FTP Upload] (p. 60)<br />
[Subdirectory Name to Create]<br />
Only the modifiers %y,%m,%d,%w,%H,%h,%n can be used.<br />
[File Name to Create]<br />
Only the modifiers %y,%m,%d,%w,%H,%M,%S,%s,%n can be used.<br />
[E-mail Notification] (p. 61)<br />
[Message Body]<br />
All modifiers can be used.<br />
8<br />
Appendix<br />
149
Troubleshooting<br />
Before contacting the dealer where you purchased the product or <strong>Canon</strong>'s Customer Service Center, check the items<br />
specified as follows. If a log message is displayed, check the details of the message and corresponding countermeasure in<br />
the log message list.<br />
Problem<br />
The camera does not start.<br />
<strong>VB</strong> Initial Setting Tool does not operate.<br />
Camera Angle Setting Tool does not operate.<br />
The top page of the camera is not displayed.<br />
The Admin Tools will not start.<br />
The Admin Viewer will not start.<br />
Video is not displayed.<br />
Countermeasures<br />
• If you are using a PoE hub, check if the LAN cable is connected correctly.<br />
• If you are using an AC adapter (sold separately), check if the AC adapter is<br />
connected correctly.<br />
• Turn the camera off and on again (see “Installation <strong>Guide</strong>” > “Connecting the<br />
Camera”).<br />
• Check if the LAN cable is connected correctly.<br />
• Turn the camera off and on again (see “Installation <strong>Guide</strong>” > “Connecting the<br />
Camera”). The camera no longer responds to <strong>VB</strong> Initial Setting Tool 20 minutes after<br />
being turned on.<br />
• Check if the camera and the PC in which the <strong>VB</strong> Initial Setting Tool is operating are<br />
connected to the LAN in the same segment.<br />
• The <strong>VB</strong> Initial Setting Tool may not function when the [Windows Firewall] function is<br />
enabled. In this case, see “Notes on Use When the [Windows Firewall] Function is<br />
Enabled” (p. 20).<br />
• Check if you are using an older version of the <strong>VB</strong> Initial Setting Tool.<br />
• Check if the LAN cable is connected correctly.<br />
• Check if the camera and the PC in which the Camera Angle Setting Tool is operating<br />
are connected to the LAN in the same segment.<br />
• “Application could not be started. Install .NET Framework 3.5 (SP1 or later).” If this<br />
message is displayed, install .NET Framework 3.5 (SP1 or later) or enable settings<br />
(p. 19).<br />
• Check if the LAN cable is connected correctly.<br />
• Check if the network to which the camera is connected is set up correctly. In<br />
particular, check if the IP address, subnet mask and default gateway address are set<br />
within the ranges supported by the applicable network.<br />
• If you have changed the IP address, the new address will not become effective until<br />
the camera is rebooted.<br />
• Check if the correct URI (camera IP address) is entered in your web browser (p. 42,<br />
p. 78, p. 127).<br />
• Check whether the connection is from a computer whose access is blocked in<br />
[Access Control] on the Setting page.<br />
• “Your web browser is not supported.” If this message is displayed, use Internet<br />
Explorer 7 or later.<br />
• “Application could not be started. Install .NET Framework 3.5 (SP1 or later).” If this<br />
message is displayed, install .NET Framework 3.5 (SP1 or later) or enable settings<br />
(p. 19).<br />
• “Application could not be started. Install .NET Framework 4.5.” If this message is<br />
displayed, install .NET Framework 4.5 or enable settings (p. 19).<br />
• “JavaScript is not available or disabled on your web browser.” If this message is<br />
displayed, set [Active Script] to [Enable] in Internet Explorer's security settings. (See<br />
(2) below for instructions on how to set this.)<br />
• “The settings from (1) to (3) below must be carried out to use the Admin Viewer and<br />
Admin Tools.” If this message is displayed, set the following.<br />
(1) Use the installer to install your Admin Tools Certificate (p. 26).<br />
(2) When using Internet Explorer 9 or greater, follow the steps in “Registering the<br />
Top Page of the Camera as a Trusted Site” (p. 20) and add this web site to<br />
[Trusted sites] in Internet Explorer's security settings.<br />
(3) In Internet Explorer click [Tools] > [Internet Options] > [Security] > [Custom<br />
level] and under the Security Settings list, set [XAML browser applications],<br />
[File download] and [Launching programs and files in an IFRAME] to [Enable].<br />
• To improve video quality, refer to “[Video] Setting Video Size, Quality and Frame Rate”<br />
(p. 55) in “Chapter 5 Setting Page” to change settings and make adjustments.<br />
• Up to 30 viewers can access the camera at the same time. If this limit has been<br />
exceeded, video is not displayed and a message appears.<br />
150
Troubleshooting<br />
The video is not displayed for Digital PTZ<br />
panel in Admin Viewer.<br />
The video is not updated in the Digital PTZ<br />
panel in Admin Viewer.<br />
There is no audio.<br />
Problem<br />
The camera cannot be controlled.<br />
The viewer gets disconnected.<br />
You forgot your password.<br />
Data cannot be uploaded.<br />
You cannot use recording-mode stream<br />
transmission.<br />
Video cannot be recorded on an SD memory<br />
card.<br />
Files cannot be saved in the setting page or<br />
Admin Tools.<br />
A message indicating “Cannot access the SD<br />
card. Please recreate the video management<br />
information on the Setting page.” appears<br />
when an attempt is made to start up the<br />
Recorded Video Utility.<br />
Countermeasures<br />
• If [Server] > [Video Server] > [Maximum Number of Clients] is configured to 0 in the<br />
setting page, the image will not be displayed in the Digital PTZ panel. Increase the<br />
number in [Maximum Number of Clients].<br />
• [Server] > [Video Server] > [Maximum Connection Time (sec.)] on the setting page is<br />
applied to the time for updating video in the Digital PTZ panel.<br />
If the value is set to other than 0, the video will no longer be updated after the set time<br />
elapses.<br />
If the value is set to 0, the video update time becomes unlimited. Take note, however,<br />
that this time affects not only the Digital PTZ panel, but also the time that individual<br />
clients can connect to the camera.<br />
• If there is no audio, check the audio server settings of the camera and also check the<br />
sound and audio device settings for the PC.<br />
• If you are using the Admin Viewer with the administrator authorities, check if the<br />
camera is connected to the RM Viewer or another viewer that lets the administrator<br />
use audio.<br />
• In <strong>VB</strong> Viewer, audio cannot be used if the <strong>Canon</strong> Network Camera Audio Receiver 3.0<br />
add-on is not installed.<br />
• If you connect the Admin Viewer as an administrator, you will have exclusive<br />
possession of the camera control privileges. If you connect to the Admin Viewer as an<br />
Authorized User, you cannot control the camera unless the administrator releases<br />
camera control. Consult the Administrator (p. 124).<br />
• Check the network and PC for abnormality.<br />
• Reboot the PC and connect again.<br />
• You can initialize all settings of the camera excluding date and time using the reset<br />
switch (p. 164). The administrator password required for initialization is “camera”.<br />
Note, however, that network settings such as the IP address and subnet mask will be<br />
initialized and must be set again.<br />
• Check the upload destination in the [Upload] menu, as well as the upload operation<br />
upon event in the [Event] menu, to see if both are set correctly.<br />
• You can perform an operation check based on the currently set upload destination by<br />
running a test (p. 60) from the [Upload] menu.<br />
• Check [View Logs] in the [Maintenance] menu or logs on the server to check the<br />
detailed operating environment. For [View Logs], see “Application (Uploader)<br />
Messages” (p. 153). Also see “Important” in p. 59.<br />
• For the server settings, contact your System Administrator.<br />
• You cannot use recording-mode stream transmission if [Upload] in the [Upload] menu<br />
is set to HTTP or FTP. Set [Upload] to [Upload Disabled] (p. 59).<br />
• To record video to an SD memory card when an event occurs, check the [Video<br />
Record Action] settings under [Event] in the setting page. When [Video Record<br />
Action] is set to [Upload], change it to [Record to SD Card].<br />
• When recording-mode stream video that could not be transmitted due to network<br />
errors or video for which the HTTP/FTP upload failed is not stored on the SD memory<br />
card, check [<strong>Operation</strong> Settings] under [Memory Card] in the setting page. When<br />
[<strong>Operation</strong> Settings] is set to [Save Log], change it to [Save Logs and Videos].<br />
• To manually save recordings to an SD memory card, obtain camera control privileges.<br />
• Saving to certain folders is prohibited in Windows 8, Windows 7, Windows Vista,<br />
Windows Server 2008, and Windows Server 2012. Accordingly, an attempt to save a<br />
file may fail. Specify [Documents], [Pictures] and other folders.<br />
• Select [SD Card Information] under [Memory Card] in the setting page to check<br />
[Video Management Information Status]. When [Video Management Information<br />
Recreation Required] is displayed, click [Exec] in [Recreate Video Management<br />
Information] under [SD Card <strong>Operation</strong>s]. When video management information has<br />
been recreated, make sure that [Video Management Information Status] is [Normal].<br />
8<br />
Appendix<br />
151
List of Log Messages<br />
Log Messages on the Camera<br />
Log messages are classified into the following types.<br />
Category Level Code Fault level<br />
crit Error 4xx Software-level failure<br />
(Task operations will<br />
stop)<br />
err Error 3xx <strong>Operation</strong>al error<br />
(<strong>Operation</strong>s will<br />
continue)<br />
warning Warning 2xx Non-operational error<br />
notice Warning 1xx Error external to the<br />
system<br />
info Information 0xx Information on normal<br />
operation<br />
Note<br />
If no content is recorded in a log for approximately two hours, “--<br />
MARK --” will be recorded in the message area.<br />
W031 Transmitted video data size [info]<br />
Description<br />
%1= host=, user=,<br />
video=:<br />
(W031)<br />
%1 W: WebView session, V: Session-less video<br />
client<br />
Meaning<br />
W040 Clearing to external memory [info]<br />
Description<br />
When a client disconnected, the total data<br />
that was sent to the client displayed in<br />
number of frames.<br />
%1 the image storing - %2 (W040)<br />
%1 Starting or stopping<br />
%2 Reason for starting/stopping<br />
Meaning<br />
W101 Invalid user name [notice]<br />
Description<br />
Started or stopped clearing stream<br />
recording to external memory.<br />
user not found (W101)<br />
• Application (Camera) Messages<br />
Meaning<br />
The camera was accessed by an<br />
unauthorized user.<br />
W001 Starting and stopping of system [info]<br />
Description %1 webview (W001)<br />
%1 Starting or stopping<br />
W102 Invalid password [notice]<br />
Description<br />
user password mismatch<br />
(W102)<br />
Meaning<br />
wvhttp server (webview) has started or<br />
stopped.<br />
Meaning<br />
The password is invalid<br />
W030 Startup and shutdown of WebView Livescope<br />
Client [info]<br />
Description<br />
%1%2 host=, user=, prio=<<br />
Priority>(W030)<br />
%1 W: WebView session, V: Session-less video<br />
client, N: Session-less event client<br />
W130 Buffer recovered [notice]<br />
Description<br />
Meaning<br />
stream buffer recovered (W130)<br />
Image buffer for stream recording has<br />
recovered.<br />
W210 Camera operation discarded [warning]<br />
%2 +: Connect, -: Disconnect<br />
Description<br />
camera operation discarded (W210)<br />
Meaning<br />
The camera server client was connected or<br />
disconnected.<br />
Meaning<br />
Camera operation requested was<br />
discarded.<br />
W230 Buffer overflow [warning]<br />
Description<br />
Meaning<br />
stream buffer overflowed (W230)<br />
The image buffer for the stream recording<br />
overflowed and images were discarded.<br />
152
List of Log Messages<br />
• Application (Uploader) Messages<br />
A004 Starting and stopping of uploader [info]<br />
Description<br />
%1 uploader (A004)<br />
%1 Starting or stopping<br />
Meaning<br />
A040 Number of uploads (MAIL) [notice]<br />
Description<br />
The uploader was started or stopped.<br />
uploader mail: normal=%1 test=%2 (A040)<br />
%1 Number of normal uploads.<br />
%2 Number of test uploads.<br />
Meaning<br />
A041 Number of uploads (FTP) [notice]<br />
Description<br />
Shows the number of uploads executed.<br />
uploader ftp: normal=%1 test=%2 (A041)<br />
%1 Number of normal uploads.<br />
%2 Number of test uploads.<br />
Meaning<br />
A042 Number of uploads (HTTP) [notice]<br />
Description<br />
Shows the number of uploads executed.<br />
uploader http: normal=%1 test=%2 (A042)<br />
%1 Number of normal uploads.<br />
%2 Number of test uploads.<br />
Meaning<br />
A120 Resolution of upload destination name failed<br />
[notice]<br />
Description<br />
Meaning<br />
Shows the number of uploads executed.<br />
uploader cannot resolve the server name<br />
(A120)<br />
The name of the upload destination could<br />
not be resolved.<br />
A134 Invalid upload setting (FTP/HTTP mode) [notice]<br />
Description<br />
Meaning<br />
A135 Invalid upload setting (FTP PORT/PASV mode)<br />
[notice]<br />
Description<br />
Meaning<br />
A136 Invalid upload setting (HTTP notification only/<br />
image mode) [notice]<br />
Description<br />
Meaning<br />
A137 Invalid upload setting (E-mail notification)<br />
[notice]<br />
Description<br />
ftp/http mode invalid. uploader set <br />
forcibly (A134)<br />
The upload mode setting is invalid. The<br />
upload function was forcibly disabled.<br />
ftp port/pasv mode invalid. uploader set<br />
forcibly (A135)<br />
The PORT/PASV mode setting in connection<br />
with FTP upload is invalid. The PASV mode<br />
was forcibly set.<br />
http notice/image mode invalid. uploader<br />
set forcibly (A136)<br />
The notification only/image mode setting in<br />
connection with HTTP upload is invalid. The<br />
image mode was forcibly set.<br />
mode invalid. uploader set forcibly<br />
(A137)<br />
Meaning The e-mail notification setting is invalid. E-<br />
mail notification was forcibly disabled.<br />
A138 Invalid upload setting (E-mail notification<br />
authentication mode) [notice]<br />
Description<br />
Meaning<br />
authentication mode invalid. uploader set<br />
forcibly (A138)<br />
The setting for e-mail notification<br />
authentication mode is invalid.<br />
“SMTP_AUTH” was forcibly set.<br />
8<br />
Appendix<br />
A121 Connection to upload destination failed [notice]<br />
Description<br />
Meaning<br />
uploader cannot connect the server (A121)<br />
Execution of connect to upload destination<br />
failed.<br />
A271 E-mail communication buffer overflowed<br />
[warning]<br />
Description<br />
Meaning<br />
mail queue is full (A271)<br />
E-mails overflowed from the communication<br />
buffer.<br />
A122 Connection to upload destination failed [notice]<br />
Description<br />
uploader cannot connect the server (A122)<br />
Countermeasure<br />
Make adjustments to reduce the number of<br />
event occurrences. Also adjust video quality<br />
and video size for upload.<br />
Meaning<br />
The upload destination could not be<br />
connected due to a reason other than A120<br />
and A121.<br />
153
A272 Upload communication buffer overflowed<br />
[warning]<br />
Description<br />
Meaning<br />
Countermeasure<br />
ftp/http queue is full (A272)<br />
Upload data overflowed from the<br />
communication buffer.<br />
Make adjustments to reduce the number of<br />
event occurrences. Also adjust the video<br />
quality, video size and frame rate for upload.<br />
A273 Used buffer size is over maximum size [warning]<br />
Description<br />
Meaning<br />
Countermeasure<br />
used buffer size is over maximum size.<br />
(A273)<br />
The buffer reached maximum usage size.<br />
Adjust the video quality, video size and<br />
frame rate for upload.<br />
B011 Audio client connected [info]<br />
Description [%1] %2 connected n=%3 (B011)<br />
%1 Client type (send | recv)<br />
%2 Client host IP address<br />
%3 Total number of clients<br />
Meaning An audio client was connected.<br />
B012 Audio client closed [info]<br />
Description [%1] %2 closed n= %3 (B012)<br />
%1 Client type (send | recv)<br />
%2 Client host IP address<br />
%3 Total number of clients<br />
Meaning An audio client was disconnected.<br />
A274 Event buffer for upload overflowed [warning]<br />
Description<br />
Meaning<br />
Countermeasure<br />
event queue is full (A274)<br />
Event buffer for upload overflowed.<br />
Make adjustments to reduce the number of<br />
event occurrences.<br />
A275 Image buffer for upload overflowed [warning]<br />
B101 Error request received [notice]<br />
Description<br />
%1 unusual request [%2] (B101)<br />
%1 Client host IP address<br />
%2 Error type (400 | 404 | ...)<br />
Meaning<br />
The request was denied due to a command<br />
error (400) or parameter error (404).<br />
Description<br />
Meaning<br />
Countermeasure<br />
buffer queue is full (A275)<br />
Image buffer for upload overflowed.<br />
Make adjustments to reduce the number of<br />
event occurrences. Also adjust the video<br />
quality, video size and frame rate for upload.<br />
B102 Client connection denied [notice]<br />
Description %1 request denied [%2] (B102)<br />
%1 Client host IP address<br />
%2 Denial type (41 | 43 | ...)<br />
A470 Uploader initialization failed [crit]<br />
Description<br />
%1 Error number<br />
Meaning<br />
Countermeasure<br />
uploader initialization failure - %1 (A470)<br />
The uploader could not be initialized.<br />
If the problem persists after rebooting the<br />
camera, the camera is faulty, arrange for<br />
servicing.<br />
• Application (Audio Server) Messages<br />
Meaning<br />
Countermeasure<br />
Client connection was denied due to an<br />
authentication error (41), time specification<br />
error (42), insufficient resource (43),<br />
specification of unsupported codec (45),<br />
specification of unpermitted user level (47),<br />
too many clients (49) or invalid operation<br />
mode (4a).<br />
41: Check user name, password or user list<br />
used when connecting. 42: Check playtime<br />
or maximum connection time settings used<br />
when connecting. 43: Reconnect or restart.<br />
45: Use supported client software. 47:<br />
Check user level used when connecting. 49:<br />
Check client number settings. 4a: Check if<br />
usage of audio server is enabled.<br />
B001 Starting and shutdown of audio server [info]<br />
Description %1 audio. (B001)<br />
%1 starting | stopping<br />
Meaning The audio server was started/shut down.<br />
B103 Client forcibly disconnected [notice]<br />
Description %1 access denied [%2] (B103)<br />
%1 Client host IP address<br />
%2 Denial type (41 | 42 | 4a)<br />
Meaning<br />
Connection was initially permitted, but the setting<br />
has subsequently been changed to prohibit<br />
access, thereby triggering a forced disconnection<br />
(the denial type is the same with B102).<br />
154
List of Log Messages<br />
B201 Event notification failure [info]<br />
B402 Audio server initialization failed [err]<br />
Description<br />
cannot notify %1 event [%2] (B201)<br />
Description<br />
audio initialization error [%1] (B402)<br />
%1 Event type (ald)<br />
%1 Error number<br />
%2 Error number<br />
Meaning The event notification failed.<br />
B202 Event reception failure [info]<br />
Meaning<br />
Countermeasure<br />
The audio server could not be initialized.<br />
The audio server stops.<br />
If the problem persists after rebooting, the<br />
camera is faulty. Arrange for servicing.<br />
Description cannot recv event [%1] (B202)<br />
%1 Error number<br />
Meaning The event could not be received.<br />
B203 Audio message send error [info]<br />
Description audio message send error %1 [%2] (B203)<br />
%1 Message type<br />
%2 Error number<br />
Meaning The audio message could not be sent.<br />
B204 Audio message reception failure [info]<br />
Description audio message recv error [%1:%2] (B204)<br />
%1 Error notification number<br />
%2 Cause of error<br />
Meaning The audio message could not be received.<br />
B403 Settings change failed [err]<br />
Description<br />
cannot set config [%1:%2] (B403)<br />
%1 Error notification number<br />
%2 Error number<br />
Meaning<br />
Countermeasure<br />
• Application (Video-Related) Messages<br />
V001 Starting and shutdown of video server [info]<br />
Description<br />
The settings could not be updated. The<br />
audio server stops.<br />
If the problem persists after rebooting, the<br />
camera is faulty. Arrange for servicing.<br />
%1 video (V001)<br />
%1 Starting or stopping<br />
Meaning<br />
The video server was started/stopped.<br />
8<br />
Appendix<br />
B301 Audio device error [err]<br />
Description cannot use audio device for %1 [%2:%3]<br />
(B301)<br />
%1 Transmission/reception type (rx | tx)<br />
%2 Error handling (open | write | flush)<br />
%3 Error number<br />
Meaning<br />
An audio device error was detected.<br />
V020 Starting intelligent service [info]<br />
Description starting intelligent. (V020)<br />
Meaning Intelligent service was started.<br />
V020 Shutting down intelligence service [info]<br />
Description shutdown intelligent. (V020)<br />
Meaning Intelligent service was shut down.<br />
Countermeasure<br />
If the error is not reset automatically,<br />
arrange for servicing.<br />
V200 Video input warning [warning]<br />
B401 Audio device initialization failed [err]<br />
Description<br />
%1 Error number<br />
Meaning<br />
Countermeasure<br />
audio device initialization error [%1] (B401)<br />
The audio device could not be initialized.<br />
The audio server stops.<br />
If the problem persists after rebooting, the<br />
camera is faulty. Arrange for servicing.<br />
Description<br />
%1 Video number<br />
%2 Error number<br />
Meaning<br />
Countermeasure<br />
video %1 warning - %2 (V200)<br />
An error that permits recovery of the video<br />
input system was detected.<br />
Change image size or Q value, or decrease<br />
data size for each JPEG image.<br />
155
V320 Internal error in intelligent service [err]<br />
Description cannot work intelligent [%1] [%2] [%3] .<br />
(V320)<br />
%1 Error number<br />
%2 Cause of error<br />
%3 Error information<br />
Meaning<br />
Countermeasure<br />
V321 Pseudo mode setting error in intelligent service<br />
[err]<br />
Description<br />
Meaning<br />
Countermeasure<br />
An internal error occurred in intelligent<br />
service.<br />
If the problem persists after rebooting, the<br />
camera is faulty. Arrange for servicing.<br />
pseudo mode setting fail. (V321)<br />
An error occurred in the pseudo mode<br />
setting of intelligent service.<br />
If the problem persists after rebooting, the<br />
camera is faulty. Arrange for servicing.<br />
V402 Video input frozen [crit]<br />
Description<br />
video %1 stalled (V402)<br />
%1 Video number<br />
Meaning<br />
Countermeasure<br />
V403 Video input error [crit]<br />
Description<br />
%1 Video number<br />
%2 Error number<br />
Meaning<br />
Countermeasure<br />
The video input function was stopped<br />
because video generation stopped.<br />
If the problem persists after rebooting, the<br />
camera is faulty. Arrange for servicing.<br />
video %1 fatal error - %2 (V403)<br />
The video input function was stopped<br />
because an error that does not permit<br />
recovery of the video input system was<br />
detected.<br />
If the problem persists after rebooting, the<br />
camera is faulty. Arrange for servicing.<br />
V400 Video input initialization error [crit]<br />
Description video %1 initialization failure - %2 (%3)<br />
(V400)<br />
%1 Video number<br />
%2 Process description<br />
%3 Error details<br />
Meaning<br />
The video input function was stopped<br />
because the video input system could not<br />
be initialized.<br />
V420 Could not start intelligent service [crit]<br />
Description intelligent initialization error [%1] [%2] .<br />
(V420)<br />
%1 Error number<br />
%2 Cause of error<br />
Meaning<br />
Countermeasure<br />
Failed to initialize intelligent service.<br />
If the problem persists after rebooting, the<br />
camera is faulty. Arrange for servicing.<br />
Countermeasure<br />
If the problem persists after rebooting, the<br />
camera is faulty. Arrange for servicing.<br />
V421 Intelligent service error [crit]<br />
Description<br />
intelligent working error [%1] [%2] . (V421)<br />
V401 Video input command error [crit]<br />
Description<br />
%1 Video number<br />
video %1 command error - %2 (%3) (V401)<br />
%2 Process description<br />
%3 Error details<br />
Meaning<br />
The video input function was stopped<br />
because a video input command could not<br />
be processed.<br />
%1 Error number<br />
%2 Cause of error<br />
Meaning<br />
Countermeasure<br />
An error that does not permit recovery<br />
occurred while intelligent service was<br />
running.<br />
If the problem persists after rebooting, the<br />
camera is faulty. Arrange for servicing.<br />
Countermeasure<br />
If the problem persists after rebooting, the<br />
camera is faulty. Arrange for servicing.<br />
156
List of Log Messages<br />
• Application (SD Memory Card) Messages<br />
M001 Starting and stopping of SD memory card<br />
control module [info]<br />
H201 Timeout disconnect [warning]<br />
Description a request for %1 timed out after writing %d<br />
seconds (H201)<br />
%1 Request URI<br />
Description<br />
%1 sdctrl (M001)<br />
%d 360 (Timeout time)<br />
%1 Starting or stopping<br />
Meaning<br />
The SD memory card control module (sdctrl)<br />
has started or stopped.<br />
Meaning<br />
Disconnected due to HTTP server timeout<br />
(360 sec.).<br />
M201 SD memory card write protection [warning]<br />
Description<br />
Meaning<br />
M203 Not enough space on SD memory card [warning]<br />
Description<br />
Meaning<br />
M204 Invalid file removed [warning]<br />
Description<br />
Read only filesystem (M201)<br />
A write-protected SD memory card is<br />
inserted.<br />
There is not available space (M203)<br />
Insufficient SD memory card capacity.<br />
Invalid file %1 was removed. (M204)<br />
%1 Name of removed file<br />
Meaning<br />
An invalid file was removed.<br />
• System Messages<br />
S001 System started [info]<br />
Description<br />
Meaning<br />
S002 System settings changed [info]<br />
Description<br />
Meaning<br />
S010 Event service started [info]<br />
Description<br />
Meaning<br />
starting paramd (S001)<br />
Parameter management module started.<br />
Updated system settings. (S002)<br />
Settings not requiring rebooting were<br />
changed.<br />
starting event (S010)<br />
The event service was started.<br />
8<br />
Appendix<br />
M301 SD memory card control module error [err]<br />
Description<br />
%1 process failure (M301)<br />
%1 mount or unmount<br />
Meaning<br />
• HTTP Server Messages<br />
Mount or unmount process failed.<br />
H143 User name specification error [notice]<br />
Description<br />
%1 IP address<br />
Meaning<br />
(http_auth.c.XXX) get_password failed,<br />
IP:%1 (H143)<br />
An unknown user was specified in user<br />
authentication.<br />
S011 Event service shut down [info]<br />
Description<br />
Meaning<br />
S012 External device service started [info]<br />
Description<br />
Meaning<br />
S013 External device service shut down [info]<br />
Description<br />
Meaning<br />
shutdown event (S011)<br />
The event service was shut down.<br />
starting extio (S012)<br />
The external device input/output service<br />
was started.<br />
shutdown extio (S013)<br />
The external device input/output service<br />
was shut down.<br />
H144 Password specification error [notice]<br />
Description<br />
(http_auth.c.XXX) password doesn't match<br />
for %1 username%2, IP:%3 (H144)<br />
%1 URL XSS vulnerability countermeasure<br />
implementation (process equivalent to ftpd)<br />
%2 User Name<br />
S014 Timer service started [info]<br />
Description starting timer (S014)<br />
Meaning The timer service was started.<br />
S015 Timer service shut down [info]<br />
%3 IP address<br />
Description<br />
shutdown timer (S015)<br />
Meaning<br />
A wrong password was specified in user<br />
authentication.<br />
Meaning<br />
The timer service was shut down.<br />
157
S070 Change to SSL certificate [info]<br />
S310 Working error in event service [err]<br />
Description<br />
ssl: succeeded to %1 certificate (S070)<br />
Description<br />
cannot work event [%1] [%2] [%3] (S310)<br />
%1 generate | load | delete | restore<br />
Meaning<br />
Countermeasure<br />
A certificate was generated/loaded/deleted/<br />
restored<br />
S220 PAN/TILT operation warning [warning]<br />
Description<br />
None<br />
%1 PAN | TILT<br />
%2 Warning details<br />
Meaning<br />
Countermeasure<br />
%1 warning detected. [%2] (S220)<br />
An error occurred during operation or<br />
stopping of PAN/TILT.<br />
Check that the camera is not touching the<br />
dome, etc.<br />
S302 Error on saving settings [err]<br />
Description<br />
Meaning<br />
Can’t update system settings (S302)<br />
An error generated while the system was<br />
saving a setting. Setting could not be saved.<br />
%1 Error number<br />
%2 Cause of error<br />
%3 Error information<br />
Meaning<br />
Countermeasure<br />
S311 Working error in external input/output service<br />
[err]<br />
Description<br />
%1 Error number<br />
%2 Cause of error<br />
%3 Error information<br />
Meaning<br />
Countermeasure<br />
An error occurred while the event service<br />
was running.<br />
If the problem persists after rebooting, the<br />
camera is faulty. Arrange for servicing.<br />
cannot work extio [%1] [%2] [%3] (S311)<br />
An error occurred while the external input/<br />
output device service was running.<br />
If the problem persists after rebooting, the<br />
camera is faulty. Arrange for servicing.<br />
Countermeasure<br />
Provide enough memory space by deleting<br />
unnecessary files in the user memory area,<br />
etc.<br />
S312 Working error in timer service [err]<br />
Description<br />
cannot work timer [%1] [%2] [%3] (S312)<br />
S303 Error on saving settings [err]<br />
Description<br />
Meaning<br />
Can’t update files of system settings (S303)<br />
An error generated while the system was<br />
saving a setting. Setting could not be saved.<br />
%1 Error number<br />
%2 Cause of error<br />
%3 Error information<br />
Meaning An internal error occurred in the timer service.<br />
Countermeasure<br />
Provide enough memory space by deleting<br />
unnecessary files in the user memory area,<br />
etc.<br />
Countermeasure<br />
If the problem persists after rebooting, the<br />
camera is faulty. Arrange for servicing.<br />
S307 Error on saving settings [err]<br />
Description<br />
Meaning<br />
Countermeasure<br />
(vbadmin.c XXX) Can't update system<br />
settings (S307)<br />
An error generated while the settings were<br />
saved by the setup protocol. Setting could<br />
not be saved.<br />
Provide enough memory space by deleting<br />
unnecessary files in the user memory area, etc.<br />
S320 PAN/TILT operation error [err]<br />
Description<br />
%1 PAN | TILT<br />
%2 Warning details<br />
Meaning<br />
Countermeasure<br />
%1 error occurred. [%2] (S320)<br />
An error occurred during operation or<br />
stopping of PAN/TILT.<br />
Check that the camera is not touching the<br />
dome, etc.<br />
If the error is not caused by problems such<br />
as contact with peripheral items, the camera<br />
needs to be serviced.<br />
158
List of Log Messages<br />
S410 Event service initialization error [crit]<br />
Description<br />
%1 Error number<br />
%2 Cause of error<br />
Meaning<br />
event initialization error [%1] [%2] (S410)<br />
An error occurred in the initialization of the<br />
event service.<br />
• RTP-related Messages<br />
R001 Startup of RTP distribution module [info]<br />
Description starting media_plane (R001)<br />
Meaning RTP distribution module started.<br />
Countermeasure<br />
If the problem persists after rebooting, the<br />
camera is faulty. Arrange for servicing.<br />
R002 Stopping of RTP distribution module [info]<br />
Description<br />
stopping media_plane (R002)<br />
S411 External input/output service initialization error<br />
[crit]<br />
Description<br />
%1 Error number<br />
%2 Cause of error<br />
Meaning<br />
Countermeasure<br />
S412 Timer service initialization error [crit]<br />
Description<br />
%1 Error number<br />
%2 Cause of error<br />
Meaning<br />
Countermeasure<br />
S413 Timer service runtime error [crit]<br />
Description<br />
%1 Error number<br />
Meaning<br />
Countermeasure<br />
• Camera Messages<br />
extio initialization error [%1] [%2] (S411)<br />
An error occurred in the initialization of the<br />
external input/output device service.<br />
If the problem persists after rebooting, the<br />
camera is faulty. Arrange for servicing.<br />
timer initialization error [%1] [%2] (S412)<br />
An error occurred in the initialization of the<br />
timer service.<br />
If the problem persists after rebooting, the<br />
camera is faulty. Arrange for servicing.<br />
timer working error [%1] (S413)<br />
An error occurred while the timer service<br />
was running.<br />
If the problem persists after rebooting, the<br />
camera is faulty. Arrange for servicing.<br />
C201 Day/Night Mode switching warning [warning]<br />
Meaning<br />
R003 RTSP PLAY request received [info]<br />
Description<br />
RTP distribution module stopped.<br />
%1 Client IP address<br />
PLAY received: client_IP=%1, profile=%2,<br />
num_of_sessions=%3(V=%4,A=%5,<br />
M=%6,BC=%7) (R003)<br />
%2 Profile name of requested PLAY<br />
%3 Total number of client sessions<br />
%4 Total distribution count of Video stream<br />
%5 Total distribution count of Audio stream<br />
%6 Total distribution count of Metadata stream<br />
%7 Total distribution count of<br />
AudioBackChannel<br />
Meaning<br />
R004 RTSP TEARDOWN request received [info]<br />
Description<br />
%1 Client IP address<br />
RTSP PLAY request was received.<br />
TEARDOWN received: client_IP=%1,<br />
profile=%2, num_of_sessions=%3(V=%4,<br />
A=%5,M=%6,BC=%7) (R004)<br />
%2 Profile name of requested TEARDOWN<br />
%3 Total number of client sessions<br />
%4 Total distribution count of Video stream<br />
%5 Total distribution count of Audio stream<br />
%6 Total distribution count of Metadata stream<br />
%7 Total distribution count of<br />
AudioBackChannel<br />
Meaning<br />
RTSP TEARDOWN request was received.<br />
8<br />
Appendix<br />
Description<br />
Meaning<br />
Countermeasure<br />
Can’t switch Day/Night mode, because<br />
current mode is Auto. (C201)<br />
Day/Night Mode could not be switched.<br />
Set Day/Night Mode to manual.<br />
159
R005 Starting multicast [info]<br />
R103 RTSP authentication failure [notice]<br />
Description<br />
start multicast: profile=%1,<br />
num_of_sessions=%2(V=%3,A=%4,M=%5,<br />
BC=%6) (R005)<br />
Description<br />
Meaning<br />
RTSP authorization error (R103)<br />
RTSP authentication has failed.<br />
%1 Client IP address<br />
%2 Profile name of requested<br />
MulticastStreaming START<br />
%3 Total distribution count of Video stream<br />
%4 Total distribution count of Audio stream<br />
%5 Total distribution count of Metadata stream<br />
%6 Total distribution count of<br />
AudioBackChannel<br />
Meaning<br />
Multicast was started.<br />
R006 Stopping multicast [info]<br />
Description<br />
%1 Client IP address<br />
stop multicast: profile=%1,<br />
num_of_sessions=%2(V=%3,A=%4,<br />
M=%5,BC=%6) (R006)<br />
%2 Profile name of requested<br />
MulticastStreaming STOP<br />
%3 Total distribution count of Video stream<br />
%4 Total distribution count of Audio stream<br />
%5 Total distribution count of Metadata stream<br />
%6 Total distribution count of<br />
AudioBackChannel<br />
Meaning<br />
Multicast was stopped.<br />
R107 RTSP authentication failure or missing<br />
authentication information [notice]<br />
Description<br />
Meaning<br />
R107 Insufficient resources [notice]<br />
Description<br />
Meaning<br />
R301 Distribution communication error [err]<br />
Description<br />
RTSP Error: error_code=401: Unauthorized<br />
(R107)<br />
RTSP authentication has failed or<br />
authentication information is missing.<br />
RTSP Error: error_code=503: Service<br />
Unavailable (R107)<br />
Service unavailable due to insufficient<br />
resources.<br />
For example, the max. number of RTP<br />
connections exceeded.<br />
message queue open error: %1 (R301)<br />
%1 Modules that generate errors<br />
RTP_CTRL_QUEUE<br />
RTP_DATA_QUEUE<br />
VIDEO_CTRL_QUEUE<br />
VIDEO_DATA_QUEUE<br />
AUDIO_CTRL_QUEUE<br />
AUDIO_DATA_QUEUE<br />
EVENT_CTRL_QUEUE<br />
RECVQ_META<br />
SENDQ_MEDIA<br />
R101 RTP session timeout [notice]<br />
Description session timeout: session ID=%1 (R101)<br />
%1 Session ID<br />
Meaning RTP session has timed out.<br />
Meaning<br />
Countermeasure<br />
A communication error occurred between<br />
modules.<br />
If the problem persists after repeated<br />
attempts and rebooting, the camera may be<br />
faulty. Arrange for servicing.<br />
R102 Information acquisition failure (RTP payload<br />
size) [notice]<br />
Description<br />
Meaning<br />
cannot get parameter: RTP_payload_size<br />
(R102)<br />
Information acquisition has failed (RTP<br />
payload size).<br />
R102 Information acquisition failure (IP address)<br />
[notice]<br />
Description<br />
Meaning<br />
cannot get parameter: IP_address (R102)<br />
Information acquisition has failed (IP<br />
address).<br />
R302 Information acquisition failure from paramd [err]<br />
Description<br />
cannot get parameter: %1 (R302)<br />
%1 user_account: User account<br />
IP_address: IP address of the camera<br />
profile_media_configuration:<br />
MediaConfiguration information<br />
RTSP_port_number: RTSP port number<br />
Meaning<br />
R303 Metadata distribution initialization failure [err]<br />
Description<br />
Meaning<br />
Information acquisition from paramd has<br />
failed.<br />
metadata initialization error (R303)<br />
Metadata distribution initialization has failed.<br />
160
List of Log Messages<br />
R304 Abnormal termination of client [err]<br />
Description<br />
delete session from some kind of error:<br />
client_IP=%1, session_ID=%2 (R304)<br />
%1 Client IP address<br />
%2 Session ID<br />
Meaning<br />
The client session terminated abnormally.<br />
R304 Client disconnected [err]<br />
Description<br />
connection reset by peer:<br />
client_IP=client_IP=%1 (R304)<br />
%1 Client IP address<br />
Meaning<br />
Disconnected from client.<br />
R304 Client disconnected [err]<br />
Description<br />
RTP/HTTP connection closed by client<br />
(R304)<br />
8<br />
Meaning<br />
Disconnected from client.<br />
R305 RTSP processing error [err]<br />
Appendix<br />
Description<br />
Meaning<br />
RTSP Error: error_code=500: Internal Server<br />
Error (R305)<br />
An RTSP processing error occurred.<br />
161
List of Viewer Messages<br />
Messages Displayed in the Information Field<br />
Messages displayed in the information field of the viewer are classified into the following three types.<br />
Icon Category Explanation<br />
Information Message Help messages on various buttons, pull-down lists, etc., as well as frame rate and other<br />
information from the camera are shown.<br />
Warning Message<br />
A message will be displayed notifying the user when camera control privileges cannot<br />
be obtained, the audio session stops, etc.<br />
Error Message<br />
Displayed when a system error occurs in the viewer.<br />
• Information Messages<br />
Message<br />
Connection closed by the camera.<br />
Audio connection has been closed.<br />
Camera control gained.<br />
Camera control lost.<br />
Use the menu displayed by right-clicking to exit the full<br />
screen mode.<br />
Recording to SD card aborted.<br />
The connection was terminated because the image has<br />
been flipped.<br />
The connection was terminated because the password<br />
has been changed.<br />
Explanation<br />
The camera was disconnected.<br />
The video session has continued after the audio session was disconnected<br />
(applicable to both transmission and reception).<br />
Displayed when camera control is obtained. You can operate the camera.<br />
Displayed when camera control is released. You cannot operate the camera<br />
until you get camera control privileges again.<br />
When switched to full screen mode<br />
When recording to SD memory card was completed successfully<br />
When the image was flipped during camera connection (camera connection<br />
is terminated when an image is flipped)<br />
When the password of the account used to connect to the camera was<br />
changed during camera connection and then any WV-HTTP command was<br />
issued<br />
Message<br />
{n}fps Pan : {p} Tilt : {t} Zoom : {z} IS: {Image Stabilizer<br />
value}<br />
Explanation<br />
Communicating with the camera normally<br />
Message<br />
{n}fps Pan : {p} Tilt : {t} Zoom : {z}<br />
{n}fps<br />
Explanation<br />
Communicating with the camera normally (when Digital PTZ is enabled)<br />
Communicating with the camera normally (when Digital PTZ is disabled)<br />
162
List of Viewer Messages<br />
• Warning Messages<br />
Message<br />
Could not connect to the camera.<br />
The camera is busy.<br />
Failed to get camera control privileges.<br />
Failed to establish audio connection.<br />
You are not connected to the camera.<br />
Please get camera control privileges.<br />
Another user is already connected as an administrator.<br />
Explanation<br />
Connection failed due to an invalid IP address, etc.<br />
The connection limit was exceeded.<br />
The request for camera control privileges was denied because the camera<br />
was being used by the Admin Viewer, etc.<br />
Connection for audio reception failed.<br />
An attempt was made to operate the camera when the camera was not<br />
connected.<br />
An attempt was made to operate the camera without camera control privileges.<br />
The Admin Viewer is already connected to the camera.<br />
The viewer is already connected in another window.<br />
Cookie is not available or blocked on your web browser.<br />
The viewer is already available in another window.<br />
Cookie is not available or blocked on your web browser.<br />
JavaScript is not available or disabled on your web browser. JavaScript is not available or blocked on your web browser.<br />
No audio device.<br />
Failed to initialize <strong>Canon</strong> Network Camera Audio<br />
Receiver.<br />
The [Audio] button has been clicked when there is no audio device or the<br />
audio device has been disabled in the PC.<br />
ActiveX plugin is not installed within ten seconds after clicking the [Audio]<br />
button.<br />
8<br />
Appendix<br />
restricted.<br />
Image display for Digital PTZ use is<br />
The image display for the Digital PTZ is restricted by settings in the camera.<br />
Insufficient SD card capacity.<br />
Recording was attempted and there was not enough free space on the SD<br />
memory card.<br />
163
Restore Default Settings<br />
It is recommended that you write down the settings for respective camera functions. If you have forgotten the settings and<br />
want to set the camera from the beginning, restore the factory default settings first.<br />
*For factory default settings, see p. 166.<br />
Restoring the Initial Setting from the<br />
Maintenance Page in the Web Browser<br />
1<br />
Launch the web browser and display the settings<br />
menu.<br />
A confirmation message appears, asking if you want<br />
to restore the default settings. To restore the default<br />
settings, click [OK].<br />
Maximum packet size<br />
Network settings<br />
Date, time and time zone<br />
SSL certificate<br />
Encrypted communications<br />
3 Click [Exec] under [Restore Default Settings]. camera on and off by plugging in or unplugging LAN<br />
cable (PoE power supply), AC adapter, or external<br />
To display the settings menu, you need to enter the IP<br />
address of the camera, user name and administrator<br />
password (p. 42).<br />
•<br />
Caution<br />
You must not turn off the camera while it is<br />
performing the [Restore Default Settings]<br />
operation. Turning off the camera at this stage<br />
may result in disabling its ability to boot correctly.<br />
• Once [OK] is clicked, you can no longer stop the<br />
process of restoring the default settings.<br />
Restoring Factory Default Settings with<br />
the Reset Switch on the Camera<br />
If you have forgotten or do not know the IP address of the<br />
camera or your Administrator password, you cannot<br />
operate the camera via the network. In this case, press<br />
On the Setting Menu page, click [Maintenance].<br />
2 the reset switch at the back of the camera.<br />
The maintenance page appears.<br />
For <strong>VB</strong>-H610VE/<strong>VB</strong>-H610D, remove the dome case.<br />
1<br />
For dome case removal, see the “Installation <strong>Guide</strong>”<br />
included with the camera.<br />
Turn off the camera.<br />
2<br />
There is no on/off switch on the camera. Turn the<br />
power plug.<br />
3<br />
Turn on the power while pushing the reset switch, and<br />
keep pushing the reset switch for 5 seconds or more.<br />
The reset switch is located in a recessed area. Push<br />
the switch using the tip of a slender object such as a<br />
clip.<br />
All settings of the camera, except for the date and<br />
time, are restored to factory default settings.<br />
The camera will be reset to the factory default settings<br />
excluding the following items.<br />
Administrator password for the camera<br />
164
Restore Default Settings<br />
Important<br />
If the reset switch is pushed, network-related settings will also<br />
be restored to factory default settings including the camera's IP<br />
address, subnet mask, default gateway address, etc.<br />
Accordingly, you can no longer operate the camera from the<br />
PC you were using to connect to the camera before. When<br />
initializing the camera, use the “<strong>VB</strong> Initial Setting Tool” installed<br />
in your PC to set an IP address appropriate for the environment<br />
in which the camera is used (See “Performing Initial Settings for<br />
the Camera” (p. 28)).<br />
<strong>VB</strong>-H710F<br />
Reset Switch<br />
<strong>VB</strong>-<strong>H41</strong><br />
Reset Switch<br />
4<br />
For <strong>VB</strong>-H610VE/<strong>VB</strong>-H610D, attach the dome case.<br />
For dome case attachment, see the “Installation<br />
<strong>Guide</strong>” included with the camera.<br />
8<br />
<strong>VB</strong>-H610VE<br />
Reset Switch<br />
Appendix<br />
<strong>VB</strong>-H610D<br />
Reset Switch<br />
165
List of Factory Default Settings<br />
Item<br />
Setting<br />
• User Name (Administrator ID) root<br />
• Administrator password camera<br />
• Path to setting pages<br />
admin<br />
• LAN<br />
LAN Interface<br />
Auto<br />
Maximum Packet Size 1500<br />
• IPv4<br />
IPv4 Address Setting Method Manual<br />
IPv4 Address 192.168.100.1<br />
Subnet Mask 255.255.255.0<br />
IPv4 Default Gateway Address<br />
Installation Location<br />
• Current Date and Time<br />
• Setting<br />
Setting Method<br />
Auto-Setting of NTP Server<br />
NTP Server<br />
Time Zone<br />
Daylight Saving Time<br />
• Camera Name<br />
Item<br />
Camera Name (alphanumeric<br />
characters)<br />
Set manually<br />
Disable<br />
(GMT+09:00) Osaka,<br />
Sapporo, Tokyo<br />
Disable<br />
Camera<br />
Setting<br />
AutoIP<br />
Enable<br />
• Initial Camera Settings<br />
IPv4 Address (AutoIP)<br />
• IPv6<br />
AE Mode<br />
Slow Shutter<br />
Auto<br />
Disable<br />
IPv6<br />
Auto (RA)<br />
Enable<br />
Enable<br />
Shutter Speed 1/100<br />
Exposure Compensation 0<br />
Auto (DHCPv6)<br />
Enable<br />
Metering Mode<br />
Center-Weighted<br />
IPv6 Address (Manual)<br />
Focus Mode<br />
Auto<br />
Prefix Length 64<br />
IPv6 Default Gateway Address<br />
Smart Shade Control<br />
White Balance<br />
Disable<br />
Auto<br />
IPv6 Address (Auto)<br />
• DNS<br />
Name Server Address 1<br />
R Gain 255<br />
B Gain 255<br />
• Camera Control<br />
Name Server Address 2<br />
Digital Zoom<br />
Disable<br />
Auto-Setting of Name Server<br />
Address<br />
Host Name<br />
Host Name Registration with<br />
DDNS<br />
Search Domain<br />
Search Domain List<br />
• SNMP<br />
SNMP<br />
Community Name<br />
Administrator Contact<br />
Information<br />
Administration Function<br />
Name<br />
Disable<br />
Disable<br />
Disable<br />
public<br />
<strong>VB</strong>-<strong>H41</strong><br />
<strong>VB</strong>-H610<br />
<strong>VB</strong>-H710<br />
Image Stabilizer<br />
AGC Limit 5<br />
• Day/Night<br />
Mode<br />
Switching Brightness<br />
Response (sec.) 20<br />
• Installation Conditions<br />
Dome<br />
LED Setting<br />
Image Flip<br />
• Camera Position Control<br />
Restricted to Presets<br />
Camera Position without Control<br />
Disable<br />
Manual<br />
Standard<br />
Do not use<br />
Turn On<br />
Disable<br />
No Restriction<br />
Do not return to Home<br />
Position<br />
166
List of Factory Default Settings<br />
Item<br />
Setting<br />
Item<br />
Setting<br />
• External Input Device 1<br />
Device Name (alphanumeric<br />
characters)<br />
• External Input Device 2<br />
Device Name (alphanumeric<br />
characters)<br />
• External Output Device 1<br />
Device Name (alphanumeric<br />
characters)<br />
• External Output Device 2<br />
Device Name (alphanumeric<br />
characters)<br />
• JPEG<br />
Video Quality: 320 x 240 3<br />
Video Quality: 480 x 270 3<br />
Video Quality: 960 x 540 3<br />
Video Quality: 1920 x 1080 3<br />
Video Quality:<br />
Digital PTZ<br />
Video Size: Video Transmission 480 x 270<br />
Maximum Frame Rate: Video<br />
Transmission<br />
3<br />
30.0<br />
Video Size: Upload / SD card 480 x 270<br />
• H.264<br />
Bit Rate Control<br />
Video Quality 3<br />
Target Bit Rate (kbps) 2048<br />
Use bit rate control<br />
Video Size 480 x 270<br />
Frame Rate (fps) 30<br />
I Frame Interval (sec) 0.5<br />
• On-screen display<br />
Date display<br />
Position of date display<br />
Format of date display<br />
Time display<br />
Position of time display<br />
Text display<br />
Position of text display<br />
Text string display<br />
Color of text<br />
Color of text outline<br />
Color depth of text and outline<br />
Disable<br />
Upper left<br />
YYYY/MM/DD<br />
Disable<br />
Upper left<br />
Display nothing<br />
Upper left<br />
Black<br />
White<br />
Fill text and outline<br />
• RTP Server<br />
RTP<br />
Enable<br />
RTSP Authentication Method Digest Authentication<br />
RTSP Port 554<br />
• Audio Multicast<br />
Multicast Address 0.0.0.0<br />
Multicast Port 0<br />
Multicast TTL 0<br />
• RTP Streaming 1<br />
Video Size<br />
320 x 240 JPEG<br />
Frame Rate 5<br />
Multicast Address 0.0.0.0<br />
Multicast Port 0<br />
Multicast TTL 0<br />
Audio Transmission<br />
Disable<br />
• RTP Streaming 2<br />
Video Size<br />
320 x 240 JPEG<br />
Frame Rate 10<br />
Multicast Address 0.0.0.0<br />
Multicast Port 0<br />
Multicast TTL 0<br />
Audio Transmission<br />
Disable<br />
• RTP Streaming 3<br />
Video Size<br />
320 x 240 JPEG<br />
Frame Rate 15<br />
Multicast Address 0.0.0.0<br />
Multicast Port 0<br />
Multicast TTL 0<br />
Audio Transmission<br />
Disable<br />
• RTP Streaming 4<br />
Video Size<br />
320 x 240 JPEG<br />
Frame Rate 30<br />
Multicast Address 0.0.0.0<br />
Multicast Port 0<br />
Multicast TTL 0<br />
Audio Transmission<br />
Disable<br />
• RTP Streaming 5<br />
Video Size H.264<br />
Multicast Address 0.0.0.0<br />
Multicast Port 0<br />
Multicast TTL 0<br />
8<br />
Appendix<br />
167
Item<br />
Setting<br />
Item<br />
Setting<br />
Audio Transmission<br />
• General Upload<br />
Upload<br />
Video Format<br />
Disable<br />
Upload Disabled<br />
JPEG<br />
Message Body<br />
• Video Server<br />
Maximum Number of Clients 30<br />
Camera Control Queue Length 30<br />
Frame Rate 1<br />
Pre-event Buffer (number of<br />
frames)<br />
0<br />
Maximum Connection Time<br />
(sec.)<br />
Camera Control Time (sec.) 20<br />
0<br />
Post-event Buffer (number of<br />
frames)<br />
Pre-event Buffer (sec) 0<br />
0<br />
• Audio Server<br />
Audio Transmission from the<br />
Camera<br />
Disable<br />
Post-event Buffer (sec) 0<br />
Input Volume 50<br />
• HTTP Upload<br />
Voice Activity Detection<br />
Disable<br />
Notification<br />
URI<br />
User Name<br />
Proxy Server<br />
Proxy Port 80<br />
Proxy User Name<br />
Parameter (query string)<br />
• FTP Upload<br />
Notification<br />
FTP Server<br />
User Name<br />
PASV Mode<br />
File Upload Path<br />
File Naming<br />
Subdirectory Name to Create<br />
File Name to Create<br />
File Name to Create<br />
Maximum Number of Loops 0<br />
• E-mail Notification<br />
Notification<br />
Mail Server Name<br />
Mail Server Port 25<br />
Notification Only with<br />
HTTP<br />
Video data upload with<br />
FTP<br />
Enable<br />
YYMMDDHHMMSSms<br />
image.jpg<br />
video.mov<br />
Text Only<br />
Audio Reception from Viewer<br />
Output Volume 50<br />
Echo Canceller<br />
Audio Input<br />
• HTTP Server<br />
Authentication Method<br />
HTTP Port 80<br />
Disable<br />
Disable<br />
Line In<br />
HTTPS Port 443<br />
• Video Record Setting<br />
Video Record Action<br />
• Volume Detection<br />
Volume Detection Event<br />
Detect Criteria<br />
Reference Volume Level 50<br />
Detect Criteria Duration (sec) 0<br />
ON Event <strong>Operation</strong><br />
OFF Event <strong>Operation</strong><br />
Ongoing ON Event <strong>Operation</strong><br />
Preset<br />
Video Record<br />
E-mail Notification<br />
External Device Output for<br />
ON Event<br />
Digest Authentication<br />
Upload<br />
Disable<br />
The reference volume<br />
level or above<br />
Disabled<br />
Disable<br />
Disable<br />
None<br />
Disable<br />
Disable<br />
Disable<br />
Sender (From)<br />
Recipient (To)<br />
Authentication<br />
User Name<br />
POP Server<br />
Subject<br />
None<br />
External Device Output for<br />
OFF Event<br />
• External Device Output 1<br />
<strong>Operation</strong> Mode<br />
Active Output Format<br />
Pulse Output Time (sec) 1<br />
Disable<br />
Normally Open<br />
Continuous<br />
168
List of Factory Default Settings<br />
Item<br />
Setting<br />
Item<br />
Setting<br />
• External Device Output 2<br />
• Timer 1<br />
<strong>Operation</strong> Mode<br />
Normally Open<br />
Timer Event<br />
Disable<br />
Active Output Format<br />
Continuous<br />
Start Time 00:00<br />
Pulse Output Time (sec) 1<br />
End Time 00:00<br />
• External Device Input<br />
Repeat Interval<br />
None<br />
External Device Input Event<br />
Enable<br />
Video Record<br />
Disable<br />
• External Device Input 1<br />
E-mail Notification<br />
Disable<br />
<strong>Operation</strong> Mode<br />
Normally Open<br />
External Device Output<br />
Disable<br />
Active Event <strong>Operation</strong><br />
Disable<br />
Day/Night Mode Switching<br />
Disable<br />
Inactive Event <strong>Operation</strong><br />
Disable<br />
• Timer 2<br />
Ongoing Active Event <strong>Operation</strong><br />
Preset<br />
Video Record<br />
Disable<br />
None<br />
Disable<br />
Timer Event<br />
Disable<br />
Start Time 00:00<br />
End Time 00:00<br />
8<br />
E-mail Notification<br />
External Device Output for<br />
Active Event<br />
External Device Output for<br />
Inactive Event<br />
Audio Playback at Active Event<br />
Audio Playback at Inactive<br />
Event<br />
Sound Clip<br />
Volume 50<br />
Day/Night Mode Switching<br />
• External Device Input 2<br />
<strong>Operation</strong> Mode<br />
Active Event <strong>Operation</strong><br />
Inactive Event <strong>Operation</strong><br />
Ongoing Active Event <strong>Operation</strong><br />
Preset<br />
Video Record<br />
E-mail Notification<br />
External Device Output for<br />
Active Event<br />
External Device Output for<br />
Inactive Event<br />
Disable<br />
Disable<br />
Disable<br />
Disable<br />
Disable<br />
Disable<br />
Normally Open<br />
Disable<br />
Disable<br />
Disable<br />
None<br />
Disable<br />
Disable<br />
Disable<br />
Disable<br />
Repeat Interval<br />
None<br />
Video Record<br />
Disable<br />
E-mail Notification<br />
Disable<br />
External Device Output Disable<br />
• Timer 3<br />
Timer Event<br />
Disable<br />
Start Time 00:00<br />
End Time 00:00<br />
Repeat Interval<br />
None<br />
Video Record<br />
Disable<br />
E-mail Notification<br />
Disable<br />
External Device Output Disable<br />
• Timer 4<br />
Timer Event<br />
Disable<br />
Start Time 00:00<br />
End Time 00:00<br />
Repeat Interval<br />
None<br />
Video Record<br />
Disable<br />
E-mail Notification<br />
Disable<br />
External Device Output Disable<br />
• Sound Clip Upload 1<br />
Appendix<br />
Audio Playback at Active Event<br />
Disable<br />
Sound Clip Name<br />
Audio Playback at Inactive<br />
Event<br />
Sound Clip<br />
Volume 50<br />
Day/Night Mode Switching<br />
Disable<br />
Disable<br />
• Sound Clip Upload 2<br />
Sound Clip Name<br />
• Sound Clip Upload 3<br />
Sound Clip Name<br />
• Authorized User Account<br />
User List<br />
169
Item<br />
Setting<br />
Item<br />
Setting<br />
• User Authority<br />
06: / 128 Yes<br />
Authorized User<br />
07: / 128 Yes<br />
Privileged Camera Control<br />
Camera Control<br />
Video Distribution<br />
Audio Distribution<br />
Guest user<br />
Camera Control<br />
Video Distribution<br />
Audio Distribution<br />
• IPv4 Host Access Restrictions<br />
Apply Host Access Restrictions<br />
Default Policy<br />
Network Address / Subnet<br />
Checked<br />
Checked<br />
Checked<br />
Checked<br />
Checked<br />
Checked<br />
Checked<br />
Disable<br />
Authorize Access<br />
01: / 32 Yes<br />
02: / 32 Yes<br />
08: / 128 Yes<br />
09: / 128 Yes<br />
10: / 128 Yes<br />
11: / 128 Yes<br />
12: / 128 Yes<br />
13: / 128 Yes<br />
14: / 128 Yes<br />
15: / 128 Yes<br />
16: / 128 Yes<br />
17: / 128 Yes<br />
18: / 128 Yes<br />
19: / 128 Yes<br />
20: / 128 Yes<br />
03: / 32 Yes<br />
04: / 32 Yes<br />
05: / 32 Yes<br />
06: / 32 Yes<br />
• IPsec<br />
IPsec<br />
• Auto Key Exchange Settings<br />
IPsec SA Encryption Algorithm<br />
Auto Key Exchange<br />
AES->3DES<br />
• IPv6 Host Access Restrictions<br />
Apply Host Access Restrictions<br />
Default Policy<br />
Prefix / Prefix Length<br />
07: / 32 Yes<br />
08: / 32 Yes<br />
09: / 32 Yes<br />
10: / 32 Yes<br />
11: / 32 Yes<br />
12: / 32 Yes<br />
13: / 32 Yes<br />
14: / 32 Yes<br />
15: / 32 Yes<br />
16: / 32 Yes<br />
17: / 32 Yes<br />
18: / 32 Yes<br />
19: / 32 Yes<br />
20: / 32 Yes<br />
Disable<br />
Authorize Access<br />
01: / 128 Yes<br />
02: / 128 Yes<br />
03: / 128 Yes<br />
04: / 128 Yes<br />
05: / 128 Yes<br />
IPsec SA Authentication<br />
Algorithm<br />
IPsec SA Validity Period (min) 480<br />
ISAKMP SA Encryption<br />
Algorithm<br />
ISAKMP SA Authentication<br />
Algorithm<br />
HMAC_SHA1_96<br />
AES->3DES<br />
SHA1<br />
DH Group Group 2<br />
ISAKMP SA Validity Period (min) 480<br />
• IPsec Set 1<br />
IPsec Set<br />
IPsec Mode<br />
Destination IPv4 Address<br />
Destination IPv6 Address<br />
Source IPv4 Address<br />
Source IPv6 Address<br />
Security Protocol<br />
Security Gateway IPv4 Address<br />
Security Gateway IPv6 Address<br />
Disable<br />
Tunnel Mode<br />
ESP<br />
Destination Subnet Mask Length 16<br />
Destination Prefix Length 16<br />
IKE Pre-Shared Key<br />
SA ESP Encryption Algorithm<br />
AES<br />
170
List of Factory Default Settings<br />
Item<br />
Setting<br />
Item<br />
Setting<br />
SA ESP Authentication<br />
Algorithm<br />
SA ESP Encryption Key<br />
(outbound)<br />
SA ESP Authentication Key<br />
(outbound)<br />
SA ESP SPI (outbound)<br />
SA ESP Encryption Key<br />
(inbound)<br />
HMAC_SHA1_96<br />
SA AH Authentication Algorithm<br />
SA AH Authentication Key<br />
(outbound)<br />
SA AH SPI (outbound)<br />
SA AH Authentication Key<br />
(inbound)<br />
SA AH SPI (inbound)<br />
• IPsec Set 3<br />
HMAC_SHA1_96<br />
SA ESP Authentication Key<br />
(inbound)<br />
SA ESP SPI (inbound)<br />
SA AH Authentication Algorithm<br />
SA AH Authentication Key<br />
(outbound)<br />
SA AH SPI (outbound)<br />
SA AH Authentication Key<br />
(inbound)<br />
SA AH SPI (inbound)<br />
HMAC_SHA1_96<br />
IPsec Set<br />
IPsec Mode<br />
Destination IPv4 Address<br />
Destination IPv6 Address<br />
Source IPv4 Address<br />
Source IPv6 Address<br />
Security Protocol<br />
Security Gateway IPv4 Address<br />
Security Gateway IPv6 Address<br />
Disable<br />
Tunnel Mode<br />
ESP<br />
8<br />
Appendix<br />
• IPsec Set 2<br />
IPsec Set<br />
IPsec Mode<br />
Disable<br />
Tunnel Mode<br />
Destination Subnet Mask Length 16<br />
Destination Prefix Length 16<br />
IKE Pre-Shared Key<br />
Destination IPv4 Address<br />
Destination IPv6 Address<br />
Source IPv4 Address<br />
Source IPv6 Address<br />
Security Protocol<br />
ESP<br />
Security Gateway IPv4 Address<br />
Security Gateway IPv6 Address<br />
Destination Subnet Mask Length 16<br />
Destination Prefix Length 16<br />
IKE Pre-Shared Key<br />
SA ESP Encryption Algorithm<br />
SA ESP Authentication<br />
Algorithm<br />
SA ESP Encryption Key<br />
(outbound)<br />
SA ESP Authentication Key<br />
(outbound)<br />
SA ESP SPI (outbound)<br />
SA ESP Encryption Key<br />
(inbound)<br />
SA ESP Authentication Key<br />
(inbound)<br />
AES<br />
HMAC_SHA1_96<br />
SA ESP Encryption Algorithm<br />
AES<br />
SA ESP SPI (inbound)<br />
SA ESP Authentication<br />
Algorithm<br />
SA ESP Encryption Key<br />
(outbound)<br />
SA ESP Authentication Key<br />
(outbound)<br />
SA ESP SPI (outbound)<br />
SA ESP Encryption Key<br />
(inbound)<br />
HMAC_SHA1_96<br />
SA AH Authentication Algorithm<br />
SA AH Authentication Key<br />
(outbound)<br />
SA AH SPI (outbound)<br />
SA AH Authentication Key<br />
(inbound)<br />
SA AH SPI (inbound)<br />
• IPsec Set 4<br />
HMAC_SHA1_96<br />
SA ESP Authentication Key<br />
(inbound)<br />
SA ESP SPI (inbound)<br />
IPsec Set<br />
IPsec Mode<br />
Destination IPv4 Address<br />
Disable<br />
Tunnel Mode<br />
171
Item<br />
Setting<br />
Item<br />
Setting<br />
Destination IPv6 Address<br />
Source IPv4 Address<br />
Source IPv6 Address<br />
SA ESP Authentication<br />
Algorithm<br />
SA ESP Encryption Key<br />
(outbound)<br />
HMAC_SHA1_96<br />
Security Protocol<br />
ESP<br />
Security Gateway IPv4 Address<br />
Security Gateway IPv6 Address<br />
Destination Subnet Mask Length 16<br />
Destination Prefix Length 16<br />
IKE Pre-Shared Key<br />
SA ESP Authentication Key<br />
(outbound)<br />
SA ESP SPI (outbound)<br />
SA ESP Encryption Key<br />
(inbound)<br />
SA ESP Authentication Key<br />
(inbound)<br />
SA ESP Encryption Algorithm<br />
AES<br />
SA ESP SPI (inbound)<br />
SA ESP Authentication<br />
Algorithm<br />
SA ESP Encryption Key<br />
(outbound)<br />
SA ESP Authentication Key<br />
(outbound)<br />
SA ESP SPI (outbound)<br />
SA ESP Encryption Key<br />
(inbound)<br />
SA ESP Authentication Key<br />
(inbound)<br />
HMAC_SHA1_96<br />
SA AH Authentication Algorithm<br />
SA AH Authentication Key<br />
(outbound)<br />
SA AH SPI (outbound)<br />
SA AH Authentication Key<br />
(inbound)<br />
SA AH SPI (inbound)<br />
• Certificates<br />
Certificate Status<br />
Country (C)<br />
HMAC_SHA1_96<br />
Not Installed<br />
SA ESP SPI (inbound)<br />
State/Province (ST)<br />
SA AH Authentication Algorithm<br />
HMAC_SHA1_96<br />
Locality (L)<br />
SA AH Authentication Key<br />
(outbound)<br />
SA AH SPI (outbound)<br />
SA AH Authentication Key<br />
(inbound)<br />
Organization (O)<br />
Organizational Unit (OU)<br />
Common Name (CN)<br />
Validity Period Start Date<br />
SA AH SPI (inbound)<br />
Validity Period End Date<br />
• IPsec Set 5<br />
• Encrypted Communications<br />
IPsec Set<br />
Disable<br />
SSL Communications<br />
Disable<br />
IPsec Mode<br />
Tunnel Mode<br />
• SD Card <strong>Operation</strong>s<br />
Destination IPv4 Address<br />
Mount/Unmount<br />
Destination IPv6 Address<br />
<strong>Operation</strong> Settings<br />
Save Logs and Videos<br />
Source IPv4 Address<br />
Video Format<br />
JPEG<br />
Source IPv6 Address<br />
Security Protocol<br />
ESP<br />
Security Gateway IPv4 Address<br />
Security Gateway IPv6 Address<br />
Destination Subnet Mask Length 16<br />
Destination Prefix Length 16<br />
IKE Pre-Shared Key<br />
SA ESP Encryption Algorithm AES<br />
Pre-event Buffer (number of<br />
frames)<br />
Post-event Buffer (number of<br />
frames)<br />
Pre-event Buffer (sec) 0<br />
Post-event Buffer (sec) 0<br />
Overwrite videos<br />
Delete Videos<br />
Recreate Video Management<br />
Information<br />
0<br />
0<br />
Disable<br />
172
Index<br />
A<br />
Abandoned Object Detection .......................... 111<br />
Access Control ................................................... 68<br />
Admin Tools ....................................................... 82<br />
Admin Tools Certificate ................................ 16, 26<br />
Admin Viewer ........................................... 128, 137<br />
Administrator .................................................... 125<br />
Administrator Password ..................................... 47<br />
AE Mode ............................................................ 51<br />
AGC Limit ........................................................... 53<br />
Aperture ........................................................... 140<br />
Audio Distribution ....................................... 68, 124<br />
Audio Multicast .................................................. 57<br />
Audio Reception ................................ 62, 128, 135<br />
Audio Server ...................................................... 62<br />
Audio Transmission ............................ 62, 128, 137<br />
Authentication Method ....................................... 63<br />
Authorized User ......................................... 68, 125<br />
Auto Key Exchange ........................................... 70<br />
AutoIP ................................................................. 48<br />
B<br />
Back Up Settings ............................................... 79<br />
Basic Authentication .......................................... 63<br />
Bit Rate Control .................................................. 55<br />
BLC (Back Light Compensation) ............. 128, 130<br />
C<br />
Camera Angle Setting Tool .......................... 26, 31<br />
Camera Control .......................................... 68, 124<br />
Camera Control Privilege Status Indicator ....... 130<br />
Camera Control Privileges ....................... 124, 130<br />
Camera Name .................................................... 51<br />
Camera Position Control .................................... 54<br />
Camera Specification File .................................. 39<br />
Camera Tampering Detection .................. 104, 112<br />
Certificate Management ..................................... 73<br />
Control for Admin ..................................... 122, 138<br />
Custom Installation ............................................. 26<br />
D<br />
Date .................................................................... 50<br />
Date and Time .................................................... 50<br />
Day Mode ................................................... 53, 141<br />
Day/Night ................................................... 53, 141<br />
Day/Night Mode Focus Settings ...................... 141<br />
Daylight Saving Time ......................................... 50<br />
Default Gateway Address .................................. 47<br />
Detection Area ................................................. 110<br />
Detection Criteria ............................... 64, 109, 111<br />
Detection Line .................................................. 111<br />
Detection Setting .............................................. 113<br />
Detection Type ......................................... 103, 111<br />
Device Name ...................................................... 54<br />
DHCP ........................................................... 28, 47<br />
Digest Authentication ......................................... 63<br />
Digital PTZ ........................................................ 132<br />
Digital Zoom ............................................... 53, 132<br />
Display Screen Size ......................................... 134<br />
DNS .................................................................... 48<br />
Dome .................................................................. 54<br />
E<br />
Easy Installation ................................................. 26<br />
Echo Canceller ................................................... 62<br />
E-mail Notification .............................................. 61<br />
Encrypted Communications ............................... 74<br />
Error Message .................................................. 162<br />
Event .......................................................... 64, 110<br />
Event Display ........................................... 114, 143<br />
Event Logs ......................................................... 79<br />
Exposure .......................................................... 140<br />
Exposure Compensation .............................. 38, 51<br />
External Device Input<br />
Displaying .................................................. 143<br />
Setting .......................................................... 65<br />
External Device Name ........................................ 54<br />
External Device Output .................................... 143<br />
F<br />
Factory Default Settings ................................... 164<br />
Filter .......................................................... 117, 119<br />
Focus .......................................................... 38, 139<br />
Focus Mode ....................................................... 52<br />
Format ........................................................ 75, 119<br />
Frame Rate ................................................. 55, 143<br />
8<br />
Appendix<br />
173
FTP ....................................................................146<br />
FTP Upload .........................................................60<br />
Full Screen Mode ..............................................134<br />
G<br />
Gain ............................................................52, 140<br />
Guest User ........................................................125<br />
H<br />
H.264 ..................................................................55<br />
Home Position .......................................54, 98, 132<br />
Host Access Restrictions ..............................68, 69<br />
HTTP Port ............................................................63<br />
HTTP Server ........................................................63<br />
HTTP Upload .......................................................60<br />
HTTPS Port ..........................................................63<br />
I<br />
I Frame Interval ...................................................55<br />
Image Flip ...........................................................54<br />
Image Stabilizer ..................................................53<br />
Information Field .......................................129, 130<br />
Information Message ........................................162<br />
Infrared Cut Filter ..............................................141<br />
Initial Settings ..............................................28, 164<br />
Input Volume .......................................................62<br />
Installation Conditions .........................................54<br />
Installation <strong>Guide</strong> ..................................................5<br />
Installing the Necessary Software .......................26<br />
Intelligent Function Setting Tool ........................103<br />
IP Address ..........................................................47<br />
IPsec ...................................................................70<br />
IPv4 .....................................................................47<br />
IPv4 Host Access Restrictions ............................68<br />
IPv6 .....................................................................48<br />
IPv6 Host Access Restrictions ............................69<br />
J<br />
JPEG ...................................................................55<br />
L<br />
LAN .....................................................................47<br />
LED .....................................................................54<br />
Lock camera position ........................................107<br />
Log Code ..........................................................116<br />
Log Messages ................................................. 152<br />
Logs ........................................................... 79, 115<br />
M<br />
MAC Address ..................................................... 28<br />
Maintenance ...................................................... 79<br />
Maximum Frame Rate ........................................ 55<br />
Maximum Packet Size ........................................ 47<br />
Memory Card ..................................................... 75<br />
Message<br />
Error Message ........................................... 162<br />
Information Message ................................. 162<br />
Log Messages ........................................... 152<br />
Warning Message ...................................... 162<br />
Metering Mode ........................................... 51, 140<br />
Microphone ........................................................ 62<br />
Modifiers .......................................................... 148<br />
Mount ................................................................. 76<br />
Moving Object Detection ................................. 111<br />
Multicast ............................................................. 57<br />
N<br />
Name Server Address ........................................ 48<br />
Network .............................................................. 47<br />
Network Address/Subnet ................................... 68<br />
Night Mode ................................................ 53, 141<br />
NTP Server ......................................................... 50<br />
O<br />
One-shot AF ..................................................... 139<br />
One-shot WB .................................................... 141<br />
On-screen Display ............................................. 56<br />
Operating the External Device Output ............. 143<br />
<strong>Operation</strong> Mode ................................................. 65<br />
Output Volume ................................................... 62<br />
Overwrite videos ................................................ 75<br />
P<br />
Pan ....................................................... 37, 95, 131<br />
Panorama Creation Tool .................................... 89<br />
Panorama Display .................................... 129, 130<br />
Panorama Display Area ........................... 131, 132<br />
Panorama Screen ........................................ 93, 97<br />
Parameters ................................................. 60, 148<br />
Passing Detection .................................... 105, 113<br />
Password ..................................................... 28, 42<br />
174
Index<br />
Playback Videos .............................................. 120<br />
PoE Supply ....................................................... 164<br />
Post-event Buffer .......................................... 59, 75<br />
Pre-event Buffer ........................................... 59, 75<br />
Prefix .................................................................. 69<br />
Preset ........................................................... 64, 66<br />
Use ............................................................ 132<br />
Preset Setting Tool ............................................. 96<br />
Preset Tour ....................................................... 101<br />
Privacy Mask Setting Tool .................................. 85<br />
Privileged Camera Control ......................... 68, 124<br />
Pulse .................................................................. 65<br />
R<br />
Reboot Item ........................................................ 78<br />
Reconnect ........................................................ 135<br />
Recorded Video Utility ..................................... 118<br />
Recording Manually ......................................... 144<br />
Reference Volume Level .................................... 64<br />
Removed Object Detection .............................. 112<br />
Reset Switch .................................................... 164<br />
Restore Default Settings .................................... 79<br />
Restore Settings ................................................. 79<br />
RM-Lite ............................................................... 18<br />
Rotation .............................................................. 37<br />
RTP ..................................................................... 57<br />
RTP Streaming ................................................... 57<br />
RTSP .................................................................. 57<br />
S<br />
SD Card Information .......................................... 76<br />
SD Card <strong>Operation</strong>s ..................................... 75, 76<br />
SD Card Recording .................................. 135, 144<br />
SD Memory Card ......................... 14, 75, 129, 146<br />
Search Domain .................................................. 49<br />
Self-Signed Certificate ....................................... 73<br />
Server ................................................................. 62<br />
Setting Menu ...................................................... 44<br />
Setup CD-ROM .................................................... 5<br />
Shutter Speed ............................................ 51, 140<br />
Slow Shutter ....................................................... 51<br />
Smart Shade Control .................................. 52, 139<br />
Snapshot .......................................................... 135<br />
SNMP ................................................................. 49<br />
Sound Clip Upload ............................................. 67<br />
SSL/TLS Certificate ............................................ 73<br />
Subnet Mask ...................................................... 47<br />
T<br />
Target Bit Rate ................................................... 55<br />
Tilt ......................................................... 37, 95, 131<br />
Time .................................................................... 50<br />
Time Zone .......................................................... 50<br />
Timer .................................................................. 66<br />
Top Page ............................................................ 42<br />
Troubleshooting ............................................... 150<br />
TTL ..................................................................... 57<br />
U<br />
Unmount ............................................................. 75<br />
Upload ................................................................ 59<br />
User Account ..................................................... 68<br />
User Authentication .................................... 42, 125<br />
User Authority ..................................................... 68<br />
User List ............................................................. 68<br />
User Name ................................................... 28, 42<br />
User Page .......................................................... 44<br />
V<br />
<strong>VB</strong> Initial Setting Tool ............................. 16, 26, 28<br />
<strong>VB</strong> Viewer ................................................. 123, 129<br />
Video Distribution ....................................... 68, 124<br />
Video Format ........................................ 59, 75, 119<br />
Video Management Information ......................... 76<br />
Video Quality ...................................................... 55<br />
Video Record ................................. 65, 66, 67, 110<br />
Video Record Action .......................................... 64<br />
Video Record Setting ......................................... 64<br />
Video Saving ...................................................... 76<br />
Video Server ....................................................... 62<br />
Video Size .......................................... 55, 128, 129<br />
View Restriction Setting Tool .............................. 92<br />
Viewer<br />
Admin Viewer ..................................... 128, 137<br />
RM-Lite Viewer ............................................. 18<br />
<strong>VB</strong> Viewer .................................................. 129<br />
Viewer PTZ ....................................................... 137<br />
Voice Activity Detection ..................................... 62<br />
Volume ....................................................... 66, 110<br />
Volume Detection ....................................... 64, 143<br />
W<br />
Warning Message ............................................ 162<br />
White Balance ............................................ 52, 141<br />
8<br />
Appendix<br />
175
Z<br />
Zoom ...................................................38, 128, 132<br />
176
YT1-1635-002 © CANON INC. 2013


