

Chevrolet 2016 Spark EV - Get To Know Your Vehicle
Chevrolet 2016 Spark EV - Get To Know Your Vehicle
Chevrolet 2016 Spark EV - Get To Know Your Vehicle

You also want an ePaper? Increase the reach of your titles
YUMPU automatically turns print PDFs into web optimized ePapers that Google loves.
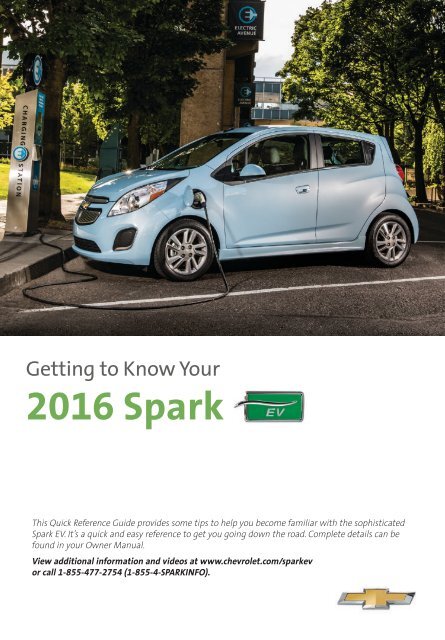
<strong>Get</strong>ting to <strong>Know</strong> <strong>Your</strong><br />
<strong>2016</strong> <strong>Spark</strong><br />
This Quick Reference Guide provides some tips to help you become familiar with the sophisticated<br />
<strong>Spark</strong> <strong>EV</strong>. It’s a quick and easy reference to get you going down the road. Complete details can be<br />
found in your Owner Manual.<br />
View additional information and videos at www.chevrolet.com/sparkev<br />
or call 1-855-477-2754 (1-855-4-SPARKINFO).<br />
1
Instrument Panel<br />
Power<br />
Mirrors<br />
Control F<br />
Pedestrian Friendly<br />
Alert/Turn Signal<br />
Lever/Exterior Lamps<br />
Control<br />
Driver<br />
Information<br />
Center<br />
Controls<br />
Instrument<br />
Panel<br />
Illumination<br />
Control<br />
Instrument<br />
Cluster/Driver<br />
Information<br />
Center<br />
Windshield<br />
Wipers<br />
Lever<br />
Power Window Switches/<br />
Power Door Locks Button<br />
Cruise<br />
Control<br />
Buttons<br />
Tilt Steering<br />
Wheel Lever<br />
Audio Steering<br />
Wheel Controls<br />
Symbols<br />
Brake System<br />
Safety Belt Reminder<br />
Airbag Readiness<br />
Service <strong>Vehicle</strong> Soon<br />
Charging System<br />
Traction Control Off<br />
Security<br />
Cruise Control Set<br />
Service Electric<br />
Parking Brake<br />
Antilock Brake System<br />
PARK<br />
2
Information<br />
Display<br />
Hazard<br />
Warning<br />
Flashers<br />
Button<br />
Infotainment<br />
System/Electric<br />
Information<br />
Leaf<br />
Button<br />
Power<br />
Button<br />
Traction<br />
Control/Sport<br />
Buttons<br />
Electric<br />
Parking Brake<br />
Switch<br />
Auxiliary<br />
Input Jack/<br />
USB Port<br />
Heated Seat<br />
Buttons<br />
Climate<br />
Controls<br />
Lights On Reminder<br />
Low Tire Pressure<br />
StabiliTrak/Traction Control<br />
<strong>Vehicle</strong> Ready<br />
Refer to your Owner Manual<br />
to learn about the information<br />
being relayed by the lights,<br />
gauges and indicators of the<br />
instrument cluster.<br />
See In Brief in your Owner Manual.<br />
F Optional equipment<br />
3
<strong>Get</strong>ting Started<br />
See More Online<br />
<strong>To</strong> get started driving your <strong>Spark</strong> <strong>EV</strong>, review the basic information in this guide<br />
along with your Owner Manual. <strong>To</strong> view informative videos about your <strong>Spark</strong> <strong>EV</strong>,<br />
scan the QR codes in this guide with your smartphone. <strong>To</strong> scan a code:<br />
1. Download a QR Code Reader to your smartphone from your phone’s app store.<br />
2. Start the reader.<br />
3. Hold the phone over the code and shoot. Some phones will recognize the code<br />
automatically.<br />
Sample<br />
Remote Keyless Entry (RKE) Transmitter (Key Fob)<br />
The RKE transmitter performs several remote functions and must be in the vehicle<br />
in order to start the vehicle.<br />
Key Release<br />
Press the top button to extend the key,<br />
which can be used for all locks.<br />
Unlock<br />
Press to unlock the<br />
driver’s door. Press<br />
again to unlock all<br />
doors.<br />
Lock<br />
Press to lock all doors.<br />
<strong>Vehicle</strong> Locator/<br />
Panic Alarm<br />
Press and release to<br />
locate the vehicle.<br />
Press and hold for three seconds to sound<br />
the panic alarm. Press again to cancel<br />
the alarm.<br />
OFF DC Stop Charge F<br />
Press and hold to stop DC fast charge.<br />
Remote Start<br />
Press and release the Lock button and<br />
then press and hold the button until<br />
the turn signal lamps flash to start the<br />
vehicle and condition the passenger cabin<br />
temperature from outside the vehicle.<br />
The heating or air conditioning system<br />
and rear window defogger (if needed) will<br />
turn on.<br />
After entering the vehicle, press the brake<br />
pedal and then press the POWER<br />
button before driving.<br />
• Press and hold the button until<br />
the parking lamps turn off to cancel a<br />
remote start.<br />
• The vehicle will turn off after 20 minutes<br />
unless the remote start is extended<br />
or the POWER button is pressed.<br />
Only two remote starts are allowed<br />
between start cycles.<br />
• It’s RECOMMENDED to use this feature<br />
when the vehicle is plugged in to allow<br />
energy from the wall outlet to assist<br />
in getting the cabin to a comfortable<br />
temperature and leaving more battery<br />
energy for driving.<br />
See Keys, Doors and Windows in your Owner Manual.<br />
4<br />
F Optional equipment
<strong>Get</strong>ting Started<br />
Starting and Stopping the <strong>Vehicle</strong><br />
The <strong>Spark</strong> <strong>EV</strong> features a push-button start/stop ignition system. The POWER button<br />
flashes when the driver’s door is open and the vehicle is not ON. Once the vehicle is ON,<br />
the button illuminates. The RKE transmitter must be in the vehicle.<br />
Note: A fan may run anytime the vehicle is ON to cool the propulsion battery.<br />
Starting the <strong>Vehicle</strong>/ON<br />
With the vehicle in Park or Neutral, press<br />
the brake pedal and then press the POWER<br />
button.<br />
The <strong>Vehicle</strong> Ready<br />
light will illuminate on the<br />
instrument cluster when the<br />
vehicle is ready to drive.<br />
If the vehicle is still plugged<br />
in, the vehicle will not shift<br />
out of Park and a Charge<br />
Cord Connected message<br />
will be displayed.<br />
Stopping the <strong>Vehicle</strong>/OFF<br />
Shift to Park and then press the<br />
button.<br />
POWER<br />
See Driving and Operating in your Owner Manual.<br />
Seat Adjustment<br />
Before driving, adjust the seat and steering wheel to a comfortable position.<br />
A<br />
B<br />
D<br />
Pull down the lever (A) to unlock the steering<br />
wheel and adjust its position.<br />
Lift the bar (B) under the front of the seat to<br />
slide the seat forward or rearward.<br />
Turn the knob (C) to raise or lower the seat.<br />
Lift the rear lever (D) to recline or raise the<br />
seatback.<br />
C<br />
See Seats and Restraints in your Owner Manual.<br />
5
Instrument Cluster<br />
The instrument cluster features a configurable LCD screen that can display basic information<br />
for <strong>EV</strong> operation as well as more detailed operating information with additional<br />
gauges.<br />
There are four configurations available:<br />
• Simple battery gauge with power<br />
indicator gauge<br />
• Enhanced battery gauge with power<br />
indicator gauge<br />
• Simple battery gauge with driver<br />
efficiency gauge<br />
• Enhanced battery gauge with driver<br />
efficiency gauge (shown at left)<br />
Driver Information Center<br />
Use the Driver Information Center controls on the left side of the instrument panel to<br />
change the instrument cluster display and access the menus.<br />
CONFIG<br />
Press to change the instrument cluster<br />
display configuration.<br />
SELECT<br />
Turn the knob to scroll through the<br />
menus. Press it to select a highlighted<br />
item.<br />
BACK<br />
Press to move back or exit a menu.<br />
<strong>To</strong> view a tutorial about the unique<br />
features of the instrument cluster, with<br />
the vehicle in Park, turn the Select knob<br />
until Information is displayed. Press<br />
the knob to select it. Use the knob to<br />
select Tutorial.<br />
See Instruments and Controls in your Owner Manual.<br />
6
Electric Power<br />
Factors that Impact Range<br />
<strong>Your</strong> driving style plays a large role in the efficiency and range of the vehicle. Avoid rapid<br />
acceleration or deceleration to help maximize energy efficiency and range. Electric range<br />
is maximized at 50 mph and below. Higher speeds use more energy and significantly<br />
reduce electric range. Hilly terrain also is less efficient than driving on flat surfaces. Avoid<br />
hilly routes when possible to maximize electric range.<br />
In hot or cold temperatures, the electric driving range may be lower due to higher energy<br />
use. Optimal energy efficiency is achieved with the climate controls turned off. Use the<br />
heated seat feature instead of the climate controls to use less energy.<br />
Remote Start Preconditioning<br />
Use remote start to heat or cool the interior when the vehicle is plugged in to maximize<br />
electric range.<br />
<strong>To</strong>tal <strong>Vehicle</strong> Range<br />
The battery gauge displays the battery<br />
charge level. The number next to the gauge<br />
displays the current estimate of how far<br />
the vehicle can be driven before recharging<br />
the vehicle. The enhanced battery gauge<br />
provides an estimate of the minimum and<br />
maximum range the vehicle can be driven<br />
before charging.<br />
The displayed electric range is a projection<br />
based on past vehicle performance<br />
and charge level. The displayed range will<br />
change based on current driving style and<br />
climate settings.<br />
Efficiency Gauge<br />
Press the CONFIG button to select an<br />
instrument cluster display configuration<br />
showing the efficiency gauge.<br />
While driving, try to keep the spinning ball<br />
green and in the center of the gauge. The<br />
ball will turn yellow and move up or down<br />
during inefficient acceleration or aggressive<br />
braking. The ball stops spinning when the<br />
vehicle stops.<br />
How the<br />
<strong>Spark</strong> <strong>EV</strong><br />
works<br />
See Instruments and Controls in your Owner Manual.<br />
7
Efficiency<br />
Operating Modes<br />
Normal (Default)<br />
Use in normal driving conditions for<br />
efficient operation; this mode is active<br />
each time the vehicle is started.<br />
Sport<br />
Use when more responsive acceleration is<br />
desired; efficiency is reduced.<br />
Press the SPORT button, located on the<br />
center console behind the shift lever,<br />
to activate Sport Mode.<br />
Press the button again to return to<br />
Normal Mode.<br />
See Driving and Operating in your Owner Manual.<br />
Climate Controls<br />
<strong>To</strong>uch climate settings on the touch<br />
screen to view the Climate Controls.<br />
Press the TEMP button to turn the<br />
air conditioning or heater on/off.<br />
Press the AUTO button to have the<br />
system operate automatically to reach<br />
the set temperature. If the air delivery<br />
mode or fan speed is manually adjusted,<br />
automatic operation is turned off.<br />
Climate Power on the touch screen<br />
displays the impact of the climate settings<br />
on energy consumption. A lower<br />
power percentage indicates less energy is<br />
being used.<br />
See Climate Controls in your Owner Manual.<br />
8
Efficiency<br />
Information Displays<br />
Press the Leaf button on the center<br />
stack and then touch the desired tab at<br />
the bottom of the screen to display<br />
Power Flow, Charging and Energy<br />
Information.<br />
Power Flow<br />
The Power Flow screens show the current<br />
system operating condition, including<br />
Battery Power (Active), Battery Power<br />
(Stationary), Regen Power Recovery, and<br />
Power Off. Each component is highlighted<br />
when it is active.<br />
Charging<br />
The Charging screens show the charge<br />
mode status. The three programmable<br />
charge modes are:<br />
• Immediately upon plug-in<br />
• Delayed based on Departure Time<br />
• Delayed based on electric Rate and<br />
Departure Time<br />
Energy Information<br />
The Energy Information screens show how<br />
energy has been used since the last full<br />
charge, energy use over the last 5 miles<br />
or 50 miles, and energy tips to improve<br />
energy use and increase economy.<br />
See Instruments and Controls in your Owner Manual.<br />
9
Settings, Sights and Sounds<br />
<strong>To</strong>uch Screen Display<br />
Refer to your Owner Manual for important safety information about using the infotainment system<br />
while driving.<br />
multimedia:<br />
AM, FM, XM F , iPod/<br />
iPhone, USB, Aux,<br />
Bluetooth audio, video<br />
telephone:<br />
Open the Phone<br />
menu<br />
smartphone<br />
link:<br />
Play apps<br />
electric info:<br />
View electric<br />
information<br />
climate settings:<br />
Open the Climate<br />
Controls menu<br />
settings:<br />
Open the<br />
Settings menu<br />
VOL<br />
Adjust volume<br />
Power<br />
On/Off<br />
Home page<br />
Infotainment System<br />
The Infotainment system features radio, auxiliary player (input jack and USB port are<br />
located in the lower center of the instrument panel), smartphone applications and<br />
Bluetooth ® functions.<br />
Bluetooth System<br />
Before using a Bluetooth-enabled device in the vehicle, it must be paired with the<br />
in-vehicle Bluetooth system. Not all devices will support all functions. For more information,<br />
visit my.chevrolet.com/learn.<br />
<strong>To</strong> pair a device, on the touch screen, touch settings > connection settings> Bluetooth<br />
settings > pair device. Start the pairing process on the device and confirm the code on<br />
the device.<br />
See Infotainment System in your Owner Manual.<br />
10<br />
F Optional equipment
Settings, Sights and Sounds<br />
<strong>Chevrolet</strong> MyLink<br />
MyLink uses a Bluetooth or USB<br />
con nection to link a compatible smartphone,<br />
cell phone, USB flash drive or portable<br />
audio player/iPod to the touch screen<br />
infotainment display. It offers a variety<br />
of entertainment options and smartphone<br />
apps. For more information, including<br />
device compatibility, visit<br />
www.chevrolet.com/mylink or call<br />
1-855-4-SUPPORT (1-855-478-7767).<br />
Some of the currently available apps are described below. Apps must be downloaded<br />
(separate purchase may be required) to the smartphone. Connect the smartphone using a<br />
USB cable (iPhone) or Bluetooth (Android).<br />
Pandora – Listen to personalized radio stations based on favorite artists or genres.<br />
Stitcher – Stream favorite podcasts, radio shows and news.<br />
BringGo – Display and control full-function navigation and traffic features. Use to plan a<br />
route, search for points of interest, view map, get traffic data, find the nearest charging<br />
station and more. (Separate purchase required.)<br />
Tune In – Listen to music, sports and news stations<br />
from all over the world.<br />
Siri ® Eyes Free – As a feature of compatible iPhone<br />
models, Siri can be used in the vehicle to send text<br />
messages, set reminders and use other iPhone functions.<br />
See Infotainment System in your Owner Manual.<br />
<strong>Chevrolet</strong><br />
MyLink<br />
<strong>Vehicle</strong> Personalization<br />
Some vehicle features can be customized using the touch screen menus. Personalization<br />
menus may include Time & Date Settings, Radio Settings, Connection Settings, <strong>Vehicle</strong><br />
Settings, Language, Text Scroll, <strong>To</strong>uch Beep Sound, and Max Startup Volume.<br />
Press the Home button.<br />
<strong>To</strong>uch settings on the home page.<br />
<strong>To</strong>uch the desired screen menu to<br />
access the various menus and settings.<br />
<strong>To</strong>uch the BACK screen button in<br />
the upper-left corner to move back<br />
within a menu.<br />
See Instruments and Controls in your Owner Manual.<br />
11
OnStar® with 4G LTE and Wi-Fi® F<br />
With OnStar 4G LTE and Wi-Fi®, up to seven devices (smartphones, tablets and laptops)<br />
can be connected to high-speed Internet through the vehicle’s built-in Wi-Fi hotspot.<br />
<strong>To</strong> retrieve the SSID and password for the hotspot, press the white OnStar Voice<br />
Command button on the overhead console or rearview mirror, wait for the prompt,<br />
and then say “Wi-Fi settings.” The information will be displayed on the screen.<br />
For assistance, press the blue OnStar button or call 1-888-4-ONSTAR (1-888-466-7827).<br />
Note: See onstar.com for a detailed instruction guide, vehicle availability, details, and system<br />
limitations. Services and apps vary by make, model, year, carrier, availability, and conditions. 4G LTE<br />
service is available in select markets. 4G LTE performance is based on industry averages and vehicle<br />
systems design. Some services require a data plan.<br />
See Infotainment System in your Owner Manual.<br />
Charging Status<br />
The Charge Status Indicator is located on the instrument panel near the windshield.<br />
Note: Immediately after plugging in, the Charge<br />
Status Indicator may be yellow for up to five<br />
seconds before turning green. The charging<br />
system may run fans and pumps when the<br />
vehicle is turned off.<br />
• Solid green with single horn chirp –<br />
<strong>Vehicle</strong> is plugged in; battery is charging<br />
• Slow (long pulse) flashing green with<br />
double horn chirp – <strong>Vehicle</strong> is plugged<br />
in; battery charging is delayed<br />
• Fast (short pulse) flashing green –<br />
<strong>Vehicle</strong> is plugged in; battery is fully<br />
charged<br />
• Solid yellow – <strong>Vehicle</strong> is plugged in;<br />
not charging<br />
• No light – <strong>Vehicle</strong> is not plugged in<br />
OR there is an issue with the charger<br />
or outlet<br />
• Repetitive horn chirps and no light<br />
– Electricity was interrupted before<br />
charging was completed<br />
See Driving and Operating in your Owner Manual.<br />
12<br />
F Optional equipment
AC Charging<br />
The <strong>Spark</strong> <strong>EV</strong> is powered by a lithium-ion high voltage battery pack. It is recommended to<br />
keep the vehicle plugged in when temperatures are below 32°F (0°C) or above 90°F (32°C).<br />
The CHARGE SOON message indicates that the driving range is getting low and the vehicle<br />
needs to be charged. Fully charge the battery at each charge event.<br />
Charging Time<br />
Using a 240-volt charging station will take approximately 7 hours to charge your <strong>Spark</strong> <strong>EV</strong>.<br />
Using a 120-volt standard outlet will take approximately 20 hours at the 12-amp setting,<br />
or considerably longer at the default 8-amp setting. Charge times will vary with outside<br />
temperature.<br />
Start AC Charging<br />
The provided 120-volt AC portable vehicle charge cord is located in the storage<br />
compartment under the cargo floor.<br />
1. With the vehicle parked, press the Leaf button on the center stack to review the<br />
Charge Level Preference screen on the touch screen for selected charge mode. Select<br />
the Change Charge Level screen button if an increased charging level is desired. Use<br />
the reduced charge level until a qualified electrician inspects your electrical circuit<br />
capacity, or if the electrical circuit or socket capacity is not known. Once the charge<br />
level is selected, turn off the vehicle.<br />
Note: The Charge Level selection returns to the reduced level each time the vehicle is driven.<br />
2. Plug the AC charge cord into an electrical<br />
outlet. DO NOT USE AN EXTENSION<br />
CORD. Charge cord i ndicators should<br />
be green. Where possible, secure the<br />
charge cord to the wall.<br />
3. Push and release the rear edge of the<br />
charge port door, located just in front<br />
of the driver’s door, to open the door.<br />
4. Plug the charge cord into the vehicle’s<br />
charge port.<br />
5. The Charge Status Indicator on top of<br />
the instrument panel will illuminate<br />
green and the horn will chirp when<br />
properly connected.<br />
Note: <strong>To</strong> change the horn chirp setting, go to<br />
Charging Alerts in the <strong>Vehicle</strong> Settings menu.<br />
If the vehicle is locked with the RKE<br />
transmitter, the charge cord theft alert is<br />
armed automatically after 30 seconds.<br />
See Driving and Operating in your Owner Manual.<br />
13
AC Charging<br />
Programmable Charging<br />
The <strong>Spark</strong> <strong>EV</strong> can be programmed for three charging modes: Immediately; Departure<br />
Time; and Rate and Departure Time.<br />
1. Press the Leaf button and then<br />
touch the Charging tab on the touch<br />
screen to view the current charge<br />
mode status.<br />
2. On the Charging screen, touch Edit to<br />
select a charge mode.<br />
End AC Charging<br />
1. Unlock the vehicle with the RKE transmitter to disarm the charge cord theft alert.<br />
2. Unplug the charge cord from the vehicle by pushing the button on top of the charge<br />
cord plug.<br />
3. Close the charge port door.<br />
4. Unplug the charge cord from the electrical outlet and stow the cord in the storage<br />
compartment.<br />
See Driving and Operating in your Owner Manual.<br />
Charging<br />
the <strong>Spark</strong> <strong>EV</strong><br />
Home Charging Station<br />
14<br />
Charging equipment with a rating of at<br />
least 240 Volt/20 Amp will provide the<br />
fastest charging time and best charging<br />
efficiency to recharge the high voltage<br />
battery.<br />
Contact your dealership or<br />
<strong>Spark</strong> <strong>EV</strong> Customer Support, or go to<br />
www.pluginnow.com, for more information<br />
about an available 240V home<br />
charging station.
DC Charging (if equipped with DC Charging Capability) F<br />
DC charging stations are typically found in public locations.<br />
Charging Time<br />
Using a DC charging station, it will take approximately 20 minutes to recharge a depleted<br />
battery to 80%. Charge times will vary with outside temperature. Charging will continue<br />
to 100%, but at a slower rate. At 100% state of charge, the vehicle may continue to draw<br />
power to condition the battery if needed. Once battery conditioning is complete, the<br />
vehicle will stop the charge session.<br />
Start DC Charging<br />
1. With the vehicle parked and turned off, push<br />
and release the rear edge of the charge port<br />
door, located just in front of the driver’s<br />
door, to open the door.<br />
2. Unlatch and lower the DC charging dust<br />
cover on the charge port.<br />
3. Plug the charge cord into the vehicle’s<br />
charge port.<br />
4. Follow the steps on the charging station to start charging. The DC plug will be locked<br />
and cannot be disconnected while charging is active.<br />
5. The Charge Status Indicator on top of the instrument panel will illuminate green and<br />
the horn will chirp when properly connected.<br />
Note: <strong>To</strong> change the horn chirp setting, go to Charging Alerts in the <strong>Vehicle</strong> Settings menu.<br />
If the vehicle is locked with the RKE transmitter, the charge cord theft alert is armed automatically<br />
after 30 seconds.<br />
End DC Charging<br />
1. Unlock the vehicle with the RKE transmitter to disarm the charge cord theft alert.<br />
2. When the vehicle is fully charged, it will stop charging and the plug will be unlocked.<br />
<strong>To</strong> stop charging at any time, use the controls on the charging station, press and hold<br />
the OFF DC Stop Charge button on the RKE transmitter, or touch the Stop button on the<br />
Battery Information screen displayed on the vehicle touch screen.<br />
3. When the Charge Status Indicator is no longer solid or flashing green, unplug the<br />
charge cord from the vehicle.<br />
4. Close the DC charging dust cover and close the charge port door.<br />
See Driving and Operating in your Owner Manual.<br />
Customer Support<br />
1-855-477-2754 (1-855-4-SPARKINFO)<br />
<strong>Chevrolet</strong> has a team of dedicated <strong>Spark</strong> <strong>EV</strong> experts ready to help owners. Contact the<br />
team if you have any questions or would like more information about your <strong>Spark</strong> <strong>EV</strong>.<br />
F Optional equipment<br />
15
Roadside Assistance<br />
1-888-811-1926 TTY Users: 1-888-889-2438<br />
As the owner of a new <strong>Chevrolet</strong>, you are automatically enrolled in the <strong>Chevrolet</strong> Roadside<br />
Assistance program for up to 5 years/60,000 miles, whichever occurs first, at no expense<br />
to you. <strong>Chevrolet</strong>’s Roadside Assistance toll-free number is staffed by a team of trained<br />
advisors who are available 24 hours a day, 365 days a year, to contact a service provider<br />
for light services (jump-starts, flat tire and lock-outs) or make arrangements to tow your<br />
vehicle to the nearest <strong>Chevrolet</strong> dealer for any repairs.<br />
Roadside Assistance and OnStar®<br />
If you require roadside service and have a current OnStar subscription, press the OnStar<br />
button and the vehicle will send your current GPS location to an OnStar Advisor who will<br />
speak to you, assess your problem, contact Roadside Assistance and relay your exact location<br />
so you will get the help you need.<br />
my<strong>Chevrolet</strong> & OnStar® Mobile Apps<br />
The my<strong>Chevrolet</strong> mobile app connects owners to a variety of vehicle information<br />
and services, such as a searchable Owner Manual and Roadside Assistance.<br />
OnStar RemoteLink Key Fob Services enable users to perform Remote Keyless Entry<br />
transmitter commands as well as checking current battery charge level and initiating<br />
charging of your <strong>Spark</strong> <strong>EV</strong>. <strong>To</strong> learn more about OnStar services, press the OnStar<br />
button, refer to your Owner Manual, call 1-888-466-7827 or visit onstar.com.<br />
Download the mobile apps from your compatible mobile device’s app store.<br />
<strong>Chevrolet</strong> Owner Center<br />
The <strong>Chevrolet</strong> Owner Center, a complimentary service for <strong>Chevrolet</strong> owners, is a one-stop<br />
resource designed to enhance your <strong>Chevrolet</strong> ownership experience. Exclusive member<br />
benefits include online service reminders, vehicle maintenance tips, online owner manual,<br />
special privileges and more. Sign up today at my.chevrolet.com.<br />
We recommend always using ACDelco or genuine GM service parts.<br />
Certain restrictions, precautions and safety procedures apply to your vehicle. Please read your Owner Manual<br />
for complete instructions. All information contained herein is based on the latest information available at the<br />
time of printing and is subject to change without notice. Copyright 2015 General Motors. All rights reserved.<br />
!23210876=A!<br />
23210876 A<br />
16


