

Samsung 7.1 Channel Blu-ray 3D Home Theater System - HT-C9950W/XAA - User Manual (ENGLISH)
Samsung 7.1 Channel Blu-ray 3D Home Theater System - HT-C9950W/XAA - User Manual (ENGLISH)
Samsung 7.1 Channel Blu-ray 3D Home Theater System - HT-C9950W/XAA - User Manual (ENGLISH)

Create successful ePaper yourself
Turn your PDF publications into a flip-book with our unique Google optimized e-Paper software.
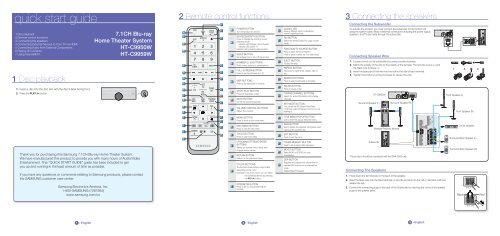
quick start guide<br />
2 Remote control functions<br />
3 Connecting the speakers<br />
18<br />
Connecting the Subwoofer<br />
1 Disc playback<br />
2 Remote control functions<br />
3 Connecting the speakers<br />
4 Connecting External Devices to Your TV via HDMI<br />
5 Connecting Audio from External Components<br />
6 Playing <strong>3D</strong> contents<br />
7 Using Internet@TV<br />
1 Disc playback<br />
1. Insert a disc into the disc slot with the disc's label facing front.<br />
2. Press the PLAY (►) button.<br />
<strong>7.1</strong>CH <strong>Blu</strong>-<strong>ray</strong><br />
<strong>Home</strong> <strong>Theater</strong> <strong>System</strong><br />
<strong>HT</strong>-<strong>C9950W</strong><br />
<strong>HT</strong>-C9959W<br />
1<br />
2<br />
3<br />
4<br />
5<br />
6<br />
7<br />
8<br />
9<br />
10<br />
11<br />
12<br />
13<br />
POWER<br />
SLEEP<br />
FULL<br />
SCREEN<br />
VOL<br />
DISC<br />
MENU<br />
TOOLS<br />
BD RECEIVER<br />
/TV<br />
MUTE<br />
SFE<br />
MODE<br />
MENU<br />
FUNCTION<br />
TV SOURCE<br />
1 2 3<br />
4 5 6<br />
7 8 9<br />
0<br />
REPEAT<br />
TUNING<br />
/CH<br />
TITLE MENU<br />
POPUP<br />
INFO<br />
19<br />
20<br />
21<br />
22<br />
23<br />
24<br />
25<br />
26<br />
27<br />
1<br />
2<br />
3<br />
4<br />
5<br />
6<br />
7<br />
8<br />
9<br />
POWER BUTTON<br />
Turn the product on and off.<br />
BD RECEIVER/TV BUTTON<br />
Press to change the remote’s current<br />
operating mode:<br />
- Indicator LED Orange: <strong>Home</strong> <strong>Theater</strong><br />
- Indicator LED Green: TV<br />
Indicator LED is directlyt above button.<br />
SLEEP BUTTON<br />
Set a Sleep time to shut off the product.<br />
NUMBER (0~9) BUTTONS<br />
Press numeric buttons to operate options.<br />
FULL SCREEN BUTTON<br />
Press to see the full screen on a TV.<br />
SKIP BUTTONS<br />
Press to skip backwards or forwards.<br />
STOP/ PLAY BUTTON<br />
Press to stop/play a disc.<br />
MUTE BUTTON<br />
Cut off the sound temporarily.<br />
VOLUME CONTROL BUTTONS<br />
Adjust the volume.<br />
17<br />
18<br />
19<br />
20<br />
21<br />
22<br />
23<br />
24<br />
25<br />
Indicator LED<br />
Glows in different colors to indicate the<br />
remote's operating mode.<br />
PLII BUTTON<br />
Select the desired Dolby Pro Logic II audio<br />
mode.<br />
FUNCTION/TV SOURCE BUTTON<br />
Press to select the home theater's<br />
mode or press to select the TV's video mode.<br />
EJECT BUTTON<br />
To eject the disc.<br />
REPEAT BUTTON<br />
Allows you to repeat a title, chapter, track or<br />
disc.<br />
SEARCH BUTTONS<br />
Press to search backwards or forwards.<br />
PAUSE BUTTON<br />
Press to pause a disc.<br />
TUNING/CHANNEL BUTTONS<br />
Search for active FM stations and change<br />
channels.<br />
SFE MODE BUTTON<br />
You can set the SFE (Sound Field Effect)<br />
mode best suited for the type of music you are<br />
listening to.<br />
To activate the product, you must connect the subwoofer to the Control Unit<br />
using the system cable. Most of external connections including the power supply,<br />
speakers, and TV are made through the subwoofer.<br />
Connecting Speaker Wire<br />
1.<br />
2.<br />
3.<br />
4.<br />
Loosen a knob on the subwoofer by turning counterclockwise.<br />
Match the polarity of the wire to the polarity of the terminal. The red wire is plus (+) and<br />
the black wire is minus (-).<br />
Insert the bare part of the wire into the hole in the side of each terminal.<br />
Tighten the knob by turning clockwise to secure the wire.<br />
<strong>HT</strong>-<strong>C9950W</strong><br />
Surround Speaker (L)<br />
Surround Speaker (R)<br />
Front Speaker (L)<br />
Front Speaker (R)<br />
Thank you for purchasing this <strong>Samsung</strong> <strong>7.1</strong>CH <strong>Blu</strong>-<strong>ray</strong> <strong>Home</strong> <strong>Theater</strong> <strong>System</strong>.<br />
We have manufactured this product to provide you with many hours of Audio/Video<br />
Entertainment. This “QUICK START GUIDE” guide has been included to get<br />
you up and running in the least amount of time as possible.<br />
If you have any questions or comments relating to <strong>Samsung</strong> products, please contact<br />
the SAMSUNG customer care center.<br />
<strong>Samsung</strong> Electronics America, Inc.<br />
1-800-SAMSUNG (7267864)<br />
www.samsung.com/us<br />
14<br />
15<br />
16<br />
17<br />
RETURN<br />
A<br />
INTERNET<br />
@<br />
EXIT<br />
TUNER MEMORY MO/ST<br />
B C D<br />
DSP<br />
28<br />
29<br />
30<br />
31<br />
10<br />
11<br />
12<br />
13<br />
14<br />
15<br />
16<br />
MENU BUTTON<br />
Press to move to the home menu.<br />
DISC MENU BUTTON<br />
Press to view the disc menu.<br />
TOOLS BUTTON<br />
Press to use Tools menu.<br />
UP/DOWN/LEFT/RIG<strong>HT</strong>/ENTER<br />
BUTTONS<br />
Select on-screen menu items and<br />
change menu values.<br />
RETURN BUTTON<br />
Return to the previous menu.<br />
COLOR BUTTONS<br />
The functions these buttons control differ<br />
depending on the menu.<br />
Example: In the home menu, you can select<br />
the connected device by pressing<br />
the RED (A) button.<br />
INTERNET@ BUTTON<br />
Press to link to various Internet@ TV<br />
services.<br />
26<br />
27<br />
28<br />
29<br />
30<br />
31<br />
TITLE MENU/POPUP BUTTON<br />
Use to enter the popup menu/title menu.<br />
INFO BUTTON<br />
Use to display the playback information when<br />
playing a <strong>Blu</strong>-<strong>ray</strong>/DVD disc.<br />
EXIT BUTTON<br />
Press to exit the menu.<br />
TUNER MEMORY BUTTON<br />
Used to set a preset radio frequency.<br />
MO/ST BUTTON<br />
Select MONO or STEREO for radio<br />
broadcasting.<br />
DSP BUTTON<br />
Regulate and stabilize the volume level or<br />
upscale MP3 level sound or stresses low<br />
tones.<br />
(Digital Signal Processor)<br />
Subwoofer<br />
Connecting The Speakers<br />
Wireless Receiver Module<br />
This product should be connected with the SWA-5000 only.<br />
1. Press down the terminal tab on the back of the speaker.<br />
2. Insert the black wire into the black terminal (–) and the red wire into the red (+) terminal, and then<br />
release the tab.<br />
3. Connect the connecting plugs to the back of the Subwoofer by matching the colors of the speaker<br />
plugs to the speaker jacks.<br />
Center Speaker<br />
Surround Back Speaker (L)<br />
Surround Back Speaker (R)<br />
Black<br />
Red<br />
1 - English<br />
2 - English<br />
3 - English
3 Connecting the speakers 5 Connecting Audio from External Components 7 Using Internet@TV<br />
4. With the product turned off, insert the TX card into the TX Card Connection (WIRELESS) on the back of<br />
the Subwoofer.<br />
• Hold the TX card so that the label "WIRELESS" faces leftward and insert the card into the port.<br />
• The TX card enables communication between the product and the wireless receiver module.<br />
5.<br />
6.<br />
7.<br />
Connect the left and right surround speakers to the wireless receiver module.<br />
Plug the power cord of the wireless receiver module into the wall outlet.<br />
Turn on the product. The product and wireless receiver module will communicate with each other<br />
and you will hear sound from the Surround speakers.<br />
TX card<br />
Attach the ferrite core (Large) as close to AUX IN as<br />
possible with no loop of core made on the audio cable.<br />
Audio Cable (not supplied)<br />
If the external analog component has only one<br />
Audio Out, connect either left or right.<br />
Connect this product to a network to download various for-a-fee or free-of-charge applications.<br />
Enjoy contents such as news, weather forecast, stock market quotes, games, movies, and music.<br />
You can also initiate this function by pressing the INTERNET@ button on the remote control.<br />
INTERNET<br />
@<br />
!<br />
✎<br />
4 Connecting External Devices to Your TV via HDMI<br />
HDMI OUT : Connecting to a TV with an HDMI Cable<br />
Connect an HDMI cable (not supplied) from the HDMI OUT jack on the back of the subwoofer to the HDMI IN jack on your TV.<br />
HDMI IN : Connecting to an External Component with an HDMI Cable<br />
1.<br />
2.<br />
CAUTION<br />
<br />
<br />
<br />
<br />
Do not let children play with or near the speakers. They could get hurt if a speaker falls.<br />
When connecting the speaker wires to the speakers, make sure that the polarity (+/ –) is correct.<br />
Keep the subwoofer speaker out of reach of children to prevent children from inserting their hands or alien<br />
substances into the duct (hole) of the subwoofer speaker.<br />
Do not hang the subwoofer on the wall through the duct (hole).<br />
NOTE<br />
If you place a speaker near your TV set, screen color may be distorted because of the magnetic fi eld generated<br />
by the speaker. If this occurs, move the speaker away from your TV set.<br />
HDMI is a standard digital interface for connection to such devices as a TV, projector, DVD player, <strong>Blu</strong>-<strong>ray</strong> player, set top box and more.<br />
HDMI removes any loss of signal from analog conversion, enabling you to enjoy video and audio sound quality as it was originally created in the<br />
digital source.<br />
Loop the HDMI cable once and attach<br />
the ferrite core (Large) as shown.<br />
Attach one ferrite core (large) to the cable that is<br />
connected to HDMI OUT; attach the other one to the<br />
cable that is connected to either HDMI1 or HDMI2.<br />
HDMI OUT<br />
HDMI IN<br />
HDMI IN<br />
SAT<br />
(Satellite/Set top box)<br />
DVD or <strong>Blu</strong>-<strong>ray</strong> Player<br />
Connect an HDMI cable (not supplied) from the HDMI IN1 or HDMI IN2 jack on the back of the product to the HDMI OUT jack on<br />
your digital devices.<br />
Press the FUNCTION button to select HDMI1 or HDMI2 input.<br />
The mode switches as follows : BD/DVD D. IN AUX iPod HDMI1 HDMI2 TUNER<br />
OPTICAL : Connecting an External Digital Component<br />
For components with digital optical audio signals such as a Cable Box/Satellite receiver (Set-Top Box).<br />
1. Connect the Digital Input (OPTICAL) on the product to the Digital Audio Output of the external digital component using a digital optical<br />
cable.<br />
2. Press the FUNCTION button on the product to select D.IN input.<br />
• The mode switches as follows : BD/DVD D. IN AUX iPod HDMI1 HDMI2 TUNER<br />
✎<br />
NOTE<br />
<br />
<br />
To see video from your Cable Box/Satellite receiver, you must connect its video output directly to a TV.<br />
If you are using a digital optical connection for audio, do not connect the Cable Box/Satellite receiver to your home theater<br />
using an HDMI connection.<br />
AUX : Connecting an External Analog Component<br />
For analog audio signal components such as a VCR.<br />
1. Connect AUX IN (Audio) on the product to the Audio Out of the external analog component.<br />
• Be sure to match connector colors.<br />
2. Press the FUNCTION button on the remote control to select AUX input.<br />
• The mode switches as follows : BD/DVD D. IN AUX iPod HDMI1 HDMI2 TUNER<br />
✎<br />
NOTE<br />
You can connect the Video Output jack of your VCR to the TV, and connect the Audio Output jacks of the VCR to this product.<br />
6 Playing <strong>3D</strong> contents<br />
This product can play <strong>3D</strong> contents through an HDMI cable. To implement the <strong>3D</strong> effect,<br />
connect a <strong>3D</strong> device (<strong>3D</strong>-compliant AV receiver, <strong>3D</strong>-compliant TV) to the product using an<br />
HDMI cable, and play the <strong>3D</strong> content while wearing <strong>3D</strong> vision glasses.<br />
Selecting the <strong>3D</strong> Function<br />
Red<br />
White<br />
Optical Cable<br />
(not supplied)<br />
1. Move to <strong>Home</strong> menu.<br />
2. Press the ◄► buttons to select Settings, and then press the ENTER button.<br />
3. Press the ▲▼ buttons to select Display, and then press the ENTER button.<br />
4. Press the ▲▼ buttons to select <strong>3D</strong>, and then press the ENTER button.<br />
- You can select a desired <strong>3D</strong> Mode or TV Screen Size.<br />
AUX<br />
Set-Top Box<br />
OPTICAL<br />
VCR<br />
Settings<br />
Display<br />
<strong>3D</strong><br />
Audio<br />
<strong>3D</strong><br />
<strong>System</strong><br />
<strong>3D</strong> Mode<br />
Network<br />
TV Screen Size :<br />
: Auto<br />
55 inch<br />
Language<br />
Security<br />
General<br />
Support<br />
> Move<br />
Still Mode<br />
s Select r Return<br />
: Auto<br />
1.<br />
2.<br />
3.<br />
4.<br />
✎<br />
Move to the home menu.<br />
- The home menu appears when you power on the product.<br />
Use the ◄► buttons to select Internet@TV and press the ENTER button.<br />
In the start screen of the Internet@TV service, you will see the service agreement<br />
screen. You must agree to the service terms and conditions before you can use<br />
the Internet@TV service.<br />
After you have signed off on the service agreement, the Internet@TV service<br />
starts updating. It takes several minutes. When the update is complete, you will<br />
see the Internet@TV menu screen.<br />
Internet@TV at a Glance<br />
1 Commercial : A <strong>Samsung</strong> commercial appears.<br />
2 Recommended : Recommended contents, which are always displayed.<br />
3 My Application : Displays a list of service contents available.<br />
4 Navigation Help : Displays remote control buttons available.<br />
5 Settings : You can set the system values and create acconuts, etc.<br />
6<br />
NOTE<br />
<br />
<br />
<br />
<br />
<strong>Samsung</strong> AppS : You can download various for-a-fee or free-of-charge widget<br />
services.<br />
<strong>Samsung</strong> Electronics shall take no legal responsibility for any interruption of the Internet@TV service caused by the service<br />
provider for any reasons.<br />
The Internet@TV service is to download and process data via the Internet so that you can enjoy the contents on the TV screen.<br />
If the Internet connection is unstable, the service may be delayed or interrupted. If the connection is especially unstable, your<br />
home theater may turn off automatically.<br />
If this occurs, check the Internet connection and try again.<br />
For more information about an Internet@TV service, visit the web site of the applicable service provider.<br />
The provided services are subject to change, depending on the Internet@TV service provider.<br />
1<br />
Please activate Internet@TV internet radio service You Tube<br />
to enjoy a variety of Internet Services.<br />
No Disc a Change Device d View Devices " Enter<br />
<strong>Samsung</strong> AppS Settings<br />
Recommended<br />
Contents 1 Contents 2 Contents 3 Contents 4<br />
My Applications<br />
Contents 1 Contents 2 Contents 3<br />
6 5 4<br />
2 3<br />
by Date 1/3<br />
a Login b Mark as Favorite d Sort by ' Return<br />
4 - English<br />
5 - English 6 - English AH68-02298Y


