55875220

You also want an ePaper? Increase the reach of your titles
YUMPU automatically turns print PDFs into web optimized ePapers that Google loves.
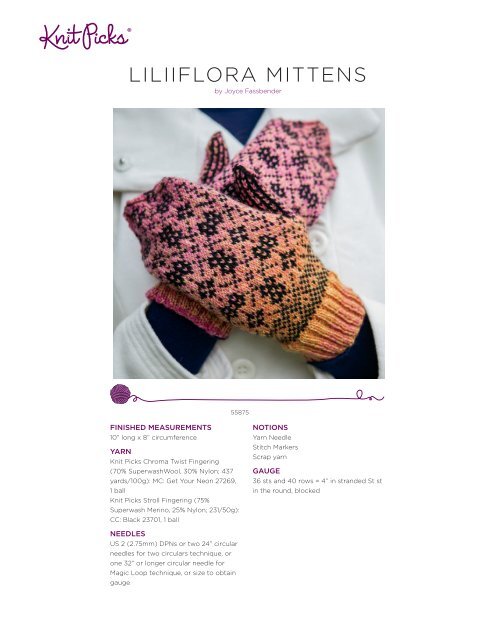
LILIIFLORA MITTENS<br />
by Joyce Fassbender<br />
55875<br />
FINISHED MEASUREMENTS<br />
10” long x 8” circumference<br />
YARN<br />
Knit Picks Chroma Twist Fingering<br />
(70% SuperwashWool, 30% Nylon; 437<br />
yards/100g): MC: Get Your Neon 27269,<br />
1 ball<br />
Knit Picks Stroll Fingering (75%<br />
Superwash Merino, 25% Nylon; 231/50g):<br />
CC: Black 23701, 1 ball<br />
NOTIONS<br />
Yarn Needle<br />
Stitch Markers<br />
Scrap yarn<br />
GAUGE<br />
36 sts and 40 rows = 4” in stranded St st<br />
in the round, blocked<br />
NEEDLES<br />
US 2 (2.75mm) DPNs or two 24” circular<br />
needles for two circulars technique, or<br />
one 32” or longer circular needle for<br />
Magic Loop technique, or size to obtain<br />
gauge
Liliiflora Mittens<br />
Notes:<br />
These mittens are worked in stranded knitting from the cuff up.<br />
The cuff is worked first, then the body. The thumb is worked after<br />
the body has been completed.<br />
DIRECTIONS<br />
Cast on 72 sts in MC using long tail cast on. Join in the round,<br />
taking care not to twist.<br />
Cuff<br />
Rnd 1: *K2, P2,* repeat * to * 18 times.<br />
Repeat rnd 1 until piece measures 2 inches from cast on edge.<br />
Hand<br />
Attach CC without breaking MC.<br />
Begin working Chart 1.<br />
Work rnds 1 – 22.<br />
Work rnd 23 as indicated in thumb instructions below.<br />
Work rnds 24 – 80.<br />
At end of chart 1, you should have 10sts remaining on needles.<br />
Using MC, graft together remaining sts.<br />
Thumb<br />
Right Mitten<br />
On rnd 23: Work one stitch. Work the next 13 sts using scrap yarn<br />
(indicated by the first red box on Chart 1). Work remaining sts of<br />
rnd as indicated on chart.<br />
Left Mitten<br />
On rnd 23: Work 22 sts. Work the next 13 stitches using scrap<br />
yarn (indicated by the second red box on Chart 1). Work<br />
remaining stitches of rnd as indicated on chart.<br />
Both mittens<br />
Carefully place the 13 stitches in the rnd directly below and the<br />
13 stitches in the rnd directly above the waste yarn onto needles.<br />
Remove waste yarn. You should now have 26 live stitches on the<br />
needles.<br />
With palm of mitten facing you, attach yarn to first stitch on the<br />
right.<br />
Work rnds 1 – 25 of Chart 2 in the round.<br />
After rnd 25, break yarn and run it through the remaining stitches.<br />
Finishing<br />
Weave in ends and wash. Block and lay flat to dry.
Chart 1<br />
72 71 70 69 68 67 66 65 64 63 62 61 60 59 58 57 56 55 54 53 52 51 50 49 48 47 46 45 44 43 42 41 40 39 38 37 36 35 34 33 32 31 30 29 28 27 26 25 24 23 22 21 20 19 18 17 16 15 14 13 12 11 10 9 8 7 6 5 4 3 2 1<br />
80<br />
79<br />
78<br />
77<br />
76<br />
75<br />
74<br />
73<br />
72<br />
71<br />
70<br />
69<br />
68<br />
Legend<br />
knit<br />
knit stitch<br />
No Stitch<br />
Placeholder - No stitch made<br />
ssk<br />
Slip one stitch as if to knit, Sl<br />
stitch as if to knit. Insert leftinto<br />
front of these 2 stitches<br />
them together<br />
k2tog<br />
Knit two stitches together as<br />
67<br />
66<br />
65<br />
64<br />
63<br />
62<br />
61<br />
60<br />
59<br />
MC<br />
CC<br />
Thumb placement<br />
58<br />
57<br />
56<br />
55<br />
54<br />
53<br />
52<br />
51<br />
50<br />
49<br />
48<br />
47<br />
46<br />
45<br />
44<br />
43<br />
42<br />
41<br />
40<br />
39<br />
38<br />
37<br />
36<br />
35<br />
34<br />
33<br />
32<br />
31<br />
30<br />
29<br />
28<br />
27<br />
26<br />
25<br />
24<br />
23<br />
22<br />
21<br />
20<br />
19<br />
18<br />
17<br />
16<br />
15<br />
14<br />
13<br />
12<br />
11<br />
10<br />
9<br />
8<br />
7<br />
6<br />
5<br />
4<br />
3<br />
2<br />
1<br />
Chart 2<br />
26 25 24 23 22 21 20 19 18 17 16 15 14 13 12 11 10 9 8 7 6 5 4 3 2 1<br />
56 55 54 53 52 51 50 49 48 47 46 45 44 43 42 41 40 39 38 37 36 35 34 33 32 31 30 29 28 27 26 25 24 23 22 21 20 19 18 17 16 15 14 13 12 11 10 9 8 7 6 5 4 3 2 1<br />
25<br />
80<br />
24<br />
79<br />
23<br />
78<br />
77<br />
22<br />
76<br />
21<br />
75<br />
20<br />
74<br />
73<br />
19<br />
72<br />
18<br />
71<br />
70<br />
17<br />
69<br />
16<br />
68<br />
15<br />
67<br />
66<br />
14<br />
65<br />
13<br />
64<br />
12<br />
63<br />
62<br />
11<br />
61<br />
10<br />
60<br />
9<br />
59<br />
58<br />
8<br />
57<br />
7<br />
56<br />
55<br />
6<br />
54<br />
5<br />
53<br />
4<br />
52<br />
51<br />
3<br />
50<br />
2<br />
49<br />
1<br />
48<br />
47<br />
Legend<br />
knit<br />
knit stitch<br />
No Stitch<br />
Placeholder - No stitch made.<br />
ssk<br />
Slip one stitch as if to knit, Slip another<br />
stitch as if to knit. Insert left-hand needle<br />
into front of these 2 stitches and knit<br />
them together<br />
k2tog<br />
Knit two stitches together as one stitch<br />
MC<br />
CC<br />
Thumb placement<br />
Liliiflora Mittens 3<br />
46<br />
45<br />
44<br />
43
About the Designer<br />
Joyce Fassbender is a biology lecturer in New York<br />
City. She recently got a puppy that she’s training to<br />
be a good knitting dog, but not to knit because, sadly,<br />
it can’t hold the needles. When not playing with the<br />
puppy, she’s obsessing over shawls and lace<br />
For pattern support, please contact joycef2@gmail.com<br />
Abbreviations<br />
BO bind off<br />
cn cable needle<br />
CC contrast color<br />
CDD Centered double dec<br />
CO cast on<br />
cont continue<br />
dec decrease(es)<br />
DPN(s) double pointed<br />
needle(s)<br />
EOR every other row<br />
inc increase<br />
K knit<br />
K2tog knit two sts together<br />
KFB knit into the front and<br />
back of stitch<br />
K-wise knitwise<br />
LH left hand<br />
M<br />
M1<br />
M1L<br />
M1R<br />
MC<br />
P<br />
P2tog<br />
PM<br />
PFB<br />
PSSO<br />
PU<br />
P-wise<br />
rep<br />
marker<br />
make one stitch<br />
make one left-leaning<br />
stitch<br />
make one right-leaning<br />
stitch<br />
main color<br />
purl<br />
purl 2 sts together<br />
place marker<br />
purl into the front and<br />
back of stitch<br />
pass slipped stitch<br />
over<br />
pick up<br />
purlwise<br />
repeat<br />
Rev St st reverse stockinette<br />
RH<br />
rnd(s)<br />
RS<br />
Sk<br />
Sk2p<br />
SKP<br />
SL<br />
SM<br />
SSK<br />
SSP<br />
SSSK<br />
St st<br />
sts<br />
stitch<br />
right hand<br />
round(s)<br />
right side<br />
skip<br />
sl 1, k2tog, pass<br />
slipped stitch over<br />
k2tog: 2 sts dec<br />
sl, k, psso: 1 st dec<br />
slip<br />
slip marker<br />
sl, sl, k these 2 sts tog<br />
sl, sl, p these 2 sts tog<br />
tbl<br />
sl, sl, sl, k these 3 sts<br />
tog<br />
stockinette stitch<br />
stitch(es)<br />
TBL<br />
TFL<br />
tog<br />
W&T<br />
WE<br />
WS<br />
WYIB<br />
WYIF<br />
YO<br />
through back loop<br />
through front loop<br />
together<br />
wrap & turn (see<br />
specific instructions<br />
in pattern)<br />
work even<br />
wrong side<br />
with yarn in back<br />
with yarn in front<br />
yarn over<br />
4 Liliiflora Mittens