3D Artist - Zbrush
3D Artist magazine is one of the best creative magazines that are available in market. 3D Artist contains the tutorials, tips, how to, concepts etc. 3D Artist magazine is made by the one of the best creative peoples. The main idea or the mission behind the 3D Artist is to spread and focus on creative stuff.
3D Artist magazine is one of the best creative magazines that are available in market. 3D Artist contains the tutorials, tips, how to, concepts etc. 3D Artist magazine is made by the one of the best creative peoples. The main idea or the mission behind the 3D Artist is to spread and focus on creative stuff.

Create successful ePaper yourself
Turn your PDF publications into a flip-book with our unique Google optimized e-Paper software.
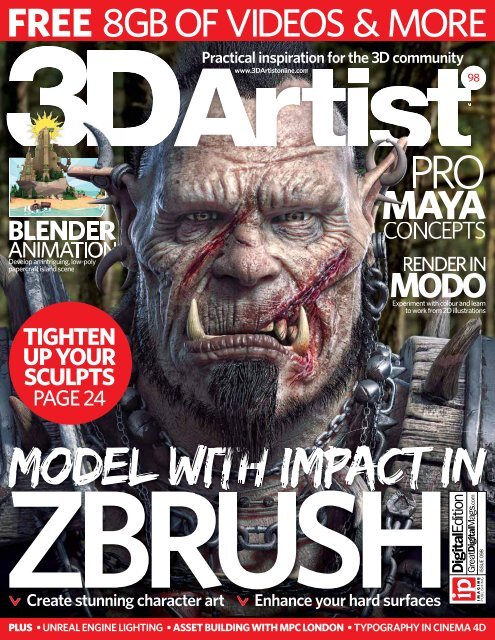
FREE 8GB OF VIDEOS & MORE<br />
Practical inspiration for the <strong>3D</strong> community<br />
www.<strong>3D</strong><strong>Artist</strong>online.com<br />
98<br />
BLENDER<br />
ANIMATION<br />
Develop an intriguing, low-poly<br />
papercraft island scene<br />
TIGHTEN<br />
UP YOUR<br />
SCULPTS<br />
PAGE 24<br />
PRO<br />
MAYA<br />
CONCEPTS<br />
RENDER IN<br />
MODO<br />
Experiment with colour and learn<br />
to work from 2D illustrations<br />
MODEL WITH IMPACT IN<br />
ZBRUSH<br />
Create stunning character art<br />
Enhance your hard surfaces<br />
PLUS • UNREAL ENGINE LIGHTING • ASSET BUILDING WITH MPC LONDON • TYPOGRAPHY IN CINEMA 4D<br />
ISSUE 098
After I finished the<br />
initial block out, I<br />
imported the orc into<br />
ZBrush and started<br />
sculpting the primary<br />
shape of the face<br />
Reza Abedi<br />
reveals how he<br />
created his<br />
stunning orc<br />
render Page 26<br />
Tighten up<br />
your ZBrush<br />
sculpts<br />
Page 24<br />
Reza Abedi<br />
rezaabedi.artstation.com<br />
Software ZBrush, 3ds Max,<br />
Substance Painter<br />
3
Where does the time go?<br />
ZBrush 4R7 is now<br />
over 18 months old,<br />
and in that time the community<br />
has wholly embraced the new<br />
tools that Pixologic squeezed in<br />
there like ZModeler, NanoMesh,<br />
ArrayMesh and the ZBrush to<br />
KeyShot Bridge. The release of<br />
4R7 took ZBrush from being a superb sculpting<br />
solution to being the ultimate tool for modellers.<br />
Now, of course, we’re all (kind of) patiently waiting<br />
for any whisper of ZBrush 5. Pixologic is fairly secretive<br />
about these things and isn’t a company to adhere to<br />
regular, yearly releases, so we’ll leave a big question<br />
mark next to that one for now. Perhaps when January<br />
rolls around and 4R7 hits the two-year mark we might<br />
hear some rumblings coming out of Los Angeles, but<br />
for now, there are plenty of exciting features for you to<br />
explore in the current release.<br />
Whether you’re new to ZBrush, or it’s your bread<br />
and butter, our cover feature will guide you through five<br />
interesting projects in different, distinctive styles that<br />
will help you to enhance your own work today. As well<br />
as another incredible array of tutorials, we’ve also been<br />
lucky enough to chat to MPC about its incredible asset<br />
pipeline this month and Blender fans can get stuck into<br />
an awesome papercraft animation project. Enjoy!<br />
Steve Holmes, Editor<br />
MPC shows off its<br />
best assets Page 32<br />
Sign up, share your art and chat to other artists at www.3dartistonline.com<br />
Get in touch...<br />
3dartist@imagine-publishing.co.uk<br />
@<strong>3D</strong><strong>Artist</strong><br />
Facebook.com/<strong>3D</strong><strong>Artist</strong>Magazine<br />
Imagine Publishing Ltd<br />
Richmond House, 33 Richmond Hill<br />
Bournemouth, Dorset BH2 6EZ<br />
☎ +44 (0) 1202 586200<br />
Web: www.imagine-publishing.co.uk<br />
www.3dartistonline.com<br />
www.greatdigitalmags.com<br />
Magazine team<br />
Editor Steve Holmes<br />
stephen.holmes@imagine-publishing.co.uk<br />
☎ 01202 586248<br />
Features Editor Carrie Mok<br />
Art Editor Newton Ribeiro de Oliveira<br />
Editor in Chief Amy Hennessey<br />
Senior Art Editor Will Shum<br />
Photographer James Sheppard<br />
Publishing Director Aaron Asadi<br />
Head of Design Ross Andrews<br />
Contributors<br />
Orestis Bastounis, James Brady, Pablo M Bravo, Paul<br />
Chambers, Paul Champion, Vikrant Dalal, Daniel D’avila,<br />
Rainer Duda, Ian Failes, Philippa Grafton, Sean Kennedy,<br />
Alvaro Ferrer Matas, Ermanno Di Nicola, Igor Sobolevsky<br />
Advertising<br />
Digital or printed media packs are available on request.<br />
Head of Sales Hang Deretz ☎ 01202 586442<br />
hang.deretz@imagine-publishing.co.uk<br />
Account Manager Simon Hall ☎ 01202 586415<br />
simon.hall@imagine-publishing.co.uk<br />
FileSilo.co.uk<br />
Assets and resource files for this magazine can be found on<br />
this website. Register now to unlock thousands of useful files.<br />
Support: filesilohelp@imagine-publishing.co.uk<br />
International<br />
<strong>3D</strong> <strong>Artist</strong> is available for licensing. Contact the International<br />
department to discuss partnership opportunities.<br />
Head of International Licensing Cathy Blackman<br />
☎ +44 (0) 1202 586401<br />
licensing@imagine-publishing.co.uk<br />
Subscriptions<br />
For all subscription enquiries:<br />
3dartist@servicehelpline.co.uk<br />
☎ UK 0844 249 0472<br />
☎ Overseas +44 (0) 1795 592951<br />
www.imaginesubs.co.uk<br />
Head of Subscriptions Sharon Todd<br />
Circulation<br />
Circulation Director Darren Pearce ☎ 01202 586200<br />
Production<br />
Production Director Jane Hawkins ☎ 01202 586200<br />
Finance<br />
Finance Director Marco Peroni<br />
Founder<br />
Group Managing Director Damian Butt<br />
Printing & Distribution<br />
Printed by William Gibbons & Sons Ltd, 26 Planetary Road,<br />
Willenhall, West Midlands, WV13 3XT<br />
Distributed in the UK, Eire & the Rest of the World by Marketforce,<br />
5 Churchill Place, Canary Wharf, London E14 5HU<br />
☎ 0203 787 9060, www.marketforce.co.uk<br />
Distributed in Australia by Gordon & Gotch Australia Pty Ltd, 26<br />
Rodborough Road, Frenchs Forest NSW 2086, Australia<br />
☎ +61 2 9972 8800, www.gordongotch.com.au<br />
Disclaimer<br />
The publisher cannot accept responsibility for any unsolicited<br />
material lost or damaged in the post. All text and layout is the<br />
copyright of Imagine Publishing Ltd. Nothing in this magazine<br />
may be reproduced in whole or part without the written<br />
permission of the publisher. All copyrights are recognised and<br />
used specifically for the purpose of criticism and review.<br />
Although the magazine has endeavoured to ensure all<br />
information is correct at time of print, prices and availability may<br />
change. This magazine is fully independent and not affiliated in<br />
any way with the companies mentioned herein. If you submit<br />
material to Imagine Publishing via post, email, social network or<br />
any other means, you automatically grant Imagine Publishing an<br />
irrevocable, perpetual, royalty-free license to use the material<br />
across its entire portfolio, in print, online and digital, and to<br />
deliver the material to existing and future clients, including but<br />
not limited to international licensees for reproduction in<br />
international, licensed editions of Imagine products. Any<br />
material you submit is sent at your risk and, although every care<br />
is taken, neither Imagine Publishing nor its employees, agents<br />
or subcontractors shall be liable for the loss or damage.<br />
© Imagine Publishing Ltd 2016<br />
ISSN 1759-9636<br />
4
Mac OS X<br />
Windows<br />
Linux<br />
FUSION 8<br />
The world’s most advanced visual effects and motion graphics<br />
software is now available on Linux as well as Mac and Windows!<br />
For over 25 years Fusion has been used to create visual effects on<br />
thousands of blockbuster films, TV shows and commercials. Fusion<br />
features an easy to use and powerful node based interface, a massive<br />
tool set, true <strong>3D</strong> workspace and GPU accelerated performance all in<br />
a single application! Now with support for Linux, Fusion 8.2 is easier<br />
than ever to integrate into your existing VFX pipeline!<br />
Hollywood’s Secret Weapon<br />
Fusion has been used to create groundbreaking visual effects and<br />
motion graphics for Hollywood films such as The Martian, Thor and The<br />
Hunger Games, as well as on hit television shows like Orphan Black,<br />
Breaking Bad, Grimm and Battlestar Galactica! If you’ve ever gone to<br />
the movies or watched television, then you’ve seen Fusion in action!<br />
Work Faster with Nodes<br />
Fusion uses nodes to represent effects and filters that can be<br />
connected together to easily build up larger and more sophisticated<br />
visual effects! Nodes are organized like a flow chart so you can easily<br />
visualize complex scenes. Clicking on a node lets you quickly make<br />
adjustments, without having to hunt through layers on a timeline!<br />
Incredible Creative Tools<br />
Whether you need to pull a key, track objects, retouch images, animate<br />
titles, or create amazing <strong>3D</strong> particle effects, Fusion has the creative<br />
tools you need! You get a true <strong>3D</strong> workspace, the ability to import <strong>3D</strong><br />
models and scenes from software like Maya and 3ds Max, along with<br />
hundreds of tools for compositing, paint, animation and more!<br />
Scaleable Studio Power<br />
Fusion’s GPU acceleration gives instant feedback while you work, so you<br />
spend more time being creative and less time waiting! Fusion 8 Studio<br />
also includes optical flow and stereoscopic <strong>3D</strong> tools, along with unlimited<br />
free network rendering and tools to manage multi user workflows, track<br />
assets, assign tasks, review and approve shots, and more!<br />
FUSION <br />
For Mac OS X, Windows and Linux<br />
Free Download<br />
FUSION STUDIO £755*<br />
For Mac OS X, Windows and Linux<br />
www.blackmagicdesign.com/uk<br />
*SRP is Exclusive of VAT.
This issue’s team of pro artists…<br />
REZA ABEDI<br />
rezaabedi.artstation.com<br />
Reza used ZBrush to sculpt his fantastic<br />
cover image, and you can join him and<br />
four other talented artists on p24 for their<br />
top workflow and style guides in the<br />
sculpting package.<br />
<strong>3D</strong><strong>Artist</strong> username RezaAbedi<br />
PAUL CHAMBERS<br />
paulchambers<strong>3D</strong>.com<br />
We saw Paul’s incredible Blender<br />
animation online a while back and<br />
decided to make it into a feature! Find out<br />
how to create a papercraft world of your<br />
own on p40.<br />
<strong>3D</strong><strong>Artist</strong> username paulchambers<strong>3D</strong><br />
IGOR SOBOLEVSKY<br />
www.artstation.com/artist/igoq<br />
Igor returns to the magazine this month<br />
to show off his admirable vehicle design<br />
skills in Maya, which will help you develop<br />
your own futuristic concepts. You’ll find<br />
his tutorial on p48.<br />
<strong>3D</strong><strong>Artist</strong> username igoq<br />
ALVARO MATAS & PABLO M BRAVO<br />
jenue.net<br />
There’s a lot to be said for creating<br />
typography for advertising and more in<br />
<strong>3D</strong> rather than relying on traditional<br />
methods. Join Alvaro and Pablo on p56<br />
for their Cinema 4D masterclass.<br />
<strong>3D</strong><strong>Artist</strong> username n/a<br />
DANIEL D’AVILA<br />
davilastudio.com<br />
If you want to create colourful and diverse<br />
abstract renders, look no further than<br />
Daniel’s expert MODO tutorial on p62.<br />
His crazy render is based on a 2D<br />
illustration and has loads of character.<br />
<strong>3D</strong><strong>Artist</strong> username dddavila<br />
JAMES BRADY<br />
www.artstation.com/artist/jamesbrady<br />
Any of you that played the Silent Hill<br />
games back in the day will remember<br />
how oppressive and frightening the<br />
environments were. James has used this<br />
as his inspiration on p68.<br />
<strong>3D</strong><strong>Artist</strong> username Sabertooth_00<br />
SEAN KENNEDY<br />
openvisualfx.com<br />
Once again, Sean is on hand to show us<br />
just how diverse Blender is with an expert<br />
matchmove and compositing tutorial on<br />
p72. Make sure you download all the<br />
supporting files from FileSilo!<br />
<strong>3D</strong><strong>Artist</strong> username hyperfx<br />
VIKRANT DALAL<br />
project01studio.blogspot.in<br />
Motion graphics feature heavily in all<br />
walks of CG nowadays, from film and<br />
games right through to advertising.<br />
Create your own in 3ds Max with<br />
Vikrant’s guide on p76.<br />
<strong>3D</strong><strong>Artist</strong> username vikrant_dalal<br />
PAUL CHAMPION<br />
linkedin.com/in/pchampion<br />
As a demonstrator at Bournemouth<br />
University’s NCCA, Paul spends half of<br />
his life in Maya, making him the perfect<br />
person to review Maya 2017. Find out<br />
what he thought on p84.<br />
<strong>3D</strong><strong>Artist</strong> username Rocker<br />
6
The fastest<br />
just got faster.<br />
Fusion Render OC II M4000<br />
Professional <strong>3D</strong> Editing Workstation<br />
- Intel® Core i7-6800K “Broadwell-E” Processor<br />
- NVIDIA Quadro M4000 8GB<br />
- 512GB PCIe SSD<br />
From £2869.99<br />
For full specs please visit: www.chillblast.com/Render2<br />
First with the latest technology<br />
Chillblast<br />
www.chillblast.com/Render2<br />
Call our sales team on 01202 057 275<br />
Intel, the Intel Logo, Intel Inside, Intel Core, Core Inside are trademarks of Intel Corporation in the U.S. and/or other countries.<br />
Price is correct at time of going to press (18-07-16) E&OE
What’s in the magazine and where<br />
News, reviews<br />
& features<br />
12 The Gallery<br />
A hand-picked collection of incredible<br />
artwork to inspire you<br />
24 Model with Impact in ZBrush<br />
Incredible guides to get you sculpting,<br />
modelling hard surfaces and more<br />
32 Showing Off Your Best Assets<br />
We sit down with MPC for an exclusive<br />
look at its <strong>3D</strong> asset pipeline<br />
40 Papercraft Adventures in Blender<br />
Paul Chambers teaches you how to create<br />
a unique environment and how to animate<br />
it all with Blender<br />
79 Technique Focus: Lightfoot<br />
Jake Denham tells us how he lit an<br />
environment with an HDRI and V-Ray<br />
80 Subscribe today!<br />
Save money and never miss an issue by<br />
snapping up a subscription<br />
82 Review: NVIDIA GeForce GTX 1080<br />
Should you get this new gaming card from<br />
NVIDIA or wait for the new Quadros?<br />
84 Review: Maya 2017<br />
With the removal of mental ray in favour<br />
of Arnold, Paul Champion deciphers if<br />
Maya 2017 is worth a look in<br />
86 Review: Redshift 2.0<br />
Rainer Duda takes the new version of<br />
Redshift for a rendering test drive<br />
88 Technique Focus: Eight Reasons<br />
Jose Klaus González Rohbrandt highlights<br />
how he created believable underwater<br />
textures for his scene<br />
98 Technique Focus: Turbulent Lion<br />
Keita Okada tells us the virtues of being<br />
more free with your modelling<br />
40<br />
Go an extra<br />
step beyond<br />
low-poly by finding<br />
or making tileable<br />
paper textures<br />
Paul Chambers on creating<br />
his papercraft style Page 42<br />
Nvidia GeForce<br />
GTX 1080<br />
82<br />
Achieve atmospheric<br />
lighting in Unreal Engine<br />
Get a year free<br />
SUBSCRIBE TODAY<br />
68<br />
72<br />
Turn to<br />
page 80<br />
for details<br />
Matchmove a<br />
scene for<br />
compositing<br />
8
Learn to sculpt<br />
complex type<br />
56<br />
62<br />
Advanced shaders and<br />
rendering in MODO<br />
The Pipeline<br />
48 Step by step: Develop stunning<br />
vehicle concepts in Maya<br />
Igor Sobolevsky drives us through<br />
the creation process of incredible<br />
vehicle renders<br />
56 Step by step: Learn to sculpt<br />
complex type<br />
Alvaro Matas and Pablo M Bravo<br />
show you top tips for modelling<br />
typography with Cinema 4D<br />
Usually we have to<br />
find the most realistic<br />
reference that we can<br />
and then make<br />
adjustments<br />
Giles Davies on creating photoreal<br />
characters for film Page 34<br />
32<br />
62 Step by step: Advanced<br />
shaders and rendering<br />
in MODO<br />
Get to grips with shading and<br />
lighting a colourful surreal scene<br />
with Daniel D’Avila<br />
68 Pipeline techniques: Achieve<br />
atmospheric lighting in<br />
Unreal Engine<br />
James Brady teaches us lighting<br />
theory and how to create realistic<br />
lighting with PBR materials<br />
72 Pipeline techniques:<br />
Matchmove a scene for<br />
compositing<br />
Use Blender and matte paintings to<br />
extend a scene<br />
76 Pipeline techniques: Create<br />
motion graphic text<br />
Master animated text effect<br />
techniques in 3ds Max<br />
The Hub<br />
92 Community news<br />
ZBrush Summit brings exclusive<br />
videogames content, plus the return<br />
of Trojan Horse was a Unicorn<br />
Develop stunning<br />
vehicle concepts<br />
in Maya<br />
48<br />
Model with Impact<br />
in ZBrush<br />
Visit the <strong>3D</strong> <strong>Artist</strong> online shop at<br />
for back issues, books and merchandise<br />
24<br />
94 Industry news<br />
Substance is now free for students<br />
and teachers, and Unity 5.4 brings<br />
the game engine up a notch<br />
96 Readers’ gallery<br />
The very best images of the month<br />
from our online community<br />
www.3dartistonline.com<br />
9
Free with<br />
your magazine<br />
Instant access to these incredible free gifts…<br />
2+ hours of videos<br />
from Pluralsight<br />
Build stylised game<br />
assets with ZBrush<br />
Register to get instant access<br />
to this pack of must-have<br />
creative resources, how-to<br />
videos and tutorial assets<br />
Premium CGAxis<br />
exterior models<br />
4 highly-detailed models<br />
with texture maps<br />
25 textures from<br />
<strong>3D</strong>Total.com<br />
Download a wide array of<br />
quality textures<br />
Log in to www.filesilo.co.uk/<strong>3D</strong><strong>Artist</strong><br />
Plus, all of this<br />
is yours too…<br />
• Scene assets, BLEND file, videos,<br />
hi-res screenshots and plate footage<br />
to accompany our Blender<br />
compositing masterclass<br />
• 3ds Max motion graphics scene files,<br />
screens and video<br />
• Loads of UE4 files and imagery to<br />
help you improve your atmospheric<br />
lighting in the engine<br />
• Mountains of quality screenshots to<br />
help you follow our tutorials<br />
Free<br />
for digital<br />
readers too!<br />
Read on your tablet,<br />
download on your<br />
computer
The home of great<br />
downloads – exclusive to<br />
your favourite magazines<br />
from Imagine Publishing<br />
Secure and safe online<br />
access, from anywhere<br />
Free access for every<br />
reader, print and digital<br />
Download only the files<br />
you want, when you want<br />
All your gifts, from all<br />
your issues, in one place<br />
Get started<br />
Everything you need to<br />
know about accessing<br />
your FileSilo account<br />
An incredible gift<br />
for subscribers<br />
Unlock<br />
every<br />
issue<br />
Follow the instructions<br />
01 on screen to create an<br />
account with our secure FileSilo<br />
system. Log in and unlock the<br />
issue by answering a simple<br />
question about the magazine.<br />
Subscribe today & unlock the free<br />
gifts from more than 30 issues<br />
Access our entire library of resources with a money saving<br />
subscription to the magazine – that’s more than 400 free resources<br />
You can access FileSilo<br />
02 on any computer, tablet<br />
or smartphone device using any<br />
popular browser. However, we<br />
recommend that you use a<br />
computer to download content,<br />
as you may not be able to<br />
download files to other devices.<br />
Over 50 hours<br />
of video guides<br />
The very best<br />
walkthroughs around<br />
More than<br />
800 textures<br />
Brought to you by<br />
quality vendors<br />
Hundreds of<br />
<strong>3D</strong> models<br />
Vehicles, foliage,<br />
furniture… it's all there<br />
If you have any<br />
03 problems with<br />
accessing content on FileSilo<br />
take a look at the FAQs online<br />
or email our team at the<br />
address below<br />
filesilohelp@imagine-publishing.co.uk<br />
Head to page 80 to subscribe now<br />
Already a print subscriber?<br />
Here’s how to unlock FileSilo today…<br />
Unlock the entire <strong>3D</strong> <strong>Artist</strong> FileSilo library with your unique Web<br />
ID – the eight-digit alphanumeric code that is printed above<br />
your address details on the mailing label of your subscription<br />
copies. It can also be found on any renewal letters.<br />
More than<br />
400 reasons<br />
to subscribe<br />
More<br />
added<br />
every<br />
issue
Have an image you feel passionate about? Get your artwork featured in these pages<br />
Create your gallery today at www.3dartistonline.com<br />
My goal was to create a<br />
short animation loop for fun,<br />
and there was this adorable fish<br />
model by Marlene Raml lying<br />
around, just waiting to be<br />
animated. I jumped into<br />
Houdini, played with the Grain<br />
tools, created the shaders and<br />
lights and I was good to go. For<br />
the look of the fish I wanted to<br />
create a stylised rubber-toy feel,<br />
and [I wanted] the background<br />
to be clean and colourful<br />
Philipp Buschauer,<br />
Blowfish, 2016<br />
12
Philipp Buschauer<br />
www.bit.ly/2bsufLi<br />
Philipp is a student from<br />
Austria finishing his Master’s<br />
degree in digital arts<br />
Software Houdini, Maya,<br />
Photoshop<br />
Work in progress…<br />
13
Pintea Andrei Catalin<br />
www.tegmark.net<br />
Graduate of the Architecture<br />
School at the Spiru Haret<br />
University in Bucharest<br />
Software 3ds Max, V-Ray,<br />
Photoshop<br />
Work in progress…<br />
In this image I tried<br />
to render a dystopian<br />
representation of<br />
Cyrus the Great. He<br />
was known to history<br />
as one of the greatest<br />
conquerors that ruled<br />
from the middle east<br />
all the way to<br />
the Balkans<br />
Pintea Andrei Catalin,<br />
Cyrus, 2016<br />
14
This is a concept I<br />
imagined in my home. It<br />
looks simple but cosy. I chose<br />
a blue colour scheme<br />
because I think it looks<br />
elegant but still modern, and I<br />
added an additional plant to<br />
make it look more fresh<br />
Ngurah Arya Hartawan,<br />
Blue Corner, 2016<br />
Ngurah A Hartawan<br />
behance.net/arcasso13<br />
Ngurah is a freelance <strong>3D</strong> artist<br />
with experience in <strong>3D</strong> visuals<br />
for arch vis and environments<br />
Software 3ds Max, V-Ray and<br />
Photoshop<br />
Work in progress…<br />
15
My first idea was to create an<br />
image in the visual style of Wes<br />
Anderson’s great movies.<br />
However, after brainstorming<br />
some ideas together with a friend<br />
of mine, there was little left of<br />
Anderson in the end. I saw this<br />
project also as an opportunity to<br />
try out Zacharias Reinhardt’s<br />
workflow as described in his<br />
great workshop ‘Movie Scene<br />
Creation in Blender <strong>3D</strong>’<br />
Lukas Walzer,<br />
High Tide, 2016<br />
Lukas Walzer<br />
www.lukas-walzer.de<br />
Lukas graduated with a degree<br />
in industrial design, though his<br />
interests include <strong>3D</strong> graphics<br />
Software Blender, Photoshop<br />
Work in progress…<br />
16
My idea came from<br />
fantasy novels and movies. I<br />
created an alien race leader<br />
– his body is very strong. It<br />
represents the power of the<br />
dark and he has powerful<br />
magic. It took me about six<br />
days to complete this work<br />
Xin Gao,<br />
The Night the Emperor, 2016<br />
Xin Gao<br />
ufocome.cgsociety.org<br />
Xin Gao makes iOS games, and<br />
is responsible for modelling,<br />
rendering and texturing<br />
Software ZBrush, Photoshop<br />
Work in progress…<br />
17
In depth<br />
18
Sérgio Merêces<br />
www.sergiomereces.com<br />
Sergio lives in Portugal and has<br />
been working on <strong>3D</strong><br />
visualisations for ten years<br />
Software 3ds Max, V-Ray<br />
Work in progress…<br />
This was a <strong>3D</strong> render of a<br />
place in nature to meditate. My<br />
goal was to create something<br />
unique with a lot of small details<br />
of nature, such as animals and<br />
ambient effects<br />
Sérgio Merêces, Meditation Garden, 2016<br />
19
Before I started,<br />
I began to research<br />
references and find<br />
inspiration. Next, I made<br />
some rough sketches on<br />
paper so that I could<br />
realise my ideas for the<br />
final image<br />
Sérgio Merêces,<br />
Meditation Garden, 2016<br />
COMPOSITION<br />
RIGHT For the composition, I explored my<br />
initial idea by drawing a basic sketch on paper<br />
with what I had in mind for the camera and<br />
composition. Then, after I had the terrain<br />
modelled, I begin to test all the scene objects<br />
in different configurations and positions until I<br />
was satisfied. I always observe the rule of<br />
thirds for all compositions.<br />
VEGETATION<br />
RIGHT The heart of this<br />
project was the vegetation<br />
and all the environment, so<br />
this is where I had to spend<br />
time featuring all the<br />
vegetation, such as grass,<br />
bushes, flowers and trees. For<br />
the grass I used Forest Pack<br />
presets, as well as for things<br />
like the water leaves and<br />
flowers. For the trees I used<br />
the Forest Pack plug-in for<br />
3ds Max, which always helps<br />
with vegetation. Its features<br />
let you do almost anything! I<br />
created a Forest Pack<br />
modifier for each different<br />
type of foliage.<br />
20
THE GALLERY<br />
LIGHTING AND MOOD<br />
The only scene light that I<br />
used for this project was a<br />
V-Ray dome with an HDRI.<br />
When you use an HDRI you<br />
must pay attention to<br />
increasing the dome<br />
samples to get a nice and<br />
clean result in the final<br />
render. The idea behind the<br />
mood was to get something<br />
shiny and warm to make the<br />
scene feel like summer.<br />
POST-PRODUCTION<br />
LEFT Post-production is<br />
always important to get nice<br />
colour corrections! For my<br />
personal projects I do<br />
everything in <strong>3D</strong>, so in the end<br />
for post-production I only do<br />
small colour corrections with<br />
Curves, Levels and the Photo<br />
Looks plug-in for Photoshop.<br />
The animals and people were<br />
added in post-production in<br />
this project.<br />
21
Reader Survey<br />
Have<br />
your<br />
say!<br />
Join our team today!<br />
Take our three-minute survey and…<br />
✓ Get 10% off our books and magazines<br />
✓ Get access to an exclusive monthly subscription offer<br />
✓ Become eligible for exclusive competitions & free gifts<br />
We absolutely love making <strong>3D</strong> <strong>Artist</strong><br />
and<br />
we hope you love reading it, too. This year<br />
we want to make it even better, so we’re<br />
asking for your help. By answering just a few<br />
questions, you could be selected to join the<br />
<strong>3D</strong> <strong>Artist</strong> reader panel! Whatever your skill<br />
level or discipline, I’m so excited to hear what<br />
you have to say about our CG coverage.<br />
Steve Holmes<br />
Editor
It’s ’<br />
quick and easy<br />
to take the survey<br />
on any device<br />
Only<br />
takes 3<br />
mins!<br />
Reader Survey<br />
Four changes<br />
you asked for<br />
in 2015…<br />
Last year we used your input<br />
to make some fantastic<br />
improvements, including…<br />
More artist interviews<br />
1 Since our last survey, we’ve<br />
acted on your desire for more<br />
artist-focused content with bigger<br />
and better interview-led features<br />
Take part in our 2016 reader survey and you<br />
can enjoy these fantastic benefits<br />
Exclusive discount subscription to the magazine<br />
Incredible savings for new and existing subscribers.<br />
Plus Free delivery direct to your door.<br />
Exclusive savings on mags and books<br />
Get a 10% discount code to use at our online shop<br />
Competitions<br />
Get the chance<br />
to enter exclusive<br />
competitions for<br />
money-can’t-buy prizes<br />
Free gifts<br />
Become eligible for<br />
free gifts including<br />
digital editions for<br />
phones and tablets<br />
Have your say<br />
Gain a place on our<br />
reader panel, giving<br />
you regular input on<br />
the magazine<br />
2<br />
Modelling tutorials<br />
No one part of the <strong>3D</strong> pipeline<br />
is more important than any other,<br />
but you called for more modelling<br />
guides and we provided just that<br />
3Videogames content<br />
We asked you which industry<br />
was the most appealing to work in.<br />
You chose games, so we added<br />
more asset and real-time tutorials<br />
Step 1<br />
Complete<br />
survey<br />
Step 2<br />
Get<br />
involved<br />
Step 3<br />
Earn<br />
rewards<br />
Complete our survey & join the team today<br />
www.3dartistonline.com/survey2016<br />
4<br />
Tips & Tricks<br />
You highlighted that tip-led<br />
features and easy-to-digest guides<br />
were important to you, so we’ve<br />
pulled out all the stops this year
MODEL WITH IMPACT IN ZBRUSH<br />
24
MODEL<br />
WITH IMPACTIN<br />
ZBRUSH<br />
<strong>3D</strong> <strong>Artist</strong> goes behind<br />
the scenes with the<br />
creators of five standout<br />
ZBrush projects<br />
Perhaps more than ever before, <strong>3D</strong> artists are<br />
able to imagine a diverse array of creatures,<br />
characters and non-organic objects. In this<br />
feature, we’re getting up close and personal with<br />
artists using ZBrush to craft anything from orcs<br />
and robots, to ornamental pillars. You’ll see some<br />
of their brush choice secrets and workflow tips for<br />
getting the best out of ZBrush. You’ll even find out<br />
shortcuts and special tricks for taking sculpts<br />
through to final renders.<br />
These artists are some of the best using ZBrush<br />
today, from major studio personnel to those<br />
working as freelancers. Follow along as they break<br />
down the stages of their creations, letting you see<br />
work-in-progress images, and give tips about how<br />
to master certain types of ZBrush sculpts, such as<br />
convincing sci-characters, or stylish, low-poly<br />
character renders. Either way, you’ll be inspired to<br />
keep creating.<br />
25
MODEL WITH IMPACT IN ZBRUSH<br />
ORCHESTRATING AN ORC<br />
Malaysia-based Reza Abedi breaks down the making of his <strong>3D</strong> warrior<br />
REZA ABEDI<br />
rezaabedi.artstation.com<br />
Character artist, Streamline Studios<br />
Get started I began with a DynaMesh<br />
01 Sphere and made the base mesh of the orc.<br />
When I finished the base mesh, I imported it into<br />
3ds Max and started to block out the armour and<br />
other objects. After I finished the block out, I<br />
imported the orc into ZBrush and started sculpting<br />
the primary shape of the face. The main brushes<br />
that I used at this level were the Standard , Move,<br />
ClayBuildup, Dam_Standard and Orb_Cracks.<br />
Add details To add in extra details I used<br />
02 some skin brushes. Some of these were<br />
gifts from my friend Rafael Souza and some of them<br />
are from Surface Mimic and Pixologic's Alpha<br />
Library. I tried to mix the brushes together to avoid<br />
using just one brush for each area.<br />
Create the wooden armour To make<br />
03 the wood armour, I unwrapped the base<br />
shape of wood before I imported it to ZBrush, then I<br />
made the wood pattern in Photoshop and imported<br />
as an Alpha in ZBrush. After that I masked the<br />
object by Alpha and inflated it. I added extra detail<br />
and more cracks with the Dam_standard and<br />
Orb_Cracks brushes.<br />
Generate orc hair For the beard and<br />
04 the hair I masked the area that I wanted<br />
and opened the FiberMesh tool menu, pressed the<br />
Preview and started to tweak the parameters.<br />
When I was happy with the length, thickness,<br />
gravity and the base shape of the hair, I generated<br />
the FiberMesh. With the GroomHairLong brush and<br />
the Move brush I changed the position of the hair.<br />
Texture the model After I completed<br />
05 the retopology and unwrapping of all the<br />
parts I started to bake the Normal map, ambient<br />
occlusion, curvature, world space normal, color ID<br />
and the Position map in Substance Designer. I<br />
attached the all parts together and imported it as a<br />
FBX file in Substance Painter. I linked all the maps<br />
that I baked in Substance Designer and started to<br />
make the textures.<br />
For some parts, such as the skin, I used the Smart<br />
Material as a base material and added extra layers<br />
and also hand painted on top of it. For some parts<br />
like the chains I just found some images on Google<br />
to use as a reference and tried to make the material<br />
from scratch.<br />
I used V-Ray for exporting the texture in<br />
Substance Painter and then I imported the textures<br />
into 3ds Max.<br />
The final look I did the retopology and<br />
06 imported the all parts in 3ds Max. I used<br />
V-Ray for this project and first of all applied the grey<br />
material to all parts and started to add light. Usually<br />
the first light is a Dome light as well as HDR images<br />
for me to make some nice ambient light. When I'm<br />
happy with the ambient light, then I will add the<br />
second light, which is the main light, and this light<br />
has nice shadow.<br />
When I was happy with the main light I turned it<br />
off and added the third light, keeping the dome light<br />
on. This light is the back light and I added a slight<br />
blue colour to it. Like the main light, I turned off the<br />
third light and added another back light that was<br />
warmer. After that, I turned all lights on and<br />
tweaked them a little until I was happy with it. When<br />
I was done with the lighting, I started to import the<br />
texture that I exported from Substance Painter and<br />
applied them to the V-Ray materials.<br />
01 02 03<br />
04 05 06<br />
26
27
STRIKING MODEL WITH PROJECTS IMPACT IN IN ZBRUSH<br />
CREATURE CREATION: BRUSH TIPS<br />
Tyler Smith annotates his dragon chicken sculpt with helpful brush tips<br />
TYLER SMITH<br />
tsmith3d.artstation.com<br />
Lead <strong>3D</strong> artist/creative director, Illfonic<br />
SKIN DETAILING<br />
--------------------------------------<br />
Here I’m going into the detail with<br />
a mixture of the Clay brush with<br />
Spray stroke and small pit<br />
mark-like Alphas. I’m also using<br />
skin Alphas with Drag Rectangle,<br />
but being very subtle about it. In<br />
my experience wrinkles should be<br />
treated with the large primary<br />
folds being sculpted by hand and<br />
laying smaller Alphas on top. I<br />
used more dragon inserts for the<br />
neck waddles and line Alphas with<br />
Lazy Mouse step to get more<br />
patterns in the skin.<br />
ROUGH SKETCHING<br />
-----------------------------------------<br />
I started with a long bird-like neck<br />
and built the makings of a fish and<br />
bird skull mashup with just the Move,<br />
ClayBuildUp and Dam_Standard/<br />
Mech Cut brushes. I kept it very low<br />
res and simple so no real detail could<br />
interfere with the overall design. I<br />
used DynaMesh to free up any<br />
radical form changes that I would<br />
want to make.<br />
UNLEASHING THE FORM<br />
-----------------------------------------------<br />
At this stage I am moving onto building<br />
anatomy and functionality into the form.<br />
Looking at a lot of both bird skull and fish<br />
skeleton anatomy, I built up the primary<br />
folds and bone protrusions in the flesh<br />
with the Dam_Standard brush. I’m also<br />
laying in the layers of flesh rolls onto the<br />
form using the Clay Build brush, doing lots<br />
of fine stokes and smoothing over them to<br />
get a nice and subtle form change.<br />
SHAPING UP<br />
-------------------------------------------<br />
Here I’m adding the teeth, a tongue<br />
and crest shapes to complete the<br />
overall silhouette using the fabulous<br />
Dragon Insert Mesh brush. I also used<br />
a simple torus to get the eye socket<br />
cavity shape and kept using the Mech<br />
Cut and Dam_Standard brushes to<br />
sharpen up the edges in the form.<br />
28
CRAFT LOW-POLY CHARACTERS<br />
Finnish <strong>3D</strong> artist Laura Peltomäki explains her tricks for sculpting a majestic owl priestess<br />
LAURA PELTOMÄKI<br />
laloon.artstation.com<br />
<strong>3D</strong> character artist<br />
Paint different subtools in various shades of grey<br />
1 and turn on the Flat Color material to see if any of<br />
the shapes don't work together.<br />
Zoom out every once in a while to keep an eye<br />
2 on the detail level – sometimes less is more.<br />
The Inflate brush is perfect for creating<br />
3 exaggerated shapes and features.<br />
SliceCurve tools are a huge help when<br />
4 sketching the main shapes with DynaMesh.<br />
Turning on the SmoothNormals from the<br />
5 Render Properties menu helps you to keep the<br />
polycount low while keeping the render surfaces<br />
looking nice and smooth.<br />
CREATE CONVINCING SCI-FI FIGURES<br />
Munich-based Sven Rabe reveals the ZBrush skills behind his sci-fi creations<br />
SVEN RABE<br />
svenrabe.artstation.com<br />
Lead modeller / senior <strong>3D</strong> artist, LIGA 01<br />
What challenges did you encounter while crafting<br />
the visor for the CR-2 pilot in ZBrush?<br />
For the visor, as it was a large and prominent piece<br />
of the design, I made various concept versions<br />
directly within ZBrush. Thanks to ZBrush, this can<br />
be done fast so you can focus more on the creative<br />
part. It was a bit harder to find the right ratio for<br />
the poly reduction to avoid artifacts in the smooth<br />
surface while keeping small details very crisp,<br />
especially for close-up renders. Therefore I used<br />
the Decimation Master plugin extensively.<br />
What were some of the key tools and techniques in<br />
ZBrush you followed?<br />
I usually start with a concept sculpt by using<br />
DynaMesh with various brushes like Move,<br />
ClayBuildUp, Dam_Standard, Clay, TrimDynamic<br />
and hPolish. After retopologising individual pieces<br />
through ZRemesher and some manual ZSphere<br />
retopo work, I start adding details through brushes<br />
and Alphas with layers to organise everything and<br />
to stay flexible. Sometimes I use ZModeler to<br />
create base meshes for further detailing. Then, for<br />
the final rendering I use Decimation Master to<br />
reduce the polycount, add UVs through UVMaster<br />
and assemble all pieces back together.<br />
What do you think are some of the key things<br />
artists should keep in mind when crafting a sci-fi<br />
character like this and keeping it realistic?<br />
Keeping a certain design language and rhythm of<br />
shapes throughout the whole piece is one of the<br />
key points in my opinion. Also a good balance<br />
between large areas and details is very important.<br />
Often, less is more, more is less. Always think of<br />
functionality and the purpose of your elements, as<br />
this gives your work more realism.<br />
29
MODEL WITH IMPACT IN ZBRUSH<br />
GO ORNAMENTAL<br />
Jamir Blanco, who works in Montreal at MPC, discusses how he sculpted a finely detailed pillar<br />
JAMIR BLANCO<br />
jamirblanco.artstation.com<br />
Environment artist, MPC<br />
Block out I wanted to make a pillar-like<br />
01 object that could also serve as a standalone<br />
asset in a scene. I looked online for variations of<br />
pillars and ornaments to serve as base ideas and<br />
references. I started by sketching in ZBrush using<br />
standard low-res PolyMesh Cylinders and radial<br />
symmetry to quickly block out the object volume.<br />
Refine basic shapes I refine each<br />
02 subtool individually. Since there’s tons of<br />
Radial replication, I only needed to refine one tool.<br />
Then it’s just duplicating and rotating them into the<br />
correct position to replace the remaining Radial<br />
Base subtools. I used the Deformations tab to rotate<br />
them into their correct positions as it makes use of<br />
the world origin as the pivot point.<br />
Add fine details After this I introduced<br />
03 new and smaller details into the model. I<br />
usually handle this by modelling assembly pieces<br />
that can be used as Insert Mesh subtools. I<br />
modelled about four or five custom meshes to be<br />
used in conjunction with primitive geometry to 'set<br />
dress' the model. Set dressing is what we do in big<br />
environments, but the same principles will make the<br />
biggest difference for just one model.<br />
Light, render and post-production<br />
04 I decimated the subtools down to<br />
something manageable in Maya, and exported<br />
everything combined. The rendering was handled in<br />
V-Ray and uses a simple three-point lighting setup. I<br />
create my key light first, then my fill, and use a sky<br />
dome for bounce light with GI. I then exported go-to<br />
passes for compositing in Photoshop, including Total<br />
Light, Reflection, AO and Object ID.<br />
01 02 03 04<br />
30
When asked who we are<br />
and what makes us unique?<br />
We thought there is no one<br />
thing.<br />
Here are 5...<br />
www.workstationspecialists.com<br />
We are Master Technicians,<br />
We are Bespoke Solutions,<br />
We are Expert Consultants,<br />
We are Uncompromising Quality,<br />
We are Intel Platinum Partners,<br />
We are<br />
the<br />
Workstation<br />
Specialists.<br />
WS-X141S Frequency Enhanced<br />
Small Form Factor (SFF)<br />
Specification:<br />
• Intel Core i5 / i7 up to 4 Core 8 Thread<br />
• Professionally Overclocked up to 4.6GHz<br />
• Only 250 x 160 x 338 mm (H x W x D)<br />
• Professional NVIDIA or AMD Graphics<br />
• 16GB-32GB DDR4 2666MHz Memory<br />
• 3 Years Full Parts & Labour Warranty<br />
Our new WS-X141S is the smallest & most<br />
optimised Workstation we have ever produced.<br />
Here at Workstation Specialists our research<br />
and development team have worked tirelessly<br />
to ensure smaller does not mean limited.<br />
Our SFF solutions are still equipped with the<br />
same AMD or NVIDIA Professional graphics<br />
cards as their larger counterparts.<br />
Intel Inside®. Extraordinary Performance Outside.<br />
Contact a representative<br />
(+44) 0800 180 4801<br />
/workstation-specialists/<br />
@wspecialists<br />
© 2016 StruMIS Ltd. T/a Workstation Specialists E & OE. © 2015 Intel Corporation. Intel and Intel Core are trademarks of Intel Corporation in the U.S. and/or other countries. Logo & company/<br />
product names are trademarks of their respective owners.
SHOWING OFF OFF YOUR BEST ASSETS<br />
Furtility is a plugin<br />
developed by MPC<br />
that helps with<br />
creating animal fur<br />
density, length and<br />
curve direction<br />
32
SHOWING OFF YOUR<br />
BEST ASSETS<br />
<strong>3D</strong> <strong>Artist</strong> embeds itself with MPC’s <strong>3D</strong> assets team in London to see how<br />
some of the studio’s most complicated models were made<br />
When Jon Favreau’s The Jungle Book<br />
was released earlier this year,<br />
audiences were enthralled by the<br />
live-action remake of the classic Disney tale. They<br />
also responded favourably to the photorealistic<br />
animals, many of which were digital models built<br />
by the assets team at MPC. <strong>3D</strong> <strong>Artist</strong> sat down<br />
with the London team for an exclusive first-hand<br />
look at the tools and techniques they use.<br />
Of course, it isn’t just in The Jungle Book where<br />
MPC’s assets team has showed off the studio’s<br />
artistry. Films such as Independence Day:<br />
Resurgence, Batman V Superman: Dawn Of<br />
Justice, Terminator: Genisys and Guardians Of<br />
The Galaxy are among the many projects the<br />
department has had a major hand in. But how are<br />
<strong>3D</strong> assets produced at MPC, and what are the<br />
secrets behind how they’re made?<br />
33
<strong>3D</strong>S SHOWING MAX UNLEASHED OFF YOUR BEST ASSETS<br />
MEET THE ASSETS TEAM<br />
The assets department is a centralised<br />
department encompassing modelling, rigging,<br />
texturing, grooming (hair and fur) and look<br />
development. That means that any character,<br />
creature or hard-surface object required for a<br />
project MPC is working on goes through the<br />
department, even if shot production is taking<br />
place at another of MPC’s offices, such as<br />
Vancouver or Montreal.<br />
The team hovers at around 100 artists in both<br />
London and Bangalore, but can ramp up<br />
extensively for big shows like The Jungle Book.<br />
MPC hires regularly and looks for modellers,<br />
texturers, riggers and look dev artists at all levels.<br />
New starters tend to be ‘buddied’ up with<br />
someone in the same discipline who can “show<br />
them the ropes,” according to MPC head of<br />
modelling Chris Uyede.<br />
For one of the world’s most prestigious visual<br />
effects studios, you might be surprised to hear<br />
that MPC relies mostly on off-the-shelf software<br />
in its assets department. However, over more<br />
than two decades, the team has built a variety of<br />
proprietary plug-ins and workflows that make its<br />
creature and character creation unique.<br />
Autodesk’s Maya sits at the core of the toolset<br />
for modelling, rigging and animation. Pixologic’s<br />
ZBrush and Autodesk’s Mudbox are used for<br />
sculpting and painting, with The Foundry’s MARI<br />
and Adobe’s Photoshop the main texturing tools.<br />
On top of these tools (predominantly interwoven<br />
into Maya) are MPC’s in-house solutions<br />
for rigging and muscle simulation and for<br />
grooming. The grooming tool Furtility, in<br />
particular, is one of the studio’s most well-known<br />
and most developed, and has found extensive use<br />
in recent years.<br />
ASSETS IN ACTION<br />
The tools of choice are certainly important, but<br />
after sitting down with the MPC team it’s also<br />
apparent that their physically-based approach to<br />
asset creation is at the core of great characters.<br />
Take The Jungle Book, for example. The animals<br />
were photoreal, but they also had to meet certain<br />
filmmaker requirements. Baloo the bear, voiced<br />
by Bill Murray, was designed to be the same<br />
proportions as a Himalayan bear. Yet he also had<br />
to take on the characteristics of the actor.<br />
“Sometimes you have to make it work<br />
somewhere in between,” suggests MPC lead<br />
modeller and asset supervisor Giles Davies.<br />
“Usually we have to find the most realistic<br />
reference that we can and then make adjustments<br />
to him.”<br />
And that’s exactly what MPC has excelled at;<br />
researching real reference and then crafting<br />
digital models that reflect the reference, but can<br />
still be adapted for a movie’s needs. Another<br />
example is the Bengal tiger Shere Khan (Idris<br />
Guardians Of The<br />
Galaxy’s Groot was<br />
complex, requiring<br />
a rigid, animatable<br />
model capable of<br />
expressing emotion<br />
We have to find the<br />
most realistic reference<br />
that we can and then<br />
make adjustments<br />
Giles Davies, lead modeller<br />
and asset supervisor<br />
34
This highlydetailed<br />
spaceship<br />
from Prometheus<br />
was modelled by<br />
Lisa Gonzalez and<br />
Gerald Blaise<br />
The detailed CG fur required for the wolf Raksha<br />
(Lupita Nyong’o) in The Jungle Book<br />
FUR-A-Q<br />
MPC’s lead modeller and asset<br />
supervisor Giles Davies reveals the tech<br />
behind the studio’s hair and fur grooming<br />
tool, Furtility<br />
<strong>3D</strong><strong>Artist</strong>: What is Furtility?<br />
Davies: Furtility is a plugin for Maya, which was<br />
first developed for the mammoths in 10,000 BC.<br />
It’s comprised of a number of specific<br />
elements. There’s hand-shaping curves, which<br />
are basically guide curves. So generally you’ll be<br />
following a bunch of reference with these<br />
curves and seeing which direction the fur is<br />
flowing. They’ll be particular patterns. You’re<br />
looking at density and length in those early<br />
stages. So, almost quite by hand, you’re<br />
mapping out the flow of the fur at this stage.<br />
<strong>3D</strong><strong>Artist</strong>: What kinds of grooming does the<br />
plugin let you do?<br />
Davies: You start off with something almost like<br />
a ball of fluff, and then add in further operating<br />
procedures. There are a whole different raft of<br />
attributes – density maps, length, scraggle, how<br />
much the individual fur is compressing,<br />
attenuation, clumping. Clumping is probably<br />
the most important, as it allows you to adjust<br />
the feel and wetness of a character or give the<br />
illusion of dirt and matting in the fur. You can<br />
also use it for feathers, vegetation and even<br />
things like ropes.<br />
<strong>3D</strong><strong>Artist</strong>: Fur can be notoriously difficult to<br />
simulate – how flexible is Furtility?<br />
Davies: It’s a bit like painting on a canvas, but<br />
you’re painting on a UV pelt. You end up with a<br />
lot of black and white mattes, which will result<br />
in the fur being more dense here, less dense<br />
there, having more clumping or less clumping.<br />
Multiplying those in different ways and<br />
blending and biasing them in different ways<br />
gives you the different looks.<br />
35
<strong>3D</strong>S SHOWING MAX UNLEASHED OFF YOUR BEST ASSETS<br />
CORE ASSETS<br />
Behind the scenes of four of MPC’s<br />
most elaborate models<br />
JUNGLE BOOK’S COMPLEX CREATURES<br />
MPC modelled 224 variations of 54 animal<br />
species. In doing so, MPC would generate<br />
1,984 terabytes of data during the making and<br />
run over 240,000,000 render farm hours.<br />
DIGITAL ARNIE IN TERMINATOR: GENISYS<br />
MPC’s CG Arnie model was built of around 1<br />
million polygons for the body, and a further<br />
250,000-plus polygons for extra elements like<br />
eyes, teeth and nails.<br />
One of the more<br />
arduous aspects of<br />
re-creating Arnie in<br />
digital <strong>3D</strong> was to<br />
re-create his face<br />
and body from 1984<br />
MAKING GODZILLA’S MODEL ROAR<br />
Godzilla took around eight months to sculpt in<br />
detail. MPC crafted multiple layers of mesh<br />
resolutions to simulate lower level muscle,<br />
mid-level folds, fine creasing and scale details.<br />
PROMETHEUS HAS LANDED<br />
The Prometheus ship from the film was built<br />
from 3 million polygons. <strong>Artist</strong>s incorporated<br />
120 UV tiles into the model, each with a set of<br />
8K maps made in MARI, Photoshop and NUKE.<br />
36
We’ve been working<br />
hard on developing new<br />
facial rigging, modelling<br />
and blend shape setups<br />
Chris Uyede, head of modelling<br />
Elba), whose fierceness was communicated via an<br />
enlarged body and, in particular, a skull twice as<br />
big as a normal Bengal.<br />
The assets team relies on a collaborative<br />
pipeline to push models through. Modellers,<br />
riggers, texturers, groom artists and later<br />
animators and effects artists can all work<br />
separately on what’s called an ‘animated<br />
character package’. During the process, artists are<br />
always looking to add in elements from real life<br />
with the aim to give their assets some grounding.<br />
The rigging process, in particular, reflects that<br />
real-world approach in that it uses physically<br />
correct modelled bones and has checks and<br />
balances to accurately cause skin and muscle<br />
deformation. “We most recently created what we<br />
just call the muscle primitive,” says head of rigging<br />
at MPC, Tom Reed. “It’s a toolkit for impacts and<br />
flesh protections that was made for The Jungle<br />
Book but instantly rolled out for Terminator:<br />
Genisys and other films.”<br />
“We have daily sessions twice a week here to<br />
talk about all the developments,” adds Reed.<br />
“We’re constantly trying to make sure the<br />
technology evolves and is not forgotten, and that<br />
new techniques get shared. One of the strengths<br />
of how we approach the department as a<br />
centralised team means we can really get this<br />
stuff used everywhere straight away.”<br />
Terminator: Genisys was certainly one of the<br />
benefits of that desire to keep on top of the tech,<br />
but it was also one of MPC’s most difficult<br />
challenges, since it required the creation of a fully<br />
photorealistic digital human. Not only that, it was<br />
a human whom millions around the world<br />
instantly recognise: Arnold Schwarzenegger. And<br />
just to make it even harder, it had to be Arnie as he<br />
appeared in the original Terminator film in 1984.<br />
Although the actor is, of course, still alive, the<br />
assets team did not have a way to scan and<br />
photograph Schwarzenegger as he was 30 years<br />
ago. However, they did have access to a scan of a<br />
bust made of the actor at the time and they could<br />
take advantage of some facial motion capture<br />
acquired using MOVA technology and scans of<br />
the on-set stunt stand-in.<br />
Ultimately, these inputs served just as a base<br />
for intricate sculpting and modelling carried out<br />
by the assets department. Even then, and as<br />
MPC always does, it had to be adapted to the<br />
various shots required. “You couldn’t just make<br />
one model to work in every shot,” notes MPC<br />
lead modeller and texture artist Klaus Skovbo.<br />
“We ended up with a very hi-res mesh and any<br />
changes we did in the sculpt could be carried into<br />
the mesh.”<br />
With its ‘digital Arnie’, MPC also embarked on a<br />
heavy R&D effort into a FACS (facial action coding<br />
system) approach to replicating face and mouth<br />
shapes. “We’ve been working hard on developing<br />
new facial rigging, modelling and blend shape<br />
setups here,” says Uyede.<br />
37
<strong>3D</strong>S SHOWING MAX UNLEASHED<br />
OFF YOUR BEST ASSETS<br />
Inside MPC’s London visual effects studio,<br />
located in the heart of Soho<br />
Originally, this was to enable a CG<br />
Schwarzenegger to deliver a significant number of<br />
lines of dialogue, but in the final film there were<br />
much fewer required. Still, the work on the FACS<br />
system, and on the muscle and bone simulation<br />
work done in general for Genisys, is able to be<br />
adapted for future use at MPC on future projects.<br />
For example, on The Jungle Book, the FACS<br />
approach was “anthromporhmised to animals,”<br />
according to Davies. “It was a fun process<br />
because you’re collecting a load of reference of,<br />
say, a bear, but a bear’s face is muzzle-based so<br />
you just have to relay the muscles in our face to<br />
the muscles in theirs.”<br />
Not all of MPC’s assets are organic characters<br />
or creatures, of course. Some of the most detailed<br />
of the studio’s models can be seen in such films as<br />
Prometheus, The Martian and recently in<br />
Independence Day: Resurgence. For this sequel to<br />
the original alien invasion film, the team was<br />
charged with building, among other things, a<br />
300-metre-tall moon cannon that appears in the<br />
opening sequence. Added to that was an alien<br />
mothership, and a moon base and a lunar<br />
environment that are destroyed – all of which<br />
nearly “broke Maya,” according to Sue Rowe, the<br />
visual effects supervisor for MPC on Resurgence.<br />
With future projects such as Alien: Covenant,<br />
Ghost In The Shell and Justice League on MPC’s<br />
horizon, it’s quite possible that even more<br />
complex and ‘Maya breaking’ assets will be<br />
created by the assets team. And that’s something<br />
that, as audiences, we’re always grateful for.<br />
Godzilla’s body<br />
was carefully<br />
worked on,<br />
from the bones<br />
to the fat, the<br />
muscles and<br />
the scales<br />
38
A devilishly good<br />
<strong>3D</strong> procedural platform.<br />
Start learning today with Houdini Apprentice – a FREE version of the same software<br />
used by the world’s top film, TV and game dev studios. Visit SideFX.com today.<br />
Creature artwork: Tanvir Islam
35 PAPERCRAFT SUBSTANCE ADVENTURES PAINTER TIPSIN BLENDER<br />
PAPERCRAFT<br />
ADVENTURES<br />
IN BLENDER<br />
40
Paul Chambers brings a world to life and shows<br />
you how to composite and light animated scenes<br />
Papercraft is a delicate, often colourful art<br />
style that has seen many different<br />
methods and software attempt to<br />
re-create the look, but the results are almost<br />
always a static render. “I felt that there was a<br />
missed opportunity to bring this to life,” says<br />
generalist Paul Chambers, on why he decided to<br />
be non-traditional and create an animated<br />
papercraft island.<br />
But why has he chosen Blender? "I love how<br />
quickly it opens compared to something like<br />
Maya," he says. "I think the modelling tools are<br />
better than Maya, and I love how it can handle the<br />
entire pipeline from blocking to compositing."<br />
Over the next few pages discover Chambers'<br />
17-step guide for creating an animated short, and<br />
get inspired to break the mould yourself at home<br />
or in the studio.<br />
41
PAPERCRAFT ADVENTURES IN BLENDER<br />
Use your time wisely Adopting a<br />
01 low-poly look and using Blender’s<br />
internal renderer are two ways to keep the<br />
modelling, materials and rendering on this project<br />
simple. Keep your focus – and time – on learning<br />
scene building and the basics of rigging and<br />
animation. All it takes is a quick pencil sketch to get<br />
going. The point is to make a basic turntable<br />
animation you can populate with small animation<br />
moments. Think about the island theme and what<br />
those moments might be. A bird diving? A fish<br />
jumping? A helicopter swooping?<br />
Get the basics down Block out<br />
02 basic geometry: an ocean, island,<br />
architecture and any static objects. Set up a camera<br />
to frame the scene and add environmental lighting.<br />
Build the island at 0,0,0 to give you a central pivot.<br />
Add an Empty object there and parent your camera<br />
to it. Rotating the Empty’s Z transform 360 degrees<br />
over 60 seconds with a linear curve gives you a<br />
simple loopable camera turntable. Set the project<br />
to 24fps to aid animation.<br />
03<br />
Make camera moves more<br />
interesting Add a child Empty to your<br />
central pivot Empty and connect the camera with a<br />
damped track constraint to make a Camera Target<br />
that you can animate independently. Animating the<br />
Z of the pivot Empty will let you move the entire<br />
camera rig up and down. Finally, animating the<br />
camera’s focal length gives you control over zoom.<br />
You now have a basic camera rig; everything you<br />
need to keep the turntable spin, but also frame the<br />
action and climb into the sky or dive under the<br />
ocean. Using Bezier curves on the F-curves will<br />
keep all camera movement smooth.<br />
Get the<br />
Papercraft look<br />
Go an extra step beyond low-poly by<br />
finding or making tileable paper textures.<br />
Set Texture Mapping to Generated<br />
Coordinates and Cube Projection in the<br />
Properties> Texture tab and you may not<br />
even need UVs. Search 'Online Normal<br />
Map' for sites that will let you generate<br />
Normal and Specular maps from your<br />
base texture and add them to your<br />
material. Give the edges a folded paper<br />
look without adding geometry by adding<br />
a Wireframe Modifier in the Properties<br />
panel. Finally, use a procedural cloud<br />
texture with a gentle Displace Modifier<br />
to make the folds look more organic.<br />
Build a day-night cycle Model a<br />
04 sky, clouds, sun and moon and give<br />
them basic materials. Parent these models to<br />
another Empty object to make a background group.<br />
Parent this group to the camera rig so that it always<br />
manages to stay in the camera's view. Animate the<br />
rotation of this background group over the length of<br />
your animation so that you can create your very<br />
own day-to-night cycle movement. You can also<br />
animate the colours of this backdrop by changing<br />
the diffuse colour of the materials and pressing the<br />
'I' key to insert keyframes. Find a day, sunset,<br />
sunrise and night-time colour scheme, and a timing<br />
that feels right.<br />
02<br />
01<br />
03<br />
04<br />
42
05<br />
06<br />
07<br />
Li n k fi l e sBuilding a scene with a lot of<br />
05 content quickly gets unwieldy. Start<br />
building props like trees and rocks in separate files<br />
and keep them in named directories. Keep files<br />
organised and iterative like 'assets/rocks/small_<br />
rock_001.blend'. In your main scene go to File> Link<br />
to import these objects while keeping them<br />
externally editable. Any individual edits you make<br />
can be quickly relinked by changing the filename<br />
iteration number under Blender File in the Outliner<br />
and reloading the scene. If you need duplicate<br />
objects, remember to use Opt/Alt+D so the copies<br />
always tie back to the external link.<br />
Prep models for linking Simple<br />
06 geometry saves time for animating and<br />
makes rigging easier. Group models with several<br />
objects by selecting all and using Cmd/Ctrl+G.<br />
Name the group 'GRP_Groupname' to make it<br />
easier to find in the Outliner of your main scene<br />
later. Make the group link-ready by centring it on<br />
0,0,0 and apply all object transforms, scale and<br />
rotation with Cmd/Ctrl+A. Try linking a group into<br />
your main scene and adjust scale as necessary.<br />
Once you’ve found the right 1-1 match, apply scale<br />
again. Keeping scale 1-1 across all files will make<br />
linking and animating easier, especially with rigs.<br />
Rig your models Other than simple<br />
07 transforms, animated models will need<br />
a rig. Start with Add>Armature>Single Bone. Tab<br />
into Edit mode and start building your rig by<br />
extruding and naming bones. This is best done in<br />
Orthographic views. Tab out of Edit mode, pick<br />
your geometry, then Shift-select your armature and<br />
go to Object>Parent>With Automatic Weights.<br />
With low-poly geometry, Blender will do a nice job<br />
of automatically assigning weights. Any errors can<br />
be fixed in Weight Paint mode. When painting<br />
weights, bones are easily selected under Vertex<br />
Groups in the Data tab of the Properties panel.<br />
43
PAPERCRAFT ADVENTURES IN BLENDER<br />
10<br />
08<br />
09<br />
11<br />
12<br />
44
14<br />
Link rigs into your scene Linking a<br />
08 rig into your scene requires a couple<br />
more steps than a static prop does. Make sure that<br />
any armatures that you have built have unique<br />
names and were added to the relevant named<br />
group in their file. Now when you link in that group,<br />
you’ll pull in the armature as well. The linked group<br />
should appear at 0,0,0. To be able to animate the<br />
rig in your main scene, make it a proxy by pressing<br />
Cmd/Ctrl+Opt/Alt+P, then select the armature<br />
name from the drop-down menu. This should now<br />
mean that you can position and animate the rig at<br />
your own will.<br />
09<br />
Place rigs for timing Start this<br />
process of blocking camera timing by<br />
placing your rigs so that when your camera passes<br />
them, it does so at an appropriate time of the day or<br />
night in the scene and at an appropriate distance.<br />
This will give you a sense of when you have gaps in<br />
your action to fill with animations that you may not<br />
have even thought of yet. If necessary, adjust<br />
geometry placement in the main scene to clear<br />
space or make space for more interesting<br />
composition. It’s best to position your rig using the<br />
Proxy Group’s transforms. Save the transforms of<br />
any bones within your rigs for animation.<br />
13<br />
Animate your camera Now that your<br />
10 main props and rigs have been<br />
successfully positioned, it’s time to block in the<br />
camera framing. The camera is already passing<br />
around the scene, but you can now block in the Z<br />
of the camera rig to move up or down to mirror the<br />
action. Also available is the X,Y,Z of the Camera<br />
Target to point the camera at a specific object.<br />
Finally, you can block in the focal length to zoom in<br />
or out as necessary. You’ll find that you’re just<br />
blocking for now, and after you’ve animated your<br />
rigs, you’ll want to massage these camera<br />
movements further.<br />
Block your animation Your rig positions<br />
11 are blocked and so is your camera framing.<br />
It’s time to block the armature animations. Stay<br />
broad, as this is a standard animation approach. Go<br />
one rig at a time and take your time. Pose your rig<br />
and insert keyframes for your key poses only.<br />
Timing out the action on paper and tapping your<br />
foot can help with this process. Keep playing short<br />
sections of the animation back and forth and adjust<br />
camera blocking as needed. Spend most of your<br />
animation time at this stage. Frame-by-frame<br />
animation later will be wasted if your key timing and<br />
framing here is poorly considered.<br />
14<br />
How to use<br />
duplicate rigs<br />
Blender can be fussy about linking<br />
duplicate identical armatures into one<br />
scene. Take three seagulls, for example.<br />
One way around this is to duplicate your<br />
finished rigs into separate files (so as<br />
Seagull_A, Seagull_B, Seagull_C). Give<br />
unique names to the groups and the<br />
armatures in those files (so Seagull_A.<br />
blend contains GRP_Seagull_A, and<br />
geometry posed with RIG_Seagull_A).<br />
Now you can link these groups into your<br />
main scene and turn them into unique<br />
Proxies that can be animated<br />
individually. If you don’t do this, posing<br />
one duplicate rig will pose them all.<br />
Fine-tune your animation I highly<br />
12 recommend you move into final<br />
animation only when you’ve got a strong blocking<br />
foundation. Have friends and forum members<br />
review your work and give feedback, as they’ll spot<br />
things you didn’t. To finesse, add new pose<br />
keyframes at halfway points between your existing<br />
keyframes. Review and adjust. Then split the<br />
difference and add more intermediate keys. Slowly<br />
you’ll be building a frame-by-frame animation.<br />
Resist the urge to let Blender interpolate frames.<br />
The best animators work on stepped or constant<br />
splines – 'on 1s' (every frame) or 'on 2s' (every<br />
other). 'On 2s' can give a nice stop-motion look.<br />
Add lights and light rigs Add lights<br />
13 to your scene, including two constrained<br />
to the sun and moon, and viewport render or test<br />
frames at 25 per cent of the final size with no<br />
anti-aliasing to get quick feedback. Next, add key,<br />
fill, rim and bounce lights to Empty parents to make<br />
light rigs. Constrain these rigs to your animated<br />
models. These can now be used to adjust the<br />
lighting on that specific model only. Make sure they<br />
only light specific subjects by moving the light rig<br />
and accompanying models to to their own layer<br />
with 'M' and check This Layer Only under the<br />
lighting Property panels.<br />
Composite for flexibility Now our<br />
animation and lighting is complete, it’s<br />
time for finalising the look. Run some test renders.<br />
Use the Blender Node editor to adjust colour, tone<br />
and contrast, all of which can also be animated<br />
over time. If your camera moves underwater,<br />
consider an animated mask to give that section its<br />
own look. What about a different look for day and<br />
for night? Separate frame passes into a multilayered<br />
OpenEXR – it’s easy to do and gives you<br />
much more flexibility. Consider a separate Blender<br />
file just for compositing and bring in your passes<br />
using image input nodes.<br />
45
PAPERCRAFT ADVENTURES IN BLENDER<br />
15<br />
Create a tiltshift<br />
effect<br />
The papercraft look pairs nicely with a<br />
shallow depth of field. Output a Depth<br />
pass to the compositor, then send this<br />
pass to the Value inputs of two Map<br />
Range nodes. Drive the From Max inputs<br />
of these nodes with individual<br />
foreground and background values you<br />
can animate separately. The Map Range<br />
nodes in turn drive two black and white<br />
Mix node factors to generate two<br />
normalised greyscale images. Finally, use<br />
these images to drive the Size inputs of<br />
two Blur nodes on your render blurring<br />
the background, then the foreground.<br />
16 17<br />
46<br />
Run test renders Run more test<br />
15 renders to check everything. Look for<br />
efficiencies to lower times. Aim for 15-20 minutes<br />
per frame on a modern machine at 1080p.<br />
Anti-aliasing is a big killer, so don’t bump it any<br />
higher than necessary. Buffer shadows render<br />
faster than Ray shadows. Keep materials,<br />
reflections and refractions as simple as possible.<br />
Time spent optimising your scene now will cut the<br />
total render time dramatically in the long run.<br />
Before your final render, render one frame every<br />
ten frames using Frame Step in the Render panel.<br />
Adjust and render stepped frames again. Only<br />
render every frame when everything looks good.<br />
Fix renders with patches<br />
16 Unfortunately you’re probably not done<br />
rendering. Look for any errors. The good news is<br />
that doing separate passes has given you flexibility,<br />
so only re-render what you need. When possible,<br />
use Cmd/Ctrl+B to set render borders around only<br />
the part of the frame containing the error. Consider<br />
Ray Mairlot’s excellent Animated Render Border<br />
plug-in from Blender Market. You can then drop<br />
these patches back onto your previously rendered<br />
frames using an Alpha over Node in the editor. You<br />
can even separate out multi-layer EXR passes,<br />
patch them individually and reconstitute them, all in<br />
the Node editor. Very powerful.<br />
Complete your scene Your visuals are<br />
17 complete, so now it's finally time to make<br />
your animation really stand out from the crowd by<br />
adding in some audio. Sound effects can be<br />
recorded with your phone or purchased cheaply<br />
online at websites like www.pond5.com. I used the<br />
open-source video editor Shotcut to add sound to<br />
my scene, but you can also do it all within Blender’s<br />
Non Linear editor if you prefer to keep it within its<br />
original software. Add some titles made in a paint<br />
program like Krita and your entire pipeline is open<br />
source, saving you money for your next project.<br />
Now get out there and share your animation with<br />
the world!
DEVELOP VEHICLE CONCEPTS IN MAYA<br />
Expert advice from industry professionals, taking you from concept to completion<br />
All tutorial files can be downloaded from: filesilo.co.uk/3dartist<br />
48
IGOR SOBOLEVSKY<br />
Axiom AXM Fury, 2016<br />
Software<br />
Maya, KeyShot, Photoshop,<br />
Illustrator<br />
Learn how to<br />
• Develop a concept<br />
• Create mechanical parts<br />
• Model surfaces<br />
• Texture materials in KeyShot<br />
• Output precise masks<br />
• Composite a final image<br />
Concept<br />
AXM Fury is the latest addition<br />
to the Axiom family of racing<br />
machines. This electric vehicle<br />
originally had a perfectly<br />
symmetrical design, however a<br />
year after it’s conception in<br />
2035 the league moved to<br />
extended race durations. This<br />
development warranted the<br />
installation of additional power<br />
cells and cooling systems to<br />
manage excessive heat. As a<br />
result the cockpit had to be<br />
offset, and the body widened<br />
to accommodate these<br />
additional systems.<br />
Develop vehicle<br />
concepts in Maya<br />
Design a race car from start to finish, inspired by Le Mans and Formula 1<br />
cars, with the infusion of a fighter jet aesthetic<br />
This tutorial will focus on automotive design in Maya<br />
2016. Designing cars is fun and exciting, but the<br />
process can present some problems. Overall design,<br />
surfacing, stance, functionality and CMF all are areas of<br />
opportunity as well as challenges. We will go through the<br />
necessary steps to resolve these challenges and build a<br />
high-poly model of a near-future racing machine. You will<br />
design and build body surfaces with proper edge flow,<br />
comprehensive mechanical parts as well as interior elements.<br />
This process will allow us to experiment with some of the new<br />
tools in Maya and their application in a hard-surface<br />
workflow. With the aid of KeyShot, Photoshop and Illustrator<br />
you will produce a series of presentation-ready images that<br />
highlight and showcase the design of the vehicle.<br />
Block in Sketch out a couple of views to pull together<br />
01 some ideas and to familiarise yourself with the overall<br />
form. Since this is a high-level concept we don’t need to worry<br />
about small details yet. These images will be used as a starting<br />
point of the model block in. Select the Side viewport and go to<br />
the Local View menu to select the Image Plane option. This will<br />
import your sketch into the scene. Start by blocking in the<br />
stance of the vehicle by creating the wheels. Make sure to<br />
change the parameters of the primitive by making adjustments<br />
in Channel Box>Layer Editor. Position and space out the<br />
wheels. Create a plane with couple of subdivisions and be sure<br />
to move the vertices to block out the centre of the body.<br />
Make the main hull Proceed by adding edge loops<br />
02 to further define the form. A great way to alter the<br />
edge flow is to use the Extrude tool and offset the faces. If<br />
you’re working with the aim of creating symmetry, go to the<br />
Modeling Toolkit palette and activate Symmetry. By doing this,<br />
it’ll enable you to work on the both sides of the hull at once.<br />
Elements that are highlighted in blue when you hover over<br />
them are symmetrical.<br />
Build the fairings and fenders The nature of this<br />
03 design calls for large swooping fairings that improve<br />
the aerodynamics and reduce drag. The best way to start is<br />
with the actual tire. Select a ring of faces on the tire and<br />
duplicate the face. In this situation, 18 subdivision axes were<br />
used in order to provide enough resolution to construct the<br />
fairing. Select a number of edges on each side of the ring and<br />
extrude them. Proceed by extruding the edges on the top of the<br />
part and moving them in to make the top of the fairing. Keep an<br />
eye on how the edges are flowing.<br />
02<br />
01<br />
03<br />
YOUR<br />
FREE<br />
DOWNLOADS<br />
from filesilo.co.uk/3dartist<br />
• Tutorial screenshots<br />
49
DEVELOP VEHICLE CONCEPTS IN MAYA<br />
When working with complex<br />
topology, try breaking down the<br />
design into elements that are<br />
easy to tackle<br />
Make the body panels When you are satisfied<br />
04 with the initial body shape of your racer, begin adding<br />
additional parts and panels onto the base of your vehicle.<br />
Selecting and duplicating faces will help you to develop<br />
additional surfaces as separate parts – for example, the inset<br />
front of the car and the enclosure around the cockpit. These<br />
parts can later be combined to form one body when needed.<br />
The back quarter panel was made by duplicating the front<br />
fender and closing the open ring around the wheel. Use this<br />
method to generate separate parts as opposed to importing<br />
parts or creating a new shapes. When working with complex<br />
topology, try breaking down the design into elements that are<br />
easy to tackle. Always be sure to keep your edge count in mind<br />
– after all, an equal number of edges makes for easy geometry<br />
bridging while maintaining quads. A good example of this was<br />
the combination and bridge of the fairing and the main hull of<br />
the vehicle.<br />
Define the form Once you are happy with the form<br />
05 you can start defining the shapes even further. Press<br />
‘3’ to get a preview of the smoothed geometry. This will give<br />
you a better understanding of the form when it will be<br />
smoothed. Start adding edge loops to the areas of the design<br />
that need to possess harder edges. In some places you’ll find it<br />
helpful to use the Bevel tool to crease certain areas of geometry<br />
without creating a continuous edge loop. A good example is<br />
the area around the wheel well, where the geometry creases<br />
and flows into the fender flare and the hard edges that run<br />
along the nose of the vehicle. Use the Multi Cut tool to add<br />
additional edges to the form when needed.<br />
Model the suspension The overall form of the<br />
06 vehicle leaves a number of exposed areas where we<br />
can showcase the intricate workings of the suspension. Start by<br />
importing a reference image of the suspension. A great<br />
example of this are the exposed shocks in the front of the<br />
vehicle. Block out the cylindrical parts first, then bridge the<br />
exposed areas. Use Align tools to centre the springs with the<br />
centre of the shock. Adjust the swing arms by selecting the<br />
areas that need to be moved, then press ‘D’ to align pivot and<br />
move them into place.<br />
04 06<br />
06 05<br />
06<br />
New Pivot tool use<br />
The improvements to the basic Pivot tool are quite<br />
useful. When manipulating parts like shocks, struts or<br />
geometry in general, press ‘D’. This will activate the Edit<br />
Pivot tool. Just hover over a vertex, face or edge and<br />
you will get an Align prompt under the cursor. This<br />
operation will align the manipulator along selected<br />
elements. This way we can easily nudge a vertex, face<br />
or an edge along the surface of the form. Edit Pivot is<br />
especially useful when working with mechanical parts<br />
since it can be positioned along the edge flow of the<br />
part and mimic the pivot points of the part.<br />
50
06 07<br />
Understanding the purpose of<br />
mechanical elements<br />
When working on the design it is important to take the<br />
time and get a basic understanding of how an object<br />
functions. For instance, the front pushrod suspension is<br />
inspired by the F1 vehicles. This system does not<br />
function like a traditional double wishbone suspension.<br />
Do some research and find videos and photos that<br />
demonstrate the function. This extra bit of research will<br />
help you to build a more believable model.<br />
08 06<br />
09 06<br />
Create the wheels and rims Begin by creating a<br />
07 polygon cylinder with a subdivision axis on 12. This<br />
number will dictate the amount of spokes on the rims. In this<br />
case a subdivision of 12 will produce six spokes, so be sure to<br />
bear in mind how many spokes you want on the rims at this<br />
point. Select a horizontal edge on the cylinder and extrude it.<br />
This will become one of the spokes of the rim. Proceed by<br />
adding more edge loops and bending the shape. Select the<br />
outermost face and offset it. Isolate the spoke by deleting the<br />
rest of the cylinder. At this stage, note the position of the pivot<br />
point. It should be exactly in the centre of where the cylinder<br />
used to be. As soon as you are happy with the shape of the<br />
spoke, duplicate it and rotate it 60 degrees (to work out the<br />
angle, divide 360 by the number of spokes you have planned).<br />
Now bridge the centre of the hub to get a rim.<br />
Model the seat To create the driving seat of your<br />
08 car, start by blocking out the seat and a steering wheel<br />
position and proportions. Once again, it’s crutial that you use<br />
references to get an understanding of size relationships. Begin<br />
by laying in the profile of the seat. This can be easily achieved<br />
by manipulating a plane and adding edge loops to the areas<br />
that require the definition. Once you are satisfied with with the<br />
seat profile, mirror the shape, separate them by a desired<br />
distance and bridge the two objects with four edge loops. At<br />
this point activate Symmetry and manipulate the geometry to<br />
add desired curvature to the object. Select faces through which<br />
the seat harnesses will extent and delete them. Extrude the<br />
object to add thickness to the seat. Draw a curve that flows<br />
along the seat, which will be the base for the harness straps.<br />
Build the dashboard Let’s begin by selecting a ring<br />
09 of faces on the cockpit opening and duplicate them.<br />
Next, extrude the part and add some edge loops. Continue to<br />
add definition by moving the faces, edges and vertices of the<br />
part. Select a number of faces in the centre and extrude them<br />
out. This will become the opening of the car’s dashboard where<br />
the steering wheel will be inserted. Create a plane in the centre<br />
of the dashboard and apply a new shader to it. We will use this<br />
part later as an LCD display. At this point we need to consider<br />
how the vehicle would be operated and what controls it needs<br />
to feature on the dashboard. You’ll need the steering wheel, but<br />
what other indicators, switches, dials and buttons do you need?<br />
At this point we need to consider<br />
how the vehicle would be operated<br />
and what controls it needs to feature<br />
on the dashboard<br />
51
DEVELOP VEHICLE CONCEPTS IN MAYA<br />
Make the steering wheel Create a torus from the<br />
10 Poly Primitives menu, then widen the shape and add<br />
some edge loops to make a steering wheel shape. Select a ring<br />
of polygons on the inner side of the object and duplicate them.<br />
Proceed by bridging the edges of the duplicated shape to make<br />
the hub of the steering wheel. Extrude this shape and add some<br />
more volume by moving central vertices out. Select a group of<br />
faces in the centre of the steering wheel and offset them. Make<br />
the spokes by selecting three faces that would correspond to<br />
the connection point between spokes and the steering wheel.<br />
Extrude the edges of the spokes and create a U-shaped part.<br />
Add detail If you’re happy with the shape of the exterior<br />
11 and interior, you can start adding details. This process is<br />
relatively simple, but can be time consuming, depending on<br />
how much detail you want. Use the Isolate Select to show the<br />
piece you are working on to speed up the process. Press ‘F’ to<br />
frame it in the centre of the workspace. Transitions between<br />
parts are important in the modelling process – for instance,<br />
there are additional layers of rubber and adhesive between the<br />
metal and glass of the windscreen. As the windshield is long,<br />
you can use this space to add wiring and vents under the glass.<br />
Now you can start adding rivets and minor inserts.<br />
Pick a material You should start considering colours<br />
12 and materials while you’re still modelling. The materials<br />
should be a guide for a final look, though this doesn’t have to be<br />
exact. Be sure to name and apply correct materials to parts on<br />
the model. For instance, the same glass shader was applied to<br />
the windshield as well as the headlights. When working with<br />
materials in KeyShot, some of the ones that are filed under the<br />
relevant category might not be the best ones to use – so<br />
instead of using metal, try using metallic paint instead. This<br />
material has so many more ways to be modified.<br />
10<br />
11<br />
When working with materials in<br />
KeyShot, some of the ones that are<br />
filed under the relevant category<br />
might not be the best ones to use<br />
12<br />
Maya Bonus Tools<br />
Maya’s Bonus Tools are a great<br />
addition to your modelling toolkit and<br />
have the potential to improve your<br />
workflow. This design can benefit<br />
from the use of these tools. A great<br />
example is a Curve To Tube Mesh<br />
tool. This can be found under Bonus<br />
Tools>Modeling. This command<br />
generates a tube mesh along a curve.<br />
The great part about it is that it is<br />
fully editable in terms of thickness,<br />
curvature, segments and so on. The<br />
same applies to a Curve To Ribbon<br />
Mesh tool. For instance, the harness<br />
straps were made by using this tool.<br />
Convert N-Sided Faces To Quads<br />
automatically converts your polygons<br />
to quads where it is possible.<br />
52
13<br />
Manipulator<br />
size in Maya<br />
When using Scale,<br />
Move and Rotate<br />
tools, consider<br />
changing the size of<br />
the manipulator by<br />
pressing the ‘+’ or<br />
‘-’ keys. The size<br />
increase will give<br />
you greater<br />
precision when<br />
manipulating<br />
geometry for the<br />
ultimate accuracy.<br />
14<br />
15<br />
Consider what would be<br />
important for the driver to see,<br />
including information like speed<br />
and battery charge<br />
Design the graphic When the colours, materials and<br />
13 finishes are set, begin designing the graphics. Let’s<br />
screenshot a side and top of the car as well as the centre of the<br />
dashboard. Import these images into Adobe Illustrator and<br />
begin designing the decals. Work with the graphics in the areas<br />
of their final application so you can see the final result. It’s<br />
important to keep your fonts consistent and highly visible – this<br />
is a race car, after all. Consider what would be important for the<br />
driver to see, including information like speed and battery<br />
charge. These should take priority over other graphics. Select<br />
the graphic the you want to export and go to Export Selected in<br />
the Illustrator File menu. Export these as PNG at about 400dpi.<br />
Since the dashboard UI will be applied as an Opacity mask,<br />
export the black artwork on a white background as a JPG.<br />
Apply decals Select a part that’s getting textured. In<br />
14 the Label section of the Material Preference menu,<br />
press ‘+’ and apply a graphic to the part and experiment with<br />
the mapping modes to see which one yields the best results. Be<br />
sure to scroll down in the Label section and turn the Specular to<br />
white. This will allow the decal to get the reflectivity that<br />
matches the material underneath, therefore making it more<br />
realistic. Apply the dashboard UI image to the Emissive<br />
material in the dash, using an Opacity mask section of the<br />
material. To make this work properly, the UI image should have<br />
a solid background that exceeds the actual graphic area.<br />
Prepare the final render Now that our materials and<br />
15 textures are finished, we can work on the HDRI. From<br />
Environments, pick a scene that that best showcases the<br />
model. If the render will be inserted into a scene in post, make<br />
sure that it has similar features and lighting conditions. At this<br />
point we need to save the cameras. This will help you to dial in<br />
the scene and lighting with a steady position of the model. You<br />
can further modify the HDRI by adding highlight pins in the Edit<br />
HDRI menu. Add pins in the areas that highlight the form of the<br />
design. In the Render menu, select Resolution, Samples and<br />
Ray Bounces. Go to the Passes section and check Clown Pass.<br />
53
DEVELOP VEHICLE CONCEPTS IN MAYA<br />
Composite the image Open a file in Photoshop and choose your resolution and size.<br />
16 Select the final render as well as the Clown Pass and drag them onto the canvas. It is<br />
crucial that both the render and the Clown Pass are positioned in exactly the same location on<br />
the canvas. Create a layer, apply a Linear gradient with dark and light-blue colours and then<br />
position it along the bottom. You’ll notice that the shadow on the render looks unrealistic. Go to<br />
your Clown pass and select the Magic Wand tool with a Tolerance of 3. This way you can clip out<br />
the shadow in seconds. Finally, set the Blend mode to Multiply.<br />
16<br />
Igor Sobolevsky<br />
Igor works in the fields of concept, graphic and<br />
industrial design. Currently, Igor is a designer at ZAGG,<br />
specialising in <strong>3D</strong> modelling and product design.<br />
Bomb Disposal Bot, 2016<br />
Maya, ZBrush, KeyShot, Photoshop<br />
A robot designed for explosives diffusion and disposal. An<br />
array of sensors and cameras in conjunction with dextrous<br />
manipulators ensures a high rate of success.<br />
17<br />
Cosa Nostra Pizza Delivery Vehicle, 2015<br />
Maya, Rhino, KeyShot, Photoshop<br />
Vehicle based on Neal Stephenson’s book Snow Crash. This<br />
armored car will get your pizza delivered in 30 minutes or less<br />
no matter what.<br />
Add adjustment layers and weathering Now that your image is composited, you<br />
17 can start making alterations with adjustment layers. Once again, make sure to use the<br />
Clown Pass to your advantage. If a part of the Clown Pass is selected you can go to Layers>New<br />
Adjustment Layer>Levels, for instance. Notice that the generated mask is in the exact shape of<br />
your selection. Now you can make isolated changes to that particular area with a non-destructive<br />
result. Create Levels, Exposure and HLS adjustment layers to achieve an uncoated metal look.<br />
Make sure that a mask is selected and begin painting in scratches and weathering. Feel free to<br />
import textures and perform similar Clown Pass operations with them. Since our workflow is<br />
non-destructive, make the most of experimenting with looks.<br />
54 All tutorial files can be downloaded from: filesilo.co.uk/3dartist<br />
MEV 2 Rover, 2015<br />
Maya, ZBrush, Rhino, KeyShot, Photoshop<br />
Mars Exploration Vehicle developed for extended surface<br />
missions, while providing a crew of three space to work,<br />
collect samples and make EVAs with the aid of a large airlock.
YELLOWDOG.<br />
IN THE ART OF RENDERING<br />
IT’S THE BEST OF BREED.<br />
FAST.<br />
SPOT ON.<br />
Meet YellowDog, a winning combination of superfast rendering and right first time certainty.<br />
How do we do it?<br />
IT’S FAST because we give you access to massive amounts of crowd and cloud sourced processing power.<br />
IT’S FAITHFUL, with built in checks to make sure that every frame is delivered back to you error free.<br />
IT’S HONEST. Our quotes are accurate, and you only get charged what’s quoted.<br />
IT’S FRIENDLY and easy to use, every artist’s dream.<br />
IT’S OBEDIENT – whether you want it faster or cheaper, it delivers.<br />
IT’S FLEXIBLE so you can take on the largest jobs with no capital outlay.<br />
YellowDog is your best friend in rendering. Sign up at www.yellowdog.co<br />
or call us on +44 (0)330 223 2499 to find out more.<br />
GO FURTHER AND FASTER WITH YELLOWDOG
LEARN TO SCULPT COMPLEX TYPE<br />
YOUR<br />
FREE<br />
DOWNLOADS<br />
from filesilo.co.uk/3dartist<br />
• Tutorial screenshots<br />
56<br />
ALVARO MATAS &<br />
PABLO M BRAVO<br />
Yummy, 2015<br />
Software<br />
Cinema 4D, ZBrush, Illustrator<br />
Learn how to<br />
• Use MoGraph for modelling<br />
• Work with spline dynamics<br />
• Transpose and sculpt in<br />
ZBrush<br />
• Convert selections<br />
• Sculpt in Cinema 4D<br />
Concept<br />
Yummy is a personal project<br />
made to experiment and to<br />
create something different,<br />
pushing the edges as far as we<br />
possibly can.<br />
Learn to sculpt<br />
complex type<br />
Create your own unique typography with a tasty twist<br />
We are going to mix creativity and experimentation<br />
for this tutorial on stylised typography. What we<br />
will do is mix our knowledge in a different and<br />
fresh way, in comparison to using some of the more<br />
traditional methods of modelling typography.<br />
We will be utilising Cinema 4D to master the use of some<br />
slightly different tricks, and these will provide us with the<br />
chance to model and bring our assets to life by easy and fast<br />
means – all the while by taking advantage of the software’s<br />
amazing tools. Pablo M Bravo will then later join us in the<br />
tutorial, and he will show us how to bring modelling details to<br />
life in ZBrush.<br />
From paper to a spline Starting from sketches helps<br />
01 with the process of creation. The most important step<br />
to start a project is to visualise first in your mind what you are<br />
going to design and then to make a sketch of it. You should<br />
start with a pen and paper, and after you draw your typography,<br />
open Illustrator to create a vector that connects the beginning<br />
and the end of the type. Save your document in Illustrator 8 to<br />
import it to Cinema 4D.<br />
Sweep NURBS The best way to model this piece is<br />
02 to use the vector that we created in Illustrator. To do<br />
so, we are going to take advantage of the awesome tools that<br />
Cinema 4D can offer us. First of all, select the NURBS tool and<br />
put a circle and a spline below it. Select it and go to the Object<br />
Properties menu. Using the Scale options, play around with it<br />
by putting the middle in the top, and see how our sweep starts<br />
small and gets thicker.<br />
Move the points To make the type look really great,<br />
03 we are going to have to move the points of the spline<br />
that we have created. The best thing is to have just the<br />
minimum points on this one, as if you have too many points it<br />
will become more difficult to make a nice shape for the type.<br />
Go to Object Properties and in Intermediate Points select<br />
Uniform, and set a low number of points. Select the points of<br />
the types that go behind the strokes of the type and bring them<br />
to the back.<br />
Make it editable When you are happy with your<br />
04 shape, it’s time to make it editable and to sculpt on it!
After you press the Edit icon it will split into different parts. We<br />
need to select all these parts and Ctrl/right-click on them.<br />
Alternatively, go to Mesh Conversion and press Connect<br />
Objects and delete. After we have it edited in one object, go to<br />
the Mesh command and optimise the image. With this, all our<br />
polygons will join the ones that are not connected. We are now<br />
ready to sculpt and move some parts into ZBrush.<br />
Detail the mesh Inside ZBrush, first of all go to the<br />
05 Geometry menu and press Modify Topology, then<br />
click in Weld Points. Bear in mind that some patches could still<br />
detach from Cinema 4D. Now use ZRemesher to get a better,<br />
cleaner topology that will give us more flexibility when working<br />
with the shape. Using just the Moving brush and moving its<br />
topology, you can further fix the shape of the model by focusing<br />
on the contours. Now we can subdivide and start to add the<br />
final cloth wrinkles. You can use a Standard brush and smooth<br />
it to get nice results. Try to follow the natural way of folding<br />
around the bend areas and smoothing around. Again, a good<br />
way to do so is by using references.<br />
Add the hands Starting from a base hand mesh,<br />
06 you can sculpt a quick hand using a few references<br />
from the internet. After you’re happy with the final look you can<br />
append the hands onto the rest of the model. Using Transpose,<br />
we can mask areas and smooth it to start positioning<br />
everything. At the same time, we will need to fix minor changes<br />
to make both tools work together and add extra details, such as<br />
wrinkles in the bending fingers and nails.<br />
03<br />
04 05<br />
01<br />
06<br />
02<br />
57
LEARN TO SCULPT COMPLEX TYPE<br />
Position the parts Using the Transpose tool, mask<br />
07 areas and smooth them in order to start positioning<br />
everything. You can use the Automask option of Transpose, as<br />
it’s a simple feature. Simply press ‘R’ to select rotation, then<br />
Shift-click and drag the mouse over the area you are trying to<br />
rotate. If you find a few problems using it in this way, go ahead<br />
and use the Mask tool as usual. The way that Transpose works<br />
is once you start dragging with your mouse, it will follow the<br />
surface of the model. To get better results when bending the<br />
fingers, after drag and drop use the Transpose tool, and<br />
reposition it to the centre of the volume, matching<br />
approximately the position of the finger joints, otherwise the<br />
pivot rotation will be too far from the centre of the finger.<br />
Make the sleeves To carry out this step, first we<br />
08 are going to make a selection of the part of the arm<br />
that we want, and then later on we are going to Ctrl/right-click<br />
and press Split. Alternatively, go to Mesh> Commands> Split.<br />
When you have the selection separated, you then need to go to<br />
Simulate>Cloth – then select Drag under the Cloth system, and<br />
add 1-2cm of thickness.<br />
Add the sewing To make the thread we are going<br />
09 to select the Edge button and use the Select and Loop<br />
selection. After selecting the lines that you want to have as the<br />
threads, you will need to disconnect them from the model, like<br />
a guide. In order to do so, go to Mesh>Command>Edge To<br />
Spline. This should pick out the line that you want your stitches<br />
to feature on.<br />
Two thread methods Now that you have separated<br />
10 your guide for the thread, you can do a sweep with it<br />
and add a circle. You are going to have a separate mesh so you<br />
can have another colour and a combination of textures. The<br />
second one is to simulate a real thread, so get a Cloner, get a<br />
small capsule and then drag it above the Cloner. Next, go to the<br />
MoGraph Effector and select the spline. Add this Effector to<br />
the Cloner effects and in the spline Effector attach the spline to<br />
it. When using a Cloner it is necessary to set the count to a<br />
high value in order for it to look like real thread.<br />
07<br />
08<br />
Keep<br />
tweaking<br />
Play with the<br />
points of the<br />
spline – just try<br />
moving it back<br />
and forth until<br />
you feel that the<br />
models look<br />
good. A good<br />
way to do this is<br />
with different<br />
camera angles.<br />
Go to the right<br />
camera angle<br />
and take a look<br />
at the points<br />
from there. If<br />
they look aligned<br />
it’s a good sign!<br />
09<br />
10<br />
58
11<br />
12<br />
Make the tomato Making a good mesh for the tomato<br />
11 is important for the next step. We need to have a good<br />
shape where all the spaghetti is going to be around. Make a<br />
sphere, and then open the Sculpt tools from Cinema4D and<br />
use the Grab tool to deform it until you get the shape you are<br />
happy with. Bear in mind that if you need to subdivide the<br />
mesh, do it. When you are happy with your mesh go to the<br />
Objects panel, Ctrl/right-click the object and press Current<br />
State To Object in order to copy your sculpt model into a new<br />
one, so that you can delete the last one or hide it.<br />
Throw the spaghetti To mix the spaghetti with the<br />
12 type is not going to be a straightforward process, for as<br />
you can see in the image, the spaghetti around the type is<br />
making a nice movement around the strokes. What you need<br />
to do is to select a helix from the Spline panel and play with the<br />
parameters until you get a really messy spiral shape, as you can<br />
see in this step’s screenshot. After you have made your helix,<br />
make it editable. In Type, select B-spline, and in Intermediate<br />
Points select Uniform and 8 points. It is now time to add a<br />
Spline Dynamics tag to the spline, to add a Collision Hair tag to<br />
the objects, and to press Start in the timeline. When the spline<br />
is on the top of the tomato, press Stop and delete the tags.<br />
Build the fork To make this spaghetti we are going to<br />
13 use the Spline Dynamic tag again and use the same<br />
techniques as in the previous step with the tomato. The<br />
difference here is that the shape is now around the fork when<br />
we go to delete the tags. With the new shape of the spaghetti<br />
we are going to once again add the Spline tag, go to the Get<br />
Tool Point mode, and we will select some of the points that we<br />
would like to hold the spaghetti – we would suggest these<br />
points to be around the pinches of the forks where the<br />
spaghetti clings on. Now, with the points selected in the spline,<br />
press the Spline Dynamics tag and go to Properties and select<br />
Fixed. Deselect the object, and these points should be purple<br />
now. Once again, press Play in the timeline and stop it when<br />
you like the shape that it has created. Try this a few times until<br />
you get a nice overall look.<br />
06 13<br />
Control the<br />
points of the<br />
spaghetti<br />
As we mentioned<br />
earlier, it’s not very<br />
straightforward<br />
when it comes to<br />
making the perfect<br />
spaghetti shape, so<br />
when you are finally<br />
ready with the<br />
spaghetti on the<br />
top of the tomato,<br />
put the type on top<br />
of it. Now you’ll<br />
have to play with<br />
the points one by<br />
one to put them<br />
around the type. It’s<br />
not hard but takes<br />
time, so be patient.<br />
59
LEARN TO SCULPT COMPLEX TYPE<br />
Add the napkin This is not a model – it’s just a photo taken of a kitchen napkin. Using<br />
14 photography is one of the many tricks that designers sometimes choose to use, especially<br />
when a photo really matches and fits into a given scene. All we need in order to achieve this is a<br />
good Alpha for it, so go to Photoshop and vectorise the napkin, make it white, and make the rest<br />
of the scene black. In V-Ray or in another render engine, just put this file like an Alpha and the<br />
real napkin as the Diffuse in the shader.<br />
06 14<br />
Jenue<br />
Alvaro Matas (aka Jenue) is a Spanish artist and art<br />
director who divides his time between Madrid and<br />
London. He makes playful images for editorial, music<br />
and advertisements with his own colourful view and<br />
style. Jenue seeks to go beyond traditional<br />
typography, combining CG and real-world elements.<br />
Pencilsan, 2015<br />
Cinema 4D<br />
The love between an ampersand and a pencil culminates in<br />
this hybrid transformation, made with Cinema 4D and<br />
using a real German pencil as reference.<br />
06 15<br />
Eat Me Now, 2015<br />
Cinema 4D<br />
Eat Me Now is a food series where photography and <strong>3D</strong> join<br />
forces. This piece shows how words and sticky peanut butter<br />
can magically come together to entice you eat it now.<br />
Texture the arms To make the textures of the arms, you simply need to load a denim<br />
15 texture tile and add a nice Bump for it. In this case for the Bump we used a tiles preset<br />
with a very low Global scale. For the sleeves folds we used the same shader, but we did a layer in<br />
the Diffuse channel. On top of this, we added the Lighting, Contrast and HSL effects. You might<br />
find that setting Contrast at 15% and Saturation at -12% works best, but experiment with it.<br />
F, 2015<br />
MODO, 3ds Max<br />
F is from Alvaro’s alphabet made in Plasticine with lots of<br />
different shapes and ideas with an unexpected result. This<br />
letter was made in a day.<br />
60
RENDERED WITH<br />
4000 CPUs<br />
© Bryan Talkish<br />
btalkish.com<br />
Making your deadline in time was never cheaper, easier and faster than now.<br />
Unleash the power of 4000 CPUs right into your desktop. If you are new to our<br />
online rendering service feel free to use this coupon code <strong>3D</strong>A-RE-9RF98X6<br />
to receive 35 Renderpoints worth 35€. Go to our website, register and enter your coupon<br />
code. Download our advanced RebusFarm software, send some test frames and find out<br />
yourself how fast and easy it works. The RebusFarm Renderservice is processing 24/7.<br />
35€<br />
FREE<br />
TRIAL<br />
<strong>3D</strong>A-RE-9RF98X6
PRO SHADER AND RENDERING TECHNIQUES IN MODO<br />
62
Pro shader and<br />
rendering Saab 37<br />
techniques Viggen in<br />
A Viggen plane<br />
MODO<br />
in a studio environment with<br />
fabulous lighting, useful for showing of a concept<br />
In this tutorial we are going to create a jet fighter. We will<br />
keep the detail level quite low to keep the total project time<br />
down, If you would rather have a higher poly model for<br />
another Render purpose go surrealist ahead. art in MODO by<br />
This might be good exploring enough for a new simple flyover techniques<br />
animation<br />
or a flight-sim model. It will be focused mostly on modelling<br />
It since is always that’s the a great biggest challenge part about to interpret it. We will 2D also concepts be doing and<br />
materials make a faithful and lightening version in Cycles <strong>3D</strong>, but render it’s also engine an extraordinary (Blender) to<br />
get practice a cool result. to turn shadows and lights from a pencil artwork<br />
into If a you <strong>3D</strong> already scene. are an experienced modeller I can hopefully<br />
give One some of the new most tips interesting but you probably aspects already of this heard tutorial them is to all. see<br />
how rewarding it is to bring to life great concepts like this one<br />
and increase fine details for your characters and so on.<br />
Another great aspect of this process is to take advantage of<br />
the powerful render scheme of MODO and how it handles<br />
render passes so you can have precise control of your<br />
post-production stage. You can also discover exactly how<br />
ZRemesher can easily optimise your meshes for sculpting<br />
work and maps productivity.<br />
Great lighting can be achieved in a few steps inside MODO.<br />
Not only does it create great light, it’s also a powerful tool<br />
when it comes to the shading process. Once you master the<br />
Shader Tree, you can achieve any result you aim for. MODO is<br />
the main tool in my pipeline, simply because it has a very<br />
intuitive interface. Tasks become easier when your software<br />
UI is clear and neat and that’s how it feels working in MODO.<br />
Specific render settings in MODO can boost your final<br />
render quality and save plenty of time afterwards in<br />
Photoshop. Tweaks and fine adjustments are essential for a<br />
better result, so don’t skip it!<br />
63
PRO SHADER AND RENDERING TECHNIQUES IN MODO<br />
DANIEL D’AVILA<br />
North Pole <strong>3D</strong>, 2016<br />
Software<br />
MODO, ZBrush, Photoshop<br />
Learn how to<br />
• Plan complex <strong>3D</strong> scenes<br />
• Interpret 2D artwork in <strong>3D</strong><br />
• Optimise post-production<br />
with render passes<br />
• Optimise geometry with<br />
ZRemesher<br />
• Texture fine adjustments<br />
• Shade in MODO<br />
• Light in MODO<br />
• Texture in MODO<br />
• Model in MODO<br />
• Adjust colour in Photoshop<br />
Concept<br />
This <strong>3D</strong> artwork was based on<br />
the original concept of Spanish<br />
artist The Dulk, and it’s all<br />
about surrealism. I find it so<br />
inspiring and then it came to<br />
me to rebuild the entire scene<br />
in <strong>3D</strong> with my personal vision<br />
of his work.<br />
Block primary shapes The starting point of this<br />
01 artwork begins with blocking the primary shapes of<br />
your elements. You can do that simply by observing the overall<br />
composition and extracting those shapes in your mind – for<br />
example, the whale and its S cylinder movement. Open MODO<br />
and create an eight-sided cylinder using the reference image as<br />
a backdrop. At this stage it’s not necessary to worry about<br />
topology issues, since it’s just a base mesh of your scene.<br />
Create the whale base mesh After exporting the<br />
02 whale OBJ file, import it to ZBrush as a tool and begin<br />
to refine its silhouette. Using basically the Move tool and<br />
different brush sizes you can achieve pretty good results. If<br />
your topology begins to get uneven, it’s time to turn your tool<br />
into a DynaMesh. Increase your DynaMesh resolution to 32<br />
and while pressing Cmd/Ctrl, click, hold and drag inside the<br />
canvas to activate your DynaMesh. Then when you achieve a<br />
good blocking result you need to optimise your mesh with<br />
ZRemesher. Before that, create some ZRemesher guides with<br />
the ZRemesher Guides brush to specify the polygon flow and<br />
then let ZRemesher work its magic.<br />
Begin to sculpt At this point it’s a good idea to<br />
03 create UVs, since your data will turn into maps in a<br />
further step. Always begin to sculpt rough aspects of the whale,<br />
such as the cheek volume and then go on to finer details as you<br />
increase the geometry resolution. You can make good use of<br />
brushes like Dam_Standard for the majority of the wrinkles and<br />
clay buildup. The last touches of texture are created with Alpha<br />
brushes combined with DragRect stroke.<br />
Polypaint and map exporting As you finish the<br />
04 entire sculpting stage, you’ll start to polypaint the<br />
model. Select a light-blue colour as a base for the upper side of<br />
the whale and a pale yellow for the bottom part. This is where<br />
your artistic background can make total difference in enriching<br />
details of the whale. Widespread use of masking was used to<br />
reinforce occlusion areas and reliefs. Using the Cavity Mask will<br />
produce great results to select areas combined with polypaint.<br />
At the end of this step, it’s time to export all of your maps. Be<br />
sure to export your polypaint at the highest geometry subdiv<br />
and maps like Normal and Displacement at the lowest values<br />
of your geometry subdiv.<br />
02<br />
03<br />
01<br />
04<br />
YOUR<br />
FREE<br />
DOWNLOADS<br />
from filesilo.co.uk/3dartist<br />
• Tutorial screenshots<br />
64
Enhance your work<br />
The great thing about reinterpreting<br />
a pre-existing 2D concept is the<br />
freedom to add your own personal<br />
vision and details. It’s not simply<br />
about working in a literal way since<br />
you are practicing new techniques,<br />
artistic vision and trying to push<br />
your limits. You should add textures<br />
that don’t exist, but that make<br />
sense in terms of enriching your art.<br />
Researching references is also a bit<br />
of a cliché, but it’s an effective way<br />
to push your skills further. You can<br />
also ask for opinions on specialised<br />
forums so that experienced artists<br />
can give you their words of wisdom.<br />
The more you dedicate yourself,<br />
the more you’ll evolve. Improving<br />
your artistry is an endless pursuit.<br />
05<br />
06<br />
08<br />
06 07<br />
Assemble overall positions You’ll need to repeat<br />
05 the previous steps until you get the scene completed.<br />
All the elements and characters created in the final render<br />
were made with the exact same technique, so it’s just a matter<br />
of hard work and time. Another important comment about this<br />
workflow is also the fact that all the models will remain in the<br />
same workspace even before switching between programs like<br />
MODO and ZBrush, so make sure you create all the base<br />
meshes in the desired positions as precisely as possible.<br />
Light the scene The simpler, the better – that’s an<br />
06 expression that fits perfectly for many lighting setups.<br />
Unless you need an specific effect, you can produce beautiful<br />
illumination results with just a few light sources. In this case use<br />
one directional light as the main light, an HDR image for the<br />
environment and an area light from the bottom side as the<br />
rim light.<br />
Work with your maps The next step is to take care<br />
07 of all the maps you’ve created in ZBrush and import<br />
them in to MODO. You’ll need to do a few tweaks in some of<br />
them in order to produce the correct results in the render. In the<br />
case of Normal maps, select the map in the Shader Tree, go to<br />
the tab image still and set the Colorspace to Linear instead of<br />
None. In the Texture Locator tab set the Vertical Wrap to -1, so<br />
it will flip the vertical to suit the map correctly in the UV. In the<br />
case of Diffuse maps you can play with gamma values to<br />
balance the contrast and saturation of the map.<br />
Shade in MODO Before starting the shading work<br />
08 in MODO, lock the position of your main camera for<br />
security purposes so you don’t offset the position accidentally.<br />
Duplicate your original camera and use it as a free camera, so<br />
you can pan around and focus on closer spots of your model.<br />
Watch the Preview window refresh the results. The use of a<br />
physically-based (BRDF) material can produce great results<br />
with a richer texture. Duplicate your Diffuse map and drive it as<br />
a Subsurface Color map, which will give the effect of<br />
translucency that can be seen in most of the characters, such<br />
as the friendly penguins in front of the whale.<br />
65
PRO SHADER AND RENDERING TECHNIQUES IN MODO<br />
Create render passes Once the scene is ready we<br />
09 can move on to the Render Settings and Render<br />
Output adjustments. One my favourite features of MODO is<br />
the ability to select many different Render Outputs in a variety<br />
of situations. It will allow you to diagnose specific issues or give<br />
you huge amounts of control over compositing in Photoshop. A<br />
default scene automatically includes a Final Color and Alpha<br />
output, which should be fine for most situations. Additional<br />
layers can be added from within the Shader Tree viewport itself<br />
simply by clicking the Add Layer option of the full viewport<br />
window, and selecting Render Output>Render Output from the<br />
pop-up menu.<br />
Render the final scene Now, before starting the<br />
10 final render you should quickly adjust your Global<br />
Illumination settings. Boost your Light Bounces up to 3. This will<br />
prevent noise issues in the darker areas of your scene and also<br />
provide a more vivid final result. Select your image resolution<br />
inside the Frame tab. In this case the values are 6,000 pixels<br />
wide by 3,850 pixels tall. Once you’ve done all this, press the F9<br />
key or go to Render>Render. The Render window should open<br />
and begin to calculate the irradiance cache pre-passes. Go grab<br />
a cup of coffee and wait until the render is finished.<br />
Design cartoon clouds After the render is complete<br />
11 you can add clouds around the scene in order to give the<br />
composition some balance. In fact, this is a good opportunity to<br />
use some modern and cartoon cloud designs rather than<br />
traditional, as it would fit perfectly in this surreal scene. After a<br />
few studies the clouds were concluded and ready to render<br />
separately. You can now open Photoshop and start to have fun<br />
with the post-production stage. When you’re placing the clouds<br />
in the scene, you might find that their design is a little too<br />
distracting, so it might be worth adding in a blur or tweaking<br />
the opacity of the cloud layers. The clouds can be placed in the<br />
scene to suggest perspective and depth, so feel free to position<br />
them in different spots of your image. This is where your work<br />
will gain more life and interest.<br />
Make use of render outputs This is where you’ll<br />
12 feel thankful about having multiple layered render<br />
outputs in MODO. It becomes pretty handy to select areas<br />
with the help of Surface ID, or controlling shadow areas with a<br />
Shadow Density pass in Photoshop. As you get more and more<br />
familiar with each one of these render outputs you’ll find<br />
yourself addicted to this workflow since they give huge control<br />
to lights, shadows, reflections, specularity, roughness and so<br />
on. It is also time to play around with different background<br />
colours, and it can be a such a challenge in such a colourful<br />
palette. The pink-orange solution combined with subtle light<br />
invasions really worked for this scene.<br />
Final retouches and colour adjustments At this<br />
13 point, the last colour adjustments are added. Try to<br />
compare your rough render with your final retouched image to<br />
see how rewarding and important is to master Photoshop<br />
techniques. Add a Vibrance adjustment layer and increase the<br />
saturation of your image. You can also use a soft brush with a<br />
low opacity and paint a few interventions of pink and orange<br />
over the elements to simulate light and color bouncing. Add<br />
some fog, dust, speckles and particle effects above all layers<br />
but do not exaggerate it. It’s simply a matter of using your<br />
artistic skills and abilities to balance colour and contrasts.<br />
09 06<br />
11<br />
06 10<br />
06 12 06 13<br />
66
Special offer for readers in North America<br />
5 issues FREE<br />
When you subscribe<br />
FREE<br />
resource<br />
downloads<br />
every issue<br />
Practical inspiration<br />
for <strong>3D</strong> enthusiasts and<br />
professionals<br />
Order hotline +44 (0) 1795 592 951<br />
Online at www.imaginesubs.co.uk/3da<br />
*Terms and conditions This is a US subscription offer. You will actually be charged £80 sterling for an annual subscription. This is equivalent to $120 at the time<br />
of writing, exchange rate may vary. 5 free issues refers to the USA newsstand price of $14.99 for 13 issues being $194.87, compared with $120 for a subscription. Your<br />
subscription starts from the next available issue and will run for 13 issues. This offer expires 30 November 2016.<br />
Quote<br />
USA2<br />
for this<br />
exclusive<br />
offer!
Techniques<br />
Our experts<br />
The best artists from<br />
around the world reveal<br />
specific CG techniques<br />
Unreal Engine<br />
James Brady<br />
artstation.com/artist/jamesbrady<br />
James is a games artist<br />
working at The Creative<br />
Assembly, aspiring to<br />
become one of the best<br />
artists in the industry<br />
Blender<br />
Sean Kennedy<br />
openvisualfx.com<br />
Sean is a compositor<br />
and generalist currently<br />
employed at CoSA<br />
VFX, having previously<br />
worked at other studios<br />
3ds Max<br />
Vikrant Dalal<br />
project01studio.blogspot.in<br />
Vikrant has several<br />
years of experience in<br />
VFX. His company<br />
Project01 Design<br />
produces <strong>3D</strong> tutorials<br />
UNREAL ENGINE<br />
68<br />
YOUR<br />
FREE<br />
DOWNLOADS<br />
from filesilo.co.uk/3dartist<br />
• UE4 scene files<br />
• Tutorial screenshots<br />
Achieve atmospheric<br />
lighting in Unreal Engine<br />
This tutorial will guide you through creating realistic<br />
lighting within Unreal Engine 4, starting from adding<br />
basic lighting all the way to adding post-processing<br />
effects and using the Reflection Capture system to<br />
realistically capture the lighting reflections in your Unreal<br />
Engine scene. We will be taking you through the creative<br />
process for a Silent Hill homage scene, which stormed<br />
videogame press worldwide after it was released online. You<br />
will discover what is involved in creating realistic lighting<br />
within a game engine, along with the theory of lighting while<br />
using PBR materials and in a mainstream game engine that<br />
supports PBR rendering.<br />
Prepare your project Before diving into a project, it’s<br />
01 crucial that you are confident in knowing what you want<br />
to create and what the end goal is for your project. This will end<br />
up saving a lot of time scrubbing for references, having to<br />
reshape your project on the fly if you ultimately opt to change<br />
your final result, and overall saves a lot of time and frustration.<br />
Once you’ve gathered enough reference and have a solid mood<br />
board, then we can move on to the blocking stage.<br />
Block out your scene Once your end goal is clear<br />
02 and you are confident in what you are trying to<br />
achieve, it’s time to start the creation process. This is the<br />
easiest stage in creating an environment and helps to get you<br />
into the correct frame of mind mentally before starting to add<br />
detail into your scene. You can quickly scrub together a block<br />
out by using Unreal Engine’s primitive geometry. This can be<br />
found on the left-hand side of the editor. This also quickly<br />
allows you to decide on which angle or aspect of your block out<br />
composition works for your scene.<br />
03<br />
Add lights to your scene Once you’re happy with<br />
the block out, you can then move on to lighting the<br />
scene. This not only provides you composition, but it means<br />
you can also quickly see how materials and assets look when<br />
imported to the scene. For this project, when we initially<br />
approached lighting the Silent Hill-style scene, we were clear on<br />
the atmosphere we were trying to achieve, enabling us to have<br />
a solid idea on how the scene should be lit. Start by adding a<br />
directional light and a few low-lit light points. Lighting plays a<br />
huge role in how believable your environment looks and feels.
Remember that when creating<br />
assets for a game enine, TRIS count<br />
is very important<br />
02<br />
03<br />
Achieve a chilling atmosphere Once the lighting<br />
04 is set up in your scene and you’re happy with how it<br />
not only looks but feels, it’s time to then move on to nailing the<br />
atmosphere you are trying to portray. You can achieve this by<br />
using Unreal Engine’s Exponential Height Fog, which allows you<br />
to quickly create a chilling atmospheric composition while also<br />
leading the viewer’s eye. Start by adjusting the overall fog<br />
density followed by adjusting the overall fog opacity. You can<br />
also use directional in-scattering, which helps to blend the fog<br />
with the scene’s lighting setup.<br />
Include your materials/assets Once you’re<br />
05 content with the overall lighting and atmospheric<br />
setup, you should then begin to replace the overall block out<br />
with modular wall, floor and roof sections, followed by the<br />
assets that were created for the scene. It’s important to<br />
remember that when creating assets for a game engine, TRIS<br />
count is very important. Always remember that any assets in a<br />
scene that do not move – such as static meshes – should<br />
always be optimised. You can achieve this by deleting polygon<br />
faces that are not visible to the player. This saves TRIS count<br />
and overall UV texturing space.<br />
Capture environment reflections This stage is a<br />
06 crucial part of the environment creation process. This<br />
stage allows you to achieve realistic reflections within an<br />
environment and it also helps the game engine calculate how<br />
the glossy reflections should appear within the environment. In<br />
technical terms, the Reflection Capture actor provides indirect<br />
specular. We get direct specular through analytical lighting, but<br />
that provides reflections in a few bright directions. Indirect<br />
specular allows all parts of the scene to reflect on all other<br />
parts, which is important when you feature materials like metal<br />
that have no diffuse response and rely solely on secularity<br />
when using PBR shaders.<br />
04<br />
01<br />
05<br />
06<br />
69
TECHNIQUES<br />
Bake Light maps using Lightmass<br />
Unreal Engine’s Lightmass creates Light maps with<br />
complex light interactions like area shadowing and<br />
diffuse interrelation. It is used to pre-compute<br />
portions of the lighting contribution of lights with<br />
stationary and static mobility. This enables great<br />
optimisation and allows your scene to run a smoother<br />
frame rate. This is very important for game<br />
environments and also helps to decrease the time it<br />
takes to render a screenshot for your personal site.<br />
Remember, it’s very important to make sure a<br />
Lightmass importance volume is in your scene at all<br />
times. This means Lightmass bakes light that is only<br />
contained within it.<br />
Post-process your scene This stage is always my<br />
07 favourite part of the environment creation process.<br />
Adding post-processing to your scene enables you to tweak the<br />
overall look and feel. Examples include HDR blooming, ambient<br />
occlusion and colour tone mapping. In Unreal Engine 4, the<br />
post-processing volume is essentially only a type of blend layer<br />
that enables you to blend different effects on top of your scene.<br />
The post-processing volume also acts as a linear interpolation,<br />
which enables you to blend this with actors, such as a camera,<br />
when creating cinematic sequences.<br />
Render images of your final scene Once we’ve<br />
08 completed the environment process and are happy<br />
with the final product, we then need to move on to taking<br />
screenshots of the environment. One trick that I find speeds up<br />
the process is to add cameras to the scene to avoid situations<br />
of losing that perfect composition shot. This can be done by<br />
selecting All Classics on the left-hand side of the editor and<br />
dragging a camera actor into the scene. Once you drag a<br />
camera actor into the scene, a small box will appear outputting<br />
what that camera is rendering.<br />
Add any final touch-ups in Photoshop The<br />
09 final process is touching up the environment<br />
screenshots in Photoshop. Start by adding a Sharpen filter to<br />
really make the scene pop. Depending on how you’re trying to<br />
lead the viewer’s eye, you could start by adding a gradient<br />
overlay to focus the viewer on a specific area of the scene – this<br />
also helps to exaggerate the lighting within the scene. Follow up<br />
by adjusting the overall tone, contrast and brightness to finalise<br />
your result.<br />
07<br />
08<br />
09<br />
Lead the eye<br />
When creating an environment, it’s important to<br />
provide a focus of the scene to the viewer. This can be<br />
achieved through a number of techniques, which<br />
enable you to draw the eye into a focal point within<br />
the environment. This also applies to the lighting<br />
composition setup too. When creating the Silent Hill<br />
homage scene, you can achieve this by brightening a<br />
focal point of the scene while pushing the rest into the<br />
background. Pulling back on any detail from the<br />
unfocused section of the scene allows the viewer’s<br />
eyes the opportunity to rest on the focal point.<br />
70
CREATE THE IMPOSSIBLE<br />
www.photoshopcreative.co.uk<br />
Available<br />
from all good<br />
newsagents and<br />
supermarkets<br />
ON SALE NOW<br />
• Striking imagery • Step-by-step guides • Essential tutorials<br />
PHOTO EDITING DIGITAL PAINTING PHOTO ART<br />
TOOL GUIDES BEGINNER TIPS<br />
BUY YOUR ISSUE TODAY<br />
Print edition available at www.imagineshop.co.uk<br />
Digital edition available at www.greatdigitalmags.com<br />
Available on the following platforms<br />
facebook.com/PhotoshopCreative<br />
twitter.com/PshopCreative
TECHNIQUES<br />
BLENDER<br />
Matchmove a scene<br />
for compositing<br />
YOUR<br />
FREE<br />
DOWNLOADS<br />
from filesilo.co.uk/3dartist<br />
• Set extension assets<br />
• Video tutorial<br />
• Tutorial screenshots<br />
Set extensions are the kind of visual effect that every<br />
single movie released today has. Not just the big<br />
blockbusters, but comedies, little indie dramas and even<br />
just about every TV show has some type of set extension or<br />
background enhancement happening in it. It can be anything<br />
from alien landscapes and futuristic buildings to simply<br />
replacing a traffic sign or a storefront. Usually the same<br />
techniques are also useful if you want to remove something<br />
from a scene, like a wayward crew member or a car driving<br />
through the background of your medieval village.<br />
While set extension tasks can be accomplished using both<br />
2D and <strong>3D</strong> techniques, in this tutorial we’re going to focus on<br />
2.5D to add an important exterior location to our shot.<br />
Perhaps the actual location was a protected park, and we<br />
were not allowed to build any kinds of structure out there<br />
during shooting. If the interior scenes are all shot on a<br />
soundstage or another location, then we only need a couple<br />
of establishing exterior shots, which is where matte painting<br />
and set extensions can save the day. And if you’ve not heard<br />
of 2.5D, it is exactly what it sounds like – a blend of 2D and<br />
<strong>3D</strong>. We’ll use 2D cards with matte paintings on them and<br />
position them around our <strong>3D</strong> space.<br />
We are going to utilise Blender’s <strong>3D</strong> space for much of this<br />
project, but keep in mind that the work we are doing is set up<br />
for compositing, not a <strong>3D</strong> render. Matte painting, which isn’t<br />
the scope of this tutorial, goes hand in hand with set<br />
extensions. Matte paintings are usually given to a compositor<br />
in layers so the compositor can make adjustments to (or<br />
completely remove) each individual part of the painting and<br />
layer them into the matchmoved scene as needed. These<br />
layers can range from very simple (as in our case with this<br />
tutorial) to very complex.<br />
Do not rule out <strong>3D</strong> completely, though. Naturally, you are<br />
welcome to create any <strong>3D</strong> elements you want. Having the<br />
matchmove will make it relatively easy to drop things into<br />
place, but be sure to take great care when texturing and<br />
lighting. Look at light and shadow placements in the footage,<br />
and the overall tonality of the shot, and do your best to get<br />
your <strong>3D</strong> in the same visual world.<br />
<strong>3D</strong> track the scene Bring the footage into the Movie<br />
01 Clip Editor (MCE), then Set Scene Frames and Prefetch<br />
so it’s loaded into memory. This is a simple shot, so there<br />
should be no problems finding at least eight points to track. Try<br />
and select points that are both close and far from the camera. I<br />
tracked 16 different points, finding contrast areas on the hillside<br />
and the pathway. In this project I tried to stay away from the<br />
very edges of the image.<br />
72
01 02<br />
Zero-weighted tracks<br />
Zero-weighted tracks are track points that do not<br />
affect the camera solve. By leaving the original 16 track<br />
points weighted to 1, the camera solve should remain<br />
the same, but these new zero-weighted track points<br />
will populate the scene in their correct places and<br />
basically give us a <strong>3D</strong> outline of the landscape. We can<br />
then place vertices at each of these points<br />
automatically, which lets you easily re-create basic<br />
geometry that matches the landscape in the footage.<br />
Solve the camera motion After choosing Solve<br />
02 keyframes and setting Refine to Focal Length, K1, K2,<br />
my 16 points generated an error of 0.3. In the Scene Setup tab,<br />
press Set as Background, so Blender automatically places the<br />
frame sequence in your camera view, then click Setup Tracking<br />
Scene. There are some buttons in the MCE editor for aligning<br />
the orientation, but I usually find it just as easy to select the<br />
camera, set the pivot to the <strong>3D</strong> cursor (at centre), and rotate in<br />
the various views until it is aligned properly to the world.<br />
Zero-weighted tracks Having only 16 points<br />
03 makes it tough to get an idea of the geometry of the<br />
scene, so let’s use zero-weighted tracks to create many more.<br />
In the MCE, under the Track Settings tab, open Extra Settings<br />
and change the weight to 0. Go to the first frame and use<br />
Detect Features. Press F6 to bring up the options and change<br />
the threshold and margin until you have tons of tracks all over<br />
the shot. Track forward, then do the same from the last frame,<br />
tracking backwards. In the MCE graph editor, select the most<br />
erroneous curves and delete them.<br />
Create rough geometry Solve the camera again,<br />
04 and your <strong>3D</strong> scene should now look like a point cloud<br />
of the landscape. In the Geometry tab, press <strong>3D</strong> Markers To<br />
Mesh. In the <strong>3D</strong> view, you’ll see a vertex created for every track<br />
point. Turn off the track points by unchecking Motion Tracking<br />
in the Properties panel. Create geometry from the new vertices<br />
by going into Edit Mode, selecting four vertices, and pressing ‘F’<br />
to create a face. Keep building new faces off that one, choosing<br />
vertices that seem to make sense for the hillside.<br />
03<br />
04<br />
73
TECHNIQUES<br />
Bring in matte paintings In File>User<br />
05 Preferences>Add-Ons, turn on Import Images as<br />
Planes (which you’ll now find under Shift+A>Mesh and begin<br />
importing your matte painting elements. In this case, we’re<br />
using PNG images with alpha channels. When importing, be<br />
sure to use an Emission material and Use Alpha – Premultiplied.<br />
Place and scale them as necessary. Be sure to place the planes<br />
near vertices that lie in <strong>3D</strong> space where that matte painted<br />
element should actually be.<br />
Spice up the sky The sky was clear on the day of<br />
06 shooting, but we can add some drama by replacing it<br />
or adding clouds to it. Import a sky image as a plane and make<br />
it very large. Push it back away from the camera, beyond the<br />
farthest track point. We don’t need a real sky dome because all<br />
the elements have light painted in to them from the matte<br />
painting department. This sky will be just another layer we<br />
composite in.<br />
Arrange the layers We have to split these paintings<br />
07 into the correct layers for compositing. For this<br />
particular scene, we could leave the hut and the bridge on the<br />
same render layer, but if we want to colour correct only one of<br />
them later, it will be easier if we just place everything on its own<br />
layer. Once you have split objects onto their own layers by<br />
pressing ‘M’, you then have to set up the corresponding render<br />
layers in the Render Layers panel. Place the rough landscape<br />
geometry on a layer that won’t render.<br />
Rotoscope foreground objects Obviously we’ve<br />
08 got to bring the actor and some of the pathway back<br />
over the matte paintings. Back in the MCE Tracking Properties,<br />
turn off the checkboxes for Pattern and Disabled, to keep the<br />
view less cluttered. Press Tab to switch into Mask mode and<br />
Cmd/Ctrl-left click to begin drawing your first mask around the<br />
actor’s hair, pressing ‘I’ to set keyframes. As you create the<br />
masks, be sure to label your mask layers clearly. I’m creating<br />
one mask for the actor and one for the pathway in front of the<br />
bridge. And don’t forget you can parent masks to tracks!<br />
05<br />
Rotoscoping keyframes<br />
When rotoscoping, by default,<br />
Blender does not set a keyframe on<br />
your mask. Once you draw your<br />
mask, press ‘I’ to set a keyframe, and<br />
then we recommend turning on the<br />
Automatic Keyframe Insertion button.<br />
Now, when you adjust your mask, it<br />
will automatically set the keyframe.<br />
It’s also worth opening a dope sheet<br />
and setting it to Mask, so you can see<br />
those keyframes on a timeline. Be<br />
careful to turn off Automatic<br />
Keyframe Insertion when you go back<br />
to your <strong>3D</strong> view, or you’ll be setting<br />
random keyframes every time you<br />
move a plane!<br />
06<br />
07 08<br />
74
09 10<br />
12<br />
Projecting onto<br />
geometry<br />
We’re only using flat<br />
images here, but it’s also<br />
very easy to project those<br />
flat images onto basic<br />
geometry to give a bit of<br />
real <strong>3D</strong> depth to the matte<br />
paintings. My preferred<br />
method of doing this is by<br />
UV unwrapping the<br />
simple geometry using<br />
the Project From View<br />
option. Then simply move<br />
the UV vertices around<br />
the matte painted image<br />
to place them precisely,<br />
and your matte painting is<br />
now mapped on.<br />
Alternatively, you could<br />
use the UV Project<br />
modifier. Each way has its<br />
own pros and cons.<br />
11<br />
Moving to the compositor Once in the<br />
09 compositor, Enable Nodes should already be activated<br />
because setting up the tracking scene creates a basic node<br />
layout for render layers and shadow passes. Delete whatever<br />
you won’t need, duplicate the Render Layers node for every<br />
layer you set up in Step 7 and layer them so the sky is first<br />
(using a Mix node set to Screen), followed by the bridge, hut,<br />
and hut shadow (all using Alpha Over nodes). Create Mask<br />
nodes for your rotoscoping, combine them with a Math node<br />
set to Add (enable Clamp), and plug it into the factor of the<br />
Alpha Over node for the bridge.<br />
Adjust alpha channels You’ll have to invert the<br />
10 matte on the bridge, and add a Blur to each mask<br />
before they are combined. You could also use a Dilate/Erode<br />
node if your roto isn’t accurate enough once blurred. For the<br />
sky, run a Separate RGBA node off the Movie Clip node and<br />
plug a Color Ramp into the blue channel. Experiment with<br />
adjusting the sliders until you get a nice matte for the sky, then<br />
subtract the actor’s hair roto with a Math node. In order to get<br />
the perfect clouds, you’ll need to plug that Math node into the<br />
sky Mix factor.<br />
Add <strong>3D</strong> elements Now let’s dip into real <strong>3D</strong> to bring in<br />
11 some added realistic details. I chose to make a bird flying<br />
in the background, which I rendered from a separate project file<br />
to use as an alpha channel on a 2D card in our main scene.<br />
Other fun details could be a clothes line hanging outside with<br />
fabric blowing in the breeze, or maybe some added trees or<br />
bushes. You could even shoot an actor against a greenscreen<br />
and place that footage on a 2D card out there in front of the<br />
hut, if you liked.<br />
Finalise the shot Now that all the elements are there<br />
12 and layered correctly, feel free to dial things in to your<br />
liking. Maybe add some light wrap to the hut, and make sure<br />
the colour correction is working on all the individual elements.<br />
Check your black levels and brightness levels by making the<br />
composite overly bright or overly dark temporarily (throw a<br />
Color Correction node at the end of the node tree and crank up<br />
the Gamma). If you’re using footage from a camera that has<br />
noticeable film grain, you’ll have to add matching grain to your<br />
matte painted elements.<br />
All tutorial files can be downloaded from: filesilo.co.uk/3dartist 75
TECHNIQUES<br />
<strong>3D</strong>S MAX, AFTER EFFECTS<br />
Render your own text<br />
motion graphics<br />
YOUR<br />
FREE<br />
DOWNLOADS<br />
from filesilo.co.uk/3dartist<br />
• 3ds Max file<br />
• After Effects file<br />
• Video tutorial<br />
• Tutorial screenshots<br />
There are many different types of text effects, from<br />
movie titles and company logo animations to simple<br />
presentation text animations or any kind of video trailer<br />
text. With all these effects around, it means that you can try<br />
various different methods, but in this tutorial we are going to<br />
create motion graphics text, which you could use in a video<br />
trailer or as a <strong>3D</strong> cartoon logo.<br />
First of all, we will introduce the idea of a text effect. You<br />
may have seen these kind of effects on the internet, like on<br />
YouTube or on Vimeo. There are a number of 2D and <strong>3D</strong> apps<br />
and plugins that people choose to use for motion graphics,<br />
including 3ds Max, Cinema4D, After Effects and so on, but<br />
we are going to use 3ds Max to achieve this effect.<br />
Before you start working on this kind of effect, you should<br />
have good knowledge of 3ds Max as well as different<br />
modifiers and options within this software, because<br />
sometimes it’s the simple modifiers that yield the best results.<br />
You might not be able to learn each and every parameter of<br />
this software, as 3ds Max is very vast and will need a lot of<br />
time to go through. As far as the motion graphics effect is<br />
concerned, we will learn as much as required for this<br />
particular tutorial.<br />
This is very interesting subject because you can’t rely on<br />
one certain process to create this effect. As much as you will<br />
use your creativity and tools, you’ll find different effects every<br />
time you experiment. With this in mind, the kind of results<br />
you’ll get will very much depend on your own understanding<br />
of using tools and techniques.<br />
Create spline shapes Open 3ds Max. Before we<br />
01 start working on our scene, remember that we are<br />
going to create text motion graphics using both splines and<br />
geometry. First of all we will create our chosen word or text<br />
using Spline shapes. To do so, go to the Create panel and go to<br />
Shapes>Spline>Text. Now using a Line shape, draw a shape for<br />
this text or word. Refer to the image for better understanding.<br />
After you’ve finished the text shape, you’ll want to create<br />
surrounding shapes using a spline so it will add a more dynamic<br />
look as well as adding depth to the scene if you create these<br />
shapes in all three axes.<br />
76
Make sure you use references<br />
Always watch different videos on the internet for a<br />
better understanding of text animation. It helps to know<br />
what different artists use and which tools help to make<br />
their results more attractive and dynamic. It helps a lot.<br />
You should use this tip for other things as well.<br />
02<br />
01<br />
03<br />
Create geometry As soon as you’ve finished with<br />
02 the inital shape modelling, it’s time to create an object<br />
or geometry that will travel along these shapes or on splines.<br />
We will need to create a Geosphere. For that, go to the Create<br />
panel and select Geometry>Standard Primitives>Geosphere.<br />
Now add some modifiers to it. First add Noise modifier and set<br />
the Scale as 2.3, Strength X as 5.0, Y as 5.0 and Z as 5.0. Now<br />
add a TurboSmooth modifier and set Iterations to 2. Next, we<br />
will add our last modifier, which is Path Deform Binding, which<br />
we will use to animate this Geosphere on a spline.<br />
Animate geometry on spline shape To animate<br />
03 our geometry or object on the spline shape, we will<br />
use a Path Deform Binding modifier. Add this modifier and first<br />
of all click on the Move To Path button. We will need to change<br />
the parameters, but before that, remember we have to animate<br />
them too. Go to Frame 0 and set the Percent to 0.0, Stretch to<br />
10, Rotation to 0.0 and Twist to 2000. Next, turn on the Auto<br />
Key and go to Frame 100 or your last frame. Now set the<br />
Percent to 100 or change it as per your requirement. Stretch<br />
should be set to 12.5, with Rotation to 360 and Twist to 2000.<br />
Make the same objects or geometries for all our splines and<br />
animate them as you need to.<br />
Assign materials Now that we have finished the<br />
04 modelling and animation part, it’s time to work on the<br />
look of our geometry. For that we will use a standard material.<br />
You could use a V-Ray material, but as you can see this effect<br />
doesn’t need any advanced material, so a simple material is<br />
probably better. First of all select one Geosphere and assign a<br />
standard material, then set the Specular level to 20, Glossiness<br />
to 30 and Self Illumination to 25. There is no need to change<br />
the colour because we are going to use colourful maps for this.<br />
Assign different materials for all the Geospheres, or you can<br />
select bunch of Geospheres and create a group, assigning a<br />
single material for that group.<br />
04<br />
Try different<br />
plugins<br />
If you have good<br />
knowledge of different<br />
plugins for 3ds Max, for<br />
example FumeFX, RayFire<br />
and so on, you can use<br />
these to improve your<br />
motion graphics effects.<br />
These mean that you can<br />
add fire and smoke or<br />
break the text and so on.<br />
You can use RealFlow<br />
software to create liquid<br />
effects in your animation,<br />
so it will look more<br />
amazing and dynamic.<br />
77
TECHNIQUES<br />
Assign a texture Now we have created the material<br />
05 for our Geospheres, it’s time to work on texture for our<br />
geometries. For that we will use colourful images of textures.<br />
All you need to do is create colourful textures in Photoshop or<br />
just download them from the internet. After this, just add these<br />
images as a material and assign them to your different<br />
geometry. Because of these colourful images these Geospheres<br />
will look very attractive.<br />
Light it up After finishing the initial setup, it’s time to<br />
06 add light in the scene. We will create a single light,<br />
which is Omni – for this, go to the Create panel, and go to<br />
Lights>Standard>Omni. Click on Omni Light and create it in the<br />
viewport. Set this light position as per the camera and scene<br />
requirement. Now select the lights and go to the Modify panel,<br />
then turn on the Shadow and make it a Shadow map. Don’t<br />
change anything in Light Multiplier and Light Colour. You can<br />
add more than one light if you think that the scene needs it, but<br />
otherwise keep it single to save on rendering time.<br />
Render After finishing the lighting setup, it’s finally<br />
07 time to render the scene. Go to Render Setup by<br />
clicking F10 and set the Output Range, Output Resolution and<br />
Output Path. After finishing this setup, if you want to render<br />
different passes, for example a Diffuse pass, Light pass or a<br />
Reflection pass and so on, just go to the Render Elements tab<br />
and click on the Add button. Here you can see the new window<br />
has appeared, so select the elements that you want to render<br />
and click OK. Now just hit the Render button. It will take around<br />
one to two hours to finish the rendering.<br />
Composite and add final tweaks Once the<br />
08 render has finally finished, import the renders into<br />
After Effects or any other compositing software that you use.<br />
We’re using After Effects, so import the elements and then<br />
drag them into the timeline. Now select Element and add<br />
Brightness and Contrast or any other effects, then play around<br />
with the parameters until you get a final result that you’re<br />
satisfied with. Then create a solid background in Photoshop<br />
and import that background into After Effects as well. Drag it to<br />
the timeline below the Text Element. Now make the final<br />
output and you will get your motion graphics text.<br />
05<br />
06<br />
Try to learn<br />
particle<br />
effects<br />
If you are in the<br />
motion graphics field<br />
then you should<br />
learn particle effects.<br />
Every software has<br />
its own particle<br />
section or module,<br />
so try to learn as<br />
much as you can<br />
because you can<br />
create many<br />
different types of<br />
effects using them. I<br />
use the Particle Flow<br />
System in 3ds Max<br />
and it’s amazing.<br />
07<br />
08<br />
78
Goosefoot,<br />
2015<br />
LIGHTING<br />
Incredible <strong>3D</strong> artists take us behind their artwork<br />
LIGHTING To light the environment I used an HDR image plugged into<br />
the Texture slot of a V-Ray Light and set it to Dome. Ticking Lock To<br />
Dome Orientation means that when you rotate the light in the viewport<br />
the HDR rotates too. Once I was happy with that I put a few V-Ray IES<br />
lights into the interiors and the lighting was good to go.<br />
Jake Denham<br />
luxuryvisuals.com<br />
<strong>3D</strong><strong>Artist</strong>Online username<br />
Jaked3d<br />
Software 3ds Max, V-Ray,<br />
Photoshop<br />
79
IS THIS THE BEST<br />
MOCAP EVER?<br />
DI4D, Audiomotion and Remedy explain<br />
the awesome tech behind Quantum Break<br />
ISSUE 094<br />
Utilise ZBrush and 3ds Max to<br />
generate triple-A standard tileables<br />
ENJOY MORE OF YOUR FAVOURITE CGI<br />
SUBSCRIBE<br />
& SAVE<br />
UP TO<br />
37%<br />
*<br />
FREE 5GB OF VIDEOS & MORE<br />
Practical inspiration for the <strong>3D</strong> community<br />
www.<strong>3D</strong><strong>Artist</strong>online.com<br />
96<br />
FREE 5GB OF VIDEOS & MORE<br />
Practical inspiration for the <strong>3D</strong> community<br />
www.<strong>3D</strong><strong>Artist</strong>online.com<br />
22<br />
PAGES OF<br />
BLENDER<br />
<strong>3D</strong>S<br />
MAX<br />
2017<br />
UNLEASHED<br />
95<br />
MAYA<br />
UPDATE<br />
TESTED<br />
A worthwhile upgrade<br />
or just a stop gap?<br />
CONSTRUCT<br />
STUNNING<br />
MODELS<br />
Build, texture and render a<br />
photorealistic fighter jet<br />
BLENDER<br />
Create your own UI Enhance your workflow Get started with scripting<br />
PERFECT YOUR<br />
SHOWREEL<br />
Represent yourself properly and<br />
land your dream job today<br />
65<br />
65 PRO<br />
ISSUE 096<br />
PRO<br />
HACKS FOR<br />
BUILD BETTER<br />
CHARACTERS<br />
Develop and refine an exciting<br />
sci-fi scene in 17 expert steps<br />
001_<strong>3D</strong>A_096 Digital Edition.indd 1 28/06/2016 12:36<br />
w<br />
BUILD<br />
MODELS FROM<br />
CAD DATA<br />
PROCEDURAL<br />
VIDEOGAME<br />
TERRAIN<br />
EXPERT<br />
GOLAEM<br />
REVIEW<br />
DEVELOP<br />
GAME READY<br />
WEAPONS<br />
ILM GOES<br />
TO WAR<br />
The VFX masters take us behind the<br />
scenes of Warcraft: The Beginning<br />
UPGRADE YOUR<br />
CREATURE<br />
CONCEPTS<br />
Discover essential tools and techniques to<br />
help you master professional level design<br />
INCREDIBLE FOAM<br />
FX WITH BIFROST<br />
Harness the power of Maya’s robust fluid<br />
toolset and achieve unbelievable results<br />
COMPLEX<br />
ZBRUSH<br />
SCULPTS<br />
Get to grips with dense,<br />
character-led scenes<br />
001_<strong>3D</strong>A_095 Digital Edition.indd 1 02/06/2016 14:32<br />
w<br />
FREE 6GB OF VIDEOS & MORE<br />
<strong>3D</strong>S MAX<br />
& MAYA<br />
NEW UPDATES REVEALED<br />
Our first look at Autodesk’s exciting<br />
new software developments<br />
KITBASH<br />
CONCEPTS<br />
Mark Van Haitsma reveals<br />
the secret to great design<br />
FIRE UP YOUR<br />
Practical inspiration for the <strong>3D</strong> community<br />
www.<strong>3D</strong><strong>Artist</strong>online.com<br />
HOW TO<br />
MAKE IT AS A<br />
COMPOSITOR<br />
PHOTOREALISM<br />
IN CINEMA 4D<br />
WATER<br />
DYNAMICS<br />
IN REALFLOW<br />
MODELLING<br />
94<br />
• 5 expert workflows • Pro sculpting & hard surfaces • Advanced techniques explored<br />
001_<strong>3D</strong>A_094 Digital Edition.indd 1 03/05/2016 17:29<br />
PRO TEXTURING<br />
FOR GAMES<br />
*US Subscribers save up to 40% off the single issue price.<br />
See more at: www.greatdigitalmags.com
MAGAZINE FOR LESS WHEN YOU SUBSCRIBE!<br />
Every issue<br />
packed with…<br />
Exclusively commissioned art<br />
Behind-the-scenes guides to images and fantastic artwork<br />
Interviews with inspirational artists<br />
Tips for studying <strong>3D</strong> and getting work in the industry<br />
Why you should<br />
subscribe...<br />
Save up to 37 % off the single issue price<br />
Immediate delivery to your device<br />
Never miss an issue<br />
Available across a wide range<br />
of digital devices<br />
Subscribe today and take advantage<br />
of this great offer!<br />
Download to your device now
NVIDIA GEFORCE GTX 1080<br />
NVIDIA GeForce<br />
GTX 1080<br />
What does the Pascal architecture in NVIDIA’s newest<br />
generation of GeForce cards mean for <strong>3D</strong> design?<br />
Core clock speed<br />
has seen a big jump to<br />
1,733 MHz<br />
As a rule, we tend not to cover gaming<br />
cards. While the technology behind<br />
GeForce and Quadro cards is pretty<br />
much identical, a Quadro is the go-to choice<br />
for professionals for all sorts of reasons.<br />
But the GeForce GTX 1080 and new<br />
Pascal architecture shake things up so much<br />
that it’s incredibly tempting to consider it as<br />
an alternative to a Quadro. It’s notable for<br />
being manufactured on a 16nm process,<br />
shrunk from the 28nm that has been the<br />
same for multiple generations of graphics<br />
cards. Smaller transistors means more<br />
rendering hardware in the same space, and<br />
the potential for performance improvements.<br />
NVIDIA has squeezed 2,560 CUDA cores<br />
into the GP104 core of the GeForce GTX<br />
1080. This is more than the Quadro M5000<br />
and GeForce GTX 980, but fewer than the<br />
M6000 or GTX 980 Ti. It uses 8GB of<br />
GDDR5X memory, a higher bandwidth<br />
version of GDDR5, and this gives it a bump in<br />
memory bandwidth. Core clock speed has<br />
seen a big jump to 1,733 MHz, up from 1,202<br />
MHz in the GeForce GTX 980 and<br />
1,050MHz in the Quadro M5000. Overall<br />
performance, in terms of GFLOP/sec, is<br />
almost double both of these cards. An<br />
outstanding generational improvement.<br />
In games, the GTX 1080 comfortably<br />
outperforms pretty much everything else on<br />
the market, in some cases by a staggering<br />
margin. At 1080p, the differences are truly<br />
extraordinary, although the demands of<br />
gaming at 4K resolution slightly narrow the<br />
new card’s advantage.<br />
Physically, the card has changed a bit too.<br />
While the layout and features of retail cards<br />
will differ depending on the manufacturer,<br />
NVIDIA’s reference ‘Founders Edition’ card<br />
uses just a single power connector (older<br />
GeForce cards usually need two, while<br />
Quadros use one).<br />
There’s a striking new silver casing<br />
surrounding the cooling fan, it has a<br />
backplate and at the back, a DisplayPort 1.4<br />
connector. This will allow the use of 4K<br />
displays with refresh rates of 144Hz or higher,<br />
significant for gamers (and possibly the<br />
artists who work on those games) who want<br />
those fast frame rates at 4K resolution.<br />
It supports some of NVIDIA’s latest<br />
standards. CUDA 8 is most useful, with its<br />
support for unified memory. Just before we<br />
went to press, NVIDIA announced a new<br />
range of 16nm Pascal cards, the Quadro<br />
P6000 and P5000, along with the Pascal<br />
Titan X, all of which exist on a higher pricing<br />
tier than the GTX 1080 but should support<br />
the same new APIs.<br />
So back to the original question: what<br />
about using a GeForce GTX 1080 for<br />
professional <strong>3D</strong> design? You lose a few things<br />
Quadros have to offer: certified drivers and<br />
ECC memory are two examples, and the<br />
clock and memory speeds differ. One<br />
advantage of gaming cards was always lower<br />
pricing than Quadros, getting more graphics<br />
hardware (more CUDA cores, and often<br />
more memory) for a lower price.<br />
But the GeForce GTX 1080 is significantly<br />
more expensive than its predecessors. At<br />
£619 it’s no longer a particularly cheaper<br />
option, and we expect the Quadro P4000 to<br />
occupy a roughly similar pricing tier. We’re<br />
also yet to see pricing and performance<br />
information for AMD’s competing Radeon<br />
PRO professional GPUs.<br />
We tested under similar conditions as in<br />
our Quadro reviews, albeit with a more<br />
mid-range Core-i5 CPU and we had mixed<br />
results. In some of the tests, the GeForce<br />
GTX 1080 storms ahead. In SPECViewPerf,<br />
the (Direct-X based) Showcase-01 selfshadow<br />
result of 112 is the highest we’ve ever<br />
recorded by a huge margin.<br />
But SPECViewPerf is based on a number of<br />
different rendering tools, and not all the<br />
results were so good. The Maya score was<br />
barely more than what NVIDIA’s Quadro<br />
K620 could muster.<br />
This situation is nothing new. Gaming<br />
cards have always worked superbly in some<br />
<strong>3D</strong> tests but then fallen down in others, and<br />
despite its unquestionable raw power, it<br />
seems the GeForce GTX 1080 is no<br />
exception. It depends greatly on application<br />
optimisation, and it still seems some<br />
software simply doesn’t run as fast on<br />
GeForce cards as it does on Quadros.<br />
OpenCL and CUDA performance is<br />
significantly improved. In Luxmark 3.1 we<br />
recorded a score of 13,000 points, besting<br />
the M5000 by 30 per cent. In Arionbench,<br />
the CUDA result of 2,632 is higher than even<br />
the Quadro M6000.<br />
It’s safe to say that GPU-accelerated<br />
software (such as Adobe products) will see a<br />
serious performance boost from the GeForce<br />
GTX 1080. We also ran tests using Redshift,<br />
from a company that makes a big deal out of<br />
its support for gaming cards. The software<br />
has just been updated to support CUDA 8 so<br />
worked just fine with the GeForce GTX 1080.<br />
It’s clear that NVIDIA has knocked the ball<br />
out of the park with its Pascal architecture.<br />
It’s a huge improvement over Maxwell and it<br />
really shows in games. But GeForce cards are<br />
always a bit of a mixed bag for <strong>3D</strong> design<br />
software, and our results show the GTX 1080<br />
falling down in a few areas where the<br />
software hasn’t been optimised.<br />
If anything, it has whetted our appetite for<br />
the Pascal-based Quadro cards. Simply put, if<br />
both <strong>3D</strong> design and gaming are of equal<br />
importance to you, the benefits of the<br />
GeForce GTX 1080 make it a no-brainer<br />
purchase. But for non-gamers and those who<br />
demand guaranteed all-round performance<br />
in all <strong>3D</strong> design software, we suggest waiting<br />
for the next-generation Quadro cards.<br />
Orestis Bastounis<br />
82
MAIN The silver casing around the GeForce GTX 1080 looks<br />
really good<br />
BOTTOM LEFT DisplayPort 1.4 connectors mean support for<br />
4K displays with 144Hz refresh rates<br />
LEFT It’s a beast of a gaming card, but it’s not quite so clearly<br />
ahead with all <strong>3D</strong> design software<br />
BOTTOM RIGHT The shrink to 16nm has brought a big<br />
performance improvement<br />
BELOW This reference design is the sleekest Nvidia has ever<br />
come up with, including the backplate<br />
Essential info<br />
Price £619<br />
Website<br />
geforce.co.uk<br />
Cuda cores 2,560<br />
Boost clock<br />
1700MHz<br />
Boost clock relative 1.4x<br />
Frame buffer<br />
8GB GDDR5X memory<br />
Memory speed<br />
10GB/s<br />
Summary<br />
Verdict<br />
Features<br />
Performance<br />
Design<br />
Value for money<br />
Strong scores in certain tests were surprising, but don’t<br />
expect the GTX 1080 to dethrone professional cards<br />
83
MAYA 2017<br />
Maya 2017<br />
Autodesk has only recently released 2016 Ext 2, so what else is on<br />
offer in the latest version of the animation tool?<br />
During installation you’ll notice that the<br />
recently acquired Arnold Renderer by Solid<br />
Angle has been introduced as the preferred<br />
out-of-the-box rendering solution for Maya 2017.<br />
Once installed, its activated via the mtoa.mll<br />
plug-in. Somewhat controversially, Arnold for<br />
Maya is limited to foreground rendering only. For<br />
batch rendering in the Maya interface or command<br />
line and scaled rendering with a render farm you’ll<br />
have to make the additional purchase of Arnold<br />
licences or the renders will be watermarked. Aside<br />
from a few uses, such as creating demo reels or for<br />
verifying render output as a proof before sending<br />
to a cloud render service, having watermarked<br />
renders is, frankly, a major impediment.<br />
For mental ray users, the most significant<br />
change is that Autodesk has abruptly ceased to<br />
include licences for NVIDIA’s renderer. If your<br />
pipeline relies on mental ray this will likely be a<br />
shock and a strong reason for delaying adoption of<br />
this release. NVIDIA is continuing development of<br />
mental ray and although it’s not available yet, it is<br />
scheduled for late-September and there’s a<br />
promising beta program operating via its website<br />
that users can subscribe to. An accelerating trend<br />
of gradual decline with decreasing competitiveness<br />
and a shrinking user base has helped bring about<br />
the change, and not replacing the renderer with a<br />
fully-fledged alternative is a bold decision against<br />
the backdrop of subscription-only sales.<br />
Other new features and tools include<br />
Workspaces, a brand-new clip-based non-linear<br />
Time Editor, real-time interactive hair grooming (in<br />
XGen), Bifröst Ocean Simulation System (BOSS),<br />
Qt version 5.6.1, PySide version 2.0 and<br />
augmentations for 2016 Ext 1 and 2 features<br />
including MASH and the Render System setup.<br />
The introduction of Workspaces brings presets for<br />
frequent tasks, such as modelling, sculpting, UV<br />
editing, rigging and animation. It’s helpful,<br />
especially when getting to grips with new menus<br />
and editors that you may initially shy away from in<br />
favour of more familiar methods.<br />
The Time Editor lets you import keyframe<br />
animation, mocap, FBX Multi Take from<br />
characters, cameras, as well as separate audio that<br />
then become clips on tracks. These clips can be<br />
layered, reused, blended, grouped, scaled, split and<br />
moved between characters. Very artist friendly,<br />
the Time Editor is similar in scope to Softimage’s<br />
Animation Mixer and spells the demise of the<br />
more cumbersome Trax Editor. The Graph Editor<br />
has received an optional makeover with the<br />
Timeline repositioned at the top and a more<br />
contrasted environment. Being an important tool,<br />
the classic Graph Editor is thankfully still available<br />
if you prefer it how it was.<br />
Styling fur and hair in XGen is easier with the<br />
inclusion of a new interactive GPU brush-based<br />
toolset. An initial attempt at grooming a Wookie<br />
asset ended badly, but there were no noticeable<br />
delays with a large density of long splines. After<br />
subsequent attempts at getting used to the<br />
Groom Editor and controlling splines with a less<br />
ambitious goal, refinements became easier.<br />
Modifiers can help by adding effects like noise<br />
and displacement for finalising a more natural<br />
groom. Hair is saved to either scene files or<br />
Alembic-based cache files.<br />
The BOSS Editor is the hub for setting up<br />
Bifröst’s Ocean Simulation System. It’s as easy as<br />
choosing geometry and assigning it as a solver or<br />
influence and adjusting parameters as desired. It is<br />
resource-demanding, so using the cache for BOSS<br />
solvers is wise. Unfortunately, when adding an<br />
Ocean Shader Maya instantly crashed every time,<br />
and overall it’s worth mentioning there do seem to<br />
be more bugs than usual introduced with this<br />
release, with some interface bugs requiring a<br />
complete reboot to fix.<br />
Paul Champion<br />
For mental ray users,<br />
the most significant<br />
change is that Autodesk<br />
has abruptly ceased to<br />
include licences for<br />
NVIDIA’s renderer<br />
84
MAIN All styles of hair can be created with the XGen<br />
Interactive Grooming range of tools, brushes and modifiers.<br />
XGen is easier to use now, too<br />
ABOVE Workspaces are available, which can be modified by<br />
docking, opening and moving windows’ UI elements<br />
FAR LEFT The Time Editor, which is similar to Softimage’s<br />
Animation Mixer<br />
LEFT The new BOSS Editor, which stands for Bifröst Ocean<br />
Simulation System, in action<br />
Essential info<br />
Price<br />
OS<br />
CPU<br />
HDD<br />
RAM<br />
Summary<br />
Verdict<br />
Subscription Only<br />
Monthly £186 / $185 / €242<br />
1 Year £1,500 / $1,470 / €1,936<br />
2 Year £2,850 / $2,795 / €3,679<br />
3 Year £4,050 / $3,970 / €5,228<br />
Windows, Linux, Mac OS X<br />
64-bit Intel or AMD multi-core processor<br />
4GB free<br />
8GB minimum (16GB recommended)<br />
Features<br />
Performance<br />
Design<br />
Value for money<br />
Worth a look if your pipeline doesn’t rely on mental<br />
ray or you own Arnold licences<br />
85
REDSHIFT 2.0<br />
Redshift 2.0<br />
Redshift 2.0 comes with enhanced subsurface scattering capabilities<br />
next to realistic volumetric rendering<br />
PBR Rendering is what a lot of artists are<br />
talking about nowadays when it comes to<br />
professional production rendering. With this<br />
in mind, it’s clear that we needed to put Redshift<br />
2.0’s PBR capabilities through their paces. This is<br />
especially important with the Houdini plugin, as it’s<br />
present in most professional production pipelines<br />
around the world. We also wanted to check if the<br />
myth is still true that it is not that easy to produce<br />
high-quality renders in no time at all.<br />
During our review, we chose to work with a<br />
modern car that features a mix of physically<br />
plausible results and artistic touches.<br />
The installation process is quite easy. For the<br />
Houdini plugin, however, it was necessary to add<br />
some lines in the Environment Variables file. After<br />
that Houdini gets a new Redshift shelf containing<br />
Redshift lights, materials and corresponding nodes<br />
in the Tool menus. Next to informative options you<br />
will find Redshift lights and two great functions<br />
that add Redshift-specific options to Houdini’s<br />
camera objects and Houdini OBJ geometry nodes.<br />
Worth noting is the fact that the PBR material<br />
system can be utilised. To access the materials, it’s<br />
necessary to create a SHOP network in the main<br />
geometry node. Within the SHOP network you can<br />
investigate to see what Redshift offers in terms of<br />
material presets in the Redshift sub-menu. There<br />
are actually presets for the most common looks,<br />
including car paint, hair, skin, SSS and a glow<br />
material, followed by two material builders and a<br />
volume material.<br />
At first we took a preset – the car paint shader<br />
– and modified the values to create a matte plastic<br />
film-like look. The material was split up into four<br />
different layers, which allowed us to create a matte<br />
look with a slightly flaky effect. Each layer of the<br />
material has its own samples count. For the<br />
important layers we kept 32 samples. Simply by<br />
playing with the Glossiness we could quickly<br />
achieve this matte effect. In addition, we could<br />
deactivate unnecessary layers by putting down the<br />
weight to zero.<br />
The material presets are easy to understand and<br />
to modify, but we wanted to check something else.<br />
Houdini is well known for having VOP (VEX<br />
operator) material builders. Redshift offered us the<br />
possibility to create a Redshift material builder so<br />
that we could tailor our own material presets<br />
according to our needs. We just created Redshift<br />
networks for all necessary materials, starting from<br />
glass up to rubber, in our SHOP and in there we<br />
could access all mathematical functions and<br />
texture sampler functions from Redshift.<br />
For the tyres we used an SSS VOP node<br />
combined with procedural dirt generators to<br />
change our scatter colour to achieve a worn-out<br />
look. With a decreased scatter scale it’s quite easy<br />
to create a realistic rubber effect with a fair<br />
amount of nodes. For chrome and plastic effects<br />
we used the RS material preset, which provides the<br />
possibility to choose pre-defined setups – a great<br />
time-saver if that’s important to you.<br />
The rendering process was straightforward. In<br />
the ROP context we created a Redshift node,<br />
which allowed us to define our render attributes.<br />
Even IPR was possible in alpha stage, which was<br />
handy because we could see on the fly.<br />
A really important factor that should be<br />
mentioned as well is the area of scalability.<br />
Besides the Houdini integration, which is in<br />
the in alpha stage, there are already<br />
plug-ins available for 3ds Max, Maya and<br />
Softimage. Alongside these, Redshift has<br />
announced that a Cinema 4D plugin is already in<br />
development. After the official release of the<br />
Cinema 4D plugin, Redshift will be an exceptional<br />
competitor to many of the current state-of-the-art<br />
rendering engines.<br />
Rainer Duda<br />
86
MAIN Redshift 2.0’s PBR capabilities enable<br />
physically plausible results, including<br />
artist-friendly control structures<br />
BOTTOM MIDDLE Another great feature is the<br />
rendering support of hair and fur<br />
BOTTOM RIGHT The Redshift plugin can render<br />
OpenVDBs files and Houdini native volumes with<br />
Redshift’s volume capabilities<br />
BELOW Redshift’s IES lights give artists great<br />
flexibility in creating rich environments besides<br />
physically plausible materials<br />
Besides Houdini<br />
integration, there are<br />
already plugins available<br />
for 3ds Max, Maya<br />
and Softimage<br />
Essential info<br />
Price Starting at £380 / $500 including one year<br />
maintenance<br />
Website<br />
www.redshift3d.com<br />
OS<br />
Windows XP or newer (64-bit only), Linux<br />
(glibc 2.12 or newer)<br />
GPU NVIDIA graphics card with at least CUDA<br />
compute capability 2.0 and 1GB VRAM<br />
CPU<br />
Intel Core i5 and up<br />
Houdini 14, 15 ,15.5<br />
Summary<br />
Verdict<br />
Features<br />
Performance<br />
Design<br />
Value for money<br />
The Redshift 2.0 GPU renderer is evolving into a<br />
fast and reliable rendering solution for professional<br />
production environments<br />
87
88<br />
TEXTURING
Incredible <strong>3D</strong> artists take us<br />
behind their artwork<br />
TEXTURING My objective was to create the right textures for a<br />
underwater scene. I increased the diffuse contribution in the materials<br />
trying to limit the reflections and bright elements. The caustic effect was<br />
hand drawn in Photoshop and applied to the map slot of a direct light. All<br />
the textures where made using <strong>3D</strong>-Coat apart from the octopus skin.<br />
Jose Klaus<br />
González Rohbrandt<br />
joseklaus.cgsociety.org<br />
Though Jose is not professionally<br />
linked to <strong>3D</strong> design, it has always<br />
been his true passion<br />
Software 3ds Max, V-Ray,<br />
<strong>3D</strong>-Coat, ZBrush, Photoshop<br />
Eight Reasons, 2015<br />
89
From the makers of<br />
<strong>3D</strong> printing is our future. Whether it be a simple decoration, or a<br />
fully working prosthetic, <strong>3D</strong> Make & Print will take you through<br />
how this phenomenon is going to change everybody’s lives and<br />
teach you how to get started with your own projects!<br />
Also available…<br />
A world of content at your fingertips<br />
Whether you love gaming, history,<br />
animals, photography, Photoshop,<br />
sci-fi or anything in between, every<br />
magazine and bookazine from<br />
Imagine Publishing is packed with<br />
expert advice and fascinating facts.<br />
BUY YOUR COPY TODAY<br />
Print edition available at www.imagineshop.co.uk<br />
Digital edition available at www.greatdigitalmags.com
The inside guide to industry news,<br />
VFX studios, expert opinions<br />
and the <strong>3D</strong> community<br />
The ZBrush Summit gives a chance<br />
for artists to learn from professionals<br />
from various industries with on-site<br />
workshops. It’s really a place for artists<br />
to share ideas and concepts<br />
Paul Gaboury,<br />
<strong>3D</strong> product and development manager, Pixologic<br />
092 Community News<br />
ZBrush Summit<br />
is back<br />
Pixologic’s annual event kicks off<br />
for 2016 with an all-star cast of<br />
speakers and workshops<br />
094 Industry News<br />
Substance free<br />
for students<br />
Substance Painter and Designer is<br />
now free of charge for students and<br />
teachers, plus Unity 5.4 released<br />
92<br />
096 Social<br />
Readers’ Gallery<br />
The latest images created by the<br />
3dartistonline.com community<br />
To advertise in The Hub please contact Simon Hall on 01202 586415 or simon.hall@imagine-publishing.co.uk 91
COMMUNITY NEWS<br />
As well as the usual<br />
digital sculpting and<br />
concept workshops,<br />
there will also be<br />
traditional workshops<br />
detailing how ZBrush is<br />
used for jewellery design<br />
ZBrush Summit scores<br />
exclusive game dev content<br />
Pixologic’s annual event is free and has plenty of special content to whet ZBrush appetites<br />
92<br />
This year’s ZBrush Summit returns to Gnomon School<br />
in Hollywood, with talks from top studios such as<br />
Disney, Naughty Dog and Bethesda.<br />
The event is now in its third year, and Paul Gaboury, <strong>3D</strong><br />
product and development manager at Pixologic, explains the<br />
success behind ZBrush Summit: “What makes the ZBrush<br />
Summit so successful is having a dynamic range of<br />
presenters from various industries.<br />
These presenters also share<br />
exclusive work never before shared<br />
with the public. For example, in past<br />
years we’ve had clips from Big Hero 6<br />
before the movie was released and<br />
showings of the main characters<br />
from Far Cry 4 before the game was<br />
out. This year, one of the things to<br />
look forward to will be behind-thescenes<br />
[previews] of Final Fantasy XV<br />
the day it comes out and so much<br />
more. We strive to create an<br />
We strive to create<br />
an atmosphere at the<br />
ZBrush Summit that is<br />
a place for artists to be<br />
inspired, discover and<br />
connect with the rest of<br />
the community<br />
Paul Gaboury,<br />
<strong>3D</strong> product and<br />
development manager<br />
atmosphere at the ZBrush Summit that is a place for artists<br />
to be inspired, discover and connect with the rest of the<br />
community. The ZBrush Summit also gives a chance for<br />
artists to learn from professionals from various industries<br />
with on-site workshops. It’s really a place for artists to share<br />
ideas and concepts.”<br />
The event is free but workshops are allocated seats and<br />
tickets, with almost all of them sold<br />
out a month ahead of the 2016<br />
Summit. On the bill are a diverse range<br />
of professionals and topics including<br />
‘Anatomy Of The Creature’, which<br />
covers the principles of creating<br />
realistic creatures from id Software’s<br />
Bryan Wynia, Denzil O’Neill and Jason<br />
Martin; kitbashing and key art<br />
techniques from Peter Konig; and<br />
hard-surface techniques from<br />
Bethesda’s Dennis Mejillones and<br />
Lucas Hardi. Also presenting at
ZBrush Summit are Naughty Dog, showing off Uncharted 4,<br />
Blizzard exhibiting Overwatch, Oculus explaining how ZBrush<br />
fits into the pipeline, and Laika on its ten years of ZBrush use.<br />
“All of that is just to name a few,” exclaims Gaboury. “Last<br />
year was the first time we did a show at the Gnomon Gallery<br />
during the ZBrush Summit, which was a huge success. This<br />
year we will be following up with another Gnomon gallery<br />
show, but this time it will also contain augmented reality<br />
user interactivity. Visitors will be able to hold their phones<br />
up to the artwork and the models within the work will<br />
appear on their phones to get a closer look at the art.”<br />
If you can’t make the event then you can livestream the<br />
Summit directly to your smartphone or tablet. You’ll be able<br />
to watch ZBrush demos, industry panels and more from the<br />
comfort of your own home with the Livestream app. Some<br />
of the guests from ZBrush Summit will also be joining<br />
Pixologic with fun gameplay videos with the launch of the<br />
official Pixologic Twitch channel. The hope is to share some<br />
behind-the-scenes access to artists developing games using<br />
the ‘Let’s Play’ moniker. “Twitch is a fast growing community<br />
for artists to share their processes and workflows,” explains<br />
Gaboury. “It’s also a great place for the community to<br />
connect. We are hoping the Twitch community will be<br />
inspired to create their own artwork from what we share on<br />
our ZBrush Twitch channel. We are also looking into other<br />
avenues, such as podcasts, to allow artists access to the top<br />
industry professionals using ZBrush today.”<br />
This online strategy is only set to evolve for Pixologic and<br />
ZBrush Summit, with Gaboury commenting on the next<br />
steps: “We would like to continue to grow the three pillars of<br />
the ZBrush Summit: ‘Inspire, Connect, Discover’. We would<br />
like to continue growing the ZBrush Summit viewership, both<br />
online and on site. In fact, we have several ideas that we<br />
hope to implement in future ZBrush Summit events. Our<br />
hope is that when people tune in online they will be inspired<br />
to join us in person the next year.”<br />
ZBrush Summit will take place from 30 September until<br />
2 October at Gnomon School in Hollywood, USA.<br />
THU unleashed for 2016<br />
Trojan Horse was a Unicorn is back for its fourth year<br />
The second annual ZBrush awards will also be taking place this year for<br />
artists nominated on ZBrush Central by fellow users<br />
The beaches of Tróia, Portugal will once<br />
again play host to some of the best<br />
creative minds for Trojan Horse was a<br />
Unicorn 2016. Taking place from 19 to 24<br />
September, the five-day event boasts<br />
close to 50 key speakers.<br />
“This year, for the first time ever, we<br />
will have a creative space that will be<br />
completely ours,“ explains Andrew Luis,<br />
co-founder and director at THU. “A place<br />
where the Tribe can hang out, brainstorm,<br />
learn, create. The Gallery, which will be<br />
led by my friend and incredible artist<br />
Jeremy Mann, will be something really<br />
special… The late-night life drawing<br />
sessions that will take place in there are<br />
something I really want to see, especially<br />
since Alberto Mielgo, Jana Schirmer,<br />
Nadezda, Phil Hale and Karla Ortiz will all<br />
be taking part. That’s a lot of talent for<br />
one room.”<br />
Physical tickets are sold out for this<br />
year’s THU, but you can catch all the<br />
action on THU TV with the purchase of a<br />
THU TV ticket. “At the end of the talks,<br />
which are broadcast live, there will be a<br />
slot reserved for THU TV users to ask<br />
questions and participate actively in the<br />
debate,” continues Luis.<br />
“However, the event only lasts one<br />
week. After, THU TV will keep providing<br />
its subscribers with inspirational, creative<br />
and entertaining high-quality content,<br />
made by artists for artists. THU TV allows<br />
THU to last the whole year round; to<br />
never end.”<br />
Get in touch… www.3dartistonline.com @<strong>3D</strong><strong>Artist</strong> Facebook.com/<strong>3D</strong><strong>Artist</strong>Magazine<br />
93
INDUSTRY NEWS<br />
Unity 5.4<br />
released<br />
New version improves<br />
performance, lighting<br />
and VR support<br />
Students get triple-A<br />
texturer for free<br />
Substance can be downloaded free for those in education<br />
Allegorithmic has made its Substance software set<br />
free under the For Education banner for all students<br />
and teachers. This means that those currently in or<br />
teaching education can use the same texturing<br />
tools that Naughty Dog utilised for Uncharted 4<br />
absolutely free of charge at home or on a personal<br />
workstation. “The fairness of our licensing models<br />
has always been at the heart of what we do,”<br />
More free Substance resources<br />
Allegorithmic will be adding more free online<br />
tools for those looking to learn Substance<br />
with the release of the Substance Academy.<br />
The Academy will include tutorials, assets,<br />
videos and much more.<br />
Those who are already subscribed to<br />
Substance Live will also receive high-quality<br />
assets from a huge database every month as<br />
well as the latest updates to each software.<br />
explains Allegorithmic’s CEO and founder,<br />
Sebastien Deguy. “It started when we launched<br />
our Indie licences (a more affordable licence<br />
allowing commercial use for users earning less<br />
than $100,000 a year, with no limits on features)<br />
and then Substance Live (a rent-to-own model<br />
for software).<br />
“Up until now, students were under the Indie<br />
licence. This seemed fair to us at first, but we then<br />
realised that for them the barrier to entry was still<br />
too high (especially when their goal is simply to<br />
learn the software). Given the current number of<br />
paying licencees that we have reached today,<br />
following three years of strong growth, we decided<br />
that the time was right for us to make personal<br />
licenses free for students and teachers.”<br />
The licence lasts for one year and is renewable –<br />
it will require proof in the form of a picture of an ID<br />
with the year, name and picture of the student or<br />
teacher on the card. Go to www.allegorithmic.<br />
com/buy/download to register now.<br />
The latest Unity has finally been<br />
released with rendering and graphic<br />
improvements at the core. Having been<br />
in beta since December 2015, Unity 5.4<br />
brings plenty of upgrades, including<br />
improved multithreaded rendering and<br />
frame rates – Unity 5.4 has introduced<br />
parallel command list generation to<br />
help with distributing work to multiple<br />
CPU cores. There will also now be<br />
fewer draw calls for rendering huge<br />
amounts of identical geometries with<br />
5.4’s instancing support.<br />
Particles have been given new sizing<br />
controls for better management of <strong>3D</strong><br />
form, width and height. You’ll also be<br />
able to tweak particle properties with<br />
the new trigger module.<br />
Lighting has been enhanced, too,<br />
with the customisable Light Probe<br />
Proxy Volumes (LPPV). LPPV can be<br />
used on particles as well as larger,<br />
dynamic objects, and generate a<br />
interpolated light probe and <strong>3D</strong> grid<br />
(the resolution of which can be set)<br />
inside a bounding volume to create a<br />
spatial gradient for probe-lit objects.<br />
Multi-platform VR support has also<br />
been improved in Unity 5.4, with<br />
better support for OpenVR, Oculus<br />
Rift, Gear VR, PlayStation VR and<br />
Google’s Daydream.<br />
The short film ‘Adam’ was created using a<br />
demo version of Unity 5.4<br />
HAVE YOU HEARD? ‘Cosmos Laundromat’ by Blender Institute has won the SIGGRAPH Jury’s Choice Award!<br />
94
USD goes<br />
open source<br />
The <strong>3D</strong> scene description tool from<br />
Pixar is finally released under the<br />
Apache licence<br />
Pixar’s Universal Scene Description is now open source.<br />
USD assembles <strong>3D</strong> scenes with a more robust<br />
interchange of elemental assets, making composed<br />
scenes more understandable between software and<br />
applications. It organises these assets into ‘prims’ and<br />
layers, and overrides them non-destructively with only<br />
one API in a single scenegraph.<br />
Universal Scene Description also has a set of<br />
schemas for standard encoding and client API, such as<br />
geometry, shading, and models and assets.<br />
As the fourth-generation scene description composer<br />
from Pixar, Universal Scene Description has most<br />
recently been integrated into a movie pipeline for the<br />
first time in Finding Dory. For more information, head<br />
online to www.graphics.pixar.com/usd/docs.<br />
London VFX<br />
apprenticeships<br />
Renowned studios collaborate on<br />
apprenticeships to bolster talent<br />
in Soho<br />
Framestore, Double Negative, Lexhag, Jellyfish<br />
and The Mill have launched two two-year VFX<br />
apprenticeships. What’s special is that all of<br />
these studios are based in London and the<br />
apprenticeships will be open to all EU citizens,<br />
provided they have A-Levels or equivalent, and<br />
are not planning on studying a degree. Amy<br />
Smith, Framestore’s global head of recruitment,<br />
spearheads the campaign, which aims to<br />
diversify talent and enable a more accessible<br />
recruitment process. The two apprenticeships<br />
are junior 2D artist and assistant technical<br />
director, and will start from September 2016.<br />
Software shorts<br />
<strong>3D</strong>F Zephyr 2.7<br />
<strong>3D</strong>flow has released <strong>3D</strong>F Zephy 2.7,<br />
the tool for reconstructing <strong>3D</strong> models<br />
from photos and videos. <strong>3D</strong>F Zephyr<br />
can now be used as a <strong>3D</strong> model viewer and frames<br />
can be extracted from MOV files. Point cloud<br />
stream rendering is also now available. <strong>3D</strong>F Zephyr<br />
starts at $199 for the Lite version. For more<br />
information, visit www.3dflow.net.<br />
Shotgun 7 released<br />
The production tool receives<br />
plenty of workflow streamliners<br />
Shotgun has received a new iteration with a wide<br />
breadth of new features, including new editorial<br />
playback tools. The production manager has<br />
made reviewing work in the context of a cut<br />
easier, alongside the new Cuts tab in the Media<br />
app, which enables dragging and dropping EDL<br />
and MOV files. Any cut references for this file<br />
can then be viewed in its entirety anywhere.<br />
Cuts can also be viewed from anywhere, and<br />
review sessions are now more efficient as cuts<br />
can be accessed from the session. You can now<br />
publish information to Shotgun with the Import<br />
Cut app, too, with an informative summary of<br />
changes that you can then share with the rest of<br />
your team. Flame, Hiero/NUKE Studio and RV<br />
integration in Shotgun have all been improved,<br />
and they are now faster and more stable.<br />
Bringing you the lowdown on product updates and launches<br />
Corel Painter 2017<br />
The latest version of the illustration<br />
tool from Corel now has texture<br />
painting capabilities with the ability to<br />
import textures and materials. You can then paint<br />
these on with the new Texture Brush category.<br />
Concept artists can also now render a <strong>3D</strong> model as<br />
a 2D bitmap in the latest iteration. Corel Painter<br />
2017 is £315/$429.<br />
USD is used with<br />
Pixar’s Presto<br />
animation<br />
software, as well as<br />
all animation and<br />
rendering<br />
applications<br />
Many of Shotgun and RV 7’s new tools are ‘editorial aware’,<br />
making workflows more efficient<br />
Maxwell 4<br />
Maxwell 4 now has a GPU render<br />
engine, materials gallery and a<br />
standalone application called<br />
Multilight. Multilight edits lights before and after the<br />
finished render and can create a useful catalogue<br />
for lighting that can be automatically updated with<br />
positions and geometry. Revit has also been revised<br />
in Maxwell 4 with the FIRE preview engine added.<br />
DID YOU KNOW? The price of Houdini Education has dropped to $75 annually for universities, colleges and training centres<br />
95
Share your work, view others’ and chat to other artists, all on our website<br />
Register with us today at www.3dartistonline.com<br />
Images of<br />
the month<br />
These are the <strong>3D</strong> projects<br />
that have been awarded<br />
‘Image of the week’ on<br />
<strong>3D</strong><strong>Artist</strong>Online.com in the<br />
last month<br />
Image<br />
of the<br />
month<br />
01 The Cliff Tower<br />
by Pierrick Picaut<br />
<strong>3D</strong>A username<br />
Pierrick Picaut<br />
Pierrick Picaut says:<br />
“This is a picture done during the<br />
production of my latest Blender<br />
course. It is based on one of<br />
Corentin Chevanne’s amazing<br />
concepts, which he kindly allowed<br />
me to use.”<br />
We say: There’s a lot of mystery and<br />
character to this image and we love<br />
the painterly feel of the background. It<br />
looks like somewhere we’d like to live!<br />
02 East Field<br />
Bedroom<br />
by Stefanie Chapman<br />
<strong>3D</strong>A username<br />
stefaniechapman<br />
Stefanie Chapman says: “My tools<br />
of choice were 3ds Max, V-Ray,<br />
Photoshop and Marvelous Designer<br />
for the bedding and the rug. I love<br />
the realism fabric simulations can<br />
add to any scene!”<br />
We say: Stefanie is absolutely right – a<br />
decent fabric simulation can really<br />
elevate an arch-vis scene like this one.<br />
Great work!<br />
01<br />
03 Human Eye<br />
by Todor Nikolov<br />
<strong>3D</strong>A username<br />
ToshiCG<br />
Todor Nikolov says: “This<br />
is a human eye setup. I paid special<br />
attention to the notably complex<br />
area where the cornea, sclera and<br />
iris meet.”<br />
We say: Some people are a bit<br />
squeamish when it comes to eyes, but<br />
we think this is a great representation<br />
of one. This is a great example of<br />
subsurface scattering done right.<br />
04 Renaissance<br />
by Joaquín Kierbel<br />
<strong>3D</strong>A username<br />
jkierbel<br />
Joaquín Kierbel says:<br />
“This is a concept piece I made in<br />
my spare time for a series of sci-fi<br />
images around the subject of<br />
transcodification. I used Blender<br />
and World Machine.”<br />
We say: This is a really interesting<br />
abstract piece from Joaquin and we<br />
think the choice of colours is spot on.<br />
The lighting here is lovely, too.<br />
03<br />
96
Dark Kitchen by Mehdi Abootalebi<br />
<strong>3D</strong>A username Mehdi Abootalebi<br />
Mehdi Abootalebi says: “Dark Kitchen is a series of three shots<br />
and I always like dark and black spaces because of the<br />
mysterious feeling that they conjure. So, I tried to achieve that<br />
feeling with my work this time.”<br />
We say: Mehdi’s done a really nice job with the wooden floor texture, and it’s<br />
offset nicely by the crisp, clean white cupboards on the right.<br />
02<br />
Jaguar by Daniele Boldi Cotti<br />
<strong>3D</strong>A username dboldicotti<br />
Daniele Boldi Cotti says: “This project was created using 3ds<br />
Max, KeyShot and NUKE. A close-up was the best photographic<br />
approach to represent the luxury of one of the most popular<br />
sporty cars.”<br />
We say: Stunning work as usual from Daniele, with the camera effects and<br />
particles in the foreground a particular highlight.<br />
04<br />
Jungle by Michael Johnson<br />
<strong>3D</strong>A username Cloudless<br />
Michael Johnson says: “Inspired by The Jungle Book, I wanted to<br />
create a forest environment that made you feel like you were<br />
actually in it. I added a character to give a sense of scale and to<br />
have sort of a story point, as if he was on a journey.”<br />
We say: Michael has created a really strong mood in this piece, and we can really<br />
see the Jungle Book influence.<br />
97
MODELLING<br />
Incredible <strong>3D</strong> artists take us<br />
behind their artwork<br />
MODELLING In this project, I tried my best to express the typical<br />
fierceness of a lion by focusing on working on this model relatively quickly,<br />
rather than meticulously. Gathering good references for this sort of work<br />
is absolutely essential, as is a free and fluid work style.<br />
Keita Okada<br />
yuzuki.artstation.com<br />
2D/<strong>3D</strong> concept artist, creature<br />
designer and a digital sculptor for<br />
triple-A videogames<br />
Software<br />
ZBrush,KeyShot,Photoshop<br />
Turbulent Lion, 2016<br />
98
NVIDIA Quadro M6000-24GB<br />
VCQM6000-24GB-PB<br />
NVIDIA Quadro M2000<br />
VCQM2000-PB<br />
NVIDIA Quadro M5000<br />
VCQM5000-PB<br />
NVIDIA Quadro K1200DVI<br />
VCQK1200DVI-PB<br />
NVIDIA Quadro K5000 MAC<br />
VCQK5000MAC-PB<br />
NVIDIA Quadro K620<br />
VCQK620-PB<br />
NVIDIA Quadro M4000<br />
VCQM4000-PB<br />
NVIDIA Quadro K420<br />
VCQK420-2GB-PB<br />
Accelerate your creativity with NVIDIA ® Quadro ® — the world’s most powerful workstation graphics.<br />
Learn more www.pny.eu/quadro & pny.quadrok-selector.com<br />
Insight<br />
uk.insight.com<br />
Tel: 0844 846 3333<br />
Misco<br />
www.misco.co.uk<br />
Tel: 0800 038 8880<br />
Dabs.com<br />
www.dabs.com<br />
Tel: 0870 429 3825<br />
Scan Computers<br />
www.scan.co.uk<br />
Tel: 0871 472 4747<br />
® ® <br />
NVIDIA Quadro / Tesla / GRID / PNY SSD<br />
www.pny.eu<br />
© 2016 NVIDIA Corporation. All rights reserved. NVIDIA, the NVIDIA logo, and Quadro are trademarks and/or registered trademarks of NVIDIA Corporation. All company and product names are trademarks or registered trademarks of the respective owners with which they are associated.